|
This document is referring to a past Scout release. Please click here for the recent version. Looking for something else? Visit https://eclipsescout.github.io for all Scout related documentation. |
Preface
The goal of this book is to get you familiar with the Scout framework in a short time. Scout’s core features and concepts are introduced and explained by writing actual Scout applications. As Scout applications are written in Java, we make the assumption that you are familiar with the Java language and its core concepts.
We hope that this book helps you to get started quickly and would love to get your feedback. This feedback is very valuable to us as it helps to improve both the book’s content and the quality for all future readers.
To allow for contributions to this book, the technical setup and the book’s licence have been selected to minimize restrictions. According to the terms of the Creative Commons (CC-BY) license, you are allowed to freely use, share and adapt this book. All source files of the book including the Scout projects described in the book are available on Github.
1. Introduction
Scout is an open source framework for implementing business applications. The framework is based on Java and HTML5 and covers most recurring aspects of enterprise applications.
Scout defines an abstract application model that makes developing applications faster and helps to decouple the business code as much as possible from any specific technologies. This is particularly useful as the life span of today’s web technologies is substantially shorter then the life span of large enterprise applications.
Scout comes with multi-device support. With a single code base Scout applications run on desktop, tablet and mobile devices. The framework automatically adapts the rendering of the application to the form factor of the used device. An example of a commercial application built with Scout is provided in Figure 1.

Scout supports a modularization of applications into layers and slices. This helps to define a clean architecture for large applications. The layering is driven by the fact the Scout applications have a rendering part, a frontend part and a backend part. The modularization into slices is controlled by different business needs such as front office, back office, reporting or the administration of application users, roles and permissions.
The goals of the Scout framework can be summarized as follows.
-
Boost developer productivity
-
Make the framework simple to learn
-
Support building large applications with long life spans
Boosting developer productivity is of a very high importance and developers should be able to focus on the business value of the application. This is why Scout provides abstractions for areas/topics that are needed in most business applications again and again. Example areas/topics that are abstracted by the Scout framework are user interface (UI) technologies, databases, client-server communication or logging. For each of these abstractions Scout provides a default implementation out of the box. Typically, the default implementation of such an abstraction integrates a framework or technology that is commonly used.
Learning a new framework should be efficient and enjoyable. For developers that have a good understanding of the Java language learning the Scout framework will be straight forward. The required skill level roughly corresponds to the Oracle Certified Professional Java SE Programmer for Java version 7 or higher. As the Scout framework takes care of the transformation of the user interface from Java to HTML5, Scout developers only needs a minimal understanding of HTML5/CSS3/JavaScript. In the case of writing project specific UI components a deeper understanding of today’s web technologies might be required of course.
When needing a working prototype application by the end of the week, the developer just needs to care about the desired functionality. The necessary default implementations are then automatically included by the Scout tooling into the Scout project setup. The provided Scout SDK tooling also helps to get started quickly with Scout. It also allows to efficiently implement application components such as user interface components, server services or connections to databases.
In the case of applications with long life spans, the abstractions provided by Scout help the developer to concentrate on the actual business functionality. As all the implemented business functionality is written against abstractions only, no big rewrite of the application is necessary when individual technologies reach their end of life. In such cases it is sufficient to exchange the implementation of the adaptor for the legacy technology with a new one.
2. “Hello World” Tutorial
The “Hello World” chapter walks you through the creation of an Eclipse Scout client server application. When the user starts the client part of this application, the client connects to the server.[1] and asks for some text content that is to be displayed to the user. Next, the server retrieves the desired information and sends it back to the client. The client then copies the content obtained from the server into a text field widget. Finally, the client displays the message obtained from the server in a text field widget.
The goal of this chapter is to provide a first impression of working with the Scout framework using the Scout SDK. We will start by building the application from scratch and then we’ll deploy the complete application to a Tomcat web server.
2.1. Installation and Setup
Before you can start with the “Hello World” example you need to have a complete and working Scout installation. For this, see the step-by-step installation guide provided in Appendix B. Once you have everything installed, you are ready to create your first Scout project.
2.2. Create a new Project
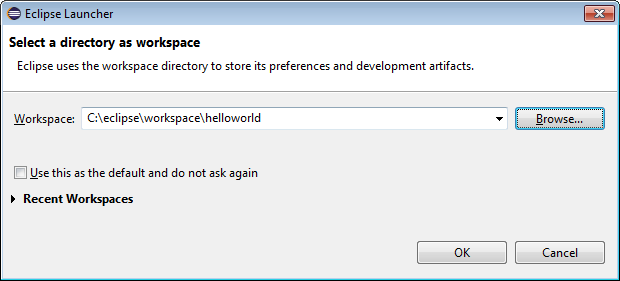
Start your Eclipse IDE and select an empty directory for your workspace as shown in Figure 2.
This workspace directory will then hold all the project code for the Hello World application.
Once the Eclipse IDE is running it will show the Java perspective.
To create a new Scout project select the menu and type “Scout Project” in the wizard search field. Select the Scout Project wizard and press Next. The New Scout Project wizard is then started as shown in Figure 3.
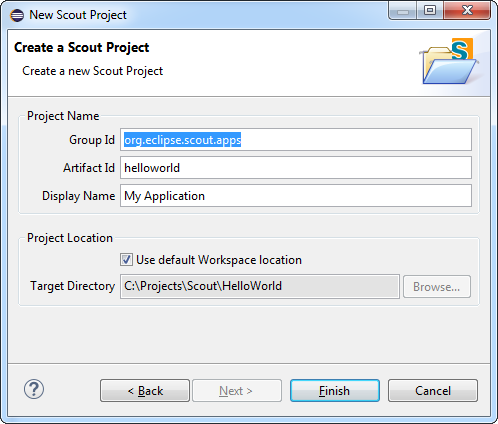
In the New Scout Project wizard you have to enter a group id, artifact id and a display name for your Scout project.
As the created project will make use of Apache Maven please refer to the Maven naming conventions to choose group id and artifact id for your project.
The artifact id will then also be the project name in the Eclipse workspace.
The display name is used as the application name presented to the user (e.g. in the Browser title bar).
For the Hello World application just use the already prefilled values as sown in Figure 3.
Then, click the Finish button to let the Scout SDK create the initial project code for you.
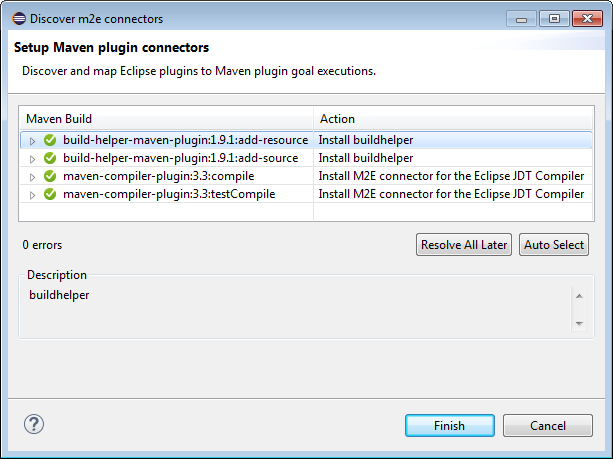
Depending on your Eclipse installation some Maven plugin connectors may be missing initially.
In that case a dialog as shown in Figure 4 may be shown.
To continue click on Finish to resolve the selected connectors.
Afterwards confirm the installation, accept the license and the message that some content has not been signed.
Finally, the installation of the maven plugin connectors requires a restart of the Eclipse IDE.
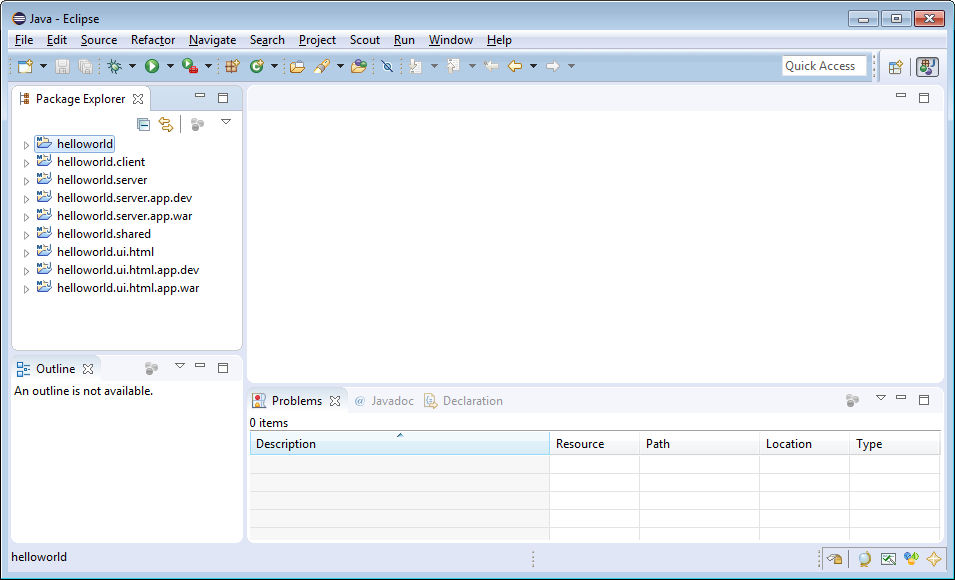
After the New Scout Project wizard has created the initial Maven modules for the Hello World application these modules are compiled and built by the Eclipse IDE.
In case of a successful Eclipse Scout installation your Eclipse IDE should display all created Maven modules in the Package Explorer and have an empty Problems view as shown in Figure 5.
2.3. Run the Initial Application
After the initial project creation step we can start the Scout application for the first time. For this, the following three steps are necessary
-
Start the Scout backend server
-
Start the Scout frontend server
-
Open the application in the browser
To start the Scout backend server we first select the [webapp] dev server.launch file in the Package Explorer view
of the Eclipse IDE and then use the Run As menu as shown in Figure 6.
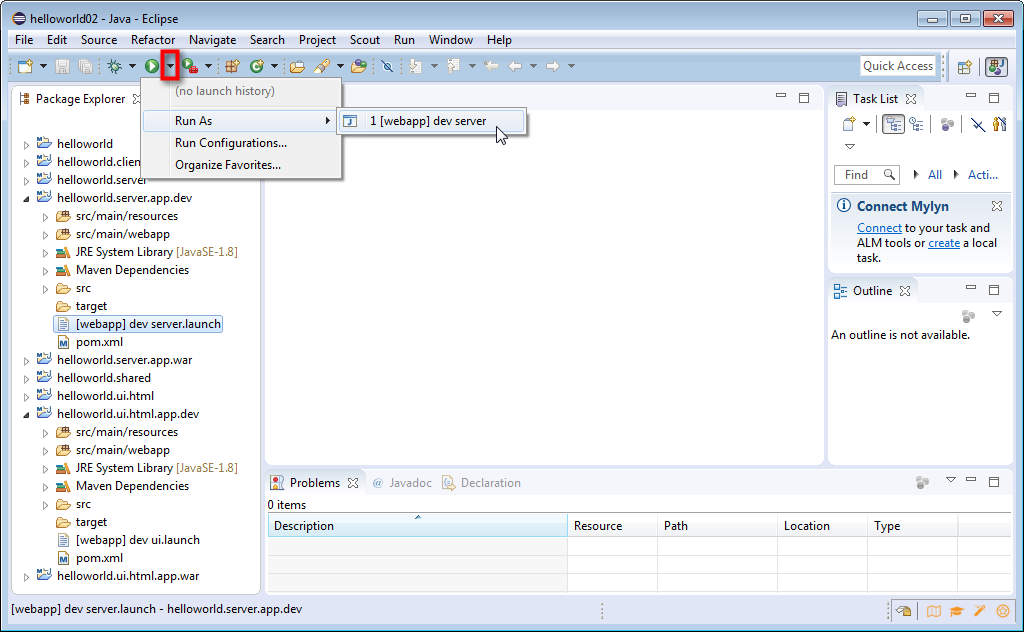
Starting the Scout frontend server works exactely the same.
But first select the [webapp] dev ui.launch file in the Eclipse IDE.
This launch file is located under module helloworld.ui.html.app.dev in the Package Explorer.
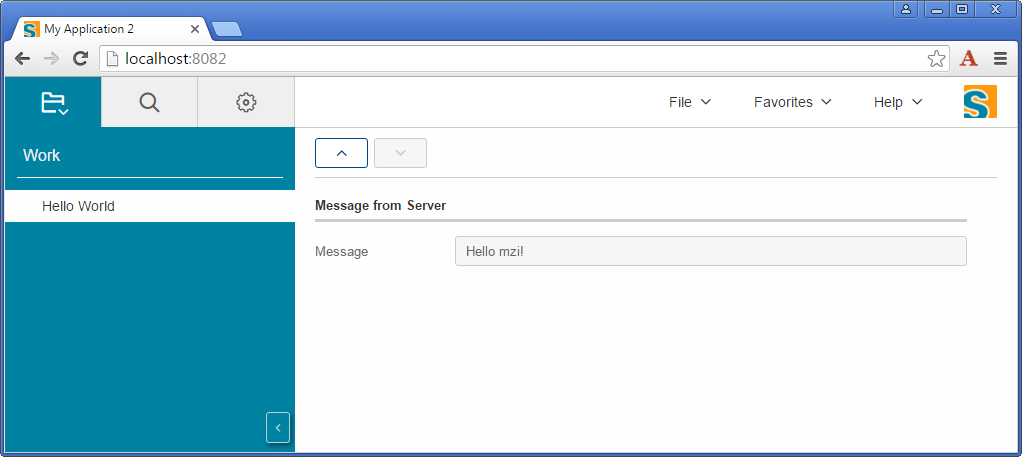
During startup of the Scout applications you should see console output providing information about the startup. After having successfully started the Scout backend and frontend servers the Hello World application can then be accessed by navigating to http://localhost:8082 in your favorite web browser.
The running Hello World application should then be started in your browser as shown in Figure 7.
2.4. Export the Application
At some point during the application development you will want to install your software on a machine that is intended for productive use. This is the moment where you need to be able to build and package your Scout application in a way that can be deployed to an application server.
As Scout applications just need a servlet container to run, Scout applications can be deployed to almost any Java application server. For the purpose of this tutorial we will use Apache Tomcat.
2.4.1. Verify the Container Security Settings
First you need to decide if the users of your application should communicate via HTTPS with the Scout frontend server. We strongly recommended this setup for any productive environment. This is why even the Scout “Hello World” example is configured to use HTTPS.
As a default Tomcat installation is configured to use HTTP only, we need to first verify if the installtion is properly configured for HTTPS too. In case HTTPS support is already enabled for your Tomcat installation, you may skip this section.
Otherwise, check out the configuration process described in the Tomcat Documentation to enable SSL/TLS.
2.4.2. Create and Install a Self-Signed Certificate
This section describes the creation and usage of a self-signed certificat in a localhost setting.
-
Create a keystore file with a self-signed certificate
-
Uncomment/adapt the HTTPS connector port in Tomcat’s server.xml configuration
-
Export the self-signed certificate from the keystore
-
Import the self-signed certificate into the Java certificate store
The first step is to create a self-signed certificate using the keytool provided with the Java runtime.
The example command line below will create such a certificate using the alias tomcat_localhost and place it into the keystore file tomcat_localhost.jks
keytool.exe -genkey -keyalg RSA -dname CN=localhost -alias tomcat_localhost -keystore tomcat_localhost.jks -keypass changeit -storepass changeit
The second step is to uncomment the HTTPS connector element in the Tomcat’s server.xml configuration file.
Make sure that parameter keystoreFile points to your newly created keystore file (if you are using a windows box, make sure not to use the backslash characters in the path to the keystore).
After a restart of Tomcat you should then be able to access Tomcat on https://localhost:8443/manager/html
    <Connector port="8443" protocol="org.apache.coyote.http11.Http11NioProtocol"
               maxThreads="150" SSLEnabled="true" scheme="https" secure="true">
        <SSLHostConfig>
            <Certificate certificateKeystoreFile="/keystore/tomcat_localhost.jks"
                         type="RSA" />
        </SSLHostConfig>
    </Connector>
The third step is to export the newly created self-signed certificate from the tomcat_localhost.jks keystore file into the tomcat_localhost.der certificate file.
keytool.exe -exportcert -alias tomcat_localhost -storepass changeit -keystore tomcat_localhost.jks -file tomcat_localhost.der
In the fourth and last step we add the self-signed certificate to the known certificates of the Java runtime.
Make sure that you modify the cacerts file of the Java runtime that is used in your Tomcat installation and modify the path to the cacerts file accordingly.
keytool.exe -import -alias tomcat_localhost -trustcacerts -storepass changeit -keystore C:\java\jre8\lib\security\cacerts -file tomcat_localhost.der
Your Scout application should now properly communicate over HTTPS in your Tomcat installation and after having installed the "Hello World" application to Tomcat it should become available on https://localhost:8443/org.eclipse.scout.apps.helloworld.ui.html.
In case the Scout frontend server cannot access the Scout backend server your self-signed certificate might be missing in the Java installation.
To verify that the certificate has been included in file cacerts file use the following command.
keytool.exe -list -storepass changeit -keystore C:\java\jre8\lib\security\cacerts | find "localhost"
Once you no longer need the self-signed certificate file in your Java installation make sure to remove the certificate again.
keytool.exe -delete -alias tomcat_localhost -storepass changeit -keystore C:\java\jre8\lib\security\cacerts
2.4.3. Update the Scout Application to work with HTTP
If you should prefer to work with HTTP only, you need to modify the security settings of your Scout application. This can be done with the steps described below.
-
In file
config.properties(in folderhelloworld.ui.html.app.war/src/main/resources):-
Add the property
scout.auth.cookieSessionValidateSecure=falseto disable the check for an encrypted channel (HTTPS). -
Change the
scout.backendUrlproperty to use HTTP instead of HTTPS and change the port according to your Tomcat setup, typically 8080.
-
-
In file
web.xml(in folderhelloworld.ui.html.app.war/src/main/webapp/WEB-INF) delete the<secure>true</secure>flag in the<cookie-config>element. -
In file
web.xml(in folderhelloworld.server.app.war/src/main/webapp/WEB-INF) delete the<secure>true</secure>flag in the<cookie-config>element.
More on this topic can be found in the Scout Architecture Documentation.
2.4.4. Create WAR Files
We are now ready to move the Hello World application from our development environment to a productive setup.
The simplest option to move our application into the 'wild' is to build it using Maven.
This produces two WAR files [2].
The first WAR file contains the Scout backend server with all business logic. The second WAR file contains the Scout frontend server that is responsible for communicating with the web browser part of the Scout application.
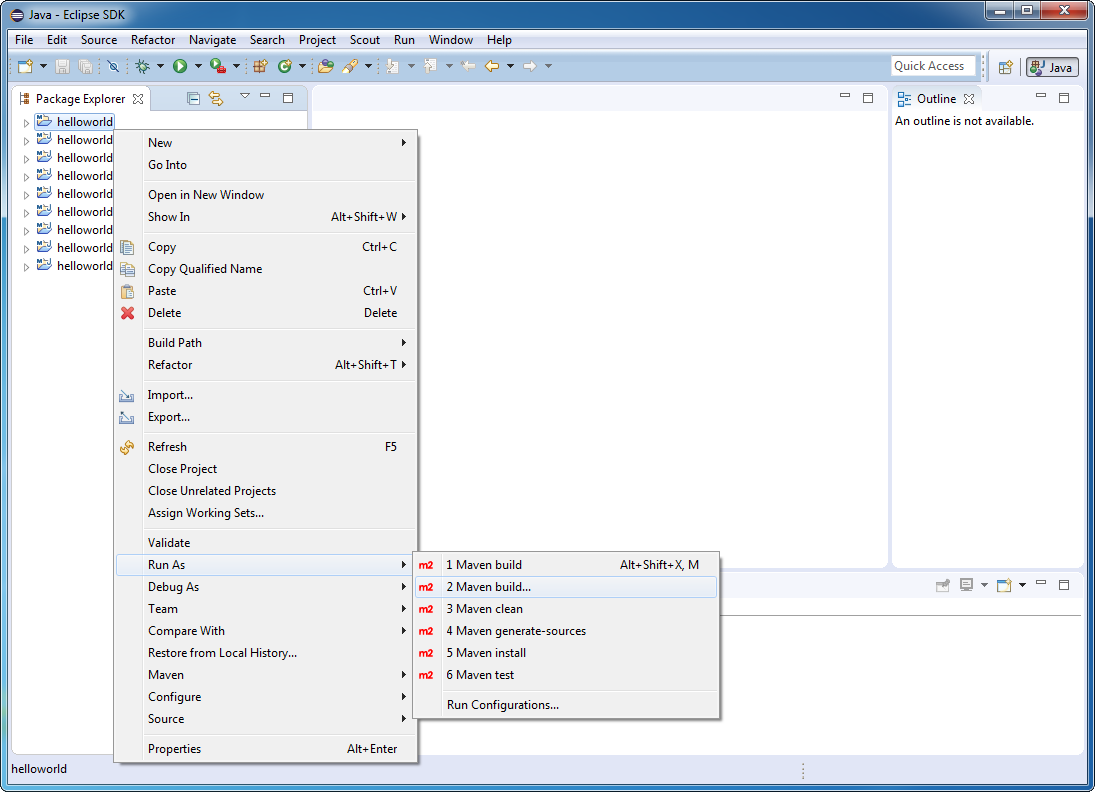
To start the build right click on the project helloworld and select the context menu Run As → Maven build… as shown in Figure 8.
In the dialog that appears enter clean verify into the Goals field and press Run.
Afterwards the compilation starts, executes all test cases and bundles the result into two WAR files. The output of the build is shown in the Console view within Eclipse. As soon as the build is reporting success you can find the built WAR files:
-
The Scout backend WAR file
org.eclipse.scout.apps.helloworld.server.warin folderworkspace_root/helloworld.server.app.war/target -
The Scout frontend WAR file
org.eclipse.scout.apps.helloworld.ui.html.warin folderworkspace_root/helloworld.ui.html.app.war/target
To see the new files within Eclipse you may need to refresh the target folder below each project using the F5 keystroke.
2.5. Deploy to Tomcat
As the final step of this tutorial, we deploy the two WAR files representing our “Hello World” application to a Tomcat web server. For this, we first need a working Tomcat installation. If you do not yet have such an installation you may want to read and follow the instructions provided in Appendix C. To verify a running Tomcat instance, type http://localhost:8080/ into the address bar of the web browser of your choice. You should then see the page shown in Figure 9.
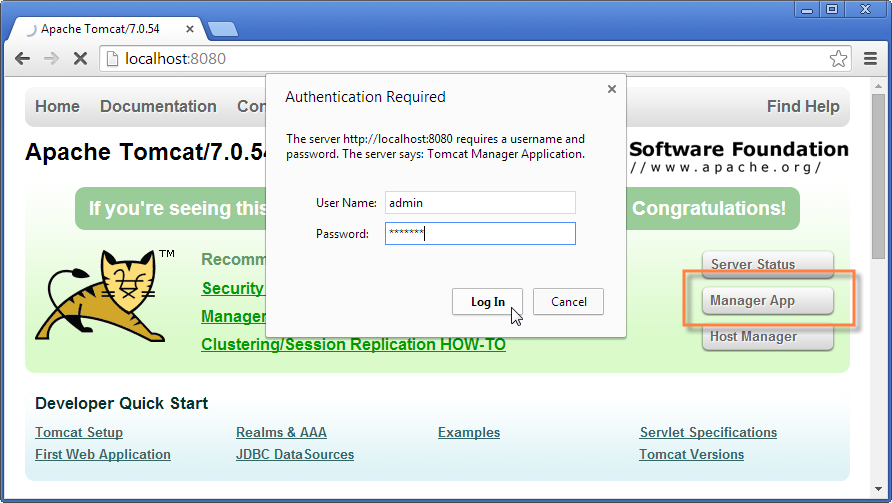
Once the web browser displays the successful running of your Tomcat instance, switch to its “Manager App” by clicking on the button highlighted in Figure 9. After entering user name and password the browser will display the “Tomcat Web Application Manager” as shown in Figure 10. If you don’t know the correct username or password you may look it up in the file tomcat-users.xml as described in Section C.2.
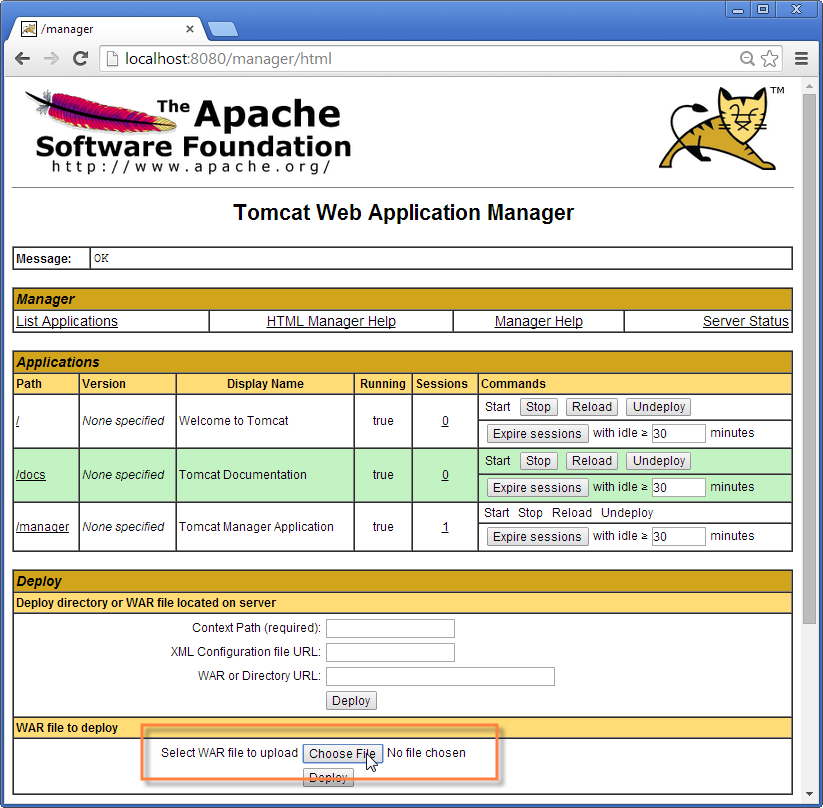
After logging into Tomcat’s manager application, you can select the WAR files to be deployed using button “Choose File” according to the right hand side of Figure 10. After picking your just built org.eclipse.scout.apps.helloworld.server.war and closing the file chooser, click on button “Deploy” (located below button “Choose File”) to deploy the application to the Tomcat web server. Then we repeat this step with the second WAR file org.eclipse.scout.apps.helloworld.ui.html.war.
This will copy the selected WAR files into Tomcats webapps directory and unpack its contents into subdirectories with the same name. You can now connect to the application using the browser of your choice and enter the following address:
http://localhost:8080/org.eclipse.scout.apps.helloworld.ui.html/
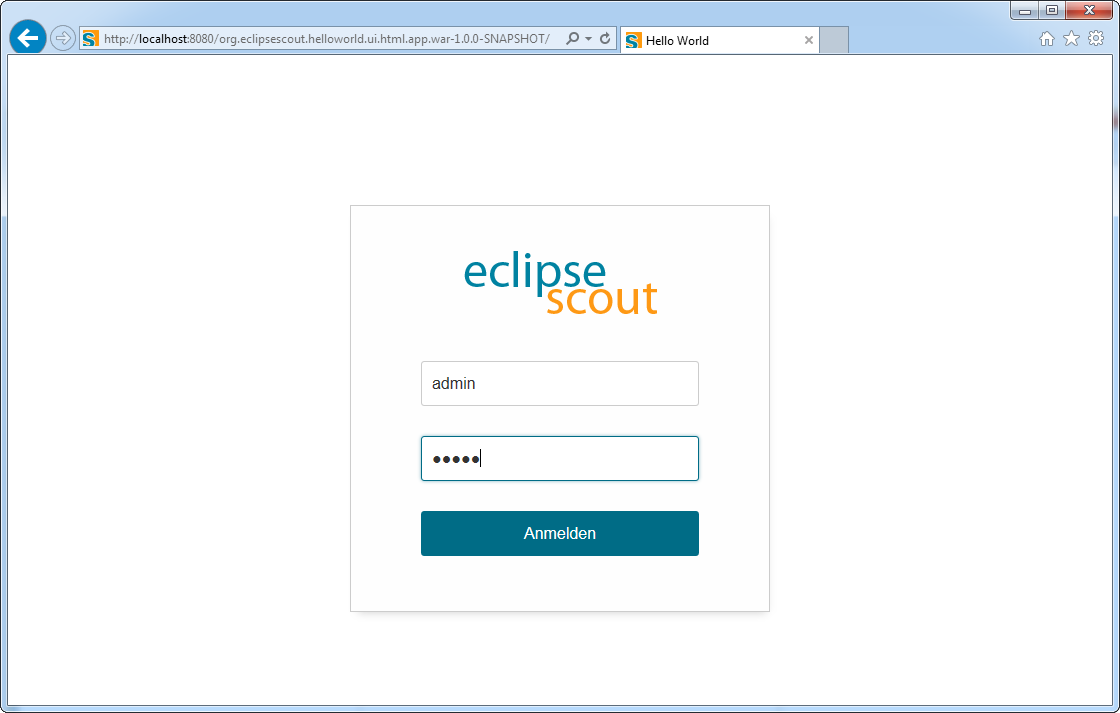
Then you will see the login page as shown in Figure 11. Two users have been pre defined: “admin” with password “admin” and “scott” with password “tiger”. You can find this configuration in the config.properties file of the application.
Please note: In a productive environment it is recommended to deploy the server and the user interface into two different servlet containers running on dedicated machines. This is because these two tiers have different requirements on resources, load balancing and access protection. Furthermore, it is strongly recommended to use an encrypted connection (e.g. TLS 1.2 [3]) between client browsers and the Scout frontend server AND between the Scout frontend and backend server!
3. Scout Tooling
This chapter presents the Scout SDK tooling that is included with the Eclipse Scout. The Scout SDK provides wizards to create new project and application components, adds code assistance to the Java Editor and comes with a NLS editor to manage all translated text entries of the application.
The chapter is organized as follows. Section 3.1 describes the goals and benefits of the tooling included. Because the Scout Tooling is based on the Eclipse IDE, Section 3.2 provides a short overview of frequently used Eclipse features. A high level description of the Scout tooling is provided in Section 3.3. Section 3.4, Section 3.5 and Section 3.6 then provide detailed descriptions of the functionality offered by the Scout SDK.
3.1. Motivation for the Tooling
Thanks to this tooling, developing Scout applications is made simpler, more productive and also more robust. Initially, a solid understanding of the Java language is sufficient to start developing Scout applications and only a rough understanding of the underlying Maven/JEE technologies is required.
The Scout SDK also helps developers to become more productive. Many repetitive and error prone tasks run automatically in the background or are taken care of by the component wizards of the Scout SDK.
The application code created by the Scout SDK wizards helps to ensure that the resulting Scout application has a consistent and robust code base and is well aligned with the application model defined by the Scout runtime framework.
3.2. Eclipse IDE tooling
The Scout tooling is an extension of the Eclipse IDE. The goal of this section is not to provide a complete overview on the features contained in the Eclipse IDE. It provides a short overview of the important eclipse features, frequently used during the development of a Scout Application. Experienced Eclipse IDE users might skip this section.
3.2.1. Start the New Wizard
To start the New Wizard wizard press Ctrl+N or use menu . In the first wizard step type the name of the object you want to create into the Wizards field as shown in Figure 12.

3.2.2. Create a new Java class
Start the New Wizard and type Class in the Wizards field. Select Class Click on Next to open the New class wizard
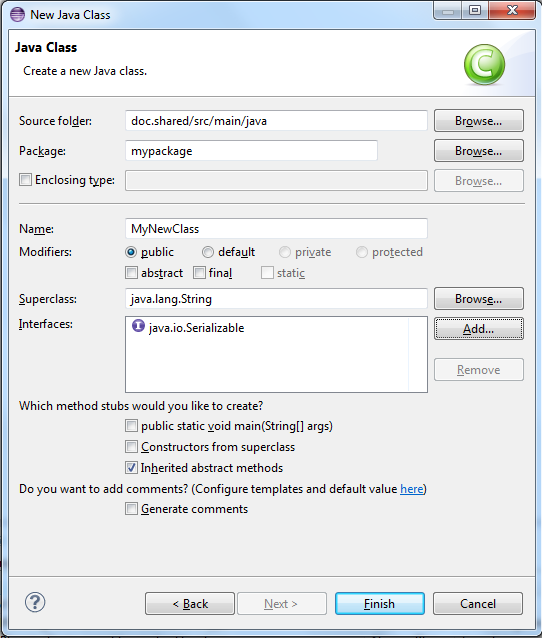
You can choose define the following properties:
-
Source folder: Click on Browse to choose the project where the class belongs.
-
Package: Click on Browse to choose the package in the given project. If the package does not exist it will be created a new one automatically.
-
Name: Type the class name
-
Modifiers: Choose public or default. Or abstract and/or final.
-
Superclass: Choose the parent class clicking on Browse
-
Interfaces: Click on Add to add the list of interfaces your class implements.
-
Method stubs: Include methods in your class.
-
Comments: Generate predefine comments.
Click on Finish when you are done with the class definition. The java editor will open and you can start editing.
3.2.3. Create a new Java package
Start the New Wizard and type Package in the Wizards field. Select Package Click on Next to open the New package wizard
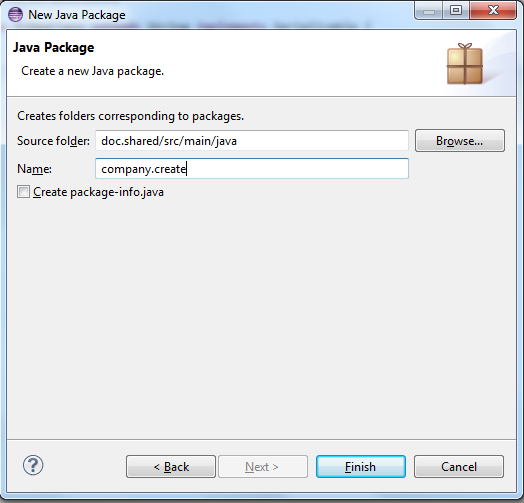
In the New package wizard you can define the following properties:
-
Source folder: Click on Browse to choose the project where the package belongs.
-
Name: Write the name of the package.
-
Package info: Choose the checkbox if you want package-info
Click on Next to create the project. The Project Browser
3.2.4. Organize Java imports
The import section of a java class needs to be kept up-to-date. New imports need to be added and no longer used ones should be removed. Eclipse offers a the shortcut Ctrl+Shift+O to accomplish this task.
In case an import cannot be resolved because several candidates exist, a selection list is displayed.
3.2.5. Rename a class
Renaming a class without SDK support is not so easy. The class and possibly the compilation unit need to be renamed. Then every reference to the class within the workspace needs to be updated.
All this work is accomplished by using the Class rename Wizard.
-
Open the Wizard using one of the following methods
-
Alt+Shift+R
-
-
Select the class in the tree and press F2
-
-
Choose the new name for the class
-
Specify which references need to be updated
-
Click [Finish] or [Next] to continue
3.2.6. Rename a package
Renaming a package without SDK support would be a tedious undertaking. All classes in the package and its subpackages would have to be modified as well as the directory structure on disk. Then every reference to the package within the workspace needs to be updated.
All this work is accomplished by using the Package rename Wizard.
-
Open the Wizard using one of the following methods
-
Alt+Shift+R
-
-
Select the package in the tree and press F2
-
-
Choose the new name for the package
-
Specify which references need to be updated
-
Click [OK] or [Prview] to continue
3.3. Scout SDK Overview
The Scout SDK tooling helps the Scout developer to quickly create frequently used Scout components. This Scout Tooling is implemented as extensions of the Eclipse IDE in the form of wizards, content assist extension to the Eclipse Java editor and support for dealing with translated texts called NLS support.
- Scout Wizards
-
The Scout SDK tooling includes a number of wizards for the creation of frequently used Scout components. In many cases the execution of such wizards involves the creation/editing of several source files. In the case of the creation of a new Scout form this includes the form class in the client module of the Scout application, a form data class and a service that communicates Descriptions for the individual wizards are provided in Section 3.4.
- Content Assist
-
In the Scout framework the hierarchical organization of Scout components if frequently reflected in the form of inner classes. This allows the Scout tooling to provide context specific proposals in the form of content assist proposals offered in the Java editor of the Eclipse IDE. Examples for this form of the tooling includes the creation of form fields or adding columns and context menus to tables. Content assist support is described in detail in Section 3.5.
- NLS Tooling
-
Eclipse Scout comes with NLS (National Language Support). To support Scout developers in using Scout’s NLS (National Language Support) the Scout SDK offers corresponding tooling to work with translated texts. This tooling is described in Section 3.6.
3.4. Scout Wizards
The Scout SDK provides a set of wizards to create new Scout projects and various components for your Scout applications.
To start any of these wizards press Ctrl+N or use menu . In the first wizard step type "Scout" into the Wizards field as shown in Figure 14.
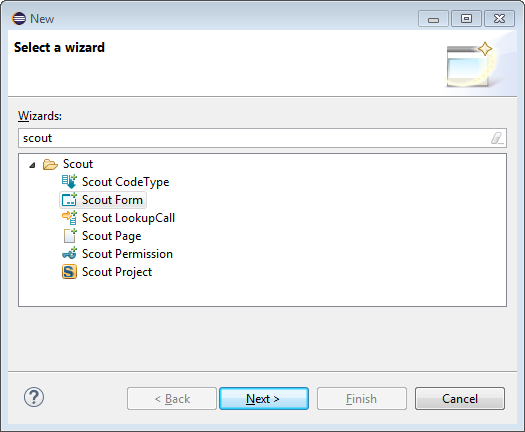
The wizards provided by the Scout SDK are introduced and described in the sections listed below.
-
New Project Wizard (Section 3.4.1)
-
New Page Wizard (Section 3.4.2)
-
New Form Wizard (Section 3.4.3)
3.4.1. New Project Wizard
The New Scout Project wizard can be used to create a new Scout project from scratch.
To open the wizard press Ctrl+N or use and type "Scout" into the Wizards search field. Then, select the entry "Scout Project" and click on Next. This leads to the initial dialog of the New Scout Project wizard as shown in Figure 15.
A detailed description of the indiviudal wizard fields of Figure 15 is provided in the next section.
By clicking on the Finish button the wizard is started and a new Scout client server application is created in the form of a Maven multi-module project.
Wizard Fields and Default Values
All fields of the Figure 15 are initially filled with default values.
- Group Id
-
Maven groupId used for all created projects. The default value is
org.eclipse.scout.apps. - Artifact Id
-
Maven artifactId for the parent project. The additional projects are derived from this name. The default value is helloworld.
- Display Name
-
The name of the application presented to the user. This name is shown in the Browser title bar. The default value is "My Application"
With the Project Location group box, you can control where the project will be created. Unchecked the Use default Workspace location checkbox to enter an other value in the Target Directory Field. The Browse… button can help you to find the appropriate path.
Created Components
With the Figure 15 wizard a complete Maven multi-module project is created. Using the default artifact Id helloworld the following Maven modules are created.
-
Maven module helloworld
-
Contains the project’s parent
pom.xmlfile
-
-
Maven module helloworld.client
-
Contains model components of the client application in
src/main/javaand model tests insrc/test/java. -
The class
HelloWorldFormin packageorg.eclipse.scout.apps.helloworld.client.helloworldis an example of a model class.
-
-
Maven module helloworld.shared
-
Contains components needed in both the client and the server application.
-
For examples see the
IHelloWorldServiceinterface insrc/main/javaand classHelloWorldFormDatainsrc/generated/java. -
The
Texts.nlsfile that can be opened in the Scout NLS Editor.
-
-
Maven module helloworld.server
-
Contains the model components of the server application in
src/main/javaand model tests insrc/test/java. -
The class
HelloWorldServicein packageorg.eclipse.scout.apps.helloworld.server.helloworldis an example of such a model class.
-
-
Maven module helloworld.server.app.dev
-
Contains all components to run the Scout server application from within the Eclipse IDE.
-
The file
config.propertiesin foldersrc/main/resourcescontains the development configuration for the Scout server application. -
The file
pom.xmlbundles the Jetty web server with the server application. -
The file
[webapp] dev server.launchcontains the launch configuration for the Eclipse IDE.
-
-
Maven module helloworld.server.app.war
-
Contains all components to create a Scout server WAR file to deploy to an external web server.
-
The file
config.propertiesin foldersrc/main/resourcescontains the server configuration. -
The file
pom.xmlis used to build the Scout server WAR file.
-
-
Maven module helloworld.ui.html
-
Contains servlet filters and the HTML pages as well as custom CSS and JavaScript files for the Scout UI Server.
-
See class
UiServletFilterinsrc/main/javaand folderWebContentinsource/main/resources.
-
-
Maven module helloworld.ui.html.app.dev
-
Contains all components to run the Scout UI application from within the Eclipse IDE.
-
The file
config.propertiesin foldersrc/main/resourcescontains the development configuration for the application. -
The file
web.xmlin foldersrc/main/webappcontains the web configuration for the application. -
The file
pom.xmlbundles the Jetty web server with the application. -
The file
[webapp] dev ui.launchcontains the launch configuration for the Eclipse IDE.
-
-
Maven module helloworld.ui.html.app.war
-
Contains all components to create a Scout UI WAR file to deploy to an external web server.
-
The file
config.propertiesin foldersrc/main/resourcescontains the application configuration. -
The file
web.xmlin foldersrc/main/webappcontains the web configuration. -
The file
pom.xmlis used to build the Scout UI WAR file.
-
3.4.2. New Page Wizard
The New Scout Page wizard can be used to create a new page and related classes. To start the wizard use or press Ctrl+N.
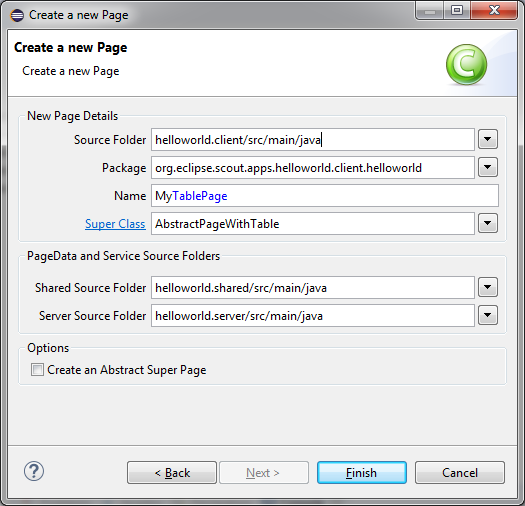
In the case of Figure 16 the package org.eclipse.scout.apps.helloworld.client.helloworld has been selected in the Package Explorer.
The only wizard field that then needs to be filled in manually is the Name field.
By clicking on the Finish button the wizard is started and the specified components are created.
Wizard Fields and Default Values
Most of the fields of the Figure 16 will be filled with default values depending on the current context of the IDE. The context can be derived from a package selected in the Package Explorer or from the class in the active Java Editor.
- Source Folder
-
The source folder of the Maven client module used for the creation of the page. The default value is the
src/main/javafolder in the Maven client module. - Package
-
The Java package that will contain the page class. The Scout SDK will try to guess the package name from the current context and derive matching package names for the Maven shared module.
- Name
-
The name of the page class. According to Scout conventions the class name ends with the suffix
TablePage(for subclasses ofAbstractPageWithTable) orNodePage(forAbstractPageWithNodes). - Super Class
-
The super class for the form.
AbstractPageWithTableis the default value. - Shared Source Folder
-
The source folder of the Maven shared module used for creation of the page data and the service interface. The default value is the
src/main/javafolder in the Maven shared module. - Server Source Folder
-
The source folder of the Maven server module used for creation of the service implementation. The default value is the
src/main/javafolder in the Maven server module.
Created Components
In the Figure 16 example shown above the Scout SDK will create the following components.
-
In Maven module helloworld.client
-
The
MyTablePagepage class in foldersrc/main/javaand packageorg.eclipse.scout.apps.helloworld.client.helloworld
-
-
In Maven module helloworld.shared
-
The
IMyServiceservice interface in foldersrc/main/javaand packageorg.eclipse.scout.apps.helloworld.shared.helloworld -
MyTablePageDatapage data class in foldersrc/generated/javaand packageorg.eclipse.scout.apps.helloworld.shared.helloworld
-
-
In Maven module helloworld.server
-
The
MyServiceimplementation in foldersrc/main/javaand packageorg.eclipse.scout.apps.helloworld.server.helloworld
-
3.4.3. New Form Wizard
The New Form wizard is be used to create a new form including a form data, permissions and and related service. To start the wizard use or press Ctrl+N.
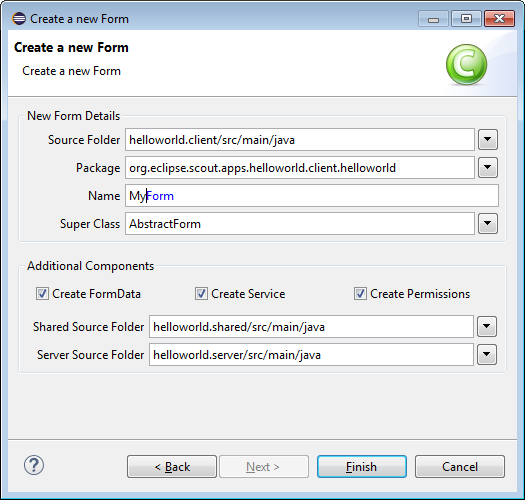
In the case of Figure 17 the package org.eclipse.scout.apps.helloworld.client.helloworld has been selected in the Package Explorer.
The only wizard field that then needs to be filled in manually is the Name field.
By clicking on the Finish button the wizard is started and the specified components are created.
Wizard Fields and Default Values
Most of the fields of the Figure 17 will be filled with default values depending on the current context of the IDE. The context can be derived from a package selected in the Package Explorer or from the class in the active Java Editor.
- Source Folder
-
The source folder of the Maven client module used for the creation of the form class. The default value is the
src/main/javafolder in the Maven client module. - Package
-
The Java package that will contain the form class. The Scout SDK will try to guess the package name from the current context and derive matching package names for the Maven shared and server modules.
- Name
-
The name of the form class. According to Scout conventions the class name ends with the suffix
Form. - Super Class
-
The super class for the form.
AbstractFormis the default value. - Create FormData
-
If ticked, a form data class will be created in the shared module.
- Create Service
-
If ticked, a service interface is created in the shared module and a service implementation is created in the Maven server module.
- Create Permissions
-
If ticked, read and update permissions are created in the Maven shared module.
- Shared Source Folder
-
The source folder of the Maven shared module used for creation of the form data, the service interface and the permission classes. The default value is the
src/main/javafolder in the Maven shared module. - Server Source Folder
-
The source folder of the Maven server module used for the service class creation. The default value is the
src/main/javafolder in the Maven server module.
Created Components
In the Figure 17 example shown above the Scout SDK will create the following components.
-
In Maven module helloworld.client
-
The
MyFormform class in foldersrc/main/javaand packageorg.eclipse.scout.apps.helloworld.client.helloworld
-
-
In Maven module helloworld.shared
-
In folder
src/main/javaand packageorg.eclipse.scout.apps.helloworld.shared.helloworld-
The
IMyServiceservice interface -
The
ReadMyPermissionpermission class -
The
UpdateMyPermissionpermission class
-
-
The
MyFormDataform data class in foldersrc/generated/javaand packageorg.eclipse.scout.apps.helloworld.shared.helloworld
-
-
In Maven module helloworld.server
-
The
MyServiceservice class in foldersrc/main/javaand packageorg.eclipse.scout.apps.helloworld.server.helloworld
-
3.5. Scout Content Assistance
To create new Scout components that are represented by inner classes in the Scout framework, the Scout tooling extends the Java content assist of the Eclipse Java editor. The offered proposals are context specific. Depending on the current cursor position in the Java editor, possible Scout components are added to the proposal list.
In a class representing a group box in a form, the Scout content assist adds proposals for various form fields. In a table class the content assist adds proposals to add table columns or context menus. Those proposals trigger the creation of inner classes for form fields, table columns or codes. The Eclipse content assist can be started by typing Ctrl+Space.
3.5.1. Create new Form Fields
To add additional form fields to a form the current edit position needs to be inside of a Scout group box. Typing Ctrl+Space then provides access to the most frequently used Scout widgets as shown in Figure 18.
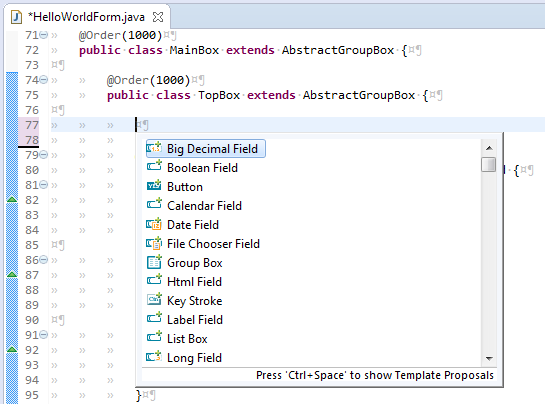
When a template is selected, it is possible to customize it by navigating between the different Edit-Groups with the Tab Key (this works exactly like other templates in the Eclipse Editor). With this mechanism you can quickly define the class name, the parent class and other properties. To exit the Edit-Mode just press Enter.
3.5.2. Create new Table Columns
For adding new columns in a table set the current edit position inside a Scout table. The Scout table itself may be located inside of a TableField as shown in Figure 19 or can also be located inside of a Scout TablePage.
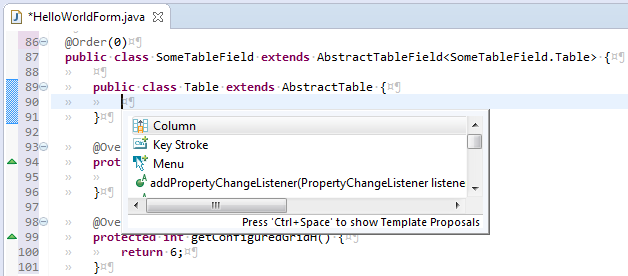
Next to adding columns the content assist shown in Figure 19 can also be used to add key stroke actions and menus to tables.
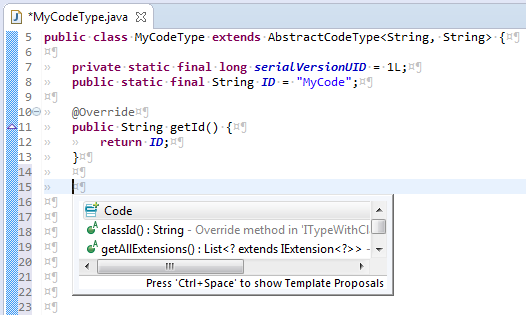
3.5.3. Create new Codes
Adding new Codes to an existing CodeType is supported by the content assist as shown in Figure 20.
3.6. Scout NLS Tooling
3.6.1. Adding a new Translated Text Entry
Translated text entries are most frequently added when working in the Java editor view.
When the the current edit position is inside the String parameter of the TEXTS.get() code, the content assist (opened with Ctrl + Space) provides support for the NLS entries as shown in Figure 21.
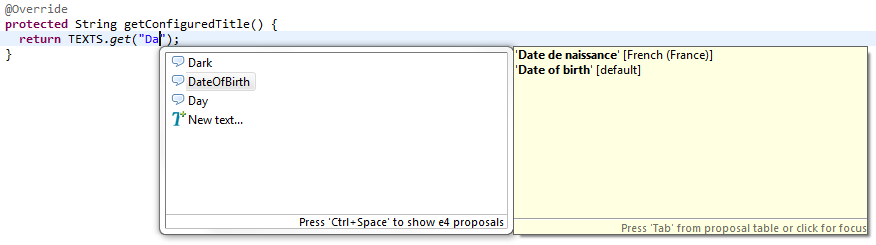
Selecting one of proposal entries (like "DateOfBirth" in the example) shows the available translations on the right hand side. To select a specific proposal entry you may double click on the entry or hit the Enter key. To create a new text entry select New text… at the end of the proposal list.
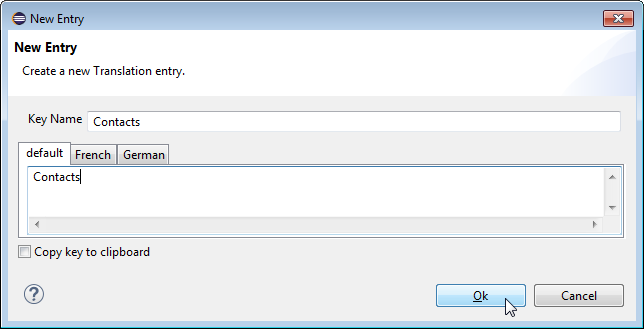
Adding a translated text can then be done in the New Entry wizard provided by the Scout SDK as shown in Figure 22.
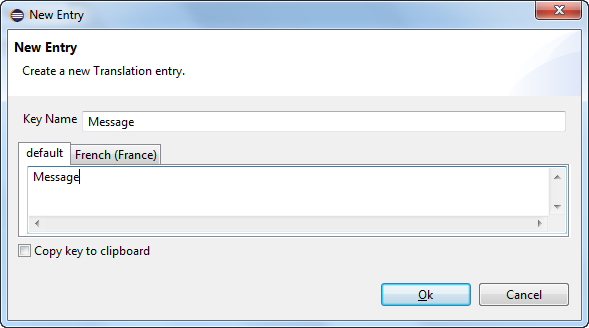
- Key Name
-
This field holds the text key that is used to access translated text.
- default
-
This field holds the default translated text for the key. Make sure to at least provide a translated text in this tab.
- French (France)
-
Additional tabs to enter translations for other languages may be present. Adding additional languages is described in the text for the NLS editor.
- Copy key to the clipboard
-
Select this checkbox to copy the key name to the clipboard and paste it later in your code.
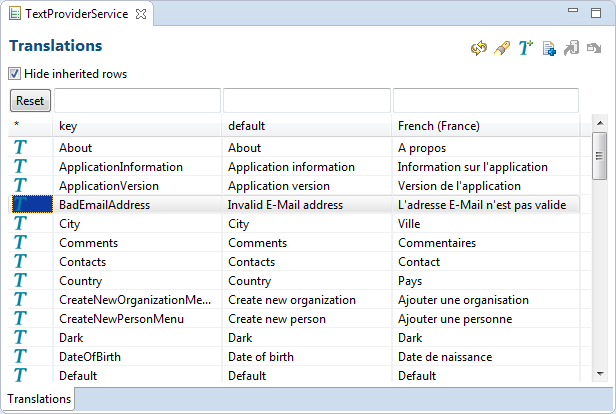
3.6.2. The NLS Editor
To manage translated application texts for different languages the Scout SDK includes a NLS editor. This editor helps to efficiently deal to edit all the property files that are used with the default setup of Scout.
The NLS editor can be accessed for each text provider service of a Scout application via the *.nls files of the shared Maven modules of the application.
In the case of the "Hello World" application you will find the Texts.nls file in module org.eclipse.scout.helloworld.shared.
To open the editor for the "Hello World" application select the Texts.nls file first and then use context menu .
The screenshot below shows the opened NLS editor.
In the first column the key values are shown that are used in accessing translations through TEXTS.get("key").
The second columns holds the default translations followed by columns holding the translations for other translated languages.
3.6.3. Action Buttons
Actions on the top right corner:
|
Refresh NLS Project |
Reload the content of the editor. |
|
Show NLS entry usage |
For each row, search in the Java code where the NLS Key is used. Results are displayed in the first column. |
|
New entry… |
Opens the New Text Entry Wizard |
|
New language… |
Opens the Add a Language Wizard |
|
Import… |
Import the NLS entries of an external file |
|
Export… |
Export the NLS entries to an external file |
Import and Export requires additional components.
Hide inherited rows checkbox
On the top of each column, the text fields allow you to filter the entries in the table. With the Reset button on the right you will empty those filters.
The entries in the table can be directly edited by pressing F2 or double-clicking into a text cell.
On each row it is possible to call following context menu:
|
Modify Entry |
Opens the New Text Entry Wizard |
|
Find references to 'Xxx' |
Search in the Java code where the NLS Key is used. |
|
Remove Xxx |
Delete the NLS Entry from the files |
3.6.4. Default Mapping to Properties Files
The mapping between the properties files is registered in the "Text Provider Service" class.
Per default the files follow this pattern:
<your application>.shared/src/main/resources/<identifier of the project>/texts/Texts<language>.properties
where:
-
<identifier of the project>is a chain of folders following the same convention as the Java source files with the package name. For example theorg.eclipse.contacts.sharedproject usesorg/eclipse/scout/contacts/sharedas path. -
<language>is an identifier of the language and the country. Some possible file names:-
Texts.propertiesis the default language -
Texts_de.propertiesis for German -
Texts_fr_BEwill be for French in Belgium
-
3.6.5. Find missing NLS Keys
If NLS keys are used in the code that do not exist in a properties file, an ugly placeholder is displayed to the user. To find such missing translations the Menu Scout → Search missing text keys… may be handy.
The result is listed in the Eclipse Search view.
The search also takes the scope of each NLS key into account. So that the key is considered to be available there must be a TextProviderService with that key on the classpath of that module.
Reported false positives can be suppressed using the following comment at the end of the corresponding line: NO-NLS-CHECK. Matches on that line are then not reported in future searches anymore.
4. A One Day Tutorial
In this chapter we will create the “Contacts” Scout application. The goal of this tutorial application is to learn about the most prominent features of the Eclipse Scout framework using a fully functional application.
The application is kept small enough to complete this tutorial within less than a day. An extended version of “Contacts” is available as a Scout sample application on Github.
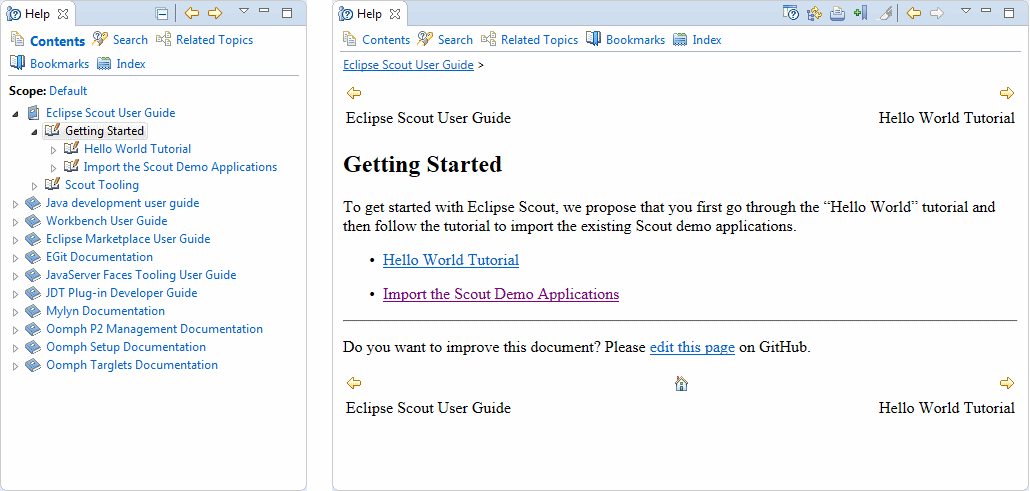
As a prerequisite to this tutorial we assume that the reader has successfully completed the chapters "Hello World Tutorial" and "Import the Scout Demo Applications" as described in the Eclipse Scout user guide. To access the Scout user guide help hit F1 in the Eclipse IDE. This opens the Eclipse help view that includes the Eclipse Scout User Guide as shown in Figure 23.
The “Contacts” tutorial is organized as follows. In the first section, the finished “Contacts” application is explained from the user perspective. The remaining sections focus on the individual steps to implement the “Contacts” tutorial application.
4.1. The “Contacts” Application
The “Contacts” demo application is a client server application to manage personal contacts, organizations and events. The persistence of entered data is achieved via simple JDBC access to a Derby database.
It is recommended that you first import the full “Contacts” demo application as described in the Eclipse Scout User Guide into a separate workspace. This gives you the possibility to check your source code against the full implementation during the various steps of the tutorial. Alternatively, you can also view the source code of the “Contacts” demo application on Github.[4].
Figure Figure 24 below shows the “Contacts” application after connecting to the Scout UI application.
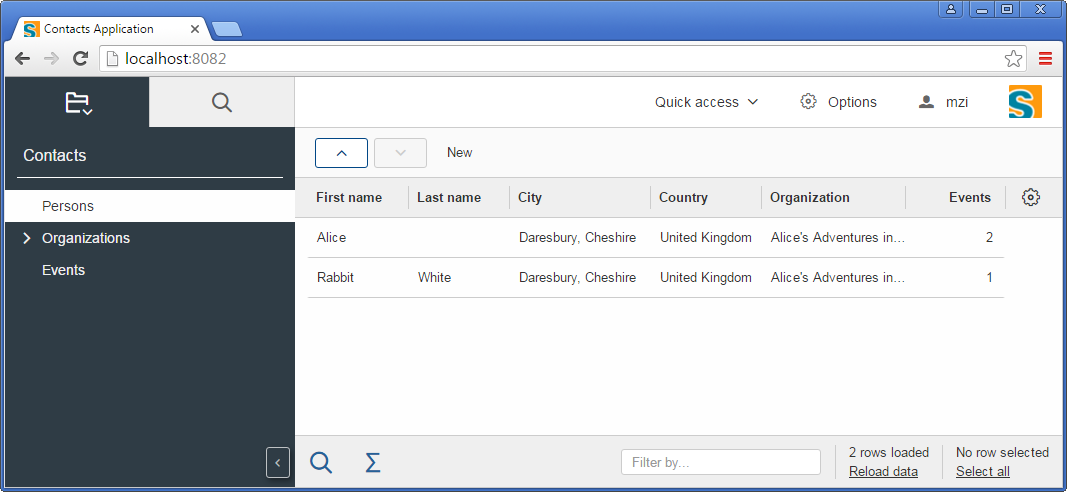
The “Contacts” application also shows the basic user interface layout of a typical Scout application. The main areas of this layout are briefly introduced below.
- Outline Button
-
In Figure 24 the top left area shows a folder icon that represents the "Contacts" outline. The small down arrow at the folder icon indicates that additional outlines are available when clicking on this view button. On the right of the button with the folder icon is a second outline button that activates a search outline (not implemented yet).
- Navigation Tree
-
The navigation tree on the left side of the layout shows the pages that are available for the selected outline. For the "Contacts" outline, the navigation tree provides access to the pages "Persons", "Organizations" and "Events". Selecting a page then shows associated information on the right hand side in the bench area. In the case of the selected "Persons" page the bench area shows a list of persons in the form of a table.
- Header
-
The header area is located at the top and holds the available top level menus. In this example these are the "Quick access", "Options" menu points as well as a user menu that shows the username of the currently logged in user "mzi".
- Bench
-
The bench represents the main display area of a Scout application. When selecting the "Persons" page, a table provides access to all available persons as shown in Figure 24. Selecting a specific person provides access to all actions that are available for the selected person. The selected person can then be opened with the Edit menu which opens the person in a view that is displayed in the bench area again as shown in Figure 25.
For entering and editing of data in Scout applications views are used in most cases. Views are displayed in the bench area of a Scout application. Several views can also be opened simultaneously. To show a specific view the user has to click on the view button associated with the desired view. An example of an opened view is shown for person "Alice" in in Figure 25.

4.2. Tutorial Overview
This tutorial walks you through the implementation of a Scout application consisting of a frontend and a backend application. The frontend application contains outlines with navigation trees, pages to present information in tabular form and forms to view and edit data. In the backend application the tutorial shows how to implement services, logging, databases access, and several other aspects of Scout applications.
The tutorial is organized into the sequence of the consecutive steps listed below. Each of the step is described in a individual section that results in a executable application that can be tested and compared against the full "Contacts" demo application.
- Step 1: Setting up the Initial Project (Section 4.3)
-
We start with an empty workspace and the "Hello World" project. At the end of step one we have a project setup that matches the "Contacts" application. This includes the organization and naming of Maven modules and the individual Java packages.
- Step 2: Adding the Person and Organization Page (Section 4.4)
-
The second step adds the user interface components to display persons and organizations. For this a "Persons" page and an "Organizations" page are created and added to the "Contacts" outline as shown in Figure 24.
- Step 3: Creating and Accessing the Database (Section 4.5)
-
This step concentrates on the backend of the "Contacts" application. The covered topics includes dealing with application properties, setup and access of a database and using the database to provide data for the person and organization page created in the previous step.
- Step 4: Adding a Form to Create/Edit Persons (Section 4.6)
-
Having access to the database is used in this step to add the components that allow a user to create and edit persons and organizations in the user interface of the "Contacts" application. In addition, this tutorial step also demonstrates how to design and implement complex form layouts with the Scout framework.
- Step 5: Form Field Validation and Template Fields (Section 4.7)
-
This step provides an introduction into form field validation and the creation of template fields. Validation of user input is important for many business applications and template fields help to improve code quality with a mechanism to reuse application specific user interface components.
- Step 6: Adding the Company Form (Section 4.8)
-
We create the organization form to create and enter organizations in the "Contacts" application. As we can reuse many of the components developed so far this is the shortest tutorial step.
- Step 7: Linking Organizations and Persons (Section 4.9)
-
In this step we modify the user interface to implement a 1:n relationship between organizations and persons. This includes the creation of a hierarchical page structure for organization, adding an organization column to the person page and adding an organization field to the person form to manage the association of a person to an organization.
- Step 8: Additional Concepts and Features (Section 4.10)
-
The last tutorial part discusses the gap between the tutorial application and the complete "Contacts" demo application.
4.3. Setting up the Initial Project
This section deals with setting up the initial workspace and codebase for the "Contacts" application. The goal of this step lies in the project setup that closely matches the "Contacts" application. This includes the organization and naming of Maven modules and the individual Java packages.
The creation up of the initial project setup described in this section consists of the tasks listed below.
-
Creating the initial Codebase (Section 4.3.1)
-
Removing unnecessary Components (Section 4.3.2)
-
Changes to Class WorkOutline (Section 4.3.3)
-
Changes to Class Desktop (Section 4.3.4)
This first step of the "Contacts" tutorial ends with a review of the results of this first tutorial step in Section 4.3.5.
4.3.1. Creating the initial Codebase
The initial code for the “Contacts” application is generated using the New Scout Project wizard. For the wizard fields you may use the values below and as shown in Figure 26
-
Group Id:
org.eclipse.scout -
Artifact Id:
contacts -
Display Name: "Contacts Application"
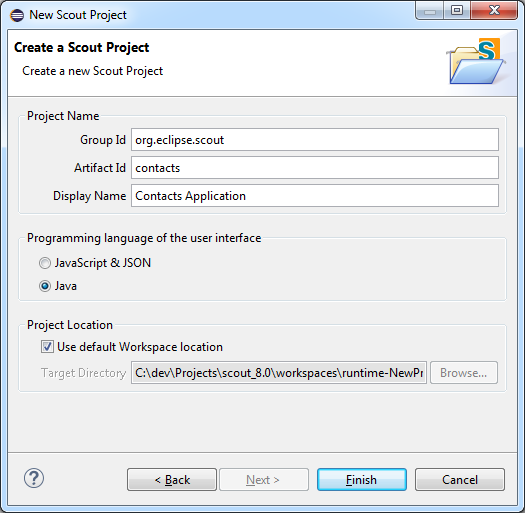
To create this initial application click on Finish. The project wizard then creates a number of Maven modules as shown in Figure 27.
4.3.2. Removing unnecessary Components
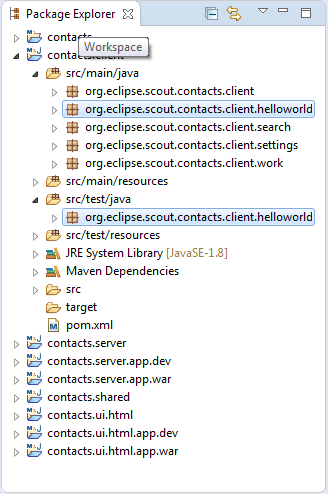
We start with removing the *.helloworld and \*.settings packages in all Maven modules of the "Contacts" application.
To delete packages, first select an individual package or packages in the Eclipse package explorer as shown in Figure 27 and then hit the Delete key.
The packages to delete is provided per Maven module in the list below.
- Client Module
contacts.client -
-
In folder
src/main/java-
Delete package
org.eclipse.scout.contacts.client.helloworld -
Delete package
org.eclipse.scout.contacts.client.settings
-
-
In folder
src/test/java-
Delete package
org.eclipse.scout.contacts.client.helloworld
-
-
- Server Module
contacts.server -
-
In folder
src/main/java-
Delete package
org.eclipse.scout.contacts.server.helloworld
-
-
In folder
src/test/java-
Delete package
org.eclipse.scout.contacts.server.helloworld
-
-
- Shared Module
contacts.shared -
-
In folder
src/main/java-
Delete package
org.eclipse.scout.contacts.shared.helloworld
-
-
In folder
src/generated/java-
Delete package
org.eclipse.scout.contacts.shared.helloworld
-
-
The deletion of these outlines results in a number of compile errors in classes WorkOutline and Desktop.
All these errors will be resolved in the following two sections where we modify the two classes to our needs.
4.3.3. Changes to Class WorkOutline
Instead of adding a new "Contacts" outline to the application we reuse the generated code and rename the "Work" outline into "Contacts" outline.
For this, we perform the following modifications to class WorkOutline.
-
Rename the class package to
org.eclipse.scout.contacts.client.contact -
Rename the class to
ContactOutline -
Change the outline title to "Contacts"
-
Change the outline icon to
Icons.CategoryBold
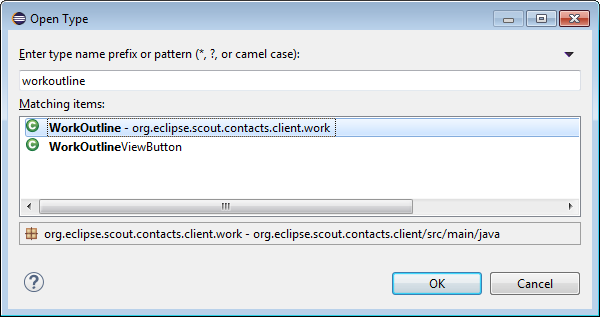
To quickly find class WorkOutline we first open the Open Type dialog from the Eclipse IDE by hitting Ctrl+Shift+T and enter "workoutline" into the search field as shown in Figure 28.
In the result list, we select the desired class and click the OK button to open the file WorkOutline.java in the Java editor of the Eclipse IDE.
We start with the package rename.
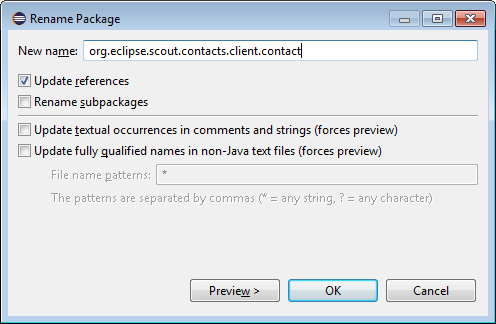
To rename the package org.eclipse.scout.contacts.client.work to org.eclipse.scout.contacts.client.contact click into the word "work" of the package name and hit Alt+Shift+R.
This opens the package rename dialog as shown in Figure 29 where we replace "work" by "contact" in the New name field.
In next step we rename class WorkOutline to ContactOutline.
In the Java editor we can then rename the class by clicking into the class identifier WorkOutline and hitting Alt+Shift+R.
Inside the edit box we can then change the class name to ContactOutline and hit the Enter key to execute the change.
If Eclipse shows a Rename Type dialog just hit button Continue to let Eclipse complete the rename operation.
To get rid of the compile error in method execCreateChildPages we simply delete the content in the method body.
Next, we change the outline title in method getConfiguredTitle by replacing the string "Work" with "Contacts", setting the cursor at the end of the word "Contacts" and hitting Ctrl+Space to open the Scout content assist as shown in Figure 30.
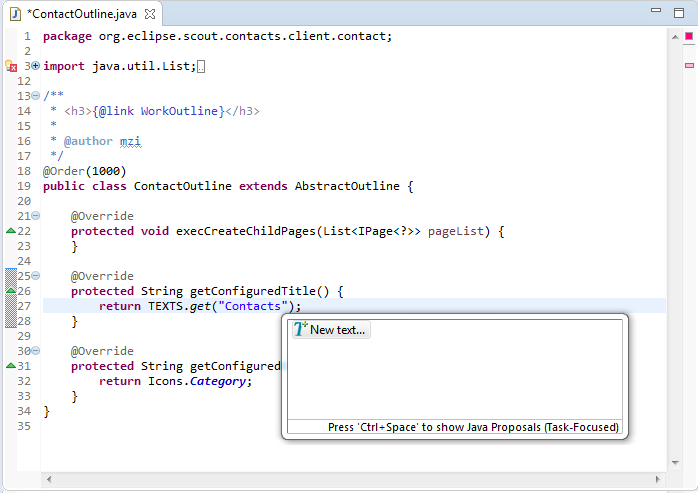
To enter a new translated text we double click on the proposal New text… to open the Scout new entry wizard as shown in Figure 31.
As the last modification we change the return value of method getConfiguredIconId to value Icons.CategoryBold and end with the code shown in Listing 1.
public class ContactOutline extends AbstractOutline {

  @Override
  protected void execCreateChildPages(List<IPage<?>> pageList) {
  }

  @Override
  protected String getConfiguredTitle() {
    return TEXTS.get("Contacts");
  }

  @Override
  protected String getConfiguredIconId() {
    return Icons.CategoryBold;
  }
}
To conclude the modifications we update the imports by hitting Ctrl+Shift+O and save the modified class using Ctrl+S.
4.3.4. Changes to Class Desktop
The second class to adapt for the "Contacts" application is the Desktop class.
This class is implemented exactly once in each Scout application and holds the available outlines and top level menus of the application in the form of inner classes.
For the "Contacts" application we adapt the initial implementation to have outline view buttons for the "Contacts" and "Search" outlines. The top level menus are then adapted to hold the menus "Quick Access", "Options" and a menu for the logged in user.
Start with opening the class in the Java editor using Ctrl+Shift+T to quickly access the class.
In the source code of method getConfiguredOutlines remove SettingsOutline.class from the list of return values in as shown in Listing 2.
  @Override
  protected List<Class<? extends IOutline>> getConfiguredOutlines() {
    return CollectionUtility.<Class<? extends IOutline>> arrayList(ContactOutline.class, SearchOutline.class);
  }
Then, perform the following changes in class Desktop
-
Delete the inner class
SettingOutlineViewButton -
Delete the inner class
UserProfileMenu. -
Rename inner class WorkOutlineViewButton to
ContactOutlineViewButton -
Create a new inner class called
QuickAccessMenuafter theSearchOutlineViewButton. For this navigate the cursor after theSearchOutlineViewButtonclass, press Ctrl+Space and select theMenuentry. Adapt the created code until it matches the template as shown in Listing 3. -
Create another menu called
OptionsMenuright after the newly createdQuickAccessMenuaccording to Listing 3 (for now you can skip the methodgetConfiguredFormand keep the super class as it is). -
Create a last menu called
UserMenuafter theOptionsMenuaccording to Listing 3.
At the end of these changes the inner class structure of class Desktop will look similar to the sample shown in Listing 3.
public class Desktop extends AbstractDesktop {

  // outline buttons of the application
  @Order(1)
  public class ContactOutlineViewButton extends AbstractOutlineViewButton {
  }

  @Order(2)
  public class SearchOutlineViewButton extends AbstractOutlineViewButton {
  }

  // top level menus for the header area of the application
  @Order(10)
  public class QuickAccessMenu extends AbstractMenu {

    @Override
    protected String getConfiguredText() {
      return TEXTS.get("QuickAccess");
    }

  }

  @Order(20)
  public class OptionsMenu extends AbstractFormMenu<OptionsForm> { (1)

    @Override
    protected String getConfiguredText() {
      return TEXTS.get("Options");
    }

    @Override
    protected String getConfiguredIconId() {
      return Icons.Gear;
    }

    @Override
    protected Class<OptionsForm> getConfiguredForm() {
      return OptionsForm.class;
    }

  }

  @Order(30)
  public class UserMenu extends AbstractFormMenu<UserForm> { (2)

    @Override
    protected String getConfiguredIconId() {
      return Icons.PersonSolid;
    }

    @Override
    protected Class<UserForm> getConfiguredForm() {
      return UserForm.class;
    }

  }
}| 1 | In your implementation OptionsMenu should extend AbstractMenu |
| 2 | In your implementation UserMenu should extend AbstractMenu |
4.3.5. What have we achieved?
In the first step of the "Contacts" tutorial we have created the initial project setup that will serve as the basis for all the following tutorial steps.
As the "Contacts" application is in a clean state you can now test the application using the following steps. The user interface of the application will now look as shown in Figure 32.
-
Start the backend application
-
Start the frontend application
-
Open address http://localhost:8082/ in your browser
From the coding perspective we now have all necessary maven Modules for "Contacts" application including Java package and class names to match with the complete Scout "Contacts" demo application. This point is important as it simplifies the comparison of intermediate stages of the tutorial application with the Scout demo application. The same is true for the user perspective: The layout of the current state of the tutorial matches with the complete "Contacts" sample application.
4.4. Adding the Person and Organization Page
In the second step of the Scout tutorial the components to display persons and organizations are added to the "Contacts" outline of the user interface of the Scout application. Specifically, a "Persons" page and an "Organizations" page are created and added to the navigation tree of the "Contacts" outline.
Database access and populating the pages with actual data from the database is not part of this section but will be covered in Section 4.5 in the next tutorial step.
The addition of the "Persons" page is described in detail in the sections listed below.
-
Creating additional Packages (Section 4.4.1)
-
Creating the Country Lookup Call (Section 4.4.2)
-
Creating the Person Page (Section 4.4.3)
-
Adding Table Columns to the Page (Section 4.4.4)
-
Link the Person Page to the Contacts Outline (Section 4.4.5)
The addition of the company page is described in Section 4.4.6. Finally, the state of the "Contacts" application is summarized in Section 4.4.7.
4.4.1. Creating additional Packages
A substantial part of the "Contacts" application deals with persons. In addition to the "Persons" page we will also add a Scout form to enter/edit persons in a later tutorial step. For the "Contacts" application we use this fact to justify the addition of a specific Java package that will hold all classes related to persons. This person package can be created with the following steps.
-
Open the "Contacts" Maven module
contacts.clientin the Eclipse Package Explorer -
Select the Java package
org.eclipse.scout.contacts.clientin foldersrc/main/java -
Press Ctrl+N, enter "package" into the search field
-
Select the Package wizard in the proposal box and click Next
-
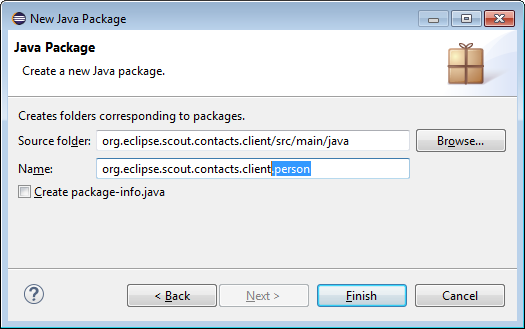
Enter
org.eclipse.scout.contacts.client.personand click Finish as shown in Figure 33 -
Make sure the newly created person package is selected in the Eclipse Package Explorer
We will also need a separate package for organizations and some common elements.
-
Add package
org.eclipse.scout.contacts.client.organization -
Add package
org.eclipse.scout.contacts.client.common
4.4.2. Creating the Country Lookup Call
The pages for the persons and the organizations will also display country information.
To display country names we will be using a special column, that maps the country codes received from the backend application to translated country names.
As the Java class Locale already contains both country codes and country names we can take advantage of this class and use it in a Scout local lookup call.
In package org.eclipse.scout.contacts.client.common create a new class CountryLookupCall according to the implementation provided in Listing 4.
public class CountryLookupCall extends LocalLookupCall<String> { (1)

  private static final long serialVersionUID = 1L;

  @Override
  protected List<LookupRow<String>> execCreateLookupRows() { (2)
    List<LookupRow<String>> rows = new ArrayList<>();

    for (String countryCode : Locale.getISOCountries()) {
      Locale country = new Locale("", countryCode);
      rows.add(new LookupRow<>(countryCode, country.getDisplayCountry())); (3)
    }

    return rows;
  }
}| 1 | Makes the CountryLookupCall to work with key type String |
| 2 | Defines the set of lookup rows to be used |
| 3 | Add a row with the country code as key and the country name as display value |
4.4.3. Creating the Person Page
In this section we create the Scout page that will be used to list all entered persons to the user of the "Contacts" application. Out-of-the box this page will support the sorting and filtering of all the persons. This "Persons" page is then added to the navigation tree below the "Contacts" outline.
We can now add the Scout person page as described below.
-
Select the newly created package
org.eclipse.scout.contacts.client.personin the Package Explorer -
Press Ctrl+N, enter "scout page" into the search field
-
Select the Scout Page wizard in the proposal box and click Next
-
Enter
PersonTablePageas the class name and click Finish as shown in Figure 34
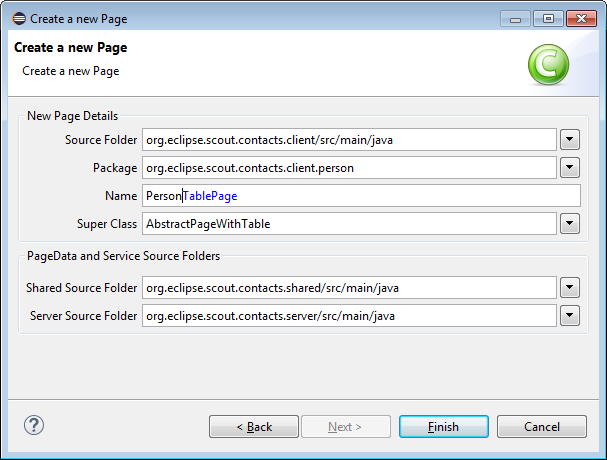
The Scout New Page Wizard then creates an initial implementation for the PersonTablePage class very similar to the listing provided in Listing 5 below.
@PageData(PersonTablePageData.class)
public class PersonTablePage extends AbstractPageWithTable<Table> {

  @Override
  protected String getConfiguredTitle() {
    return TEXTS.get("Persons"); (1)
  }

  @Override
  protected void execLoadData(SearchFilter filter) {
    importPageData(BEANS.get(IPersonService.class)
        .getPersonTableData(filter, getOrganizationId())); (2)
  }

  @Override (3)
  protected boolean getConfiguredLeaf() {
    return true;
  }

  public class Table extends AbstractTable {
    // container class to hold columns and other elements for this table page (4)
  }
}
Before we start to add the columns to the table of the page we need to do some minor adaptations to Listing 5.
| 1 | Specify the title "Persons" for the page using the Scout NLS tooling (see Section 3.6.1) |
| 2 | You don’t need to update method execLoadData to match this listing for now |
| 3 | Add method getConfiguredLeaf to specify that the person page will not have any child pages |
| 4 | We will add the columns in the next section of this tutorial |
We are now ready to populate the inner class Table of the person page with the columns to display various person attributes.
4.4.4. Adding Table Columns to the Page
Table pages are an important UI element of Scout applications as they frequently play a central role in the interactions of a user with the application. Out of the box table pages offer powerful options to sort, filter and re-arrange the data contained in the table. This functionality offers a good starting point to decide which columns to add to a table page.
To decide the columns to add the following criteria have been useful in practice.
-
Unique identifier of an element
-
Attributes that are most frequently used in searches
-
Category attributes that are useful for filtering
-
Fewer columns are better
| As the visible data of all users is held in the memory of the frontend server it is good practice to keep the number of columns as low as possible. Not taking this advice into account can substantially increase the memory footprint of the frontend server in production. |
For the person page of the "Contacts" application we will add the following columns.
-
PersonId: Hidden attribute of type string to hold the person key. Class name:
PersonIdColumn -
First Name: String column. Class name:
FirstNameColumn -
Last Name String column. Class name:
LastNameColumn -
City: String column. Class name:
CityColumn -
Country: Smart column. Class name:
CountryColumn -
Phone: String column, not visible per default. Class name:
PhoneColumn -
Mobile Phone: String column, not visible per default. Class name:
MobileColumn -
Email: String column, not visible per default. Class name:
EmailColumn -
Organization: String column, not visible per default. Class name:
OrganizationColumn
| Use the column class names as indicated above. Working with different names is possible but requires additional work later in the tutorial when the data retrieved from the database is mapped to these column class names. |
To add the first column PersonIdColumn we open class PersonTablePage in the Java editor and place the cursor inside of the body of the inner Table class.
We then open the Scout content assist with Ctrl+Space and select the Column proposal as shown in Figure 35.
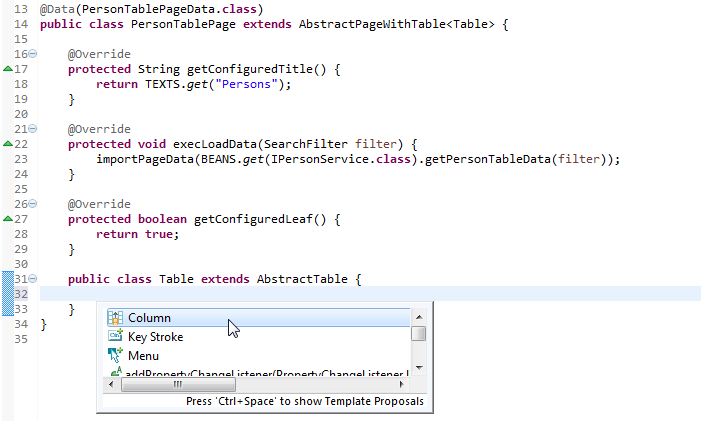
In the first edit box we type "PersonId" as shown in Figure 36 and press Enter.
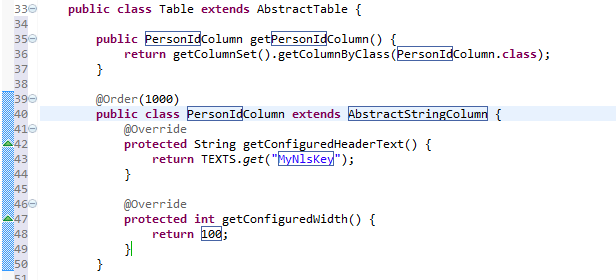
To configure this column as an invisible primary key we modify the newly created column class according to Listing 6.
    @Order(1)
    public class PersonIdColumn extends AbstractStringColumn {

      @Override (1)
      protected boolean getConfiguredDisplayable() {
        return false;
      }

      @Override (2)
      protected boolean getConfiguredPrimaryKey() {
        return true;
      }
}| 1 | Returning false here makes this column invisible. As this column will be excluded from the table control the user is not aware of the existence of this column. |
| 2 | Returning true marks this attibute as a primary key (or part of a primary key) |
We can now add the additional columns FirstNameColumn, LastNameColumn, CityColumn below.
After entering the class name press Tab twice to move the cursor to the label text of the field.
In the case of the first name enter "FirstName" and hit Ctrl+Space to open the wizard to add the translated text "First Name" as described in Section 3.6.1.
For these three columns the default implementation is fine and does not need any adaptations. Listing 7 below provides an example for this type of columns.
    @Order(2)
    public class FirstNameColumn extends AbstractStringColumn {

      @Override
      protected String getConfiguredHeaderText() {
        return TEXTS.get("FirstName");
      }

      @Override
      protected int getConfiguredWidth() {
        return 120;
      }
    }
For column CountryColumn we will use a smart column.
We again use Ctrl+Space to open the wizard and enter "Country" for the class name box and press Tab once and select AbstractSmartColumn as column type.
Next we press Tab again to enter "Country" as the translated text.
In the created class CountryColumn we need to update the class to extend AbstractSmartColumn<String> and add the method getConfiguredLookupCall according to Listing 8.
    @Order(5)
    public class CountryColumn extends AbstractSmartColumn<String> {

      @Override
      protected String getConfiguredHeaderText() {
        return TEXTS.get("Country");
      }

      @Override
      protected int getConfiguredWidth() {
        return 120;
      }

      @Override (1)
      protected Class<? extends ILookupCall<String>> getConfiguredLookupCall() {
        return CountryLookupCall.class;
      }
}| 1 | The configured lookup call is used to map country codes to the country names used in the user interface. |
After the country column we add the three columns PhoneColumn, MobileColumn, EmailColumn and OrganizationColumn that are initially not visible in the user interface.
As an example for such a column Listing 9 is provided below.
    @Order(6)
    public class PhoneColumn extends AbstractStringColumn {

      @Override
      protected String getConfiguredHeaderText() {
        return TEXTS.get("Phone");
      }

      @Override (1)
      protected boolean getConfiguredVisible() {
        return false;
      }

      @Override
      protected int getConfiguredWidth() {
        return 120;
      }
}| 1 | Returning false hides the column initially. Using the table control the user can then make this column visible in the user interface. |
Use the Eclipse content assist to efficiently add method getConfiguredVisible.
Place the cursor after method getConfiguredHeaderText, type "getConVis" and hit Ctrl+Space.
Then select the proposal getConfiguredVisible with Enter and the method is inserted for you.
|
We have now created a person page with corresponding table columns.
However, this new UI component is not yet visible in the user interface.
What is missing is the link from the application’s contacts outline class to the newly created PersonTablePage class.
This is what we will do in the following section.
4.4.5. Link the Person Page to the Contacts Outline
In this section we add the person page to the contacts outline created during the initial project setup of the first step of this tutorial. This will make the person page visible in the navigation area below the "Contacts" outline.
For this we have to add a single line of code to method execCreateChildPages of class ContactOutline according to Listing 10
  @Override
  protected void execCreateChildPages(List<IPage<?>> pageList) {
    // pages to be shown in the navigation area of this outline
    pageList.add(new PersonTablePage()); (1)
}| 1 | A new instance of the PersonTable is added to this outline. This makes the person page visible in the navigation area below the contacts outline. |
Before we can save the class ContactOutline we have to update its imports to include the import statement for class PersonTablePage.
To update the imports you can either user the menu or use the keyboard shortcut Ctrl+Shift+O.
The application is now in a state where we can restart the backend and the frontend server to verify our changes in the user interface.
4.4.6. Adding the Company Page
This section creates and adds a table page for organization to the "Contacts" outline. To create an organizations page the same steps are required as for the creation of the person page. The description is therefore kept on a higher level and in the text below only the main steps are described. Where appropriate, pointers are provided to the detailed descriptions for the creation of the person page.
-
Add client package
org.eclipse.scout.contacts.client.organization -
Add page
OrganizationTablePagewith title "Organizations" using the Scout new page wizard
@PageData(OrganizationTablePageData.class)
public class OrganizationTablePage extends AbstractPageWithTable<Table> {

  @Override
  protected String getConfiguredTitle() {
    return TEXTS.get("Organizations"); (1)
  }

  @Override
  protected void execLoadData(SearchFilter filter) {
    importPageData(BEANS.get(IOrganizationService.class).getOrganizationTableData(filter));
  }

  public class Table extends AbstractTable {
    // container class to hold columns and other elements for this table page
  }
}| 1 | Make sure to add a translated text entry for "Organizations" using the Scout NLS tooling |
The implementation of class OrganizationTablePage using the Scout new page wizard then looks as shown in Listing 11.
As in the case of the person page you can now add the columns for the inner Table class.
For the organization page add the columns according to the specification provided below.
-
OrganizationId: Hidden attribute of type string to hold the organization key. Class name:
OrganizationIdColumn -
Name: String column. Class name:
NameColumn -
City: String column. Class name:
CityColumn -
Country: Smart column. Class name:
CountryColumn -
Homepage: String column, not visible per default. Class name:
HomepageColumn
As in the case of the person page we have to add the newly created class OrganizationTablePage in method execCreateChildPages of the outline class ContactOutline as shown in Listing 12.
  @Override
  protected void execCreateChildPages(List<IPage<?>> pageList) {
    // pages to be shown in the navigation area of this outline
    pageList.add(new PersonTablePage()); (1)
    pageList.add(new OrganizationTablePage());
}| 1 | The pages will appear in the user interface according to the order in which they are added to the outline. |
4.4.7. What have we achieved?
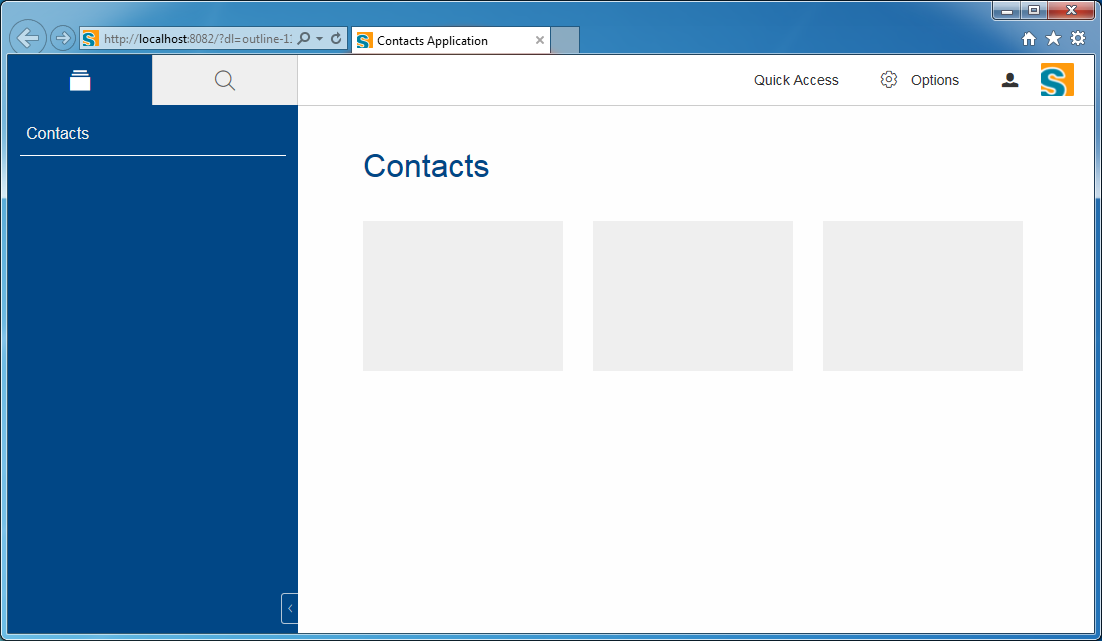
In the second step of the "Contacts" tutorial we have created a person page and an organization page to display data of persons and organizations.
The "Contacts" application is in a clean state again and you can (re)start the backend and the frontend of the application and verify the user interface in your browser. The user interface should look like the screenshot provided in Figure 37.

When comparing the state of the "Contacts" tutorial application with the Scout demo application in Figure 24 the main difference is the missing person data. Adding access to a database is the focus of the next tutorial step.
4.5. Creating and Accessing the Database
This tutorial step shows how Scout applications can interact with databases via JDBC. Due to the clean layering implemented in the "Contacts" application only the Scout backend server connects to the database. We therefore focus on the Scout backend in this part of the tutorial.
For the "Contacts" application we will work with a Derby database. The choice of Derby is based on the fact that no additional installation is required and it is possible to work with in-memory databases.
We start this tutorial step with copying the classes that handle the database creation/access from the full "Contacts" demo application as described in Section 4.5.1. The setup is then explained in the following sections.
-
Scout Config Properties (Section 4.5.2)
-
The SQL Service and SQL Statements (Section 4.5.3)
-
The Database Setup Service (Section 4.5.4)
With the basic infrastructure in place we review the existing "Contacts" backend to answer the question Section 4.5.5. In Section 4.5.6 we then add the missing pieces.
At the end of this tutorial step the "Contacts" backend server provides person and organization data to the frontend server as summarized in Section 4.5.7.
4.5.1. Adding the Infrastructure
This section describes the installation of the necessary components and classes that handle the database creation/access of the "Contacts" application.
To add the support for the Scout JDBC components and the Derby database we first need to declare the corresponding dependencies in the pom.xml file of the Maven server module. This can be done using the following steps.
-
Expanding the Maven module
contacts.serverin the Eclipse Package Explorer -
Open the
pom.xmlfile (use a double click on the file in the package explorer) and switch to the "pom.xml" tab in the Maven POM Editor. -
Add the database related dependencies according to Listing 13
<project xmlns="http://maven.apache.org/POM/4.0.0" xmlns:xsi="http://www.w3.org/2001/XMLSchema-instance" xsi:schemaLocation="http://maven.apache.org/POM/4.0.0 http://maven.apache.org/xsd/maven-4.0.0.xsd">
  <modelVersion>4.0.0</modelVersion>

  <parent>
    <groupId>org.eclipse.scout.contacts</groupId>
    <artifactId>org.eclipse.scout.contacts</artifactId>
    <version>8.0.0-SNAPSHOT</version>
    <relativePath>../org.eclipse.scout.contacts</relativePath>
  </parent>

  <artifactId>org.eclipse.scout.contacts.server</artifactId>

  <dependencies>
  <!-- database related dependencies --> (1)
    <dependency>
      <groupId>org.eclipse.scout.rt</groupId>
      <artifactId>org.eclipse.scout.rt.server.jdbc</artifactId>
    </dependency>
    <dependency>
      <groupId>org.apache.derby</groupId>
      <artifactId>derby</artifactId>
      <version>10.13.1.1</version>
    </dependency>
</dependencies>| 1 | Add the derby and the org.eclipse.scout.rt.server.jdbc dependencies to the pom.xml of your "Contacts" server module. |
After adding the database dependencies to the server’s pom.xml file we need to update all Maven server modules for the "Contacts" app.
To do this, select the three modules org.eclipse.scout.contacts.server.* and hit Alt+F5 as shown in Figure 38.
Start the update with OK.
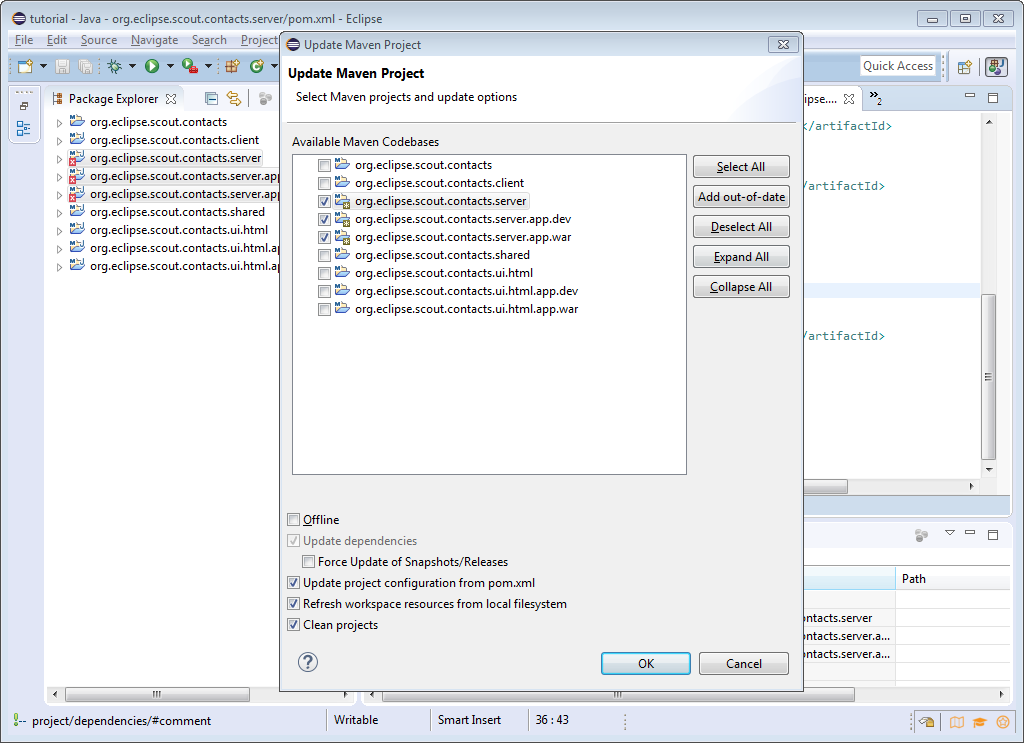
The next step is to create the org.eclipse.scout.contacts.server.sql package.
-
Expand folder
src/main/javaof Maven modulecontacts.server -
Select the existing package
org.eclipse.scout.contacts.serverand hit Ctrl+N -
This opens the dialog to select a wizard. Enter "package" into the search field
-
Select the New Java Package wizard with a double click on the Java Package proposal
-
Enter
org.eclipse.scout.contacts.server.sqlinto the Name field of the wizard and click Finish
We are now ready to copy the classes related to the database infrastructure from the "Contacts" demo application to our tutorial workspace.
The simplest way to do this is to open a second Eclipse IDE with the workspace where you have imported the Scout demo applications. If you have not done this yet go to the beginning of this tutorial Chapter 4 and catch up now.
In the demo application workspace navigate to the same package org.eclipse.scout.contacts.server.sql and copy over all its classes.
After copying these classes make sure that the structure of your server Maven module looks as shown in Figure 39.
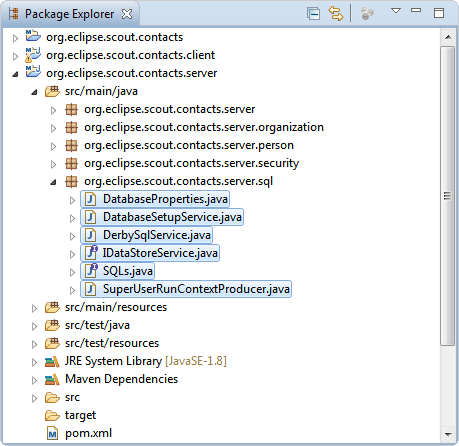
The imported classes are described in the following sections. Additional information is provided where these classes are relying on Scout concepts that have not previously been introduced.
4.5.2. Scout Config Properties
Scout Config properties can greatly improve the flexibility of Scout applications. For the "Contacts" application this feature is used to keep its database setup configurable. Moving from a in-memory setup to a disk based database is then possible without any reprogramming.
The Scout backend (and frontent) applications initialize config properties from matching values found in file config.properties.
For missing property values the default values defined in the config property classes are used.
In the case of the "Contacts" application the config property files are located in the subfolder src/main/resources of the Maven modules that specify the frontend and the backend application.
-
Expand Maven module
contacts.server.app.dev -
Expand subfolder
src/main/resources -
Open file
config.propertiesin the text editor -
Append all properties defined in Listing 14 to the file
### Database
contacts.database.jdbc.mappingName=jdbc:derby:memory:contacts-database
contacts.database.autocreate=true
contacts.database.autopopulate=true

### Application specific
contacts.superuser=system
These added property values then match the config properties defined in the class DatabaseProperties provided in Listing 15.
Remember that this is one of the database infrastructure classes we have copied before.
public class DatabaseProperties {

  public static class DatabaseAutoCreateProperty extends AbstractBooleanConfigProperty {
    // defines default value and key

    @Override
    public Boolean getDefaultValue() {
      return Boolean.TRUE; (1)
    }

    @Override
    public String getKey() {
      return "contacts.database.autocreate"; (2)
    }

    @Override
    public String description() {
      return "Specifies if the contacts database should automatically be created if it does not exist yet. The default value is true.";
    }
  }

  public static class DatabaseAutoPopulateProperty extends AbstractBooleanConfigProperty {
    // defines default value and key
  }

  public static class JdbcMappingNameProperty extends AbstractStringConfigProperty {
    // defines default value and key
  }

  public static class SuperUserSubjectProperty extends AbstractSubjectConfigProperty {
    // defines default value and key
  }
}| 1 | Defines the default value of the property that is used if the property is not defined in file config.properties |
| 2 | Defines the key to be used in file config.properties |
In the Scout framework config properties are always typed and need to implement interface IConfigProperty.
For commonly used types Scout already provides classes.
A boolean property may be created by extending Scout class AbstractBooleanConfigProperty.
Accessing the actual property values in the code is demonstrated in the next section.
4.5.3. The SQL Service and SQL Statements
Accessing databases with the Scout framework is implemented with SQL services that extend base class AbstractSqlService.
As the "Contacts" application will be working with a Derby database we also need a Derby specific SQL service.
This is why we have copied over class DerbySqlService.
The only project specific method is getConfiguredJdbcMappingName as implemented in Listing 16.
public class DerbySqlService extends AbstractDerbySqlService {

  @Override
  protected String getConfiguredJdbcMappingName() {
    String mappingName = CONFIG.getPropertyValue(JdbcMappingNameProperty.class);

    // add create attribute if we need to autocreate the db
    if (CONFIG.getPropertyValue(DatabaseAutoCreateProperty.class)) {
      return mappingName + ";create=true"; (1)
    }

    return mappingName;
  }
}| 1 | Check the Derby documentation for additional attributes. |
This listing also demonstrates how to use the config properties in the code. With the property values defined in the previous section the "Contacts" application is working with an in-memory database.
To change the setup to a disk based version, we would have to change the value for the property contacts.database.jdbc.mappingName
from jdbc:derby:memory:contacts-database to jdbc:derby:<path-to-dir>.
For a Windows box a concrete example could look like this: jdbc:derby:c:\\derby\\contacts-database.
Now we look at how the actual SQL statements of the "Contacts" application work. For our application all statements are collected into a single class. While there are many more options how to organize SQL and Java code this setup has its own advantages.
-
Efficient maintenance as all SQL statements are located in a single place
-
Code completion support in the Eclipse IDE when using the statements
-
The setup is easy to explain
The SQL statements related to the database structure are provided in Listing 17.
The statements (or building blocks of statements) in interface SQLs are plain SQL in many cases.
In the other cases the statement texts include Scout specific syntax extensions with : as a prefix character.
Examples are :<identifier> and :{<identifier>.<attribute>}.
public interface SQLs {

  String SELECT_TABLE_NAMES = ""
      + "SELECT   UPPER(tablename) "
      + "FROM     sys.systables "
      + "INTO     :result"; (1)

  String ORGANIZATION_CREATE_TABLE = ""
      + "CREATE   TABLE ORGANIZATION "
      + "         (organization_id VARCHAR(64) NOT NULL CONSTRAINT ORGANIZATION_PK PRIMARY KEY,"
      + "          name VARCHAR(64), "
      + "          logo_url VARCHAR(512), "
      + "          url VARCHAR(64), "
      + "          street VARCHAR(64), "
      + "          city VARCHAR(64), "
      + "          country VARCHAR(2), "
      + "          phone VARCHAR(20), "
      + "          email VARCHAR(64), "
      + "          notes VARCHAR(1024)"
      + "         )";

  String PERSON_CREATE_TABLE = ""
      + "CREATE   TABLE PERSON "
      + "         (person_id VARCHAR(64) NOT NULL CONSTRAINT PERSON_PK PRIMARY KEY, "
      + "          first_name VARCHAR(64), "
      + "          last_name VARCHAR(64), "
      + "          picture_url VARCHAR(512), "
      + "          date_of_birth DATE, "
      + "          gender VARCHAR(1), "
      + "          street VARCHAR(64), "
      + "          city VARCHAR(64), "
      + "          country VARCHAR(2), "
      + "          phone VARCHAR(20), "
      + "          mobile VARCHAR(20), "
      + "          email VARCHAR(64), "
      + "          organization_id VARCHAR(64), "
      + "          position VARCHAR(512), "
      + "          phone_work VARCHAR(20), "
      + "          email_work VARCHAR(64), "
      + "          notes VARCHAR(1024), "
      + "          CONSTRAINT ORGANIZATION_FK FOREIGN KEY (organization_id) REFERENCES ORGANIZATION (organization_id)"
      + "         )";
}| 1 | The syntax ':identifier' adds convenience and is supported by the Scout framework |
The next section discusses how the components introduced above are used by the "Contacts" appliction to create an initial "Contacts" database during the startup phase of the application.
4.5.4. The Database Setup Service
The database setup service is responsible to create the "Contacts" database during the startup of the application.
In order to implement such a service, a number of Scout concepts are combined into class DatabaseSetupService.
-
Access config properties using class
CONFIG -
Executing SQL statements via class
SQL -
Logging via class
LOG -
Scout platform with the annotations
@ApplicationScoped,@CreateImmediatelyand@PostConstruct
How these elements are used in class DatabaseSetupService is shown in Listing 18.
The actual creation of the "Contacts" database is performed by method autoCreateDatabase.
At the time of the database creation no user is yet logged into the application. This is why we use a run context associated with the super user. The context is then used to execute the runnable that creates the organization and person tables.
@ApplicationScoped
@CreateImmediately
public class DatabaseSetupService implements IDataStoreService {
  private static final Logger LOG = LoggerFactory.getLogger(DatabaseSetupService.class);

  @PostConstruct
  public void autoCreateDatabase() {
    if (CONFIG.getPropertyValue(DatabaseAutoCreateProperty.class)) {
      try {
        RunContext context = BEANS.get(SuperUserRunContextProducer.class).produce();
        IRunnable runnable = () -> {
          createOrganizationTable();
          createPersonTable();
        };

        context.run(runnable);
      }
      catch (RuntimeException e) {
        BEANS.get(ExceptionHandler.class).handle(e);
      }
    }
  }

  public void createOrganizationTable() {
    if (!getExistingTables().contains("ORGANIZATION")) {
      SQL.insert(SQLs.ORGANIZATION_CREATE_TABLE);
      LOG.info("Database table 'ORGANIZATION' created");

      if (CONFIG.getPropertyValue(DatabaseAutoPopulateProperty.class)) {
        SQL.insert(SQLs.ORGANIZATION_INSERT_SAMPLE + SQLs.ORGANIZATION_VALUES_01);
        SQL.insert(SQLs.ORGANIZATION_INSERT_SAMPLE + SQLs.ORGANIZATION_VALUES_02);
        LOG.info("Database table 'ORGANIZATION' populated with sample data");
      }
    }
  }

  public void createPersonTable() {
    if (!getExistingTables().contains("PERSON")) {
      SQL.insert(SQLs.PERSON_CREATE_TABLE);
      LOG.info("Database table 'PERSON' created");

      if (CONFIG.getPropertyValue(DatabaseAutoPopulateProperty.class)) {
        SQL.insert(SQLs.PERSON_INSERT_SAMPLE + SQLs.PERSON_VALUES_01);
        SQL.insert(SQLs.PERSON_INSERT_SAMPLE + SQLs.PERSON_VALUES_02);
        LOG.info("Database table 'PERSON' populated with sample data");
      }
    }
  }

  private Set<String> getExistingTables() {
    StringArrayHolder tables = new StringArrayHolder();
    SQL.selectInto(SQLs.SELECT_TABLE_NAMES, new NVPair("result", tables)); (1)
    return CollectionUtility.hashSet(tables.getValue());
  }
}| 1 | The existing tables are stored in the StringArrayHolder object named "result". |
The usage of CONFIG is already covered by the previous section.
Introductions for SQL, LOG and the Scout platform annotations are provided below.
- Logging
-
Scout uses the SLF4J framework for logging. For the actual implementation of the loggers Scout uses Logback per default. To use logging a local logger is first created using the SLF4J
LoggerFactoryclass. Additional information regarding the logging configuration is provided below. - Executing SQL Statements
-
For the execution of SQL statements Scout provides the convenience class
SQL. The various methods can be used with a simple SQL command as inSQL.insert(mySqlCommand)or using additional named objects as inSQL.insertInto(mySqlCommand, myHolder). The Scout classNVPairis frequently used to create such named objects. Make sure that the identifiers (using the Scout:syntax) provided in the SQL commands always match with the names associated with the named objects. - Scout Platform
-
The Scout platform provides the basic infrastructure and a number of services to a Scout application. Services are represented by Scout beans that are registered at startup with the platform and created once they are needed. For class
DatabaseSetupServicewe can use the Scout annotation@ApplicationScopedto register the service and to make sure that there will only be a single instance of this class. To force the creation of a beanDatabaseSetupServiceat startup time we also add Scout annotation@CreateImmediately. Finally, the annotation@PostConstructexecutes our methodautoCreateDatabaseas soon as theDatabaseSetupServicebean is created.
Changing the basic log level of an application is a frequently used scenario.
As Scout is using Logback per default we can adapt the log level in the logback.xml configuration files as shown in Listing 19.
For the "Contacts" application these configuration files are located in folder src/main/resources of the Maven modules that define the frontend and the backend applications.
More information regarding these configuration files is provided in the Logback manual.
<?xml version="1.0" encoding="UTF-8" standalone="yes"?>
<configuration>
  <root level="INFO"> (1)
    <appender-ref ref="STDOUT" />
    <appender-ref ref="STDERR" />
  </root>
</configuration>| 1 | The level attribute of the <root> element is used as the basic log level. Try "DEBUG" or "WARN" as alternative values. |
4.5.5. What is missing?
This section reviews the backend infrastructure that has been created so far and identifies the pieces that are missing to fetch person and organization data to send it to the frontend server of the "Contacts" application.
During the creation of the person page and the organization page the Scout wizards created more than just Scout pages that are visible in the user interface. It also added corresponding classes in the shared module and the server module of the "Contacts" application.
The new page wizard basically added the complete round trip from the client (frontend server) to the server (backend server) and back. Using the organization page as an example, the setup created by the page wizard involves the following classes.
-
Class
OrganizationTablePagewith methodexecLoadDatain the client module -
The service interface
IOrganizationServiceand classOrganizationTablePageDatain the shared module -
Class
OrganizationServicewith the method stubgetOrganizationTableDatain the server module
On the client side the server roundtrip is implemented in method execLoadData as shown in Listing 20.
  @Override
  protected void execLoadData(SearchFilter filter) {
    importPageData(BEANS.get(IOrganizationService.class).getOrganizationTableData(filter));
  }
This roundtrip between class OrganizationTablePage and OrganizationService works through the following steps.
-
BEANS.get(IOrganizationService.class)returns a reference to a client proxy service -
Method
getOrganizationTableData(filter)is executed on the corresponding server service -
This method returns the organization data in the form of an
OrganizationTablePageDataobject -
Method
importPageDatatransfers the data from the page data into the table of the user interface
On the server side fetching the data from the database will be implemented in class OrganizationService according to Listing 21.
public class OrganizationService implements IOrganizationService {

  @Override
  public OrganizationTablePageData getOrganizationTableData(SearchFilter filter) {
    OrganizationTablePageData pageData = new OrganizationTablePageData();
    return pageData;
  }
}
In the next section we will implement the database access logic in the getOrganizationTableData methods of the server classes OrganizationService and PersonService.
4.5.6. Fetching Organization and Person Data
We are now ready to fetch data from the Derby database using the available infrastructure and the SQL statements prepared in class SQLs.
For the implementation of method getOrganizationTableData in class OrganizationService we will use the two SQL snippet provided in Listing 22.
public interface SQLs {
  String ORGANIZATION_PAGE_SELECT = ""
      + "SELECT   organization_id, "
      + "         name, "
      + "         city, "
      + "         country, "
      + "         url "
      + "FROM     ORGANIZATION ";

  String ORGANIZATION_PAGE_DATA_SELECT_INTO = ""
      + "INTO     :{page.organizationId}, " (1)
      + "         :{page.name}, "
      + "         :{page.city}, "
      + "         :{page.country}, "
      + "         :{page.homepage}";
}| 1 | The syntax ':{identifier.attribute}' adds convenience to map SQL result sets to Scout page data objects. |
Taking advantage of the SQL convenience offered by the Scout framework, we can add the missing functionality with two lines of code.
See Listing 23 for the full listing of method getOrganizationTableData.
After adding the two additional lines, we update the imports of the classes with pressing Ctrl+Shift+O.
public class OrganizationService implements IOrganizationService {

  @Override
  public OrganizationTablePageData getOrganizationTableData(SearchFilter filter) {
    OrganizationTablePageData pageData = new OrganizationTablePageData();

    String sql = SQLs.ORGANIZATION_PAGE_SELECT + SQLs.ORGANIZATION_PAGE_DATA_SELECT_INTO; (1)
    SQL.selectInto(sql, new NVPair("page", pageData)); (2)

    return pageData;
  }
}| 1 | Added line 1: Assembling of the SQL statement |
| 2 | Added line 2: Fetching the data from the database and storing the result in pageData |
Note that the identifier "page" in the NVPair object will be mapped to the same identifier used in the ORGANIZATION_PAGE_DATA_SELECT_INTO statement.
Finally, we have to also implement the loading of the person data in class PersonService.
The implementation of method getPersonTableData is provided in Listing 24.
public class PersonService implements IPersonService {

  @Override
  public PersonTablePageData getPersonTableData(SearchFilter filter) {
    PersonTablePageData pageData = new PersonTablePageData();

    String sql = SQLs.PERSON_PAGE_SELECT + SQLs.PERSON_PAGE_DATA_SELECT_INTO;
      SQL.selectInto(sql, new NVPair("page", pageData));

      return pageData;
  }
}
4.5.7. What have we achieved?
In the third step of the "Contacts" tutorial we have added the infrastructure to work with a Derby database. The infrastructure is used to create and populate the initial database. In addition person and organization data is now fetched from the database on the "Contacts" backend server and handed to the "Contacts" frontend server via a page data object.
The "Contacts" application is in a clean state again and you can (re)start the backend and the frontend of the application and verify the result in your browser. Person and company data is now visible in the user interface as shown in Figure 40.
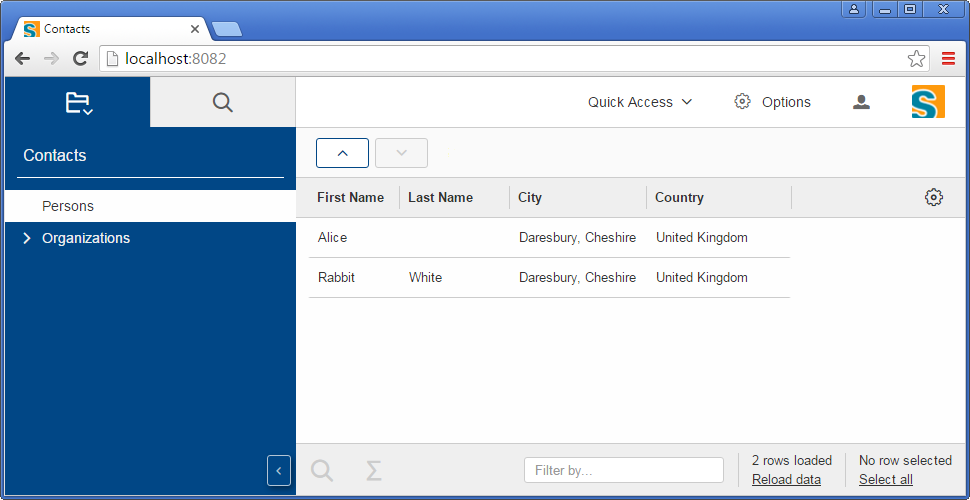
4.6. Adding a Form to Create/Edit Persons
In this tutorial step we add the Scout forms that are used to create and edit persons and organizations in the user interface. This tutorial step also provides an introduction into the design and implementation complex form layouts with the Scout framework.
Before we start with the actual implementation of the form Section 4.6.1 provides an introduction to the layouting concepts of the Scout framework. Based on this information we design a hierarchical form layout for the person form and can then dive into the creation of the person form.
-
Implementing the Form (Section 4.6.2)
-
Adding a Gender Code Type (Section 4.6.3)
-
Adding Form Fields (Section 4.6.4)
-
Person Form Handler and Person Service (Section 4.6.5)
The tutorial step concludes with a summary in Section 4.6.6.
4.6.1. Designing the Person Form
We start with the sketch of the form layout as shown in Figure 41.
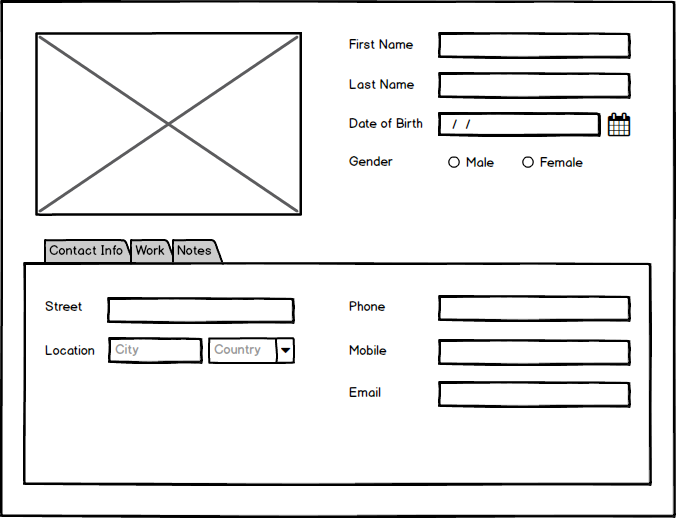
The upper half of the form shows a picture of the person and contains some primary attributes such as first name and the gender of the person.
The lower half of the form contains tab boxes. A "Contact Info" tab provides contact details of the person and adding notes for the person in the form of free text is possible in the "Notes" tab.
Figure 42 below shows how the sketched form can fit with the logical grid layout of the Scout framework. Scout containers have two columns (indicated in red) per default and as many rows (indicated in yellow) as needed.
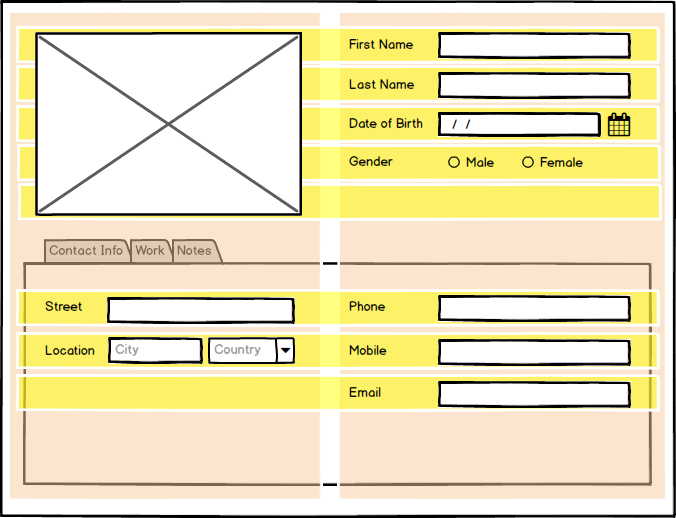
Individual form fields consist of a label part and a field part and occupy a single cell in the logical grid. Examples for fields using the default configuration are the first name field or the email field. When needed, fields can be configured to occupy several columns or rows. An example for this case is the image field that will hold the picture of the person. This field is configured to occupy 5 logical rows.
With Scout’s container widgets such as group boxes, tab boxes and sequence boxes complex layouts can be achieved. Containers provide a lot of flexibility as these widgets can be nested hierarchically as shown in Figure 43
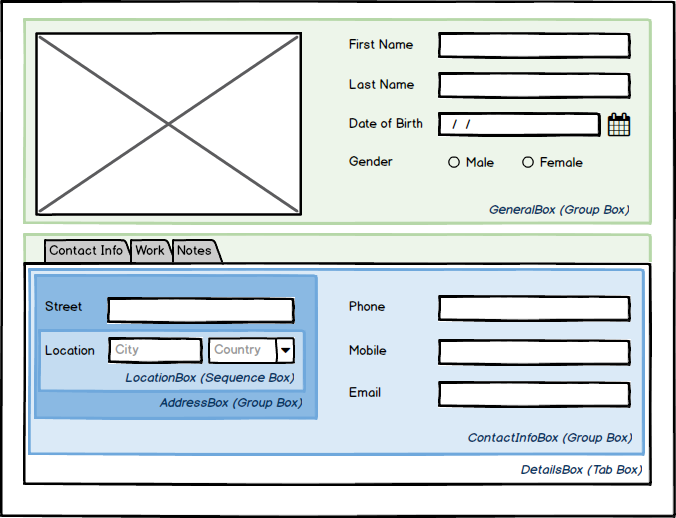
The sketch above details the organization of the container components to match the desired layout for the person form. The different container widgets can all be used with their default settings except for the address box.
For the address box we will have to modify its size and its inner organization. As group boxes occupy two columns per default we will need to reduce the width of the address box to a single column. The second change is to the inner layout of the address box. To force the location box to come below the street field we have to change the inner layout of the group box to a single column as well. Otherwise, the location box would be shown next to the street field.
In the next section we will start to implement the person form with the layout described above.
4.6.2. Implementing the Form
In this section we implement the person form with its container widgets as described in the previous section. To be able to use the form to create and edit persons we will add "New" and "Edit" context menus to the table in the person page. Finally we will also add a "Create Person" entry to the the "Quick Access" top level menu of the application.
Start the form creation with the Scout new form wizard following the steps listed below.
-
Expand the Maven module
contacts.clientin the Eclipse package explorer -
Select package
org.eclipse.scout.contacts.client.personin foldersrc/main/java -
Press Ctrl+N and enter "form" into the search field of the wizard selection dialog
-
Select the Scout Form proposal and click the Next button
-
Enter "Person" into the Name and verify that the field contents match Figure 44
-
Click Finish to start the creation of the form and its related components
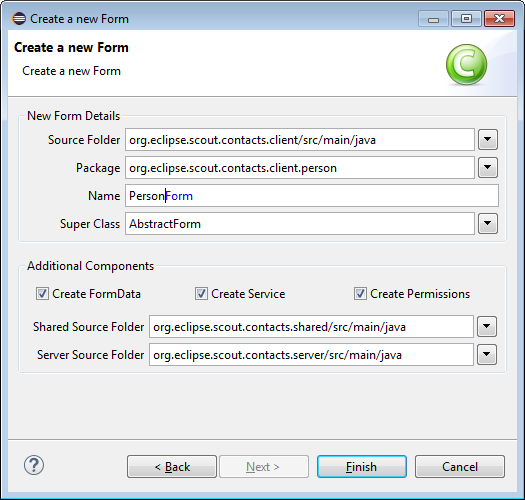
Now open the newly created class PersonForm in the Java editor and perform the changes listed below as shown in Listing 25.
-
Add property
personIdwith the corresponding getter and setter methods -
Add method
computeExclusiveKey -
Add method
getConfiguredDisplayHint -
Verify the translated text entry in method
getConfiguredTitle
@FormData(value = PersonFormData.class, sdkCommand = SdkCommand.CREATE) (1)
public class PersonForm extends AbstractForm {

  // represents the person's primary key
  private String personId;

  @FormData (2)
  public String getPersonId() {
    return personId;
  }

  @FormData (2)
  public void setPersonId(String personId) {
    this.personId = personId;
  }

  @Override
  public Object computeExclusiveKey() { (3)
    return getPersonId();
  }

  @Override
  protected int getConfiguredDisplayHint() { (4)
    return IForm.DISPLAY_HINT_VIEW;
  }

  @Override
  protected String getConfiguredTitle() {
    return TEXTS.get("Person");
  }
}| 1 | Links the form with its form data class PersonFormData. |
| 2 | The annotation @FormData on the getter and setter method define the personId as a property that will be included in the form data. |
| 3 | The object returned by this method is used by the framework to verify if a specific entity is already opened in some other form. |
| 4 | Configure this form to be opened in the view mode. Views are opened in the bench area of the user interface. |
We are now going to add the layout containers according to Listing 26.
First add class GeneralBox using the Scout content assist selecting the Group Box proposal.
Delete method getConfiguredLabel, as we are only using this group box to organize fields.
After the general box add a tab box container class by choosing the Tab Box proposal in the Scout content assist.
Inside of class DetailsBox create the individual tab containers "Contact Info", "Work" and "Notes" as inner classes of the details box according to Listing 26.
public class PersonForm extends AbstractForm {

  @Order(10)
  public class MainBox extends AbstractGroupBox { (1)

    @Order(10)
    public class GeneralBox extends AbstractGroupBox { (2)
    }

    @Order(20)
    public class DetailsBox extends AbstractTabBox { (3)

      @Order(10)
      public class ContactInfoBox extends AbstractGroupBox { (4)

        @Order(10)
        public class AddressBox extends AbstractGroupBox {
        }
      }

      @Order(20)
      public class WorkBox extends AbstractGroupBox {
      }

      @Order(30)
      public class NotesBox extends AbstractGroupBox {
      }
    }

    @Order(30)
    public class OkButton extends AbstractOkButton {
    }

    @Order(40)
    public class CancelButton extends AbstractCancelButton {
    }
  }
}| 1 | Every Scout form has a class MainBox. It contains all visible UI components. |
| 2 | The GeneralBox will hold the picture field, first name and last names, the date of birth and the gender. |
| 3 | The DetailsBox tab box will contain the various tabs implemented in inner group boxes. |
| 4 | The containers ContactInfoBox, WorkBox and Notes represent the three tabs of the tab box. |
To actually open the person form the form needs to be integrated in the user interface. In Scout application forms are typically opened by first selecting a specific row in a page and then using a context menu. For the "Contacts" application we will follow this pattern too.
Open class PersonTablePage in the Java editor and create the context menus "New" and "Edit" in the inner class Table according to Listing 27.
| 1 | This action gets executed when the user presses Enter on a table row or double clicks on a table row. |
| 2 | Transfer the primary key of the selected person row to the person form. |
| 3 | Including TableMenuType.EmptySpace in the return value activates the "New" menu even when no row is selected. |
In addition to the context menus defined for the person page we also add a "Create new person" menu on the desktop under the "Quick Access" top level menu.
To do this open class Desktop in the Java editor and navigate to the inner class QuickAccessMenu.
We can then add a NewPersonMenu using the Scout content assist and selecting the Menu proposal entry.
The final implementation for the "Create new person" menu is provided in Listing 28.
We have now created the initial implementation of the person form including context menus to open the form from the person page and the "Quick Access" top level menu of the "Contacts" application. At this point it is already possible to verify that the person form can be opened on the user interface via the context menus. A screenshot of the current state is shown in Figure 45.
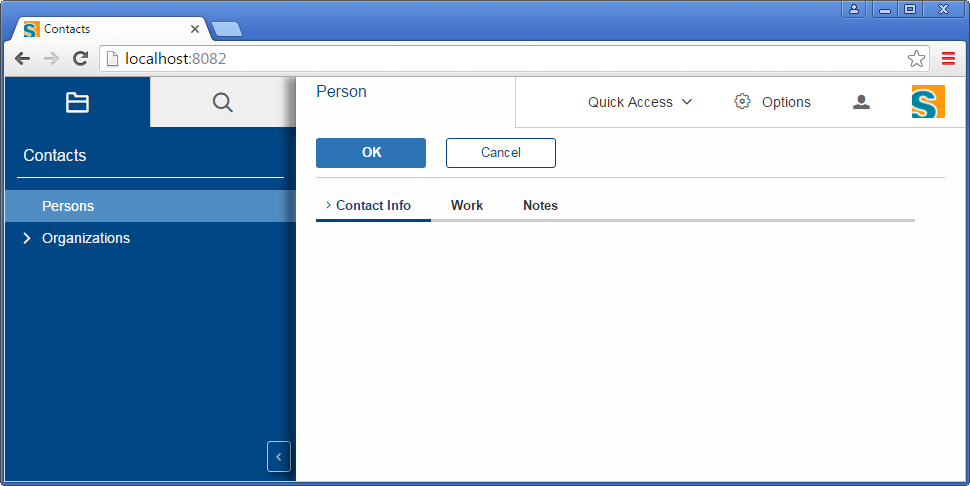
This initial implementation of the person form is also ready to add the individual form fields into the container boxes. For the fields of the person form we can directly extend the abstract form field classes offered by the Scout framework. Only for the implementation of the gender field we need a Scout code type that represents the possible values for the radio buttons.
4.6.3. Adding a Gender Code Type
In this section we will add a gender code type for the "Contacts" application. As code types can be used for the specification of the options of a radio button group, we will be able to implement the gender field by providing a reference to the code type. To keep things simple, the gender code type will contain a "Male" code and a "Female" code.
Code types are frequently used in both the frontend and the backend of an application. This implies that code type classes need to be implemented in the application’s shared module. As the gender code type is related to persons we will implement this class in the person package.
Follow the steps described below to create the gender code type.
-
Expand the Maven module
contacts.sharedin the Eclipse package explorer -
Select package
org.eclipse.scout.contacts.shared.personin foldersrc/main/java -
Press Ctrl+N and enter "code" into the search field of the wizard selection dialog
-
Select the Scout CodeType proposal and click the Next button
-
Enter "Gender" into the Name field and use the type
Stringfor the first and second type argument according to Figure 46
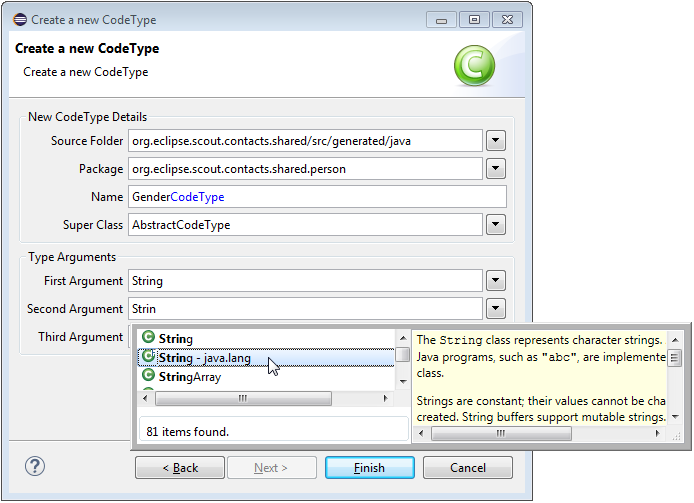
Now click button Finish to start the wizard.
Then, open the newly created class GenderCodeType in the Java editor and set the ID constant to "Gender".
The created class will then look like Listing 29 except for the missing inner code classes.
We will add these inner codes as the next step.
public class GenderCodeType extends AbstractCodeType<String, String> {

  private static final long serialVersionUID = 1L;
  public static final String ID = "Gender";

  @Override
  public String getId() {
    return ID;
  }

  @Order(1000)
  public static class MaleCode extends AbstractCode<String> {

    private static final long serialVersionUID = 1L;
    public static final String ID = "M";

    @Override
    protected String getConfiguredText() {
      return TEXTS.get("Male");
    }

    @Override
    public String getId() {
      return ID;
    }
  }

  @Order(2000)
  public static class FemaleCode extends AbstractCode<String> {

    private static final long serialVersionUID = 1L;
    public static final String ID = "F";

    @Override
    protected String getConfiguredText() {
      return TEXTS.get("Female");
    }

    @Override
    public String getId() {
      return ID;
    }
  }
}
To add an inner class MaleCode code to the gender code type perform the steps below.
-
Press Ctrl+Space and select the Code proposal with a double click
-
Enter "Male" into the first box to be used in the
MaleCodeclass name -
Tab to the value for the
IDconstant and set it to "M" -
Tab to the value in
TEXTS.getand add "Male" and its translated text -
Hit Enter to finish
Then repeat the steps above for the female code.
4.6.4. Adding Form Fields
In this section we will add the form fields to the layout containers of the person form. We will start with filling the general box with the picture field, followed by the other fields in the upper part of the person form. Finally, we fill the individual tab boxes into the details box in the lower part of the person form.
As the first field we add the field that will show the picture of the person to the GeneralBox container.
-
Open class
PersonFormin the Java editor -
Place the curson in the body of the inner class
GeneralBox. -
Copy the code provided in Listing 30 into the general box.
-
Add for each field a getter method above the MainBox (where all other getters are). Alternatively you could use the SDK to create both fields (including getters) and add the code from Listing 30.
-
Hit Ctrl+Shift+O and fix the necessary imports.
      @Order(10)
      public class PictureUrlField extends AbstractStringField {

        @Override (1)
        protected boolean getConfiguredVisible() {
          return false;
        }
      }

      @Order(20)
      public class PictureField extends AbstractImageField {

        @Override (2)
        protected Class<PictureUrlField> getConfiguredMasterField() {
          return PictureUrlField.class;
        }

        @Override (3)
        protected void execChangedMasterValue(Object newMasterValue) {
          updateImage((String) newMasterValue);
        }

        @Override
        protected boolean getConfiguredLabelVisible() {
          return false;
        }

        @Override
        protected int getConfiguredGridH() {
          return 5;
        }

        protected void updateImage(String url) {
          clearErrorStatus(); (4)

          if (url == null) {
            setImage(null);
          }
          else {
            try {
              setImage(IOUtility.readFromUrl(new URL((String) url)));
              setAutoFit(true);
            }
            catch (Exception e) { (5)
              String message = TEXTS.get("FailedToAccessImageFromUrl");
              addErrorStatus(new Status(message, IStatus.WARNING));
            }
          }
        }
}| 1 | Sets the field invisible. An invisible field does not need space in the user interface. |
| 2 | Declares PictureUrlField as the master field of the picture field. |
| 3 | This method will be called when the value of the master field has changed. |
| 4 | Clears any field error status. |
| 5 | Sets the field error status in case of an exception during the loading of the image. |
Using the combination of the PictureField and PictureUrlField as its master field has two benefits.
First, having a field that contains the the URL makes sure that this information is also stored in the form data and second, the method execChangedMasterValue can then be used to trigger the refresh of the actual picture when the picture URL is changed.
The remaining fields for the general box can then be added using the Scout content assist or by copying Listing 31 into the code below the picture field, again not forgetting the getters above the MainBox.
      @Order(30)
      public class FirstNameField extends AbstractStringField {

        @Override
        protected String getConfiguredLabel() {
          return TEXTS.get("FirstName");
        }
      }

      @Order(40)
      public class LastNameField extends AbstractStringField {

        @Override
        protected String getConfiguredLabel() {
          return TEXTS.get("LastName");
        }
      }

      @Order(50)
      public class DateOfBirthField extends AbstractDateField {

        @Override
        protected String getConfiguredLabel() {
          return TEXTS.get("DateOfBirth");
        }
      }

      @Order(60)
      public class GenderGroup extends AbstractRadioButtonGroup<String> {

        @Override
        protected String getConfiguredLabel() {
          return TEXTS.get("Gender");
        }

        @Override (1)
        protected Class<? extends ICodeType<?, String>> getConfiguredCodeType() {
          return GenderCodeType.class;
        }
}| 1 | The codes defined in GenderCodeType will be used to determine the actual radio buttons to add to the gender field. |
Whenever we add several fields to a Scout container field the individual fields will be displayed according to their order specified by the @Order annotation in the source code.
Using the default two column layout, the Scout layouting engine uses the first fields to fill up the first column before the remaining fields are assigned to the second column.
In general the Scout layouting engine tries to balance the number of fields over all available columns.
For the general box this rule has the effect that the picture field (this is the first field according to its order value) is assigned to the left column and all other fields are assigned to the right column.
After having added all the fields to the general box of the person form we can now fill the individual tabs of the DetailsBox container.
We start with adding the content to the tabs "Work" and "Notes" as described below.
Now add the string fields listed below to the "Work" tab as inner classes of the container field WorkBox.
Use the Scout content assist to add the fields and select String Field as the type of each field.
-
Class
PositionField, using label "Position" -
Class
OrganizationField, using label "Organization" -
Class
PhoneWorkField, using label "Phone" -
Class
EmailWorkField, using label "E-Mail"
The "Notes" tab represented by the container field NotesBox only contains a single string field.
This field will not need a label, span 4 rows of the logical grid and hold a multi line text according to Listing 32.
      @Order(30)
      public class NotesBox extends AbstractGroupBox {

        @Override
        protected String getConfiguredLabel() {
          return TEXTS.get("Notes");
        }

        @Order(10)
        public class NotesField extends AbstractStringField {

          @Override
          protected int getConfiguredGridH() {
            return 4;
          }

          @Override
          protected boolean getConfiguredLabelVisible() {
            return false;
          }

          @Override
          protected boolean getConfiguredMultilineText() {
            return true;
          }
        }
      }
    }
Next is the implementation of the address box in the "Contact Info" tab. The address box is realized as a single column group box that holds a street field, a city field and a country field. According to the form layout defined in Section 4.6.1 the city field and the country field will be located on the same logical row and in the same cell of the logical grid.
In the Scout default layout each form field uses up a single cell of the logical grid. Whenever we like to be more economical with the space occupied by several fields, we can work with a Scout sequence box. Inner fields of a sequence box will be arranged on a single row from left to right and the spacing between the inner fields will be minimal.
Taking advantage of these properties we implement the location box as a sequence field according to Listing 33. To further optimize screen real estate we also switch to on-field labels for the city field and the country field.
        @Order(10)
        public class AddressBox extends AbstractGroupBox {

          @Override
          protected boolean getConfiguredBorderVisible() {
            return false;
          }

          @Override
          protected int getConfiguredGridH() { (1)
            return 3;
          }

          @Override
          protected int getConfiguredGridW() { (1)
            return 1;
          }

          @Override
          protected int getConfiguredGridColumnCount() { (2)
            return 1;
          }
          @Order(10)
          public class StreetField extends AbstractStringField {

            @Override
            protected String getConfiguredLabel() {
              return TEXTS.get("Street");
            }
          }

          // use a sequence box for horizontal layout (3)
          @Order(20)
          public class LocationBox extends AbstractSequenceBox {

            @Override
            protected String getConfiguredLabel() {
              return TEXTS.get("Location");
            }

            @Override
            protected boolean getConfiguredAutoCheckFromTo() { (4)
              return false;
            }

            @Order(10)
            public class CityField extends AbstractStringField {

              @Override
              protected String getConfiguredLabel() {
                return TEXTS.get("City");
              }

              @Override
              protected byte getConfiguredLabelPosition() {
                return LABEL_POSITION_ON_FIELD; (5)
              }
            }

            @Order(20)
            public class CountryField extends AbstractSmartField<String> {

              @Override
              protected String getConfiguredLabel() {
                return TEXTS.get("Country");
              }

              @Override
              protected byte getConfiguredLabelPosition() {
                return LABEL_POSITION_ON_FIELD;
              }

              @Override
              protected Class<? extends ILookupCall<String>> getConfiguredLookupCall() {
                return CountryLookupCall.class;
              }
            }
          }
}| 1 | Makes the address box to occupy 1 column and 3 rows. |
| 2 | The content in the address box will use a single column layout. |
| 3 | Extending a Scout sequence box will place the inner fields of the LocationBox on a single row. |
| 4 | Disables the default check if the value of the first field in the sequence box is less than the value in the second field. |
| 5 | On field labels do not take any additional space and are shown in the field itself. |
While string fields are used for the street field and the city field, the country field is implemented as a smart field.
Scout smart fields can be viewed as a powerful drop down lists with search-as-you-type support.
In the case of the country field the smart field is backed by the lookup class CountryLookupCall that we already used for the country smart column in the person page.
After the address box the "Contact Info" box contains the three fields mentioned below. Use the Scout content assist to add the fields and select String Field as the type of each field.
-
Class
PhoneField, using label "Phone" -
Class
MobileField, using label "Mobile" -
Class
EmailField, using label "E-Mail"
We have now completed the implementation of the form layout and added all form fields of the person form. The application is now in a state where we can verify the layout of the person form and check the handling of the different input fields. (Re)start the application and enter some values into the various fields of the person form.
To view and enter person data with the form we have yet to add the interaction with the database in the backend of the "Contacts" application. This is the topic of the next section.
4.6.5. Person Form Handler and Person Service
This section shows how we can integrate the person form created in the previous sections with the "Contacts" backend application to load and store person data with the database.
Most of the necessary infrastructure such as the transfer objects between the frontend and the backend application has already been created by the Scout form wizard. In the text below we will first discuss the setup created by the new form wizard and then add the missing code snippets to interact with the database.
On the frontend side, the Scout new form wizard has also created the two form handler classes ModifyHandler and NewHandler.
By convention a ModifyHandler is used to change existing data and a NewHandler implements the creation of new data.
Form handler classes provide a number of callback methods that are invoked at various stages during the life cycle of the form.
The implementation created by the Scout wizard includes the methods execLoad and execStore for each form handler.
In these methods the form fetches data from the Scout backend application and/or sends new data to the backend server.
Adapt the default implementation of the form handlers according to Listing 34.
public class PersonForm extends AbstractForm {

  public class ModifyHandler extends AbstractFormHandler {

    @Override
    protected void execLoad() {
      IPersonService service = BEANS.get(IPersonService.class); (1)
      PersonFormData formData = new PersonFormData();
      exportFormData(formData); (2)
      formData = service.load(formData); (3)
      importFormData(formData); (4)

      getForm().setSubTitle(calculateSubTitle()); (5)
    }

    @Override
    protected void execStore() {
      IPersonService service = BEANS.get(IPersonService.class);
      PersonFormData formData = new PersonFormData();
      exportFormData(formData);
      service.store(formData); (6)
    }
  }

  public class NewHandler extends AbstractFormHandler {

    @Override
    protected void execStore() {
      IPersonService service = BEANS.get(IPersonService.class);
      PersonFormData formData = new PersonFormData();
      exportFormData(formData);
      formData = service.create(formData); (7)
      importFormData(formData);
    }
  }

  private String calculateSubTitle() {
    return StringUtility.join(" ", getFirstNameField().getValue(),
        getLastNameField().getValue());
  }
}| 1 | Obtains a reference to the person service located on the Scout backend application. |
| 2 | All form field values are transferred to the form data. In this case the person primary key property will be transferred to the form data. Remember that we have set this key in the "Edit" context menu. |
| 3 | The form data (including the person primary key) is sent to the load method. The load method returns the person data from the backend. |
| 4 | The field values in the form data are loaded into the form fields of the person form. |
| 5 | The sub title on the view tab of the form is updated to reflect the name of the person. |
| 6 | Calls the store method of the person service providing the updated person data. |
| 7 | Calls the create method of the person service providing the new person data. |
With the implementation provided in Listing 34 the classes ModifyHandler and NewHandler orchestrate the complete roundtrip between the frontend and the backend of the "Contacts" application.
The only part that is now missing is the implementation of the form service methods create, load and store on the backend of the "Contacts" application.
For these methods we can again rely on the default implementations created by the Scout new form wizard.
Modify the person service methods according to Listing 35.
public class PersonService implements IPersonService {

  @Override
  public PersonFormData create(PersonFormData formData) {
    if (!ACCESS.check(new CreatePersonPermission())) {
      throw new VetoException(TEXTS.get("InsufficientPrivileges"));
    }

    // add a unique person id if necessary
    if (StringUtility.isNullOrEmpty(formData.getPersonId())) {
      formData.setPersonId(UUID.randomUUID().toString());
    }

    SQL.insert(SQLs.PERSON_INSERT, formData); (1)

    return store(formData); (2)
  }

  @Override
  public PersonFormData load(PersonFormData formData) {
    if (!ACCESS.check(new ReadPersonPermission())) {
      throw new VetoException(TEXTS.get("InsufficientPrivileges"));
    }

    SQL.selectInto(SQLs.PERSON_SELECT, formData); (3)

    return formData;
  }

  @Override
  public PersonFormData store(PersonFormData formData) {
    if (!ACCESS.check(new UpdatePersonPermission())) {
      throw new VetoException(TEXTS.get("InsufficientPrivileges"));
    }

    SQL.update(SQLs.PERSON_UPDATE, formData); (4)

    return formData;
  }
}| 1 | The SQL insert statement adds a new person entry in the database. Only the primary key is used to create this entry. |
| 2 | To save all other person attributes provided in the form data, the store method is reused. |
| 3 | The SQL select into transfers the person data from the database into the form data. |
| 4 | The SQL update statement transfers all person attributes provided in the form data to the person table. |
4.6.6. What have we achieved?
In the fourth step of the "Contacts" tutorial we have added the person form to add, view and change persons. Using the person form as an example we have learned how to implement complex form layouts using the Scout layouting mechanism, Scout container fields and individual form field properties.
We have also seen how we can use context menus to integrate the forms in the user interface of the application and have implemented the interaction of the frontend with the backend application including the persistance of person data in the database.
The "Contacts" application is in a clean state again and you can (re)start the backend and the frontend of the application and verify the result in your browser. We can now verify the creation of new person entries and the modification of existing person data in the current state of the "Contacts" application. The created person form is shown in Figure 47.
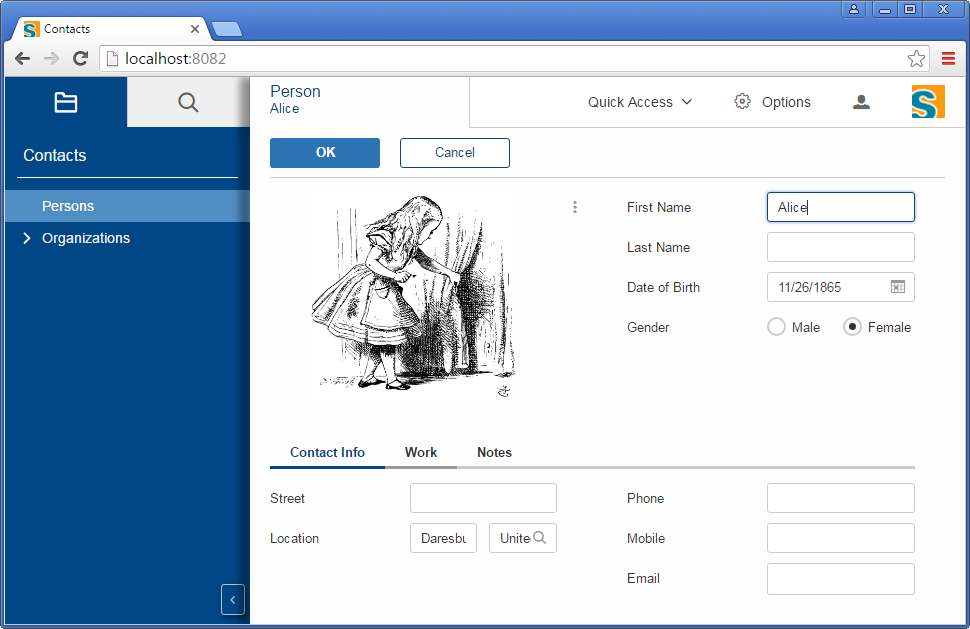
4.7. Form Field Validation and Template Fields
This tutorial step introduces two additional concepts that are used in most Scout applications. Form field validation and template fields. Form field validation helps to keep data quality high and template fields are used to increase the code quality of Scout application.
In addition to just retrieving and storing new data, a business application should also help the user to maintain the quality of the entered data. To validate user input, the Scout framework offers form field validation. Simple input validation is possible on the level of individual fields as shown in Section 4.7.1. Scout also offers mechanisms to validate field values on the level of container fields or on the level of a form as shown in Section 4.7.2. In the text below we add a number of form field validations that implement this approach for the person form.
In Section 4.7.3 we refactor the picture field code into a template field that can later be re-used for the organization form. To edit the image URL we add a simple edit form to the refactored picture field in Section 4.7.4.
In Section 4.7.5 we outline the creation of additional template fields and provide a summary of this tutorial step in Section 4.7.6.
4.7.1. Simple Form Field Validation
This section explains the form field validation on the level of a single field. As an example we will use the email address field defined in the "Contact Info" tab. The validation implemented in Listing 36 checks the length and the format of the entered email address.
        @Order(40)
        public class EmailField extends AbstractStringField {

          private static final String EMAIL_PATTERN = (1)
              "^[_A-Za-z0-9-\\+]+(\\.[_A-Za-z0-9-]+)*@" +
                  "[A-Za-z0-9-]+(\\.[A-Za-z0-9]+)*(\\.[A-Za-z]{2,})$";

          @Override
          protected String getConfiguredLabel() {
            return TEXTS.get("Email");
          }

          @Override (2)
          protected int getConfiguredMaxLength() {
            return 64;
          }

          @Override (3)
          protected String execValidateValue(String rawValue) {
            if (rawValue != null && !Pattern.matches(EMAIL_PATTERN, rawValue)) {
              throw new VetoException(TEXTS.get("BadEmailAddress")); (4)
            }

            return rawValue; (5)
          }
}| 1 | Email verification is performed against a simple regular expression. |
| 2 | This prevents the field from accepting more than 64 characters. The return value should match the size of the corresponding table column. |
| 3 | Method execValidateValue is called during validation of the new field value. |
| 4 | If the value violates any business rules, a VetoException should be thrown. |
| 5 | If the new value passes all business rules the method returns the value. |
In the next section we use the address box to demonstrate the joint validation of several fields.
4.7.2. Complex Form Field Validation
Often the values of several fields have to be considered jointly to evaluate if the entered data is actually valid.
As an example we will add a more complex form field validation on the level of the AddressBox group box widget that takes into account the data entered into the street, city, and country fields.
The implemented validation for the address box example should enforce the following set of business rules.
-
Only valid countries should be allowed
-
If a city is provided a country must also be provided
-
If street information is provided, both a city and a country must be provided
-
The address may be empty
The simplest rule is about entering only valid countries. This rule is already implemented as the country smart field only allows the user to select a single entry of the list of valid countries. A possible implementation to enforce the other rules is provided in Listing 37.
        @Order(10)
        public class AddressBox extends AbstractGroupBox {

          @Order(10)
          public class StreetField extends AbstractStringField {

            @Override (1)
            protected void execChangedValue() {
              validateAddressFields(); (2)
            }
          }

          @Order(20)
          public class LocationBox extends AbstractSequenceBox {

            @Order(10)
            public class CityField extends AbstractStringField {

              @Override
              protected void execChangedValue() {
                validateAddressFields(); (2)
              }
            }

            @Order(20)
            public class CountryField extends AbstractSmartField<String> {

              @Override
              protected void execChangedValue() {
                validateAddressFields(); (2)
              }
            }
          }

          protected void validateAddressFields() {
            boolean hasStreet = StringUtility.hasText(getStreetField().getValue());
            boolean hasCity = StringUtility.hasText(getCityField().getValue());

            getCityField().setMandatory(hasStreet); (3)
            getCountryField().setMandatory(hasStreet || hasCity);
          }
}| 1 | This method is called after the value of this field has been changed. |
| 2 | After changing the street, the city or the country recompute which address fields are mandatory. |
| 3 | The city becomes mandatory if the street field is not empty. The country is mandatory if the street or the city is not empty. |
Whenever the content of the street field, the city field, or the country field is changed the mechanism implemented above triggers a re-evaluation of the mandatory status of the city field and the country field. As the Scout default form validation ensures that every mandatory field receives some content the application prevents the user from entering address data that does not satisfy the business rules mentioned above.
The verification of user input can also be triggered before the form is closed.
This behavior can be implemented by overriding method execValidate on the form level.
As an example we use this mechanism to make sure that a user can only enter persons that have at least some name information.
Now add this validation to the person form using the implementation provided in Listing 38.
public class PersonForm extends AbstractForm {

  @Override (1)
  protected boolean execValidate() {
    boolean noFirstName = StringUtility.isNullOrEmpty(getFirstNameField().getValue());
    boolean noLastName = StringUtility.isNullOrEmpty(getLastNameField().getValue());

    getGeneralBox().clearErrorStatus(); (2)

    if (noFirstName && noLastName) {
      getGeneralBox().addErrorStatus(TEXTS.get("MissingName")); (3)
      getFirstNameField().requestFocus();

      throw new VetoException(TEXTS.get("MissingName")); (4)
    }

    return true; (5)
  }
}| 1 | This method is called during the form validation and before the form is stored/closed. |
| 2 | In case both the first name and the last name fields are empty add an error status to the parent container widget. |
| 3 | Place the focus on the first name field. |
| 4 | The return value indicates if the validation has passed successfully or not. |
As we have now implemented a number of form field validations we are now ready to test the result in the running application. Re-start the "Contacts" application and try to trigger the different validation rules. Figure 48 shows the response of the user interface when trying to save invalid person data.
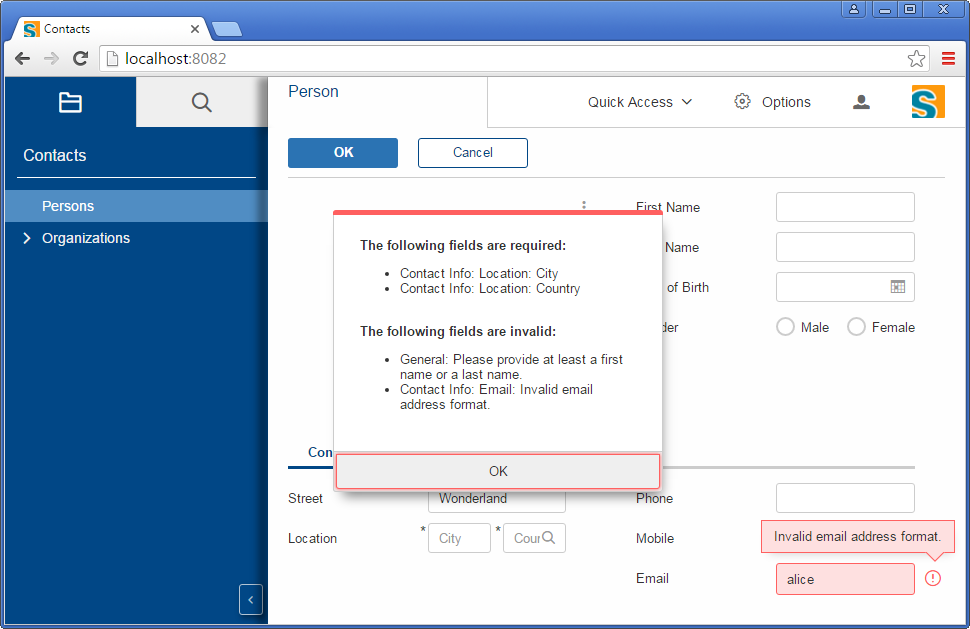
4.7.3. Creating Template Fields
In this section we show how to refactor a group of fields into a Scout template field that is ready for reuse. As an example we refactor the picture field into a template field. Later in tutorial step Section 4.8 we can then reuse this field in the company form to show the company’s logo.
The generic approach to refactor a form field into a template field is listed below.
-
Create an empty field data class in the shared module
-
Create the template field class in the client module
-
Copy the existing field code to the template field
-
Let the original field extend the new template field and fix imports
For refactoring the picture field we can exactly follow these steps. To create the empty field data class perform the following steps.
-
Expand the shared module of the "Contacts" application
-
Navigate into folder
src/generated/java -
Add a new package
org.eclipse.scout.contacts.shared.common -
Create class
AbstractUrlImageFieldDatain this package as shown in Listing 39
package org.eclipse.scout.contacts.shared.common;

public class AbstractUrlImageFieldData {
}
We are now ready to implement the template field class according to the following steps.
-
Navigate to the client module of the "Contacts" application
-
Select package
org.eclipse.scout.contacts.client.commonin foldersrc/main/java -
Create class
AbstractUrlImageFieldusing Ctrl+N -
Update the implementation according to Listing 40
-
Fix the imports using Ctrl+Shift+O
@FormData(value = AbstractUrlImageFieldData.class, (1)
    sdkCommand = SdkCommand.CREATE,
    defaultSubtypeSdkCommand = DefaultSubtypeSdkCommand.CREATE)
public class AbstractUrlImageField extends AbstractImageField {

  private String url; (2)

  @FormData (2)
  public String getUrl() {
    return url;
  }

  @FormData (2)
  public void setUrl(String url) {
    this.url = url;
    updateImage();
  }

  @Override
  protected boolean getConfiguredLabelVisible() {
    return false;
  }

  @Override
  protected int getConfiguredGridH() {
    return 5;
  }

  protected void updateImage() {
    clearErrorStatus();

    if (url == null) {
      setImage(null);
    }
    else {
      try {
        setImage(IOUtility.readFromUrl(new URL((String) url)));
        setAutoFit(true);
      }
      catch (Exception e) {
        addErrorStatus(new Status(TEXTS.get("FailedToAccessImageFromUrl"), IStatus.WARNING));
      }
    }

    getForm().touch();
  }
}| 1 | The link to the corresponding field data class. |
| 2 | Field PictureUrlField is refactored into the property url value. To transfer the content of this property to the field data object we need to add annotation @FormData to its getter and setter methods. |
The next step is to replace the original code of the picture field with the newly created template field.
As the functionality of the template field exactly matches with the original code, class PictureField only needs to extend the newly created template field as shown in Listing 41.
  @Order(10)
  public class MainBox extends AbstractGroupBox {

    @Order(10)
    public class GeneralBox extends AbstractGroupBox {

      @Order(10)
      public class PictureField extends AbstractUrlImageField { (1)
      }

      // additional form field

    }
}| 1 | The implementation of the picture field is now provided by the template field AbstractUrlImageField. |
As the last step we need to slightly modify the SQL statement that loads and stores the picture URL information. The reason for the change is the replacement of the picture url field by an url property defined as a member of the picture field. For this change perform the steps listed below.
-
Open class
SQLsin the Java editor. -
In string
PERSON_SELECTchange the token ':pictureUrl' with ':picture.url' -
In string
PERSON_UPDATEchange the token ':pictureUrl' with ':picture.url'
Based on the picture field example we have now walked through the complete process to turn normal fields into template fields. This process remains the same for refactoring container fields into template fields.
4.7.4. Adding a simple URL Input Form to the Picture Field
Using the refactored picture template field we want the user to be able to enter and update the URL of the shown picture. For this we add a simple form with a single field and a context menu to the picture template field using the Scout new form wizard as shown in Figure 49.
-
Verify that you use the correct source folder and package name.
-
In the Name field enter "PictureUrl".
-
In section Additional Components deselect all checkboxes.
-
Click Finish to let the wizard implement the form.

Now adapt the content of the URL form according to Listing 42. As you can see, there is no roundtrip to a backend server and the form only contains a single editable field.
public class PictureUrlForm extends AbstractForm {

  @Override
  protected String getConfiguredTitle() {
    return TEXTS.get("PictureURL");
  }

  public void startModify() {
    startInternal(new ModifyHandler());
  }

  public UrlField getUrlField() {
    return getFieldByClass(UrlField.class);
  }

  @Order(10)
  public class MainBox extends AbstractGroupBox {

    @Order(10)
    public class UrlBox extends AbstractGroupBox {

      @Order(10)
      public class UrlField extends AbstractStringField {

        @Override
        protected boolean getConfiguredLabelVisible() { (1)
          return false;
        }
      }
    }

    @Order(20)
    public class OkButton extends AbstractOkButton {
    }

    @Order(30)
    public class CancelButton extends AbstractCancelButton {
    }
  }

  public class ModifyHandler extends AbstractFormHandler { (2)
  }
}| 1 | No label is needed as the name of the field is already provided by the title of the form. |
| 2 | As no round trip to the backend is required the modify handler can remain empty. |
We can now add an "Edit URL" menu to the picture template field. The implementation of the edit context menu is provided in Listing 43.
| 1 | If we already have an URL for the picture prefill the url field in the form with its value. |
| 2 | Method waitFor makes the application wait until the user has closed the form. |
| 3 | Only store the new URL if the user has saved a new value. Storing the value will refresh the picture in the user interface. |
Based on the example with the picture field we have now walked through the complete process to turn normal fields into template fields. This process remains the same for refactoring container fields into template fields.
4.7.5. More Template Fields
To reduce the amount of copy & paste for the implementation of the company form in the next tutorial step, we recommend that you refactor the following fields into templates.
-
Email field
-
Address group box field
-
Notes group box field
You can follow the steps described in the previous section for the picture field. To be able to copy & paste the code in the following tutorial step you may use the following class names.
-
AbstractEmailFieldfor the email template field -
AbstractAddressBoxfor the address group template field -
AbstractNotesBoxfor the notes tab template field
Replacing the concrete fields with the template fields in the person form will result in a number of compile errors in the field getter methods of the person form. In the case of the "Contacts" application these getter methods are not needed and can simply be deleted.
Moving from concrete fields to template fields also implies some minor changes as we have seen with the picture template field.
Therefore make sure to modify the SQL statements in class SQLs accordingly.
-
Replace token ':street' by ':addressBox.street'
-
Replace token ':city' by ':addressBox.city'
-
Replace token ':country' by ':addressBox.country'
-
Replace token ':notes' by ':notesBox.notes'
4.7.6. What have we achieved?
In this step of the "Contacts" tutorial we have covered two important concepts for implementing business applications.
-
Validation of user input on the level of fields, components and the complete form
-
Creation and usage of template fields to minimize copy & paste where possible
The "Contacts" application is in a clean state again and you can (re)start the backend and the frontend of the application and verify the result in your browser. Using the created picture template field we can now update the image in the picture form as shown in Figure 50.

In the next tutorial step we are going to implement the company form to enter and edit company information. For the creation of this form we can then reuse the template fields that we have created.
4.8. Adding the Company Form
This section describes the implementation of the organization form. For the implementation of the organization form we can apply many of the concepts we have learned in the previous sections. As a result, the descriptions of this section can be kept on a much higher level.
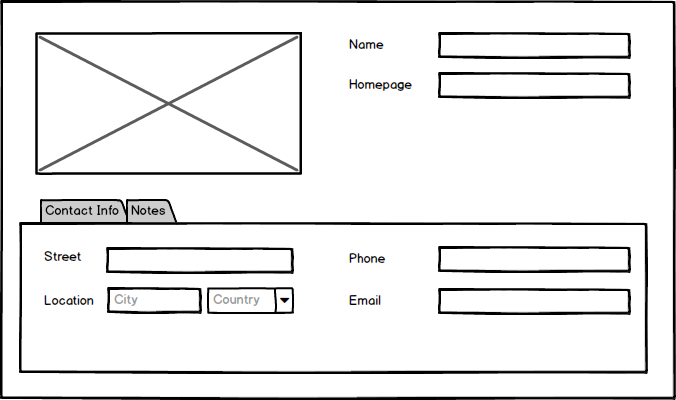
Considering the layout sketch for the organization form shown in Figure 51 we can already see how we can reuse the following fields / templates.
-
The picture field
-
The address box with street, city and country including its validation
-
The email field with its validation
-
The complete "Notes" tab
For the remaining fields "Name", "Homepage" and "Phone" we will use simple string fields with matching label texts.
We can now implement the company form according to the following steps.
-
Expand folder
src/main/javain the client module in the package explorer -
Select package
org.eclipse.scout.contacts.client.organizationand hit Ctrl+N -
Enter "form" into the search field of the wizard selection and double click on proposal Scout Form
-
Use "OrganizationForm" as class name and make sure to select all check boxes in the lower part of the wizard
-
Click Finish to start the Scout form wizard.
After creating the initial form class using Scout’s new form wizard the form layout can be implemented according to Listing 44.
public class OrganizationForm extends AbstractForm {

  private String organizationId;

  @FormData
  public String getOrganizationId() {
    return organizationId;
  }

  @FormData
  public void setOrganizationId(String organizationId) {
    this.organizationId = organizationId;
  }

  @Override
  public Object computeExclusiveKey() {
    return getOrganizationId();
  }

  @Override
  protected String getConfiguredTitle() {
    return TEXTS.get("Organization");
  }

  @Override
  protected int getConfiguredDisplayHint() {
    return IForm.DISPLAY_HINT_VIEW;
  }

  @Order(10)
  public class MainBox extends AbstractGroupBox {

    @Order(10)
    public class GeneralBox extends AbstractGroupBox {

      @Order(10)
      public class PictureField extends AbstractUrlImageField { (1)

        @Override
        protected int getConfiguredGridH() { (2)
          return 4;
        }

        @Override
        protected double getConfiguredGridWeightY() { (3)
          return 0;
        }
      }

      @Order(20)
      public class NameField extends AbstractStringField {

        @Override
        protected String getConfiguredLabel() {
          return TEXTS.get("Name");
        }

        @Override
        protected boolean getConfiguredMandatory() { (4)
          return true;
        }
      }

      @Order(30)
      public class HomepageField extends AbstractStringField {

        @Override
        protected String getConfiguredLabel() {
          return TEXTS.get("Homepage");
        }
      }
    }

    @Order(20)
    public class DetailsBox extends AbstractTabBox {

      @Order(10)
      public class ContactInfoBox extends AbstractGroupBox {

        @Override
        protected String getConfiguredLabel() {
          return TEXTS.get("ContactInfo");
        }

        @Order(10)
        public class AddressBox extends AbstractAddressBox { (5)
        }

        @Order(20)
        public class PhoneField extends AbstractStringField {

          @Override
          protected String getConfiguredLabel() {
            return TEXTS.get("Phone");
          }
        }

        @Order(30)
        public class EmailField extends AbstractEmailField { (6)
        }
      }

      @Order(20)
      public class NotesBox extends AbstractNotesBox { (7)
      }
    }

    @Order(30)
    public class OkButton extends AbstractOkButton {
    }

    @Order(40)
    public class CancelButton extends AbstractCancelButton {
    }
  }
}| 1 | We reuse the picture template field to display the company logo. |
| 2 | We reduce the number of rows for the company logo compared to the person picture. |
| 3 | We do not allow the general box to grow or shrink vertically |
| 4 | We configure the company name field to be mandatory for an organization. |
| 5 | As-is reuse of the address template box. |
| 6 | As-is reuse of the email template field. |
| 7 | As-is reuse of the notes tab box. |
To be able to open the organization form we need to link the form to the user interface. Following the pattern for the person form we define the context menus "Edit" and "New" for the organization table and a menu "Create new organization" under the "Quick access" top level menu.
The implementation of the organization form is completed by providing the logic to interact with the database in the organization service according to Listing 45. The technical setup exactly follows the implementation of the person service.
public class OrganizationService implements IOrganizationService {

  @Override
  public OrganizationFormData create(OrganizationFormData formData) {
    if (!ACCESS.check(new CreateOrganizationPermission())) {
      throw new VetoException(TEXTS.get("InsufficientPrivileges"));
    }

    if (StringUtility.isNullOrEmpty(formData.getOrganizationId())) {
      formData.setOrganizationId(UUID.randomUUID().toString());
    }

    SQL.insert(SQLs.ORGANIZATION_INSERT, formData);

    return store(formData);
  }

  @Override
  public OrganizationFormData load(OrganizationFormData formData) {
    if (!ACCESS.check(new ReadOrganizationPermission())) {
      throw new VetoException(TEXTS.get("InsufficientPrivileges"));
    }

    SQL.selectInto(SQLs.ORGANIZATION_SELECT, formData);

    return formData;
  }

  @Override
  public OrganizationFormData store(OrganizationFormData formData) {
    if (!ACCESS.check(new UpdateOrganizationPermission())) {
      throw new VetoException(TEXTS.get("InsufficientPrivileges"));
    }

    SQL.update(SQLs.ORGANIZATION_UPDATE, formData);

    return formData;
  }
}
Method prepareCreate is not needed for the creation of a new organization and we can remove it from OrganizationService and IOrganizationService.
Therefore, the implementation of the method execLoad in the new handler of the organization form can also be removed.
With these implementations of the organization form and organization service the "Contacts" application can now also be used to maintain a list of organizations.
4.8.1. What have we achieved?
In the sixth step of the "Contacts" tutorial we have added the Scout form to edit and create organizations. The focus of this part of the tutorial was on re-using previous work and applying the concepts that have been introduced in previous tutorial steps.
The "Contacts" application is in a clean state again and you can (re)start the backend and the frontend of the application and verify the result in your browser. As shown in Figure 52 company data can now be viewed and entered in the user interface.
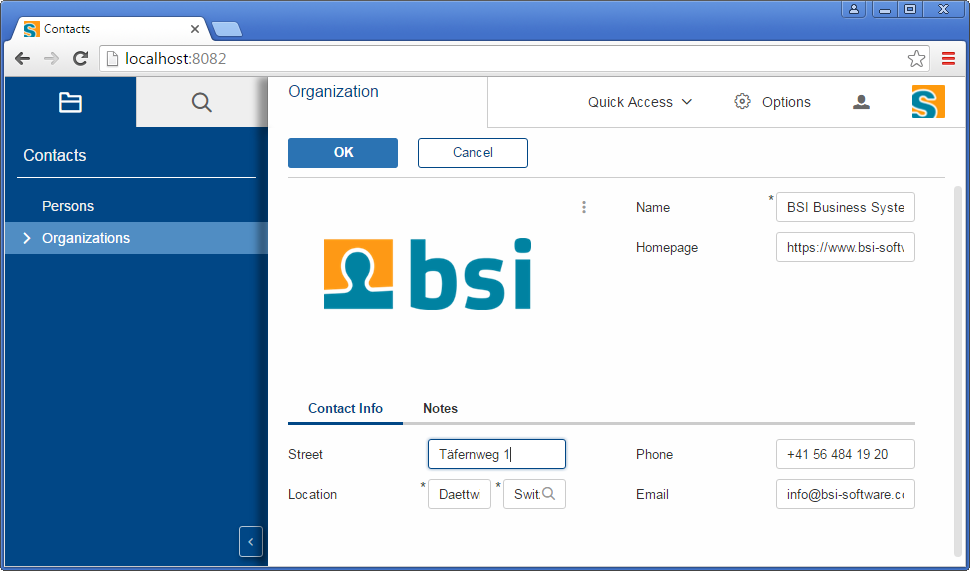
4.9. Linking Organizations and Persons
In this step we modify the user interface to represent the 1:n relationship between organizations and persons. For the implementation of this 1:n relation we follow the Scout standard pattern.
In the "Contacts" application any person can be assigned to a single organization.
This fact is represented in the database schema created using the statement SQLs.PERSON_CREATE_TABLE.
We will therefore need to be able to assign a person to an existing organization by selecting an existing organization in the field. For this we modify the organization field on the person to a smart field. To display the assigned organizations we will also modify the person page accordingly.
In addition we would like to be able to easily access all persons assigned to a specific organization. Using the existing organization page we will add a child page that will then show all associated persons. This will result in a drill-down functionality for the organization page.
The implementation of the features described above can be achieved by the the following steps.
-
Creating an Organization Lookup Call (Section 4.9.1)
-
Using the Lookup Call in the Person Form and the Person Table (Section 4.9.2)
-
Link the Person Page to Organizations (Section 4.9.3)
This last tutorial step ends with a short review in Section 4.9.4
4.9.1. Creating an Organization Lookup Call
Before we can change the organization field on the person form from a string field to a smart field we need a organization lookup call that provides the necessary data to the smartfield. We have been using this approach for the country field already. The difference to the lookup call for countries lies in the fact that we no longer have a static list of entries but need to fetch possible the organizations dynamically. We will therefore need to access the database to provide the data to the lookup call.
As this is a common requirement the Scout framework comes with the base class AbstractSqlLookupService and a default mechanism to route lookup calls from the frontend sever to database calls on the backend server.
The necessary infrastructure can be created using the Scout lookup wizard according to the steps described below.
-
Expand folder
src/main/javain the client module in the package explorer -
Select package
org.eclipse.scout.contacts.shared.organizationand hit Ctrl+N -
Enter "lookup" into the search field of the wizard selection and double click on proposal Scout LookupCall
-
Use "OrganizationLookupCall" as class name
-
Enter "String" as the key class and use service super class "AbstractSqlLookupService" in the wizard
-
Verify that the fields in the wizard match the values provided in Figure 53
-
Click Finish to start the Scout lookup call wizard.
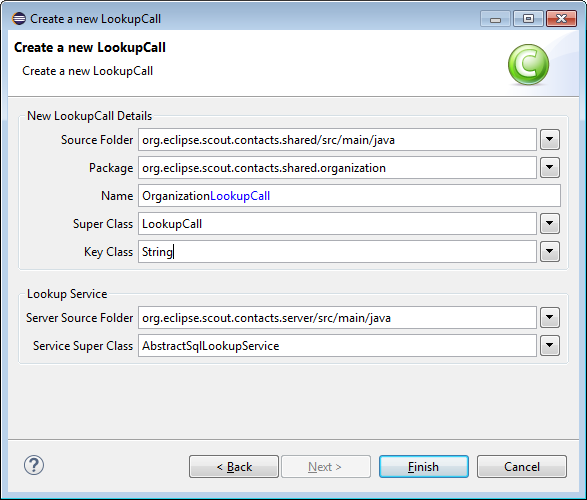
The Scout wizard will then create the lookup class OrganizationLookupCall and the corresponding lookup service with the interface IOrganizationLookupService and its initial implementation OrganizationLookupService.
We will only need to provide some implementation for the lookup service.
The service interface and the lookup call class can be used as provided by the Scout wizard.
Listing 46 shows the code generated for the lookup call
public class OrganizationLookupCall extends LookupCall<String> {

  private static final long serialVersionUID = 1L;

  @Override
  protected Class<? extends ILookupService<String>> getConfiguredService() {
    return IOrganizationLookupService.class;
  }
}
We are now ready to implement method getConfiguredSqlSelect of the organization lookup service.
Open class OrganizationLookupService in the Java editor and change the implementation according to Listing 47.
public class OrganizationLookupService
    extends AbstractSqlLookupService<String>
    implements IOrganizationLookupService {

  @Override
  protected String getConfiguredSqlSelect() {
    return SQLs.ORGANIZATION_LOOKUP; (1)
  }
}| 1 | We only need to return a single SQL statement for lookup services that extend AbstractSqlLookupService |
The SQL statement that backs the lookup service is provided in Listing 48. Lookup services can provide data for three different use cases. The most straightforward case is the mapping of a key to a specific lookup row. Next is the case where the lookup service returns a number of lookup rows that match a provided substring and finally the case where the lookup service simply returns all available rows.
  String ORGANIZATION_LOOKUP = ""
      + "SELECT   organization_id, "
      + "         name "
      + "FROM     ORGANIZATION "
      + "WHERE    1 = 1 "
      + "<key>    AND organization_id = :key</key> " (1)
      + "<text>   AND UPPER(name) LIKE UPPER(:text||'%') </text> " (2)
+ "<all></all>"; (3)| 1 | The where clause to be used for a search for a specific key |
| 2 | The where clause to be used when some search text is provided |
| 3 | The where clause that defines the full set of lookup rows |
4.9.2. Using the Lookup Call in the Person Form and the Person Table
Now we can use the organization lookup call to transform the organization field in the "Work" tab of the person form into a smart field.
To do this we open class PersonForm in the Java editor and navigate to its inner class WorkBox.
Then, update the implementation of the OrganizationField according to Listing 49
      @Order(20)
      public class WorkBox extends AbstractGroupBox {

        @Order(20)
        public class OrganizationField extends AbstractSmartField<String> { (1)

          @Override
          protected String getConfiguredLabel() {
            return TEXTS.get("Organization");
          }

          @Override (2)
          protected Class<? extends ILookupCall<String>> getConfiguredLookupCall() {
            return OrganizationLookupCall.class;
          }
        }
}| 1 | The OrganizationField now extends a Scout smart field |
| 2 | The smart field is backed by the newly created organization lookup call |
This change has the effect, that now we can assign an organization in the person form by typing a substring of the organizations name into the organization field. The conversion of the field into a smart field has the additional benefit that only valid organizations can be selected that respect the referential integrity defined by the database.
As a next step we also modify the organization column of the person page.
For this open class PersonTablePage in the Java editor and navigate to its inner class Table.
Then, change the implementation of OrganizationColumn according to Listing 50.
  public class Table extends AbstractTable {

    @Order(9)
    public class OrganizationColumn extends AbstractSmartColumn<String> {

      @Override
      protected String getConfiguredHeaderText() {
        return TEXTS.get("Organization");
      }

      @Override
      protected Class<? extends ILookupCall<String>> getConfiguredLookupCall() {
        return OrganizationLookupCall.class;
      }
    }
  }
Using the created organization lookup calls we have now completed the modifications on the person form and also used the lookup call to display the a person’s organization in the person page. The next section will focus on the necessary modifications and new components to re-use the person page as a sub page of the organization page.
4.9.3. Link the Person Page to Organizations
In this section we will implement a drill-down functionality on the organization page. The goal is to let the user of the application expand a row in the organization page to provide access to the persons of the organization.
Scout node pages are useful when we want to display different entities that are related to a specific entry in a parent page. In the "Contacts" demo application this mechanism is used to link both persons and events to an organization as shown in Figure 54. The coloring of the application has been modified to indicate that this is a screenshot of the "Contacts" demo application, not the tutorial application that we are building here.
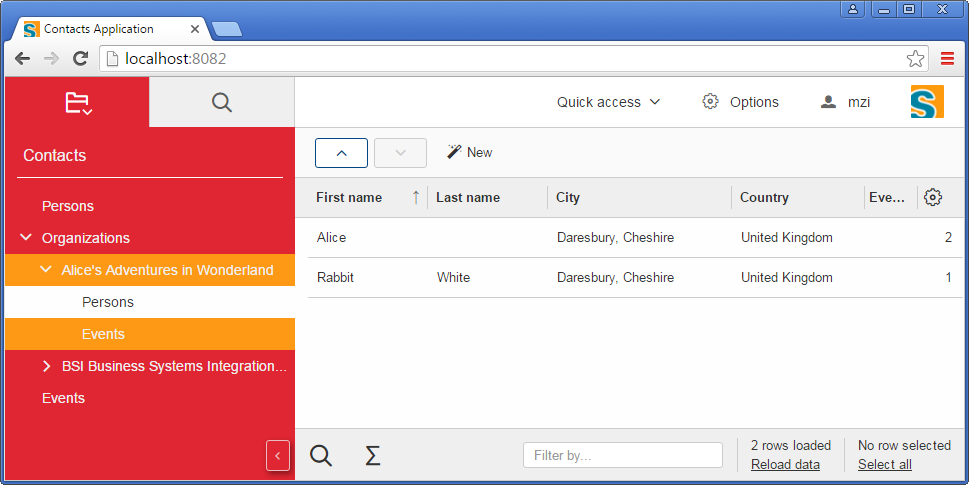
In the "Contacts" demo application this hierarchical page structure is implemented as follows.
-
Organization page implemented in class
OrganizationTablePage-
A node page implemented in class
OrganizationNodePage-
Person page implemented in class
OrganizationTablePage -
Event page implemented in class
EventTablePage
-
-
For the "Contacts" tutorial application we will create the exact same structure but only add the person page as child page to the organization node page.
To implement this sequence of linked pages we will follow the dependencies of the linked classes.
We start with adapting method getPersonTableData in the person service by adding an organization id parameter.
Using this parameter we can then restrict the person search to the subset that is linked to the specified organization.
For this change we first update the person service interface as shown in Listing 51.
getPersonTableData for the person service interface.@ApplicationScoped
@TunnelToServer
public interface IPersonService {
PersonTablePageData getPersonTableData(SearchFilter filter, String organizationId); (1)
PersonFormData create(PersonFormData formData);
PersonFormData load(PersonFormData formData);
PersonFormData store(PersonFormData formData);
}| 1 | Add parameter organizationId |
We now adapt the method implementation in the person service according to Listing 52.
public class PersonService implements IPersonService {

        @Override
        public PersonTablePageData getPersonTableData(SearchFilter filter, String organizationId) {
                PersonTablePageData pageData = new PersonTablePageData();
                StringBuilder sql = new StringBuilder(SQLs.PERSON_PAGE_SELECT);

                // if an organization is defined, restrict result set to persons that are linked to it
                if (StringUtility.hasText(organizationId)) {
                        sql.append(String.format("WHERE LOWER(organization_id) LIKE LOWER('%s') ",
                                        organizationId));
                }

                sql.append(SQLs.PERSON_PAGE_DATA_SELECT_INTO);
                SQL.selectInto(sql.toString(), new NVPair("page", pageData));

                return pageData;
        }
}
Having modified the person service we add a organization id property to the person page.
We can then populate this property when the person page is attached to the company node page.
Finally we can use in method execLoadData according to Listing 53.
@PageData(PersonTablePageData.class)
public class PersonTablePage extends AbstractPageWithTable<Table> {

  private String organizationId; (1)

  public String getOrganizationId() {
    return organizationId;
  }

  public void setOrganizationId(String organizationId) {
    this.organizationId = organizationId;
  }

  @Override
  protected void execLoadData(SearchFilter filter) {
    importPageData(BEANS.get(IPersonService.class)
        .getPersonTableData(filter, getOrganizationId())); (2)
  }

  public class Table extends AbstractTable {

    @Order(20)
    public class NewMenu extends AbstractMenu {

      @Override
      protected void execAction() {
        PersonForm form = new PersonForm();
        form.getOrganizationField().setValue(getOrganizationId()); (3)
        form.addFormListener(new PersonFormListener());
        // start the form using its new handler
        form.startNew();
      }
    }
  }
}| 1 | This property lets the person page remember an organization key |
| 2 | Provides the organization key to the person search on the backend server |
| 3 | If the user creates a new person below an organization pre-fill the corresponding field |
In the cases where the modified person page is shown as a child page of the organization page we can now improve the usability of the page’s new menu.
When creating a person under an existing organization we create the new person with a pre-filled organization id.
See the modified execAction method in NewMenu of Listing 53.
The next step in the setup of the page hierarchy is the creation of the organization node page. Node pages allow to define a list of child pages that typically represent different entities. As mentioned before we will only have the person page as a child page in the "Contacts" tutorial application.
To create the company node page follow the steps listed below.
-
Expand folder
src/main/javain the client module in the package explorer -
Select package
org.eclipse.scout.contacts.client.organizationand hit Ctrl+N -
Enter "scout page" into the search field of the wizard selection and double click on proposal Scout Page
-
Add "Organization" to the class name field
-
Switch the super class field to "AbstractPageWithNodes"
-
Verify that the fields in the wizard match the values provided in Figure 55
-
Click Finish to start the Scout page wizard
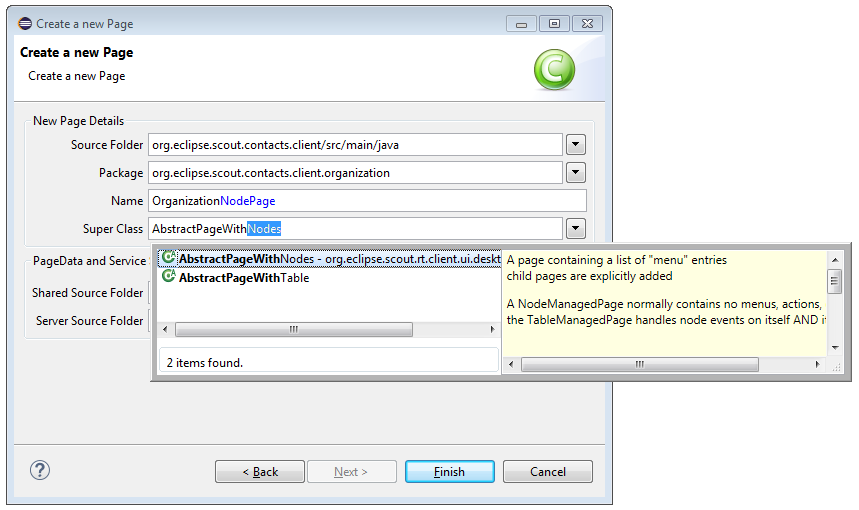
After the wizard has created the initial implementation of the node page open class OrganizationNodePage in the Java editor and adapt its implementation according to Listing 54.
OrganizationNodePage.public class OrganizationNodePage extends AbstractPageWithNodes {
private String organizationId; (1)
public String getOrganizationId() {
return organizationId;
}
public void setOrganizationId(String organizationId) {
this.organizationId = organizationId;
}
@Override (2)
protected void execCreateChildPages(List<IPage<?>> pageList) {
PersonTablePage personTablePage = new PersonTablePage();
personTablePage.setOrganizationId(getOrganizationId()); (3)
pageList.add(personTablePage);
}
}| 1 | The organization id property that represents the selected organization in the parent page |
| 2 | Method execCreateChildPages defines the list of child pages |
| 3 | Define the organization id property for the person child page |
We have now created an organization node page that contains a person page as its child page.
The only missing step to create the discussed page hierarchy is the link between the organization page with the organization node page.
Create this missing link by adding method execCreateChildPage to the organization page as shown in Listing 55.
@PageData(OrganizationTablePageData.class)
public class OrganizationTablePage extends AbstractPageWithTable<Table> {

  @Override
  protected IPage<?> execCreateChildPage(ITableRow row) {
    OrganizationNodePage childPage = new OrganizationNodePage();
    childPage.setOrganizationId(getTable().getOrganizationIdColumn().getValue(row));
    return childPage;
  }
}
The difference between Scout table pages and node pages is also reflected in the different signatures of AbstractPageWithTable.execCreateChildPage and AbstractPageWithNodes.execCreateChildPages.
Table pages can have a single child page while node pages may contain a list of child pages.
4.9.4. What have we achieved?
In the seventh step of the "Contacts" tutorial we have introduced a typical Scout user interface pattern for 1:n relationships. We have created a dynamic lookup call and used the lookup call to provide the data for a smart field and a smart column.
To implement a drill-down functionality for the organization table we have created a page hierarchy using the existing organization page and person page. To link the two table pages we have also created and integrated a Scout node page.
The "Contacts" application is in a clean state again and you can (re)start the backend and the frontend of the application and verify the result in your browser. As shown in Figure 56 the organization specific person data is now presented in a hierarchical form in the navigation area of the application.
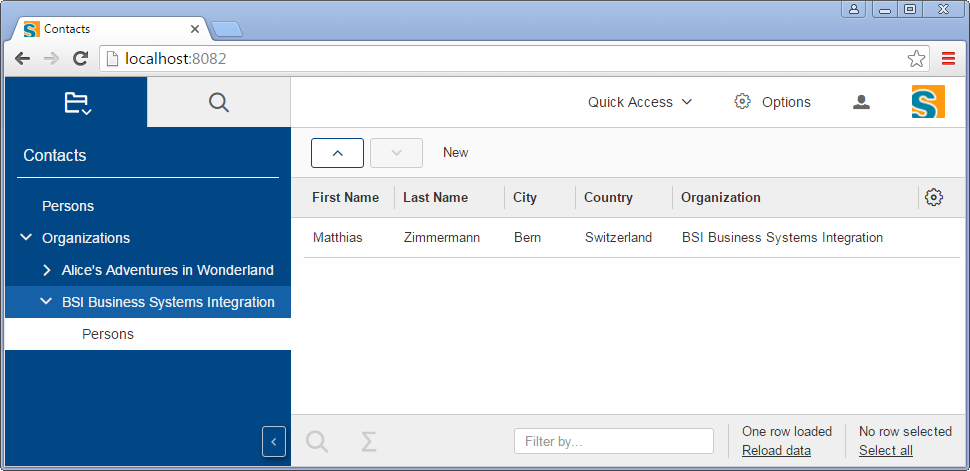
4.10. Additional Concepts and Features
This last part of the "Contacts" tutorial discusses the gap between the tutorial application and the complete "Contacts" demo application. In a number of aspects the full "Contacts" demo application comes with additional features and improvements over the functionality of its tutorial version.
The sections below highlight the following areas.
-
Theming and Styling (Section 4.10.1)
-
Modular Scout Applications (Section 4.10.2)
-
Infrastructure (Section 4.10.3)
4.10.1. Theming and Styling
-
theme switching form for top level options menu Figure 57
-
project specific theme "dark"
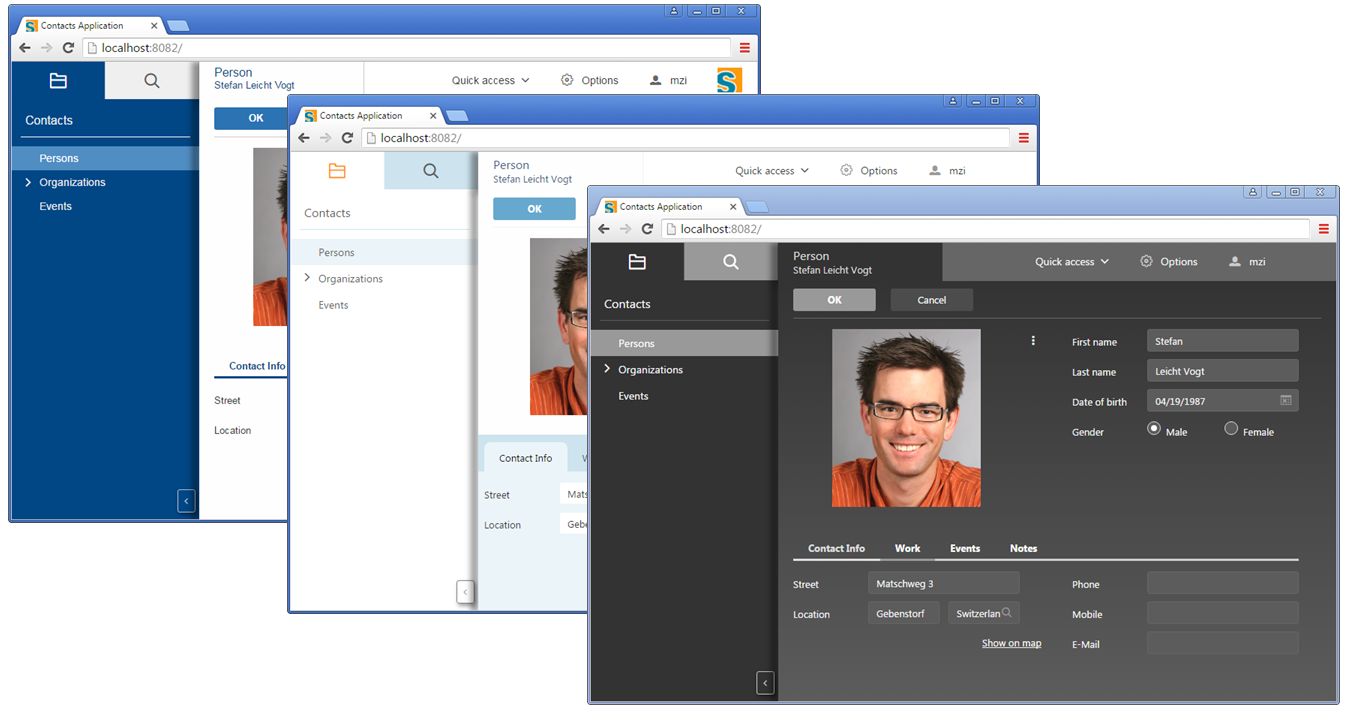
Appendix A: Licence and Copyright
This appendix first provides a summary of the Creative Commons (CC-BY) licence used for this book. The licence is followed by the complete list of the contributing individuals, and the full licence text.
A.1. Licence Summary
This work is licensed under the Creative Commons Attribution License. To view a copy of this license, visit https://creativecommons.org/licenses/by/3.0/ or send a letter to Creative Commons, 559 Nathan Abbott Way, Stanford, California 94305, USA.
A summary of the license is given below, followed by the full legal text.
You are free:
-
to Share ---to copy, distribute and transmit the work
-
to Remix---to adapt the work
-
to make commercial use of the work
Under the following conditions:
Attribution ---You must attribute the work in the manner specified by the author or licensor (but not in any way that suggests that they endorse you or your use of the work).
With the understanding that:
Waiver ---Any of the above conditions can be waived if you get permission from the copyright holder.
Public Domain ---Where the work or any of its elements is in the public domain under applicable law, that status is in no way affected by the license.
Other Rights ---In no way are any of the following rights affected by the license:
-
Your fair dealing or fair use rights, or other applicable copyright exceptions and limitations;
-
The author’s moral rights;
-
Rights other persons may have either in the work itself or in how the work is used, such as publicity or privacy rights.
Notice ---For any reuse or distribution, you must make clear to others the license terms of this work. The best way to do this is with a link to https://creativecommons.org/licenses/by/3.0/.
A.2. Contributing Individuals
Copyright (c) 2012-2014.
In the text below, all contributing individuals are listed in alphabetical order by name. For contributions in the form of GitHub pull requests, the name should match the one provided in the corresponding public profile.
Bresson Jeremie, Fihlon Marcus, Nick Matthias, Schroeder Alex, Zimmermann Matthias
A.3. Full Licence Text
The full licence text is available online at http://creativecommons.org/licenses/by/3.0/legalcode
Appendix B: Scout Installation
B.1. Overview
This chapter walks you through the installation of Eclipse Scout. The installation description (as well as the rest of this book) is written and tested for Eclipse Scout 8.0 which is delivered as integral part of the Eclipse Oxygen release train, 2017. Detailed information regarding the scheduling of this release train is provided in the Eclipse wiki.[5].
We assume that you have not installed any software relevant for the content of this book. This is why the Scout installation chapter starts with the installation of the Java Development Kit (JDK). Consequently, you will have to skip some of the sections depending on your existing setup.
In the text below, installation routines are described separately for Windows, Mac, and Linux.
B.2. Download and Install a JDK
The first step to install Scout is to have an existing and working installation of a JDK version 8. Please note that the Scout 8.0 Runtime does not support Java 9 yet. The Java 9 support is planned for Eclipse Photon release (Scout 8.0) in summer 2018.
Currently, we recommend to install the Oracle JDK 8 together with Scout. Although, using OpenJDK with Scout should work too. To successfully install the JDK you need to have at least local admin rights. You also need to know your hardware architecture in order to download the correct JDK installer.
For Windows, the steps necessary to determine your hardware architecture are described on Microsoft’s support site.[6]. For Linux several ways to determine if your os is running with 32 or with 64 bits can be found on the web.[7] For Mac this step is simple, as only a 64 bit package is provided on JDK the download page.
Once you know your hardware architecture, go to Oracle’s official download site.[8] and accept the licence agreement by clicking on the appropriate radio button. Then, select the Windows x64 package if you are running 64-bit Windows as shown in Figure 58. If you are running 32-bit Windows, go for the Windows x86 package. It is also recommended to download the Java SE 8 Documentation. The Java API documentation package is available from the official download site.[9], located further down under section Additional Resources.
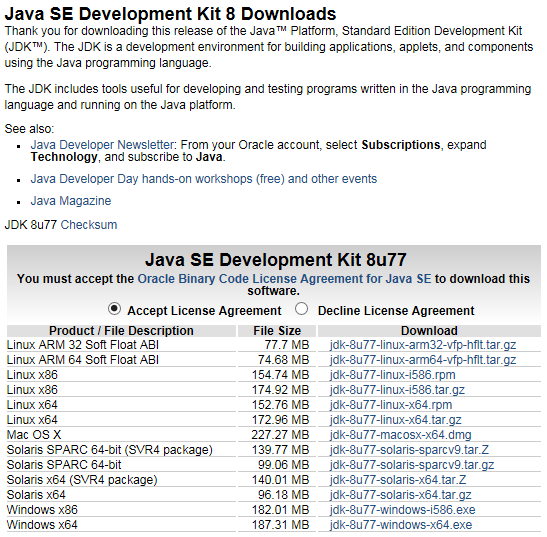
B.3. Download and Install Scout
Before you can install Scout make sure that you have a working Java Development Kit (JDK) installation version 8. To download the Eclipse Scout package visit the official Eclipse download page as shown in Figure 59.
If the download page shows the wrong platform, manually select the correct platform in the dropdown list. As shown in Figure 59, the Scout package is available as a 32 bit and a 64 bit package. Make sure to pick the package that matches your JDK installation. You can check your installation on the command line as follows.
console-prompt>java -version
java version "1.8.0_77"
Java(TM) SE Runtime Environment (build 1.8.0_77-b28)
Java HotSpot(TM) 64-Bit Server VM (build 25.77-b28, mixed mode)
If the output explicitly mentions the 64 bit installation as shown above, you have a 64 bit installation. Otherwise, you have a 32 bit JDK installed. Now you can select the correct Scout package from the Eclipse download site. After the package selection, confirm the suggested download mirror as shown in Figure 60.
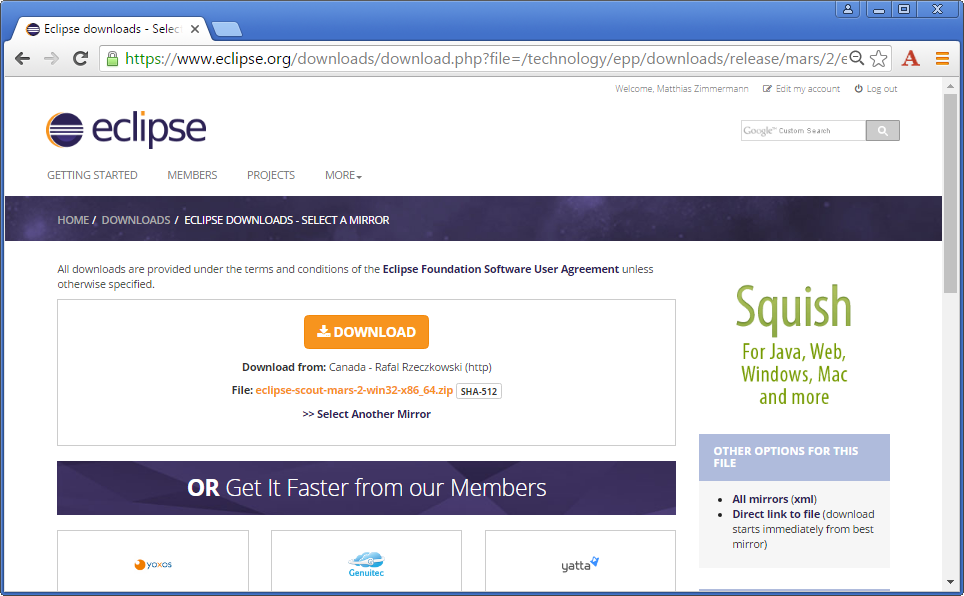
As the Scout package is a simple ZIP (or tar.gz) file, you may unpack its content to a folder of your choice.
Inside the eclipse sub-folder, you will then find the Eclipse executable file, such as the eclipse.exe file on a Windows plattform.
Starting the Eclipse executable brings up the workspace launcher as shown in Figure 61.
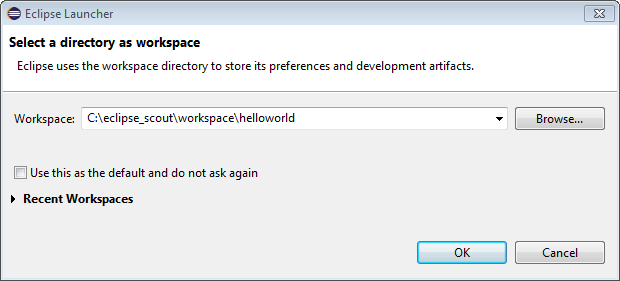
Into the Workspace field you enter an empty target directory for your first Scout project. After clicking the Ok button, the Eclipse IDE creates any directories that do not yet exist and opens the specified workspace. When opening a new workspace for the first time, Eclipse then displays the welcome screen shown in Figure 62.
To close the welcome page and open the Scout perspective in the Eclipse IDE click on the Workbench icon. As a result the empty Java perspective is displayed according to Figure 63.
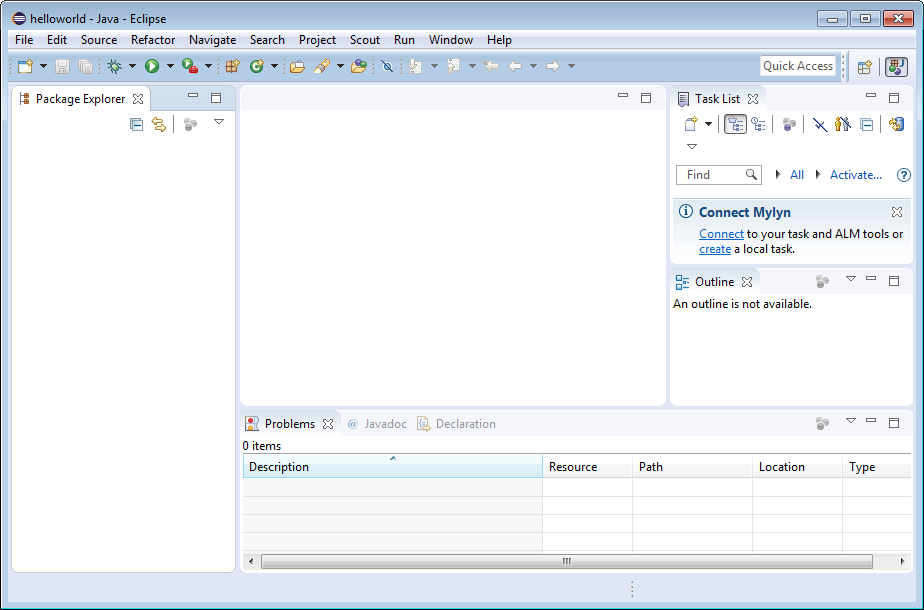
Congratulations, you just have successfully completed the Eclipse Scout installation!
If you have only installed a single JDK you will not need to change the default eclipse.ini file of your Eclipse installation.
In case you have installed multiple JDKs coming with their individual Java Runtime Environments (JREs), you might want to explicitly specifiy which JRE to use.
Open the file eclipse.ini in a editor of your choice and insert the following two lines at the top of the file:
-vm
C:\java\jdk1.8.0_77_x64\jre\bin\server\jvm.dll
where the second line specifies the exact path to the JRE to be used to start your Eclipse Scout installation.
If you have explicitly specified the JRE to be used you verify this in the running Eclipse installation. First, select the menu to open the about dialog. Then, click on the Installation Details button and switch to the Configuration tab. In the long list of system properties you will find lines similar to the ones shown below.
*** Date: Donnerstag, 19. Juni 2014 10:37:17 Normalzeit

*** Platform Details:

*** System properties:
...
-vm
C:\java\jdk1.8.0_77_x64\jre\bin\server\jvm.dll
...
sun.java.command=... vm C:\java\jdk1.8.0_77_x64\jre\bin\server\jvm.dll -vmargs ...
You have now successfully completed the Eclipse Scout installation on your Windows environment. With this running Scout installation you may skip the following section on how to add Scout to an existing Eclipse installation.
B.4. Add Scout to your Eclipse Installation
This section describes the installation of Scout into an existing Eclipse installation. As the audience of this section is assumed to be familiar with Eclipse, we do not describe how you got your Eclipse installation in the first place. For the provided screenshots we start from the popular package Eclipse IDE for Java EE Developers.
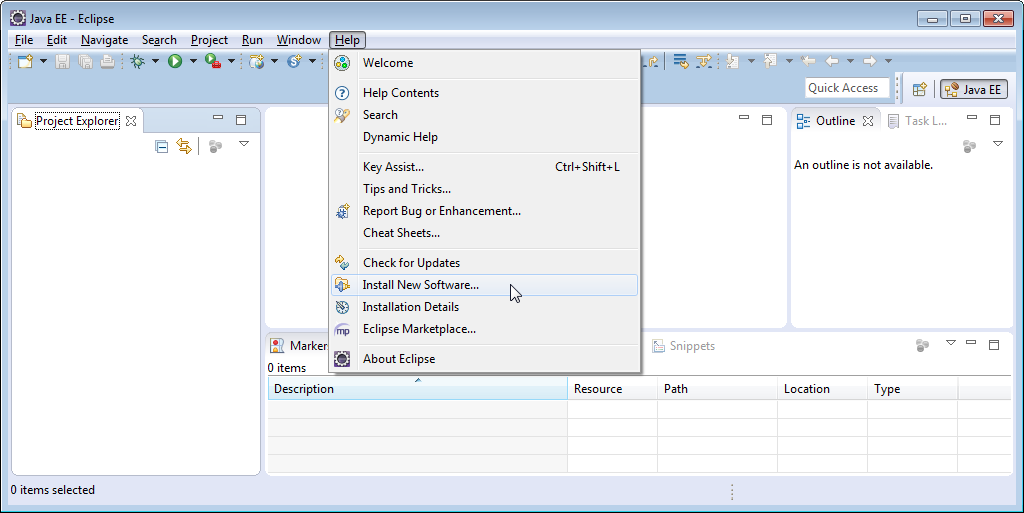
To add Scout to your existing Eclipse installation, you need to start Eclipse. Then select the menu as shown in Figure 64 to open the install dialog.
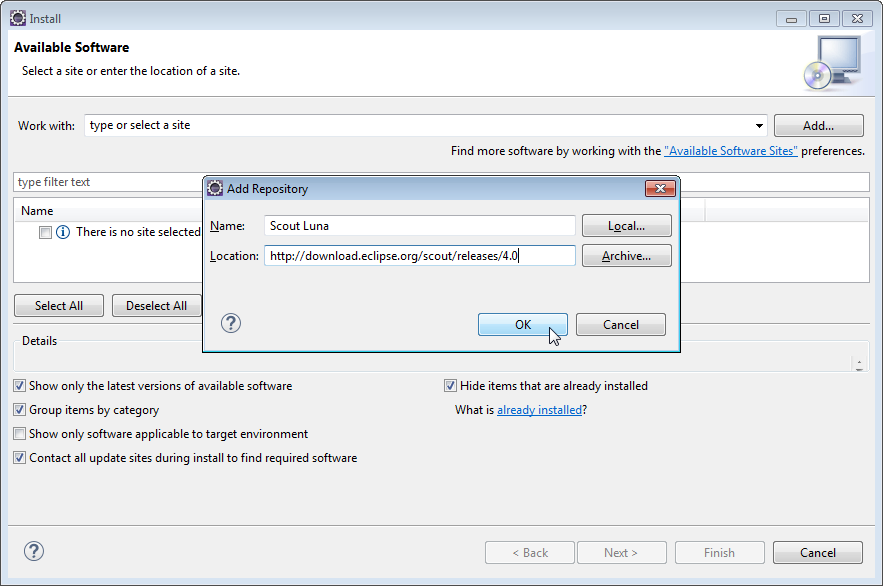
In the install dialog, click on the Add… button to enter the link to the Scout repository. This opens the popup dialog Add Repository As shown in Figure 65, you may use “Scout Oxygen” for the Name field. For the Location field enter the Scout release repository as specified below. http://download.eclipse.org/scout/releases/8.0.
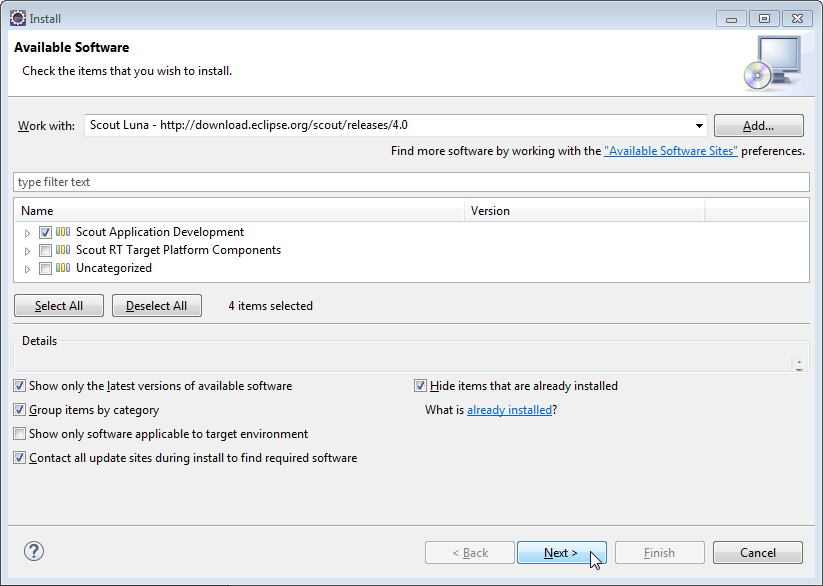
After the Eclipse IDE has connected to the Scout repository, select the Scout feature Scout Application Development as shown in Figure 66. Then, move through the installation with the Next button. On the last installation step, accept the presented EPL terms by clicking on the appropriate radio button. To complete the installation, click the Finish button and accept the request for a restart of Eclipse. After the restart of the Eclipse IDE, you may add the Scout perspective using the menu and selecting the Scout perspective from the presented list. Clicking on the Scout perspective button should then result in a state very similar to Figure 63.
B.5. Verifying the Installation
After you can start your Eclipse Scout package you need to verify that Scout is working as intended. The simplest way to verify your Scout installation is to create a “Hello World” Scout project and run the corresponding Scout application as described in Chapter 2.
Appendix C: Apache Tomcat Installation
Apache Tomcat is an open source web server that is a widely used implementation of the Java Servlet Specification. Specifically, Tomcat works very well to run Scout applications. In case you are interested in getting some general context around Tomcat you could start with the Wikipedia article.[14]. Then get introduced to its core component “Tomcat Catalina”.[15] before you switch to the official Tomcat homepage.[16].
This section is not really a step by step download and installation guide. Rather, it points you to the proper places for downloading and installing Tomcat. We recommend to work with Tomcat version 9.0. Start your download from the official download site.[17].
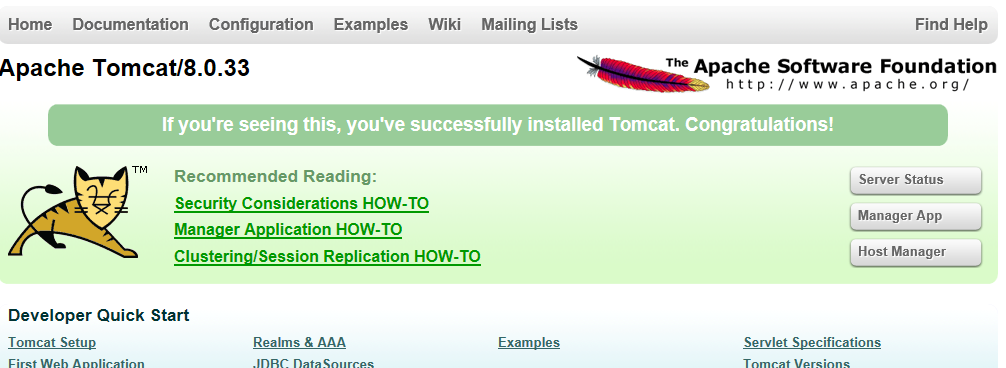
Once you have downloaded and installed Tomcat 9 (see the sections below for plattform specific guidelines) you can start the corresponding service or deamon. To verify that Tomcat is actually running open a web browser of your choice and type http://localhost:8080 into the address bar. You should then see a confirmation of the successful installation according to Figure 67.
C.1. Platform Specific Instructions
According to the Tomcat setup installation for Windows.[18] download the package “32-bit/64-bit Windows Service Installer” from the Tomcat 9 download site. Then, start the installer and accept the proposed default settings.
For installing Tomcat on OS X systems download the “tar.gz” package from the Tomcat 9 download site. Then, follow the installation guide.[19] provided by Wolf Paulus.
For Linux systems download the “tar.gz” package from the Tomcat 9 download site. Then, follow the description of the Unix setup.[20] to run Tomcat as a deamon. If you use Ubuntu, you may want to follow the tutorial.[21] for downloading and installing Tomcat provided by Lars Vogel.
C.2. Directories and Files
Tomcat’s installation directory follows the same organisation on all platforms. Here, we will only introduce the most important aspects of the Tomcat installation for the purpose of this book.
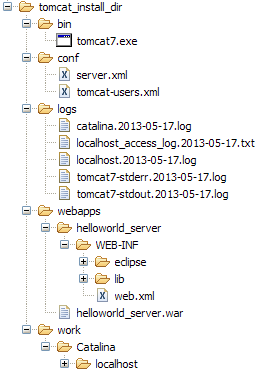
webapps.Note that some folders and many files of a Tomcat installation are not represented in Figure 68. We just want to provide a basic understanding of the most important parts to operate the web server in the context of this book. In the bin folder, the executable programs are contained, including scripts to start and stop the Tomcat instance.
The conf folder contains a set of XML and property configuration files. The file server.xml represents Tomcat’s main configuration file. It is used to configure general web server aspects such as the port number of its connectors for the client server communication. For the default setup, port number 8080 is used for the communication between clients applications and the web server. The file tomcat-users.xml contains a database of users, passwords and associated roles.
Folder logs contains various logfiles of Tomcat itself as well as host and web application log files. TODO [7.0] jbr: need to provide more on what is where (especially application logs and exact setup to generate log entries from scout apps).
The folder needed for deploying web applications into a Tomcat instance is called webapps. It can be used as the target for copying WAR files into the web server. The installation of the WAR file then extracts its content into the corresponding directory structure as shown in Figure 68 in the case of the file helloworld_server.war.
Finally, folder work contains Tomcat’s runtime “cache” for the deployed web applications. It is organized according to the hierarchy of the engine (Catalina), the host (localhost), and the web application (helloworld_server).
C.3. The Tomcat Manager Application
Tomcat comes with the pre installed “Manager App”. This application is useful to manage web applications and perform tasks such as deploying a web application from a WAR file, or starting and stopping installed web applications. A comprehensive documentation for the “Manager App” can be found under the Tomcat homepage.[22]. Here we only show how to start this application from the hompage of a running Tomcat installation.
To access this application you can switch to the “Manager App” with a click on the corresponding button on the right hand side. The button can be found on the right hand side of Figure 67. Before you are allowed to start this application, you need to provide username and password credentials of a user associated with Tomcats’s manager-gui role.
  <tomcat-users>
    <!--
    NOTE: By default, no user is included in the "manager-gui" role required
    to operate the "/manager/html" web application. If you wish to use it
    you must define such a user - the username and password are arbitrary.
    -->
    <user name="admin" password="s3cret" roles="manager-gui"/>
  </tomcat-users>
To get at user names and passwords you can open file tomcat-users.xml located in Tomcat’s conf directory. In this file the active users with their passwords and associated roles are stored. See Listing Listing 56 for an example. From the content of this file, we see that user admin has password s3cret and also posesses the necessary role manager-gui to access the “Manager App”. If file tomcat-users.xml does not contain any user with this role, you can simply add new user with this role to the existing users. Alternatively, you also can add the necessary role to an existing user. Just append a comma to the existing right(s) followed by the string manager-gui. Note that you will need to restart your Tomcat application after adapting the content of file tomcat-users.xml.
With working credentials you can now start the “Manager App” as described the “Hello World” tutorial in Section 2.5.
| Do you want to improve this document? Have a look at the sources on GitHub. |