| Looking for something else? Visit https://eclipsescout.github.io for all Scout related documentation. |
This chapter presents the Scout SDK plugins available for the Eclipse IDE. The Scout SDK provides wizards to create new project and application components, adds code assistance to the Java Editor and comes with a NLS editor to manage all translated text entries of the application.
The chapter is organized as follows. Motivation for the Tooling describes the goals and benefits of the tooling included. Because the Scout Tooling is based on the Eclipse IDE, Eclipse IDE tooling provides a short overview of frequently used Eclipse features. A high level description of the Scout tooling is provided in Scout SDK Overview. Scout Wizards, Scout Content Assistance and Scout NLS Tooling then provide detailed descriptions of the functionality offered by the Scout SDK.
Motivation for the Tooling
Thanks to this tooling, developing Scout applications is made simpler, more productive and also more robust. Initially, a solid understanding of the Java language is sufficient to start developing Scout applications and only a rough understanding of the underlying Maven/JEE technologies is required.
The Scout SDK also helps developers to become more productive. Many repetitive and error prone tasks run automatically in the background or are taken care of by the component wizards of the Scout SDK.
The application code created by the Scout SDK wizards helps to ensure that the resulting Scout application has a consistent and robust code base and is well aligned with the application model defined by the Scout runtime framework.
Eclipse IDE tooling
The Scout tooling is an extension of the Eclipse IDE. The goal of this section is not to provide a complete overview on the features contained in the Eclipse IDE. It provides a short overview of the important eclipse features, frequently used during the development of a Scout Application. Experienced Eclipse IDE users might skip this section.
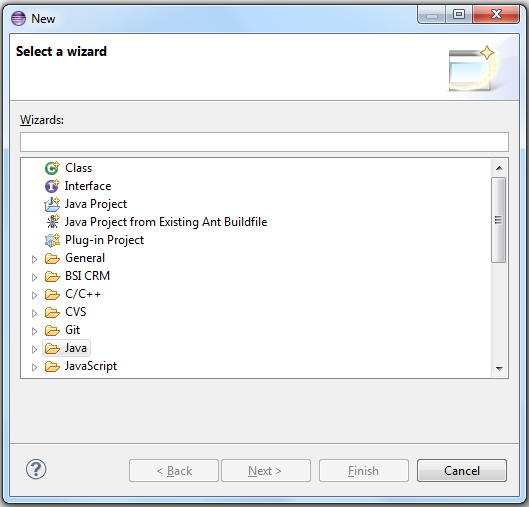
Start the New Wizard
To start the New Wizard wizard press Ctrl+N or use menu . In the first wizard step type the name of the object you want to create into the Wizards field as shown in Figure 1.
Create a new Java class
Start the New Wizard and type Class in the Wizards field. Select Class Click on Next to open the New class wizard
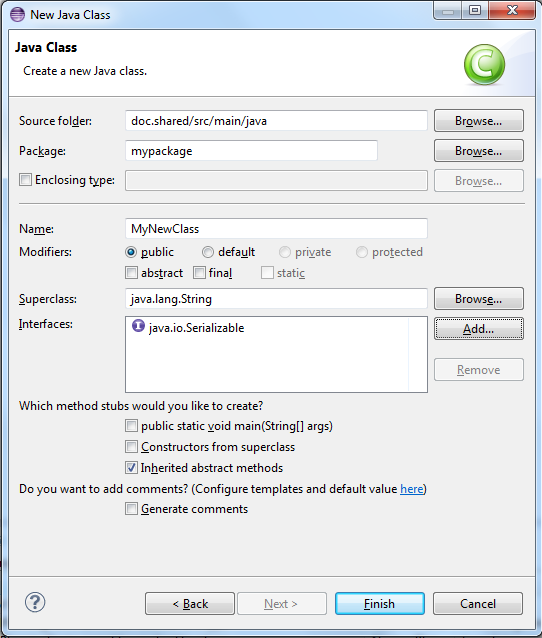
You can choose define the following properties:
-
Source folder: Click on Browse to choose the project where the class belongs.
-
Package: Click on Browse to choose the package in the given project. If the package does not exist it will be created a new one automatically.
-
Name: Type the class name
-
Modifiers: Choose public or default. Or abstract and/or final.
-
Superclass: Choose the parent class clicking on Browse
-
Interfaces: Click on Add to add the list of interfaces your class implements.
-
Method stubs: Include methods in your class.
-
Comments: Generate predefine comments.
Click on Finish when you are done with the class definition. The java editor will open and you can start editing.
Create a new Java package
Start the New Wizard and type Package in the Wizards field. Select Package Click on Next to open the New package wizard
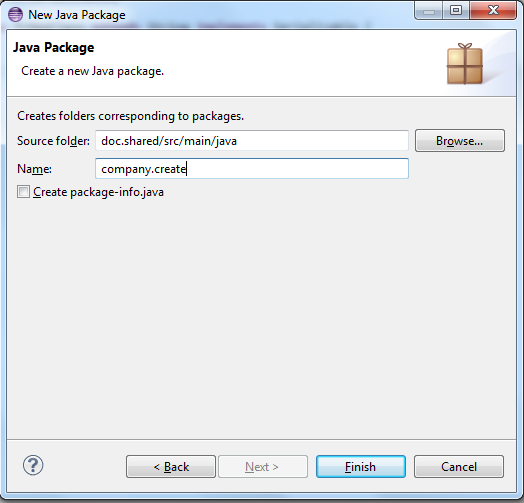
In the New package wizard you can define the following properties:
-
Source folder: Click on Browse to choose the project where the package belongs.
-
Name: Write the name of the package.
-
Package info: Choose the checkbox if you want package-info
Click on Next to create the project. The Project Browser
Organize Java imports
The import section of a java class needs to be kept up-to-date. New imports need to be added and no longer used ones should be removed. Eclipse offers a the shortcut Ctrl+Shift+O to accomplish this task.
In case an import cannot be resolved because several candidates exist, a selection list is displayed.
Rename a class
Renaming a class without SDK support is not so easy. The class and possibly the compilation unit need to be renamed. Then every reference to the class within the workspace needs to be updated.
All this work is accomplished by using the Class rename Wizard.
-
Open the Wizard using one of the following methods
-
Alt+Shift+R
-
-
Select the class in the tree and press F2
-
-
Choose the new name for the class
-
Specify which references need to be updated
-
Click [Finish] or [Next] to continue
Rename a package
Renaming a package without SDK support would be a tedious undertaking. All classes in the package and its subpackages would have to be modified as well as the directory structure on disk. Then every reference to the package within the workspace needs to be updated.
All this work is accomplished by using the Package rename Wizard.
-
Open the Wizard using one of the following methods
-
Alt+Shift+R
-
-
Select the package in the tree and press F2
-
-
Choose the new name for the package
-
Specify which references need to be updated
-
Click [OK] or [Prview] to continue
Scout SDK Overview
The Scout SDK tooling helps the Scout developer to quickly create frequently used Scout components. This Scout Tooling is implemented as extensions of the Eclipse IDE in the form of wizards, content assist extension to the Eclipse Java editor and support for dealing with translated texts called NLS support.
- Scout Wizards
-
The Scout SDK tooling includes a number of wizards for the creation of frequently used Scout components. In many cases the execution of such wizards involves the creation/editing of several source files. In the case of the creation of a new Scout form this includes the form class in the client module of the Scout application, a form data class and a service that communicates Descriptions for the individual wizards are provided in Scout Wizards.
- Content Assist
-
In the Scout framework the hierarchical organization of Scout components if frequently reflected in the form of inner classes. This allows the Scout tooling to provide context specific proposals in the form of content assist proposals offered in the Java editor of the Eclipse IDE. Examples for this form of the tooling includes the creation of form fields or adding columns and context menus to tables. Content assist support is described in detail in Scout Content Assistance.
- NLS Tooling
-
Eclipse Scout comes with NLS (National Language Support). To support Scout developers in using Scout’s NLS (National Language Support) the Scout SDK offers corresponding tooling to work with translated texts. This tooling is described in Scout NLS Tooling.
Scout Wizards
The Scout SDK provides a set of wizards to create new Scout projects and various components for your Scout applications.
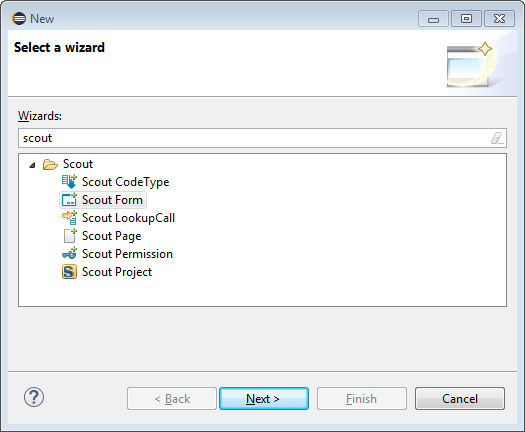
To start any of these wizards press Ctrl+N or use menu . In the first wizard step type "Scout" into the Wizards field as shown in Figure 3.
The wizards provided by the Scout SDK are introduced and described in the sections listed below.
-
New Project Wizard (New Project Wizard)
-
New Page Wizard (New Page Wizard)
-
New Form Wizard (New Form Wizard)
New Project Wizard
The New Scout Project wizard can be used to create a new Scout project from scratch.
To open the wizard press Ctrl+N or use and type "Scout" into the Wizards search field. Then, select the entry "Scout Project" and click on Next. This leads to the initial dialog of the New Scout Project wizard as shown in Figure 4.
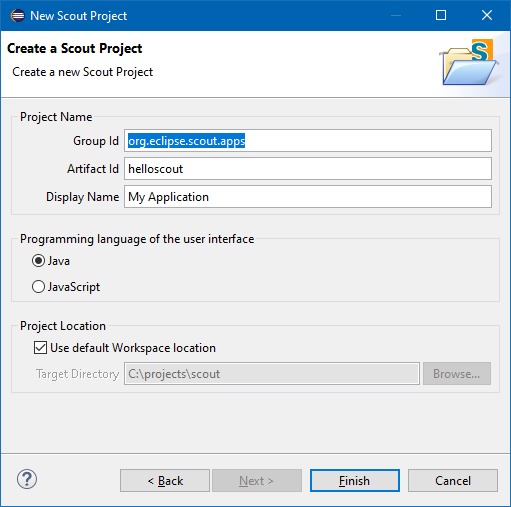
A detailed description of the indiviudal wizard fields of Figure 4 is provided in the next section.
By clicking on the Finish button the wizard is started and a new Scout client server application is created in the form of a Maven multi-module project.
Wizard Fields and Default Values
All fields of the Figure 4 are initially filled with default values.
- Group Id
-
Maven groupId used for all created projects. The default value is
org.eclipse.scout.apps. - Artifact Id
-
Maven artifactId for the parent project. The additional projects are derived from this name. The default value is helloworld.
- Display Name
-
The name of the application presented to the user. This name is shown in the Browser title bar. The default value is "My Application"
With the Project Location group box, you can control where the project will be created. Unchecked the Use default Workspace location checkbox to enter an other value in the Target Directory Field. The Browse… button can help you to find the appropriate path.
Created Components
With the Figure 4 wizard a complete Maven multi-module project is created. Using the default artifact Id helloworld the following Maven modules are created.
-
Maven module helloworld
-
Contains the project’s parent
pom.xmlfile
-
-
Maven module helloworld.client
-
Contains model components of the client application in
src/main/javaand model tests insrc/test/java. -
The class
HelloWorldFormin packageorg.eclipse.scout.apps.helloworld.client.helloworldis an example of a model class.
-
-
Maven module helloworld.shared
-
Contains components needed in both the client and the server application.
-
For examples see the
IHelloWorldServiceinterface insrc/main/javaand classHelloWorldFormDatainsrc/generated/java. -
The
Texts.nlsfile that can be opened in the Scout NLS Editor.
-
-
Maven module helloworld.server
-
Contains the model components of the server application in
src/main/javaand model tests insrc/test/java. -
The class
HelloWorldServicein packageorg.eclipse.scout.apps.helloworld.server.helloworldis an example of such a model class.
-
-
Maven module helloworld.server.app.dev
-
Contains all components to run the Scout server application from within the Eclipse IDE.
-
The file
config.propertiesin foldersrc/main/resourcescontains the development configuration for the Scout server application. -
The file
pom.xmlbundles the Jetty web server with the server application. -
The file
[webapp] dev server.launchcontains the launch configuration for the Eclipse IDE.
-
-
Maven module helloworld.server.app.war
-
Contains all components to create a Scout server WAR file to deploy to an external web server.
-
The file
config.propertiesin foldersrc/main/resourcescontains the server configuration. -
The file
pom.xmlis used to build the Scout server WAR file.
-
-
Maven module helloworld.ui.html
-
Contains servlet filters and the HTML pages as well as custom CSS and JavaScript files for the Scout UI Server.
-
See class
UiServletFilterinsrc/main/javaand folderWebContentinsource/main/resources. -
The file
js build.launchcontains the launch configuration for the Eclipse IDE that executes the JavaScript build.
-
-
Maven module helloworld.ui.html.app.dev
-
Contains all components to run the Scout UI application from within the Eclipse IDE.
-
The file
config.propertiesin foldersrc/main/resourcescontains the development configuration for the application. -
The file
web.xmlin foldersrc/main/webappcontains the web configuration for the application. -
The file
pom.xmlbundles the Jetty web server with the application. -
The file
[webapp] dev ui.launchcontains the launch configuration for the Eclipse IDE.
-
-
Maven module helloworld.ui.html.app.war
-
Contains all components to create a Scout UI WAR file to deploy to an external web server.
-
The file
config.propertiesin foldersrc/main/resourcescontains the application configuration. -
The file
web.xmlin foldersrc/main/webappcontains the web configuration. -
The file
pom.xmlis used to build the Scout UI WAR file.
-
New Page Wizard
The New Scout Page wizard can be used to create a new page and related classes. To start the wizard use or press Ctrl+N.
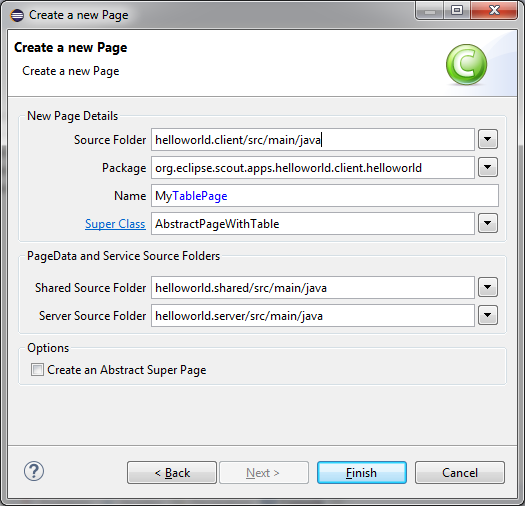
In the case of Figure 5 the package org.eclipse.scout.apps.helloworld.client.helloworld has been selected in the Package Explorer.
The only wizard field that then needs to be filled in manually is the Name field.
By clicking on the Finish button the wizard is started and the specified components are created.
Wizard Fields and Default Values
Most of the fields of the Figure 5 will be filled with default values depending on the current context of the IDE. The context can be derived from a package selected in the Package Explorer or from the class in the active Java Editor.
- Source Folder
-
The source folder of the Maven client module used for the creation of the page. The default value is the
src/main/javafolder in the Maven client module. - Package
-
The Java package that will contain the page class. The Scout SDK will try to guess the package name from the current context and derive matching package names for the Maven shared module.
- Name
-
The name of the page class. According to Scout conventions the class name ends with the suffix
TablePage(for subclasses ofAbstractPageWithTable) orNodePage(forAbstractPageWithNodes). - Super Class
-
The super class for the form.
AbstractPageWithTableis the default value. - Shared Source Folder
-
The source folder of the Maven shared module used for creation of the page data and the service interface. The default value is the
src/main/javafolder in the Maven shared module. - Server Source Folder
-
The source folder of the Maven server module used for creation of the service implementation. The default value is the
src/main/javafolder in the Maven server module.
Created Components
In the Figure 5 example shown above the Scout SDK will create the following components.
-
In Maven module helloworld.client
-
The
MyTablePagepage class in foldersrc/main/javaand packageorg.eclipse.scout.apps.helloworld.client.helloworld
-
-
In Maven module helloworld.shared
-
The
IMyServiceservice interface in foldersrc/main/javaand packageorg.eclipse.scout.apps.helloworld.shared.helloworld -
MyTablePageDatapage data class in foldersrc/generated/javaand packageorg.eclipse.scout.apps.helloworld.shared.helloworld
-
-
In Maven module helloworld.server
-
The
MyServiceimplementation in foldersrc/main/javaand packageorg.eclipse.scout.apps.helloworld.server.helloworld
-
New Form Wizard
The New Form wizard is be used to create a new form including a form data, permissions and and related service. To start the wizard use or press Ctrl+N.
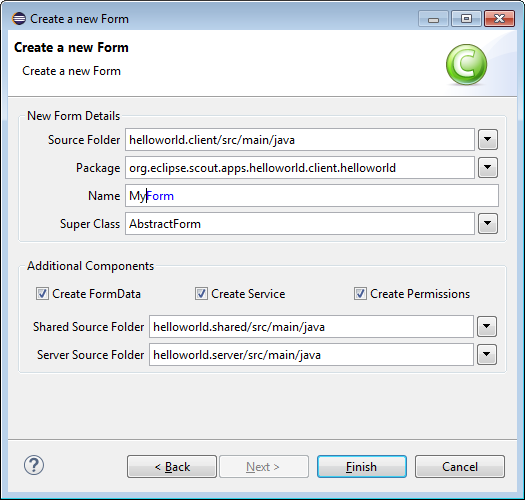
In the case of Figure 6 the package org.eclipse.scout.apps.helloworld.client.helloworld has been selected in the Package Explorer.
The only wizard field that then needs to be filled in manually is the Name field.
By clicking on the Finish button the wizard is started and the specified components are created.
Wizard Fields and Default Values
Most of the fields of the Figure 6 will be filled with default values depending on the current context of the IDE. The context can be derived from a package selected in the Package Explorer or from the class in the active Java Editor.
- Source Folder
-
The source folder of the Maven client module used for the creation of the form class. The default value is the
src/main/javafolder in the Maven client module. - Package
-
The Java package that will contain the form class. The Scout SDK will try to guess the package name from the current context and derive matching package names for the Maven shared and server modules.
- Name
-
The name of the form class. According to Scout conventions the class name ends with the suffix
Form. - Super Class
-
The super class for the form.
AbstractFormis the default value. - Create FormData
-
If ticked, a form data class will be created in the shared module.
- Create Service
-
If ticked, a service interface is created in the shared module and a service implementation is created in the Maven server module.
- Create Permissions
-
If ticked, read and update permissions are created in the Maven shared module.
- Shared Source Folder
-
The source folder of the Maven shared module used for creation of the form data, the service interface and the permission classes. The default value is the
src/main/javafolder in the Maven shared module. - Server Source Folder
-
The source folder of the Maven server module used for the service class creation. The default value is the
src/main/javafolder in the Maven server module.
Created Components
In the Figure 6 example shown above the Scout SDK will create the following components.
-
In Maven module helloworld.client
-
The
MyFormform class in foldersrc/main/javaand packageorg.eclipse.scout.apps.helloworld.client.helloworld
-
-
In Maven module helloworld.shared
-
In folder
src/main/javaand packageorg.eclipse.scout.apps.helloworld.shared.helloworld-
The
IMyServiceservice interface -
The
ReadMyPermissionpermission class -
The
UpdateMyPermissionpermission class
-
-
The
MyFormDataform data class in foldersrc/generated/javaand packageorg.eclipse.scout.apps.helloworld.shared.helloworld
-
-
In Maven module helloworld.server
-
The
MyServiceservice class in foldersrc/main/javaand packageorg.eclipse.scout.apps.helloworld.server.helloworld
-
Scout Content Assistance
To create new Scout components that are represented by inner classes in the Scout framework, the Scout tooling extends the Java content assist of the Eclipse Java editor. The offered proposals are context specific. Depending on the current cursor position in the Java editor, possible Scout components are added to the proposal list.
In a class representing a group box in a form, the Scout content assist adds proposals for various form fields. In a table class the content assist adds proposals to add table columns or context menus. Those proposals trigger the creation of inner classes for form fields, table columns or codes. The Eclipse content assist can be started by typing Ctrl+Space.
Create new Form Fields
To add additional form fields to a form the current edit position needs to be inside of a Scout group box. Typing Ctrl+Space then provides access to the most frequently used Scout widgets as shown in Figure 7.
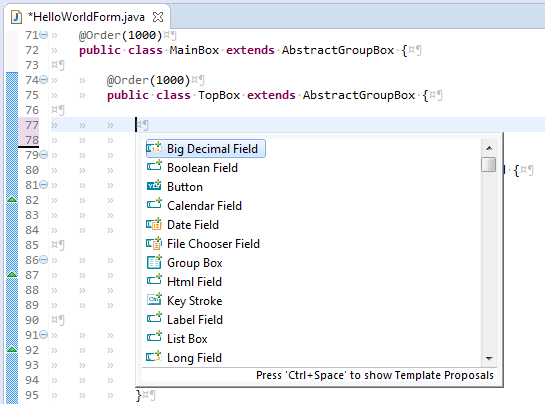
When a template is selected, it is possible to customize it by navigating between the different Edit-Groups with the Tab Key (this works exactly like other templates in the Eclipse Editor). With this mechanism you can quickly define the class name, the parent class and other properties. To exit the Edit-Mode just press Enter.
Create new Table Columns
For adding new columns in a table set the current edit position inside a Scout table. The Scout table itself may be located inside of a TableField as shown in Figure 8 or can also be located inside of a Scout TablePage.

Next to adding columns the content assist shown in Figure 8 can also be used to add key stroke actions and menus to tables.
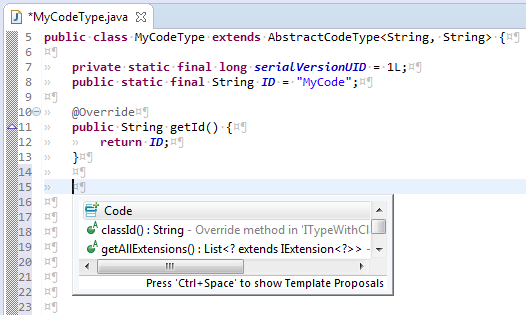
Create new Codes
Adding new Codes to an existing CodeType is supported by the content assist as shown in Figure 9.
Scout NLS Tooling
Adding a new Translated Text Entry
Translated text entries are most frequently added when working in the Java editor view.
When the the current edit position is inside the String parameter of the TEXTS.get() code, the content assist (opened with Ctrl + Space) provides support for the NLS entries as shown in Figure 10.
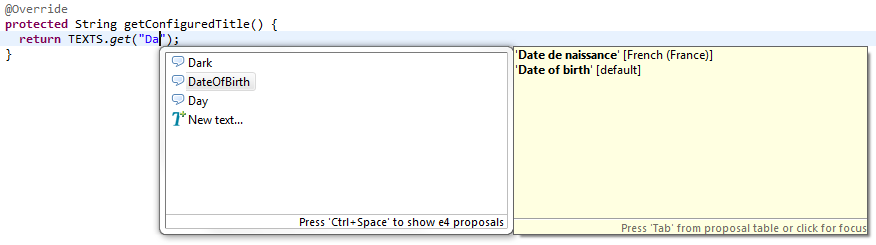
Selecting one of proposal entries (like "DateOfBirth" in the example) shows the available translations on the right side. To select a specific proposal entry you may double click on the entry or hit the Enter key. To create a new text entry select New text… at the end of the proposal list.
Adding a translated text can then be done in the New Entry wizard provided by the Scout SDK as shown in Figure 11.
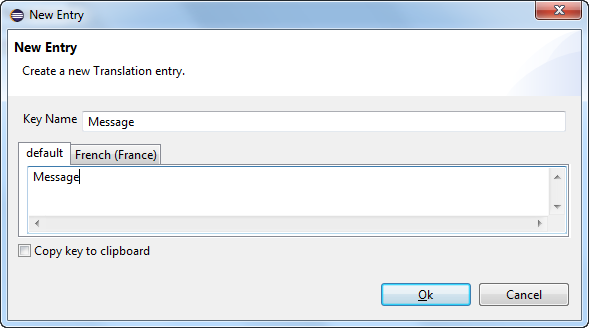
- Key Name
-
This field holds the text key that is used to access translated text.
- default
-
This field holds the default translated text for the key. Make sure to at least provide a translated text in this tab.
- French (France)
-
Additional tabs to enter translations for other languages may be present. Adding additional languages is described in the text for the NLS editor.
- Copy key to the clipboard
-
Select this checkbox to copy the key name to the clipboard and paste it later in your code.
The NLS Editor
To manage translated application texts for different languages the Scout SDK includes a NLS editor. This editor helps to efficiently deal to edit all the property files that are used with the default setup of Scout.
The NLS editor can be accessed for each text provider service of a Scout application via the *.nls files of the shared Maven modules of the application.
In the case of the "Hello World" application you will find the Texts.nls file in module org.eclipse.scout.helloworld.shared.
To open the editor for the "Hello World" application select the Texts.nls file first and then use context menu .
The screenshot below shows the opened NLS editor.
In the first column the key values are shown that are used in accessing translations through TEXTS.get("key").
The second columns holds the default translations followed by columns holding the translations for other translated languages.
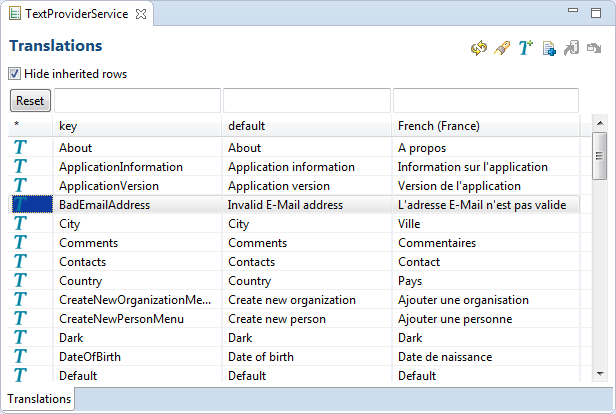
Action Buttons
Actions on the top right corner:
|
Refresh NLS Project |
Reload the content of the editor. |
|
Show NLS entry usage |
For each row, search in the Java code where the NLS Key is used. Results are displayed in the first column. |
|
New entry… |
Opens the New Text Entry Wizard |
|
New language… |
Opens the Add a Language Wizard |
|
Import… |
Import the NLS entries of an external file |
|
Export… |
Export the NLS entries to an external file |
Import and Export requires additional components.
Hide inherited rows checkbox
On the top of each column, the text fields allow you to filter the entries in the table. With the Reset button on the right you will empty those filters.
The entries in the table can be directly edited by pressing F2 or double-clicking into a text cell.
On each row it is possible to call following context menu:
|
Modify Entry |
Opens the New Text Entry Wizard |
|
Find references to 'Xxx' |
Search in the Java code where the NLS Key is used. |
|
Remove Xxx |
Delete the NLS Entry from the files |
Default Mapping to Properties Files
The mapping between the properties files is registered in the "Text Provider Service" class.
Per default the files follow this pattern:
<your application>.shared/src/main/resources/<identifier of the project>/texts/Texts<language>.properties
where:
-
<identifier of the project>is a chain of folders following the same convention as the Java source files with the package name. For example theorg.eclipse.contacts.sharedproject usesorg/eclipse/scout/contacts/sharedas path. -
<language>is an identifier of the language and the country. Some possible file names:-
Texts.propertiesis the default language -
Texts_de.propertiesis for German -
Texts_fr_BEwill be for French in Belgium
-
Find missing NLS Keys
If NLS keys are used in the code that do not exist in a properties file, an ugly placeholder is displayed to the user. To find such missing translations the Menu Scout → Search missing text keys… may be handy.
The result is listed in the Eclipse Search view.
The search also takes the scope of each NLS key into account. So that the key is considered to be available there must be a TextProviderService with that key on the classpath of that module.
Reported false positives can be suppressed using the following comment at the end of the corresponding line: NO-NLS-CHECK. Matches on that line are then not reported in future searches anymore.
Appendix A: Scout SDK Installation
This chapter walks you through the installation of the Eclipse Scout SDK. There are two ways to install it.
-
Install a prepackaged Eclipse IDE tailored for Scout developers.
-
Install the Scout SDK plugins into an existing Eclipse IDE.
Install Eclipse IDE for Scout Developers
The installation process for the Eclipse package containing Scout is described in the Hello Scout Tutorial.
Add Scout to your Existing Eclipse IDE
This section describes the installation of Scout into an existing Eclipse installation. As the audience of this section is assumed to be familiar with Eclipse, we do not describe how you got your Eclipse installation in the first place. For the provided screenshots we start from the popular package Eclipse IDE for Java EE Developers.
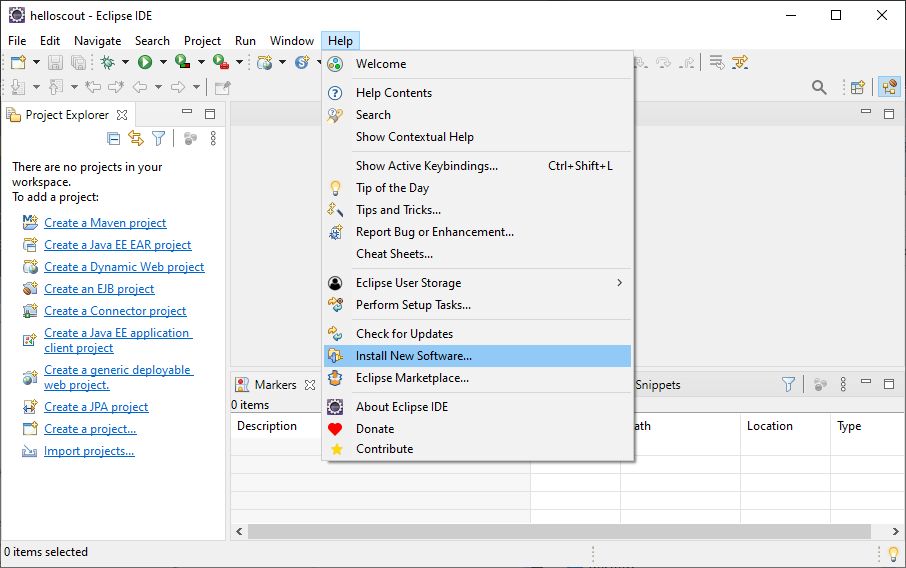
To add Scout to your existing Eclipse installation, you need to start Eclipse. Then select the menu as shown in Figure 12 to open the install dialog.
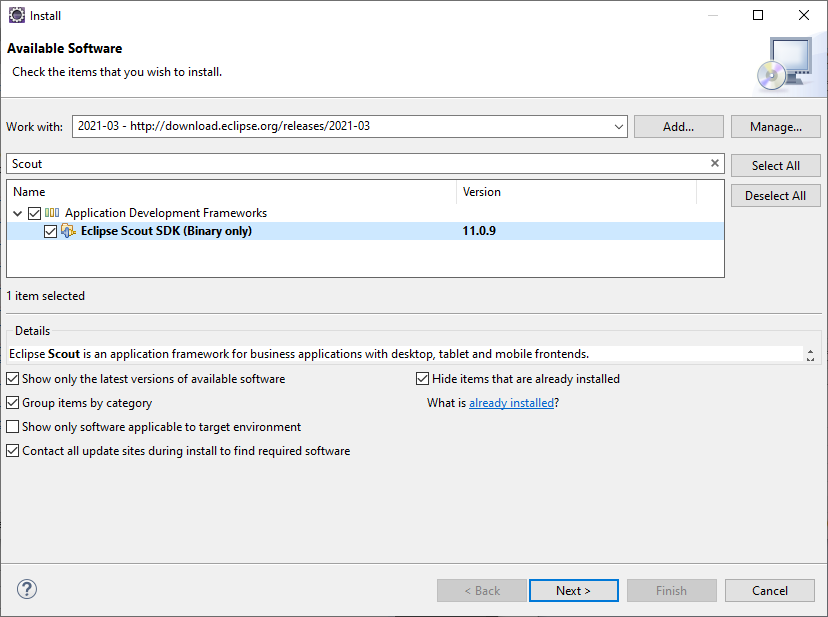
In the install dialog, select the update site matching your Eclipse installation. Type Scout into the filter field below and select Eclipse Scout SDK (Binary only). Then, move through the installation with the Next button. On the last installation step, accept the presented EPL terms by clicking on the appropriate radio button. To complete the installation, click the Finish button and accept the request for a restart of Eclipse. After the restart of the Eclipse IDE the Scout SDK is ready to use!
Verifying the Installation
The simplest way to verify your Scout installation is to create a “Hello World” Scout project and run the corresponding Scout application as described in Hello Scout.
| Do you want to improve this document? Have a look at the sources on GitHub. |