Preface
Today, the Java platform is widely seen as the primary choice for implementing enterprise applications. While many successful frameworks support the development of persistence layers and business services, implementing front-ends in a simple and clean way remains a challenge. This is exactly where Eclipse Scout fits in. The primary goal of Scout is to make your life as a developer easier and to help organisations to save money and time. For this, the Scout framework covers most of the recurring front-end aspects such as user authentication, client-server communication and the user interface. This comprehensive scope reduces the amount of necessary boiler plate code, and let developers concentrate on understanding and implementing business functionality.
The purpose of this book is to get the reader familiar with the Scout framework. In this book Scout’s core features are introduced and explained using many practical examples. And as both the Scout framework and Scout applications are written in Java, we make the assumption that you are familiar with the language too. Ideally, you have worked with Java for some time now and feel comfortable with the basic language features.
In the first part of the book a general introduction into the runtime part of the framework and the tooling - the Scout SDK - is provided. After the mandatory ''Hello World!'' application, the book walks you though a complete client server application including database access. The focus of the book’s second part is on the front-end side of Scout applications. First, an overview of the Scout client model is introduced before Scout’s most important UI components are described based on the Scout widget demo application. To cover the the server-side of Scout applications, an additional part of the book is planned to be released jointly with version 5.0 of the Scout framework. And finally, we intend to amend the book regarding building, testing and continuous integration for Scout applications.
Last but not least, we thank you for your interest in Scout, for being part of our community and for your friendly support of new community members. To allow for contributions to this book, the technical setup and the book’s licence have been selected to minimize restrictions. According to the terms of the Creative Commons (CC-BY) license, you are allowed to freely use, share and adapt this book. All source files of the book including the Scout projects described in the book are available on github. For the first edition of this book, we did already receive a number of bug reports and comments that were pointing out mistakes, inconsistencies and suggestions for changes. This feedback is very valuable to us as it helps to improve both the book’s content and the quality for all future readers. We hope that this book helps you to get started quickly and would love to get your feedback.
1. Introduction
1.1. What is Scout?
Scout is an open source framework for building business applications. The Scout framework covers most recurring aspects of a classical client server architecture with a strong focus on the application’s front-end. With its multi-device capability, a Scout client applications may run simultaneously as a rich client, in the browser and on mobile and tablet devices.
To different groups of people, Scout means different things. End users are interested in a good usability, the management cares about the benefits a new framework can offers to the organisation and developers want to know if a framework is simple to use and helps them to solve practical issues. This is why the text below describes Scout from the perspective of these three roles.
1.1.1. End User Perspective
End users of enterprise applications care about friendly user interfaces (UI) and well designed functionality that support them in their everyday work. Depending on the current context/location of an end user, either desktop, web or mobile clients work best. If working in the office, a good integration of the enterprise software with Lotus Notes or Microsoft Office often help to boost the users productivity. As office software is typically installed locally on the users PC, integrating this software also requires a desktop client for the enterprise application. When a user is working on a computer outside of his company where the enterprise client is not installed (or the user lacks the permissions to install any software), the natural choice is to work with a web application. And when the user is on the move or sitting in a meeting, the only meaningful option is to work with a mobile device.
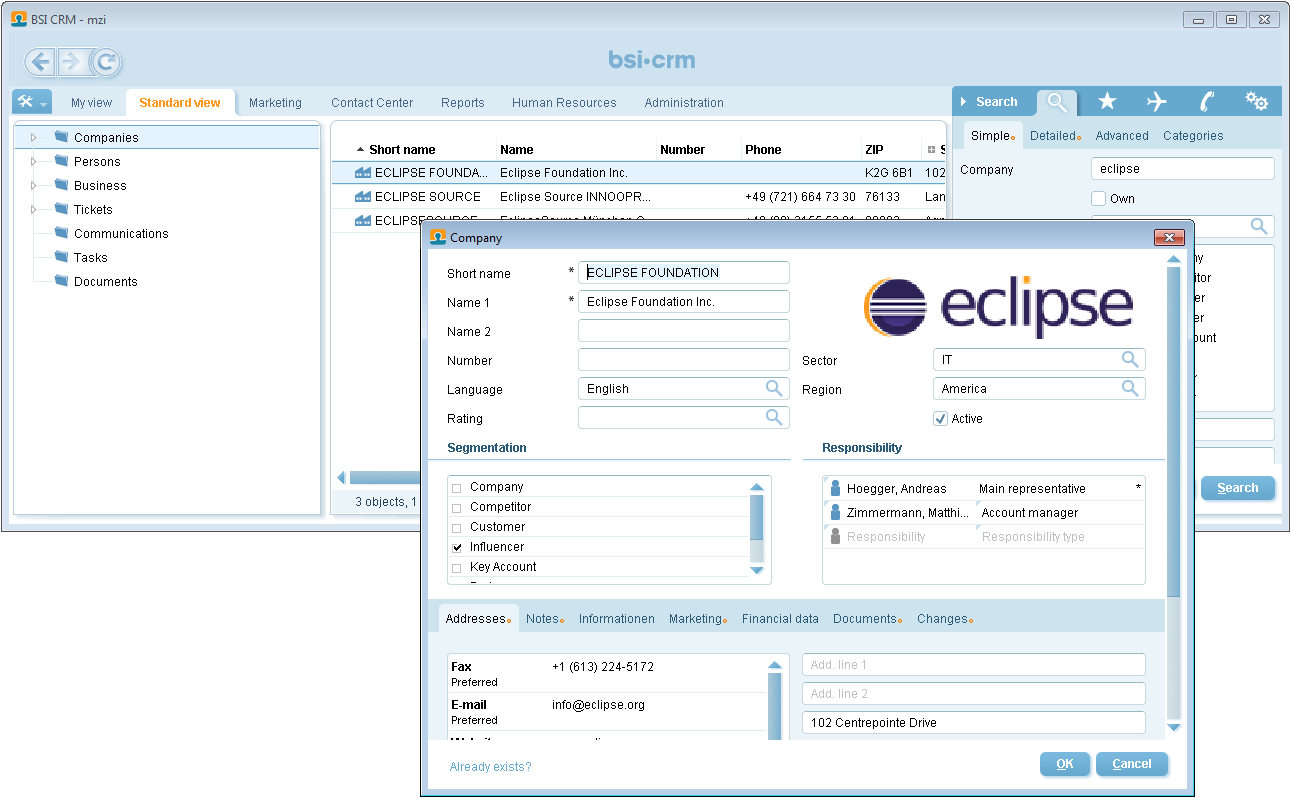
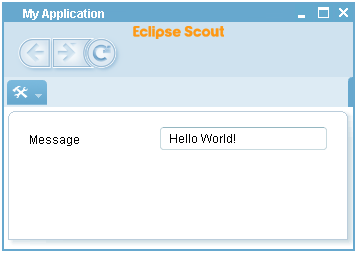
To provide a concrete example, we briefly describe a real world enterprise application based on Scout. A first screenshot of a Scout desktop client is provided in Figure 1. The screenshot provides an overview of the layout of a customer relationship management (CRM) solution. On the left hand side, an entity class such as companies can be selected. Once an entity such is selected, a form is presented on the right hand side to enter the search criteria. After entering “eclipse” into the company search field, the list of matching companies is presented. Using the context menu on a specific company, the corresponding company dialog can be opened for editing.
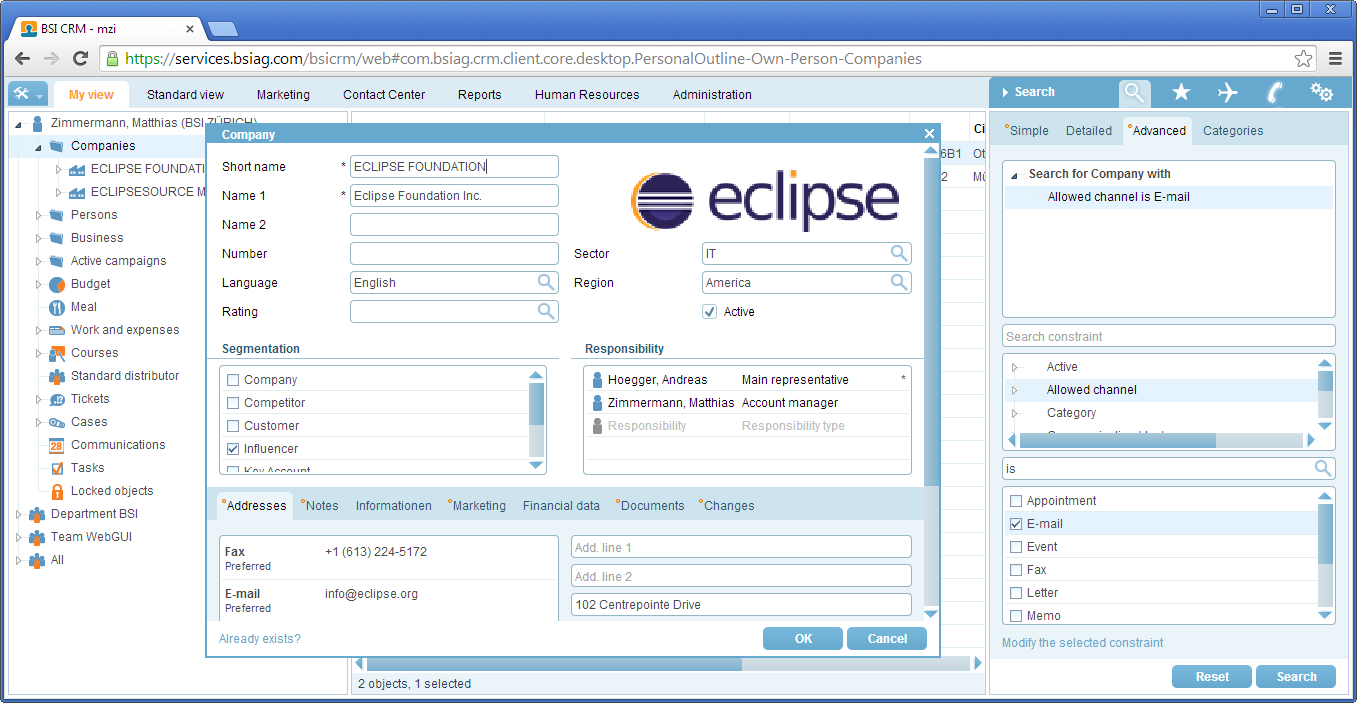
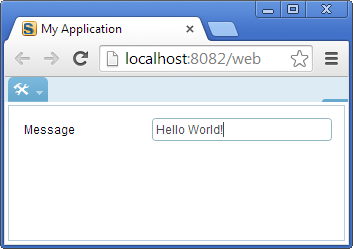
In Figure 2 a screenshot of the web client of the CRM Scout application is shown. When comparing the screenshots of the desktop client with the web application it is interesting to note how Scout applications offer a consistent look and feel for the two clients. This is important as it makes the end user feel “at home” on the web client.
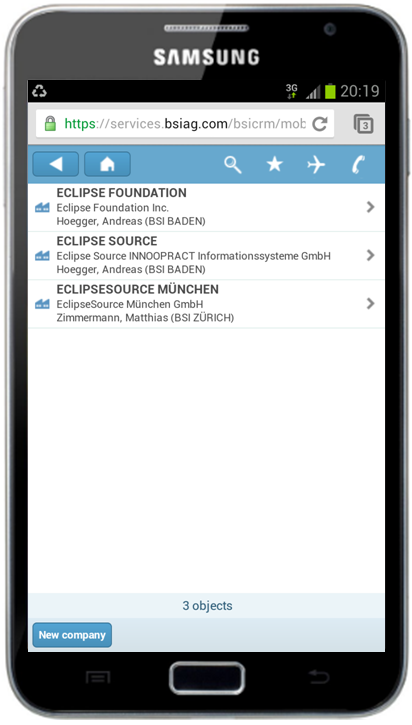
Finally, Figure 3 provides a screenshot of the now familiar CRM application. In contrast to desktop and web applications, most tablets and mobile phones are controlled using touch features instead of mouse clicks. In addition, less elements may be presented on a single screen compared to desktop devices. These two aspects makes it impractical to directly reuse the desktop user interface on mobile devices. The look and feel still relates to the desktop and web clients but is optimized to the different form factor of the mobile device. And the end user benefits from the identical behaviour and the the known functionality of the application.
Comparing the company table shown in the background of Figure 1 with Figure 3 it can be observed that the multi-column table of the desktop client has been transformed into a list on the mobile device. In addition, the context menu “New company” is now provided as a touch button. As the navigation in the application and the offered choices remain the same for Scout desktop and mobile applications, the end user feels immediately comfortable working with Scout mobile applications.
1.1.2. Management Perspective
For the management, Scout is best explained in terms of benefits it brings to the organisation in question. This is why we are going to concentrate on a (typical) application migration scenario here. Let us assume that to support the company’s business, a fairly large landscape of multi-tier applications has to be maintained and developed. Including host systems, client server applications with desktop clients, as well as applications with a web based front-end.
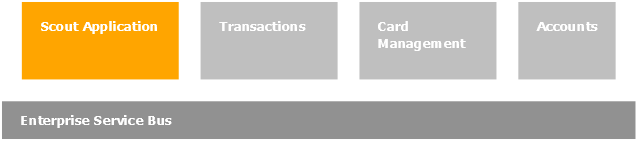
Usually, these applications interact with each other through a service bus as shown in Figure 4. Often, some of the applications that are vital to the organisation’s core business have grown historically and are based on legacy technologies. And for technologies that are no longer under active development it can get difficult to find staff having the necessary expertise or motivation. Sometimes, the organisation is no longer willing to accept the costs and technology risks of such mission critical applications.
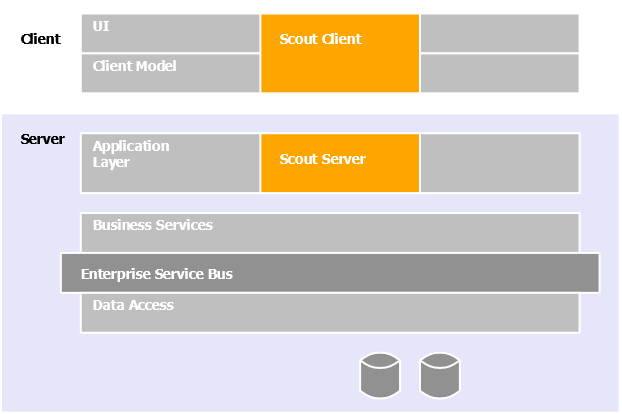
In this situation, the company needs to evaluate if it should buy a new standard product or if the old application has to be migrated to a new technology stack. Now let us assume, that available products do not fit the company’s requirements well enough and we have to settle for the migration scenario. In the target architecture, a clean layering similar to the one shown in Figure 5 is often desirable.
While a number of modern and established technologies exist that address the backend side (data bases, data access and business services), the situation is different for the UI layer and the application layer. The number of frameworks to develop web applications with Java is excessively large.[1], but the choice between desktop application technologies in the Java domain is restricted to three options only. Swing, SWT and JavaFX. Both Eclipse SWT and Java Swing are mature and well established but Swing is moving into 'maintenance only' mode and will be replaced by JavaFX. However, the maturity of the new JavaFX technology in large complex enterprise applications is not yet established. Obviously, deciding for the right UI technology is a challenge and needs to be made very carefully. Reverting this decision late in a project or after going into production can get very expensive and time consuming.
Once the organisation has decided for a specific UI technology, additional components and frameworks need to be evaluated to cover client server communication, requirements for the application layer, and integration into the existing application landscape. To avoid drowning in the integration effort for all the elements necessary to cover the UI and the application layer a ‘lightweight’ framework is frequently developed. When available, this framework initially leads to desirable gains in productivity. Unfortunately, such frameworks often become legacy by themselves. Setting up a dedicated team to actively maintain the framework and adapt to new technologies can reduce this risk. But then again, such a strategy is expensive and developing business application frameworks is usually not the core business of a company.
Can we do better? To implement a business application that covers the UI and the application layer as shown in Figure 5, Eclipse Scout substantially reduces both risk and costs compared to the inhouse development presented above. First or all, Scout is completely based on Java and Eclipse. Chances are, that developers are already familiar with some of these technologies. This helps in getting developers up to speed and keeping training costs low.
On the UI side, Scout’s multi-device support almost allows to skip the decision for a specific UI technology. Should a particular web framework become the de-facto standard in the next years, it will be the responsibility of the Scout framework to provide the necessary support. Existing Scout applications can then switch to this new technology with only minimal effort. This is possible because the Scout developers are designing and building the UI of an application using Scout’s client model. And this client model is not linked to any specific UI technology. Rather, specific UI renderers provided by the Scout framework are responsible to draw the UI at runtime.
As Scout is an open source project, no licence fees are collected. Taking advantage of the growing popularity of Scout, free community support is available via a dedicated forum. At the same time, professional support is available if the organisation decides for it.
As the migration of aging applications to current technology is always a challenge, it surely helps to have Scout in the technology portfolio. Not only is it a low risk choice, but also boosts developer productivity and helps to motivate the development team. Additional reasons on why Scout helps to drive down cost and risks are discussed in Section Why Scout?.
1.1.3. Developer Perspective
From the perspective of application developers, Scout offers a Java based framework that covers the complete client server architecture. This implies that — once familiar with the Scout framework — the developer can concentrate on a single framework language (Java) and a single set of development tools.
As Scout is completely based on Java and Eclipse, Scout developers can take full advantage of existing knowledge and experience in these domains. And to make learning Scout as simple as possible, Scout includes a comprehensive software development kit (SDK), the Scout SDK. The Scout SDK helps to create a robust initial project setup for client server applications and includes a large set of wizards for repetitive and error prone tasks.
On the client-side Scout’s flexible client model allows the developer to create a good user experience without having to care about specific UI technologies. The reason for this can be found in Scout’s client architecture that cleanly separates the UI model from the UI technology. In Scout (almost) every UI component is implemented four times. First the implementation of the UI model component and then, three rendering components for each UI technology supported by Scout. For desktop clients these are the Swing and the SWT technologies, and for the web and mobile support this is Eclipse RAP which in turn takes care of the necessary JavaScript parts.
Not having to worry about Swing, SWT or JavaScript can significantly boost the productivity. With one exception. If a specific UI widget is missing for the user story to be implemented, the Scout developer first needs to implement such a widget. Initially, this task is slightly more complex than not working with Scout. For custom widgets the Scout developer needs to implement both a model component and a rendering component for a specific UI technology. But as soon as the client application needs to be available on more than a single frontend, the investment already pays off. The developer already did implement the model component and only needs to provide an additional rendering component for the new UI technology. In most situations the large set of Scouts UI components provided out-of-the box are sufficient and user friendly applications are straight forward to implement. Even if the application needs to run on different target devices simultaneously.
Client-server communication is an additional aspect where the developers is supported by Scout. Calling remote services in the client application that are provided by the Scout server looks identical to the invocation of local services. The complete communication including the transfer of parameter objects is handled fully transparent by the Scout framework. In addition, the Scout SDK can completely manage the necessary transfer objects to fetch data from the Scout server that is to be shown in dialog forms on the Scout client. The binding of the transferred data to the form fields is done by the framework.
Although the Scout SDK wizards can generate a significant amount of code, there is no one-way code generation and no meta data in a Scout application. Just the Java code.[2]. Developers preferring to write the necessary code manually, may do so. The Scout SDK parses the application’s Java code in the background to present the updated Scout application model to the developers preferring to work with the Scout SDK.
Finally, Scout is an open source framework hosted at the Eclipse foundation. This provides a number of interesting options to developers that are not available for closed source frameworks. First of all, it is simple to get all the source code of Scout and the underlying Eclipse platform. This allows for complete debugging of all problems and errors found in Scout applications. Starting from the application code, including the Scout framework, Eclipse and down to the Java platform.
Scout developer can also profit from an increasing amount of free and publicly available documentation, such as this book or the Scout Wiki pages. And problems with Scout or questions that are not clearly addressed by existing documentation can be discussed in the Scout forum. The forum is also a great place for Scout developers to help out in tricky situation and learn from others. Ideally, answered questions lead to improved or additional documentation in the Scout Wiki.
At times, framework bugs can be identified from questions asked in the forum. As all other enhancement requests and issues, such bugs can be reported in Bugzilla by the Scout developer. Using Bugzilla, Scout developers can also contribute bug analysis and patch proposals to solve the reported issue. With this process, Scout developers can actively contribute to the code base of Eclipse Scout. This has the advantage, that workarounds in existing Scout applications can be removed when an upgrade of the Scout framework is made.
Having provided a significant number of high quality patches and a meaningful involvement in the Scout community, the Scout project can nominate a Scout developer as a new Scout committer. Fundamentally, such a nomination is based on the trust of Scout committers in the candidate. To quote the official guidelines.[3] for nominating and electing a new committer:
A Committer gains voting rights allowing them to affect the future of the Project. Becoming a Committer is a privilege that is earned by contributing and showing discipline and good judgment. It is a responsibility that should be neither given nor taken lightly, nor is it a right based on employment by an Eclipse Member company or any company employing existing committers.
After a successful election process (existing committers voting for and not against the candidate) the Scout developer effectively becomes a Scout committer. With this new status, the Scout developer then gets write access to the Eclipse Scout repositories and gains voting rights and the possibility to shape the future of Scout.
1.2. Why Scout?
Most large organizations develop and maintain enterprise applications that have a direct impact on the success of the ongoing business. And at the same time, those responsible for the development and maintenance of these applications struggle with this task. It is a big challenge to adapt to changing business demands and complying with the latest legal requirements in time. And the increasing pressure to lower recurring maintenance costs does not make the situation any easier.
It often seems that too many resources are required to keep a heterogeneous set of legacy technologies alive. In this situation, modernizing mission critical applications can help to improve over the current situation. For the target platform stack, Java is a natural choice as it is mature, widely adopted by in the industries and unlikely to become legacy in the foreseeable future. While for the back-end side of enterprise applications well-known and proven frameworks do exist, the situation on the client side is less clear. Unfortunately, user interface (UI) technologies often have lifetimes that are substantially shorter than the lifetimes of larger mission critical applications. This is particularly true for the web, where many of today’s frameworks will no longer be relevant in five or more years.
Enter Eclipse Scout. This open source framework covers most of the recurring needs that are relevant to the front-end development of business applications. And Scout forces a clean separation between the user interface and the specific UI technology used for rendering. This has two major benefits. First, Scout developers implement the user interface against an abstraction layer, which helps to focus on the business functionality and saves development time. And second, long term maintenance costs are lower, as the Scout code remains valid even when the rendering technology needs to be exchanged. Therefore, Scout helps to improve the productivity of the development teams and reduces the risk of major application rewrites.
To provide a first impression on the scope and goals of the Scout framework, a number of scenarios where Scout typically contributes to your projects success are listed below .
-
You are looking for a reasonable client side framework for your business application.
-
You need an application that works on the desktop, in browsers and on mobiles devices.
-
You don’t have the time to evaluate and learn a new UI technology.
-
You need a working prototype application by the end of the week.
-
Your application’s expected lifespan is 10 years or more.
That Scout should help in the last two situations mentioned above seems to be contradictory at first but is just based on a simple principle. Where possible, the Scout framework provides abstractions for areas/topics.[4] that need to be implemented for business applications again and again. And for each of these abstractions Scout provides a default implementation out of the box. Typically, the default implementation of such an abstraction integrates a framework or technology that is commonly used.
When needing a working prototype application by the end of the week, the developer just needs to care about the desired functionality. The necessary default implementations are then automatically included by the Scout tooling into the Scout project setup. The provided Scout SDK tooling also helps to get started quickly with Scout. It also allows to efficiently implement application components such as user interface components, server services or connections to databases.
In the case of applications with long lifespans, the abstractions provided by Scout help the developer to stay productive and concentrate on the actual business functionality. At the same time, this keeps the code base as independent of specific technologies and frameworks as possible. This is a big advantage when individual technologies incorporated in the application reach their end of life. As all the implemented business functionality is written against abstractions only, no big rewrite of the application is necessary. Instead, it is sufficient to exchange the implementation for the legacy technology with a new one. And often, an implementation for a new technology/framework is already provided by a more recent version of Scout.
1.3. What should I read?
The text below provides guidelines on what to read (or what to skip) depending on your existing background. We first address the needs of junior Java developers that like to learn more about developing enterprise applications. Then, we suggest a list of sections relevant for software wizards that already have a solid understanding of the Eclipse platform, Java enterprise technologies, and real world applications. Finally, the information needs of IT managers are considered.
1.3.1. I know Java
The good news first. This book is written for you! For the purpose of this book we do not assume any significant understanding of the Java Enterprise Edition (Java EE).[5] and the Eclipse Platform.[6].
Of course, having prior experience in client server programming with Java is helpful. And having used the Eclipse IDE for Java development before --- please do not mistake the IDE with the Eclipse platform.[7] is certainly of benefit.
The “bad” news is, that writing Scout applications requires a solid understanding of Java. To properly benefit from this book, we assume that you have been developing software for a year or more. And you should have mastered the Java Standard Edition (Java SE).[8] to a significant extent. To be more explicit, you are expected to be comfortable with all material required for the Java Programmer Level I Exam.[9] and most of the material required for Level II.[10].
We now propose to start downloading and installing Scout as described in Appendix Scout Installation and do some actual coding. To do so, please continue with the “Hello World” example provided in Chapter “Hello World” Tutorial. You can expect to complete this example in less than one hour including the necessary download and installation steps. Afterwards, you might want to continue with the remaining material in “Getting Started”. Working through the complete book should take no more than two days.
Once you work with the Scout framework on a regular basis, you might want to ask questions in the Scout forum.[11]. When your question gets answered, please ask yourself if your initial problem could have been solved by better documentation. In that case, you might want to help the Scout community by fixing or amending the Scout wiki pages.[12]. Or this book. If you find a bug in Eclipse Scout that makes your life miserable you can report it or even propose a patch. And when your bug is fixed, you can test the fix. All of these actions will add to the healthy grow of the Scout community.
1.3.2. I know tons of both Java and Eclipse
This means that you are one of these software wizards that get easily bored. You prefer to get a quick impression before deciding to dig deeper and hate going through lengthy descriptions. In that case let us assume that you are prepared to spend two hours to grasp the scope of Eclipse Scout and get an impression of its strengths and limitations. The list below suggests a sequence of sections to digest including a brief motivation for each one.
-
Chapter “Hello World” Tutorial
"Hello World"Tutorial. Download and installation of the Scout package should take less than 30 minutes, going through the"Hello World"takes another 15 minutes. -
Section Walking through the Initial Application “Walking through the Initial Application” Read about some key elements used in every Scout client application including integration of server services and data binding.
-
Chapter Scout Tooling “Scout Tooling”. Browse through the tooling chapter to get an impression on the tooling provided with Scout. Make sure you understand that the Scout SDK is supporting the developer without restricting the developer.
-
Chapter A Larger Example “The My Contacts Application”. Check out the slightly larger demo application. In case you are not yet running out of time, download the demo app as described in the Scout wiki.[13].
1.3.3. I am a manager
Being a manager and actually reading this book may indicate one of the following situations:
-
Your developer tried to convince you that Eclipse Scout can help you with implementing business applications in a shorter time and for less money. And you did not understand why (again) a new technology should work better than the ones you already use.
-
Your are a product manager of a valuable product that is based on legacy technology. And you are now evaluating options to modernize your product.
-
Think about your current situation. There must be a reason why you are checking out this book.
To learn about Scout and about its benefits first go through Section What is Scout? and Section Why Scout?. Then, flip through Section The “My Contacts” Application to get an impression of the “My Contacts” application. In case you like the idea that your developers should be able to build such an application in a single day, you might want to talk to us.[14].
2. “Hello World” Tutorial
The “Hello World” chapter walks you through the creation of an Eclipse Scout client server application. When the user starts the client part of this application, the client connects to the server.[15] and asks for some text content that is to be displayed to the user. Next, the server retrieves the desired information and sends it back to the client. The client then copies the content obtained from the server into a text field widget. Finally, the client displays the message obtained from the server in a text field widget.
The goal of this chapter is to provide a first impression of working with the Scout framework using the Scout SDK. We will start by building the application from scratch and then we’ll deploy the complete application to a Tomcat web server. Except for a single line of code in the server part of the “Hello World” application, we will only be using the tooling provided by the Scout SDK.
Based on this simple “Hello World” applications a large number of Scout concepts can be illustrated. Rather than including such background material in this tutorial, this information is provided separately in Chapter “Hello World” Background. This tutorial is also available in the Scout wiki.[16].
2.1. Installation and Setup
Before you can start with the “Hello World” example you need to have a complete and working Scout installation. For this, see the step-by-step installation guide provided in Appendix Scout Installation. Once you have everything installed, you are ready to create your first Scout project.
2.2. Create a new Project
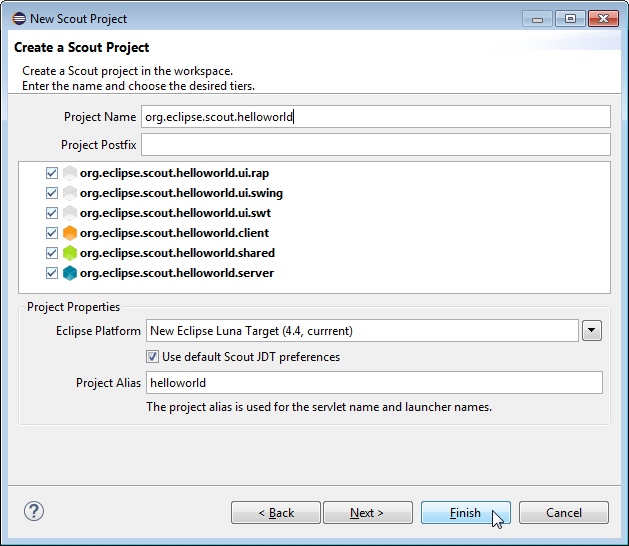
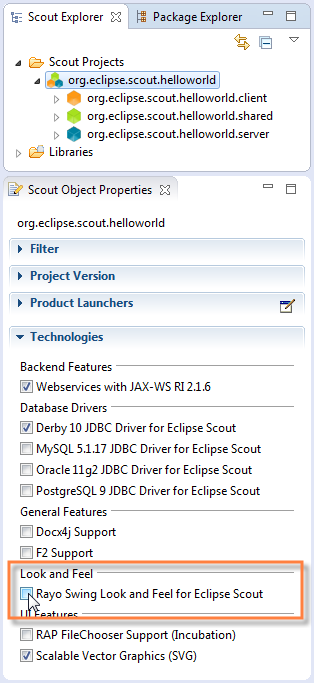
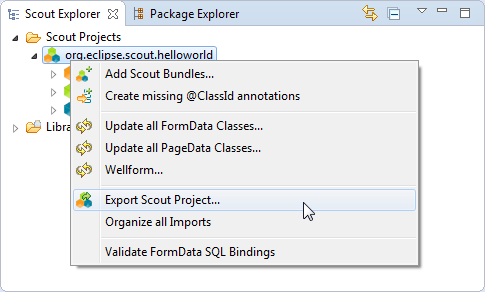
Start your Eclipse IDE and select an empty directory for your workspace. This workspace directory will then hold all the project code for the “Hello World” application. Once the Eclipse IDE is running it will show the Scout perspective with the Scout Explorer view and an empty Scout Object Properties view. To create a new Scout project select the context menu as shown in Figure 6.
In the New Scout Project wizard enter a name for your Scout project. As we are creating a “Hello World” application, use org.eclipsescout.helloworld for the Project Name field according to Figure 7. Then, click the Finish button to let the Scout SDK create the initial project code for you.
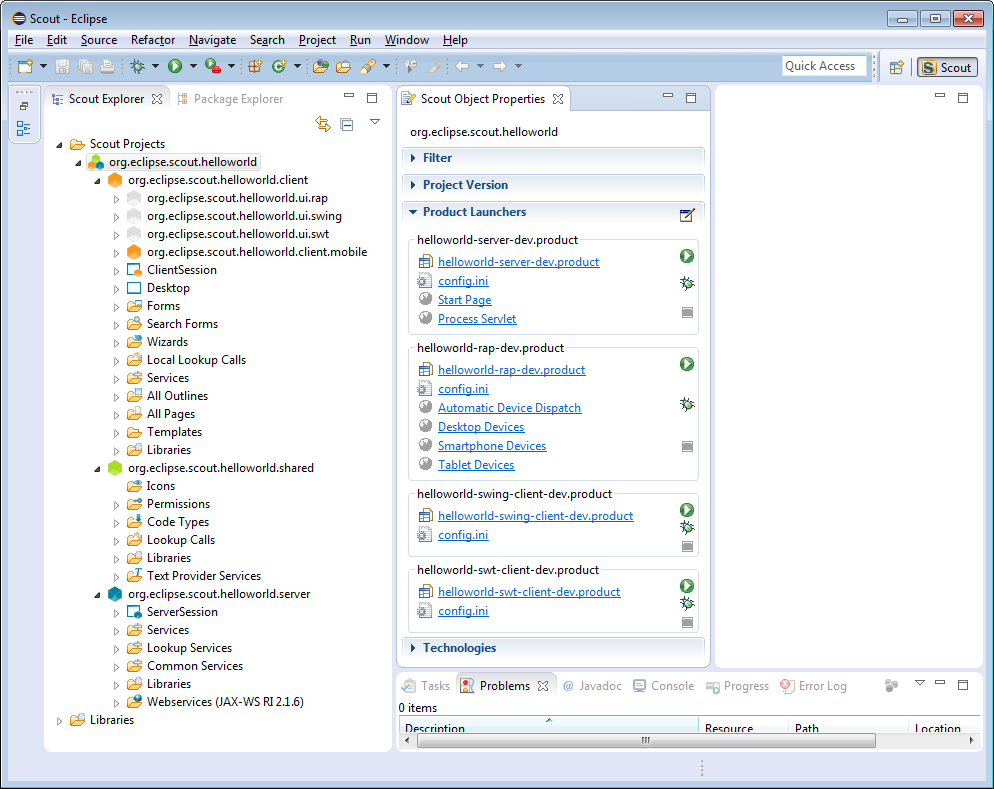
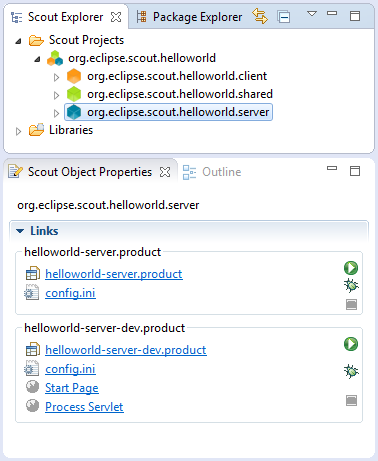
Once the initial project code is built, the Scout SDK displays the application model in the Scout Explorer as shown in Figure 8. This model is visually presented as a tree structure covering both the client and the server part of the application. The Scout Explorer view on the left hand side displays the top level elements of the complete Scout application. Under the orange node the Scout client components are listed. Components that are needed in both the Scout client and the Scout server are collected under the green node. And the Scout server components are listed below the blue node in the Scout Explorer view.
2.3. Run the Initial Application
After the initial project creation step we are ready to start the server and the clients of the still empty Scout application. For this, we switch to the Scout Explorer and select the root node org.eclipse.scout.helloworld. Selecting the application’s org.eclipse.scout.helloworld node in the Scout Explorer displays the product launchers in the Scout Object Properties. As we can see in Figure 9, we have product launchers for four different development products.
Server |
The Scout server application |
RAP |
The RAP server application for web and mobile clients |
Swing |
The Scout Swing desktop client application |
SWT |
The Scout SWT desktop client application |
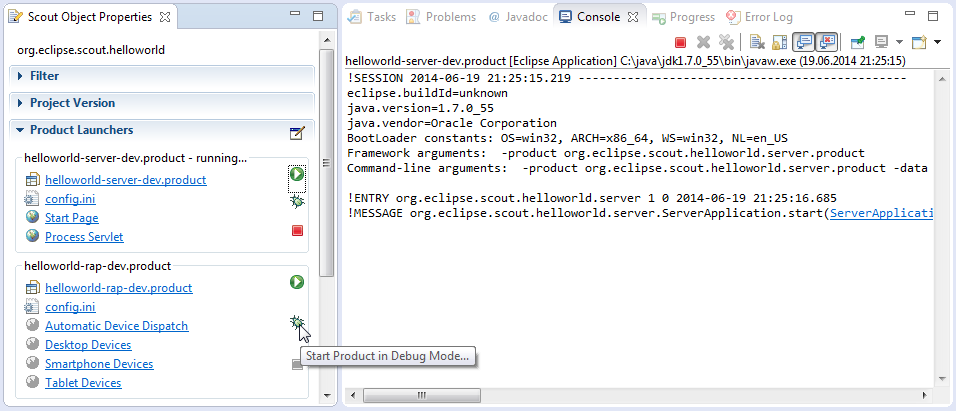
Each product launcher box provides a link to the corresponding Eclipse product file.[17], the configuration file.[18], as well as three launcher icons to start and stop the corresponding application. The green Circle icon starts the product in normal mode. The Bug icon just below, starts a product in debug mode. To terminate a running product, the red Square icon is provided. Alternatively, you can also stop products by clicking on the same red icon in the console view. This is shown on the right hand side of Figure 9. Client products may also be stopped by closing the client’s main window or using the provided menu.
Before any of the client products is started, we need to start the server product using the green circle or the bug launcher icon. During startup of the Scout server you should see console output similar to the one shown on the right hand side of Figure 9. Once the server is running, you may start the web client as shown in Figure 9, the Swing client, or the SWT client in the same way. And with a running RAP product, the Scout web client can be opened in a web browser. Just click on the provided Automatic Device Dispatch link or open a a browser and manually type the address http://localhost:8082/web into the browser’s navigation bar.
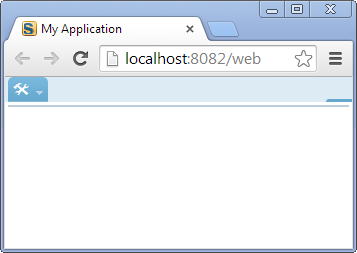
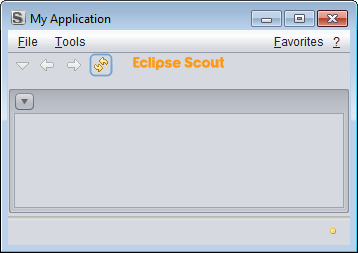
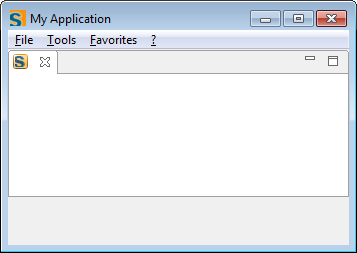
Having started the Scout server and all client products, the client applications should become visible as shown in Figure 10.
2.4. The User Interface Part
The project creation step has created a Scout client that displays an empty desktop form. We will now add widgets to the client’s desktop form that will later display the “Hello World!” message.
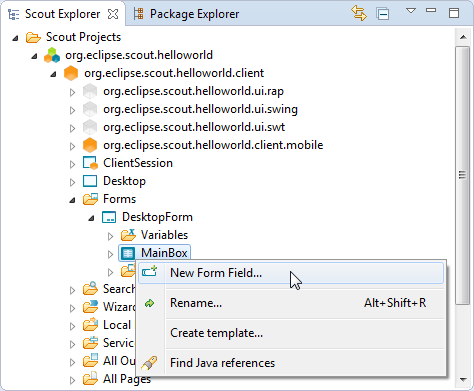
To add any widgets to the desktop form, navigate to the DesktopForm in the Scout Explorer. For this, click on the orange client node in the Scout Explorer view. Then, expand the Forms folder by clicking on the small triangle icon, and further expand the DesktopForm. As a result, the MainBox element becomes visible below the desktop form as shown in Figure 11. With a click of the right mouse button over the MainBox, the available context menus are displayed. To start the form field wizard select the menu.
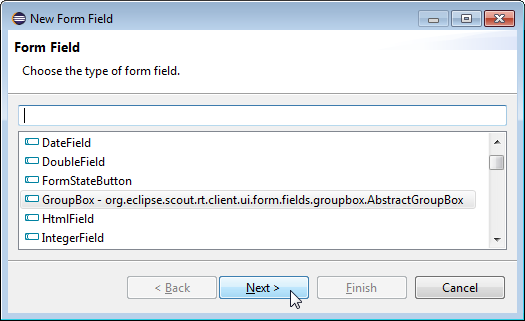
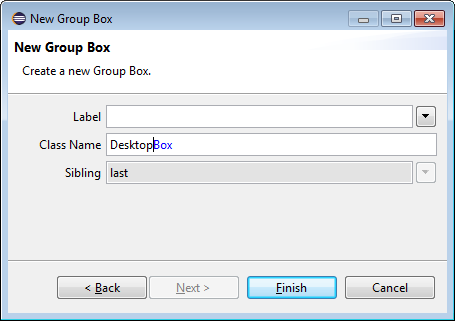
In the first step of the form field wizard shown on in Figure 12 choose GroupBox as the form field type and click on the Next button. In the second wizard step, enter ‘Desktop’ into the Class Name field before you close the wizard with the Finish button. The Scout SDK will then add the necessary Java code for the DesktopBox in the background.
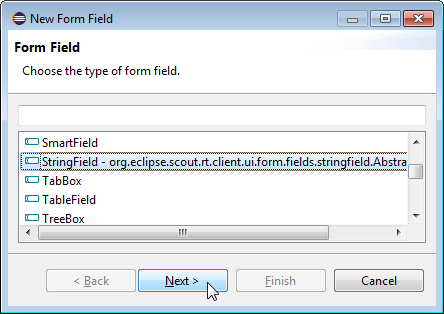
We can now add the text field widget to the group box just created. To do this, expand the MainBox in the Scout Explorer view to access the newly created DesktopBox element. On the DesktopBox use the menu again. In the first wizard step, select StringField as the form field type according to Figure 13. To select the StringField type you can either scroll down the list of available types or enter “st” into the field above the field type list. In the second wizard step, enter ‘Message’ into the Label field. As we do not yet have the text ‘Message’ available in our “Hello World” application the wizard prompts the user with the proposal New Translated Text ….
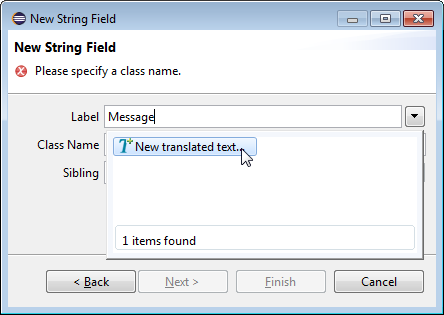
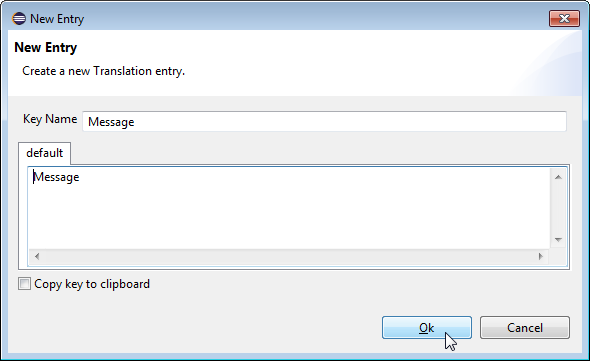
With a double click on this option a new text entry can be added to the application as shown in Figure 14. Once an initial translation for the message label is provided, close the translation dialog with the Ok button. Finally, close the form field wizard using the Finish button.
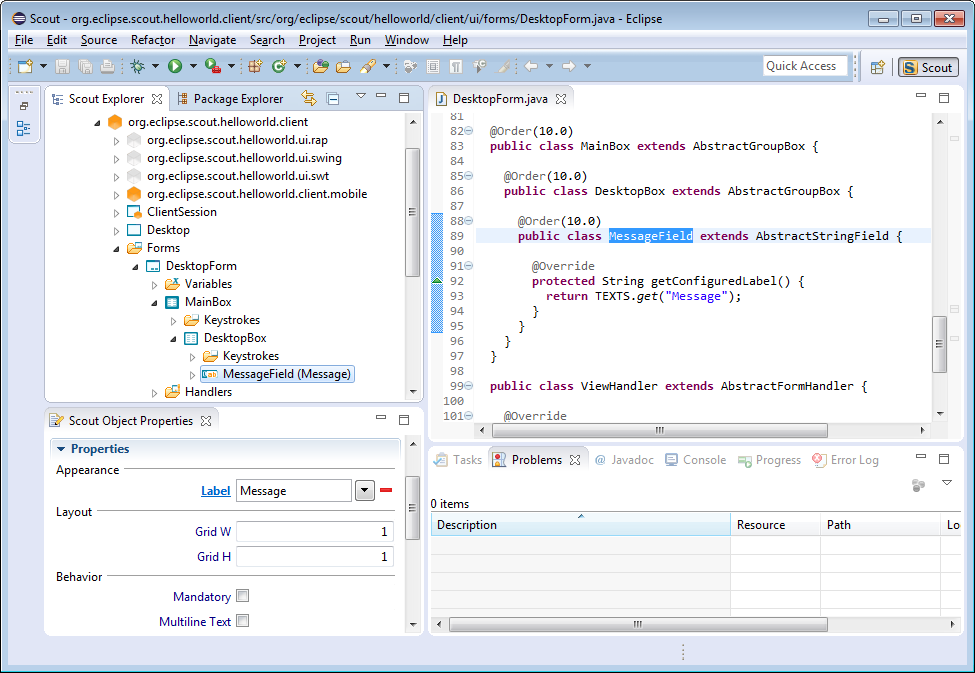
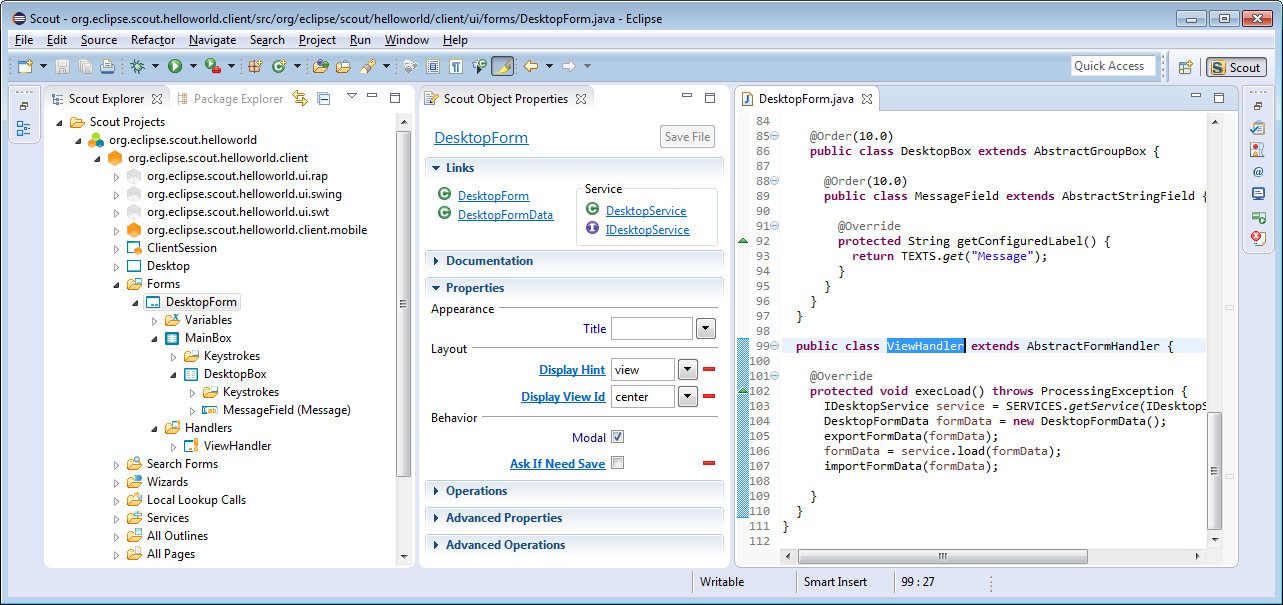
By expanding the DesktopBox element in the Scout Explorer, the new message field becomes visible. Now, double click on the message field element to load the corresponding Java code into an editor and displays the message field’s properties in the Scout Object Properties as shown in Figure 15. This is a good moment to compare your status with this screenshot. Make sure that both the Java code and the project structure in the Scout Explorer look as shown in Figure 15.
Having verified your status of the “Hello World” application start the start the server and a client of the application as described in the previous section. The client applications will then display your message widget. However, the text widget is still empty, as we did not yet load any initial content into this field. This is the topic of the next section.
2.5. The Server Part
The responsibility of the Scout server in our “Hello World” application is to provide an initial text content for the message field in the client’s user interface. We implement this behaviour in the load method of the server’s DesktopService. An empty stub for the load method of the DesktopService service has already been created during the initial project creation step.
To navigate to the implementation of the desktop service in the Scout SDK, we first expand the blue top-level server node in the Scout Explorer. Below the server node, we then expand the Services folder which shows the DesktopService element. Expanding this DesktopService node, the load method becomes visible as shown in Figure 16.
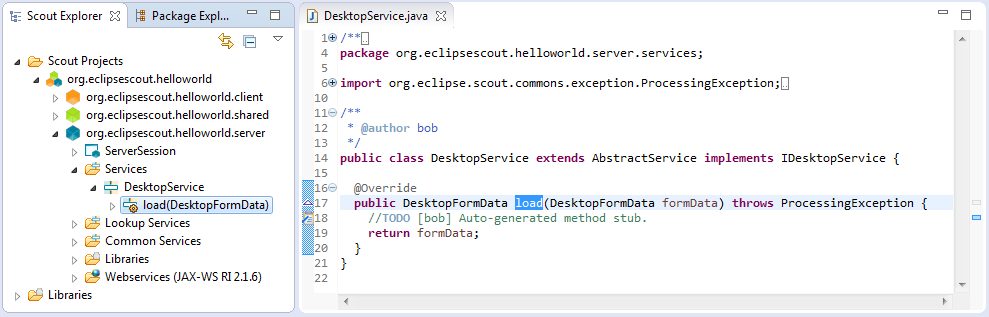
The DesktopService represents the server service corresponding to the DesktopForm on the client side. This initial setup represents Scout’s default where client forms and server services typically come in pairs. Whenever the client’s user interface displays a form to the user, the client connects to the server and calls the load method of the corresponding server service. We just need to add our business logic to the load method of the server’s DesktopService.
According to the signature of the load method, a formData object is passed into this method that is then handed back in the return statement. To complete the implementation of the load method it is sufficient to assign the text 'hello world!' to the message field part of the form data. The complete implementation of the load method is provided in Listing 1.
  @Override
  public DesktopFormData load(DesktopFormData formData) throws ProcessingException {
    formData.getMessage().setValue("Hello World!"); (1)
    return formData;
}| 1 | assign a value to the value holder part of the FormData corresponding to the message field |
With this last element we have completed the Scout “Hello World” application.
2.6. Add the Rayo Look and Feel
For Eclipse Scout applications a slick look and feel called Rayo is available in the Eclipse Marketplace.[19]. And in this (optional) part of the “Hello World” tutorial we will add Rayo to our “Hello World” Swing client application. As a result, we will get a Scout desktop application that looks the same as the corresponding Scout web client as shown in Figure 17.
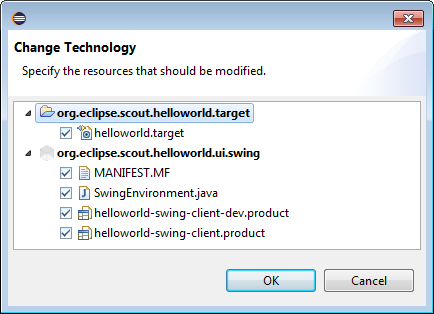
To add Rayo in the Scout SDK to our “Hello World” project, switch to the Scout Explorer and select the top-level org.eclipse.scout.helloworld node. Then, according to Figure 18, select the checkbox Rayo Swing Look and Feel for Eclipse Scout under the Technologies section of the Scout Object Properties. This brings up a dialog showing the proposed changes to application’s target file and the Swing plugin of the “Hello World” application. These changes need to be confirmed with the OK button. The first time the user adds the Rayo feature in the Scout SDK, Eclipse needs to download the package from the Eclipse Marketplace. This download and subsequent installation of Rayo will make you to go through the following steps.
-
Accept Licence: GPL with Classpath Exception
-
Accept unsigned content
After the successful download and installation of the Rayo package, start the Swing client using the procedure described in Section Run the Initial Application. When we also start the web client of the “Hello World” application using the RAP product launcher, we can compare the result side by side.
2.7. Exporting the Application
We are now ready to move the finished “Hello World” application from our development environment to a productive setup. The simplest option to move our application into the ‘wild’ is to use the Export Scout Project wizard provided by the Scout SDK. Using the default settings, the export wizard produces two WAR files.[20] that contain the complete Scout server and the desktop and mobile client applications.
To deploy the application to a web server the WAR files generated by the wizard are the only artefacts needed. The first WAR file contains the Scout server including a zipped desktop client for downloading. In the second WAR file, the RAP server application that provides both the web client and the client for mobile devices.
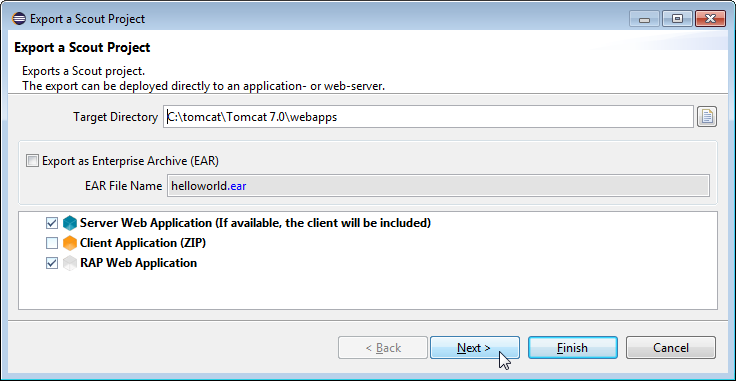
To start the export wizard, we start the Scout SDK with the “Hello World” Scout project. In the Scout Explorer we then select the corresponding context menu on the “Hello World” top level application node as shown in Figure 19. In the first wizard dialog shown in Figure 20, the target directory for the WAR files needs to be specified. You may choose any directory as the target directory.[21]. After clicking Next button the second wizard step proposes the server product file that specifies the artefacts to be exported including the file name for the WAR file for the “Hello World” server application. Typically, the proposed default values are fine. Move to the third dialog with Next button.
helloworld_server.war file. In the last step of the export wizard the RAP sever is exported to the specified file name (right).
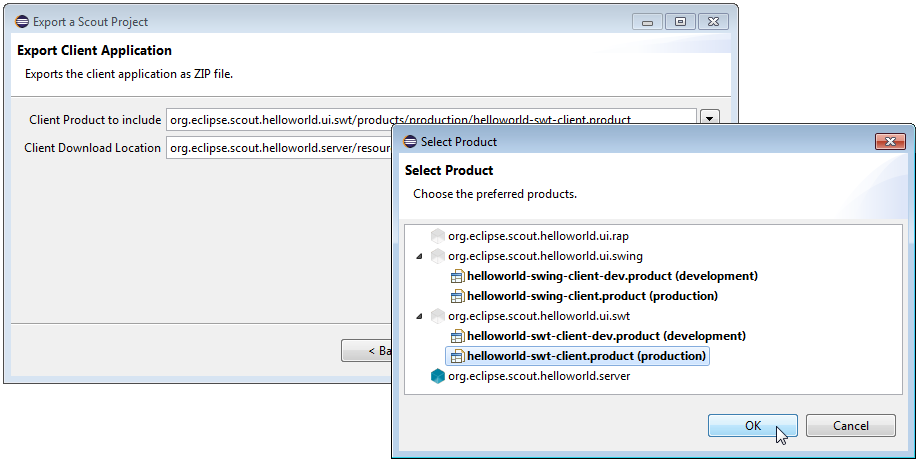
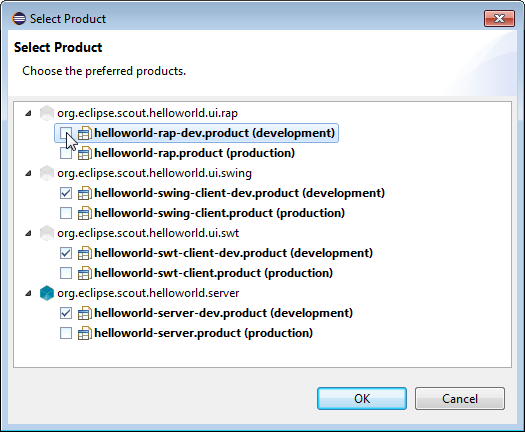
In the third dialog of the Export Scout Project wizard the desktop client to be included in the WAR file needs to be specified. The default selection is set to the SWT client application. For the “Hello World” example, we want to include the Swing client application with the Rayo Look and Feel. For this, we need to change the selected product to helloworld-swing-client.product (production) according to Figure 21. With Next button we move to the last wizard step.
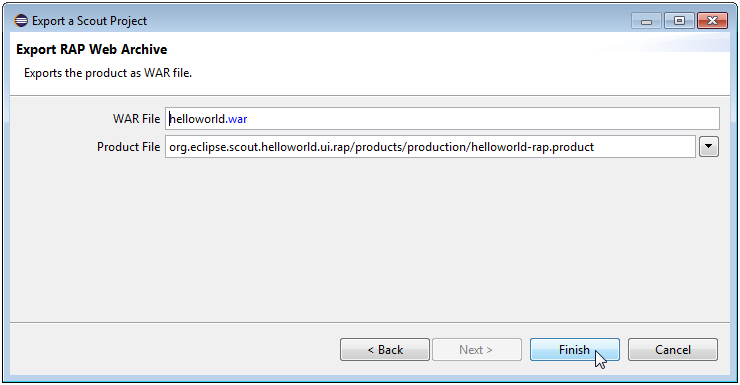
In the last wizard dialog shown in Figure 22, the RAP server product and the corresponding WAR file name are specified. Normally, the proposed field values are fine and we can close the wizard with Finish button. After this last step, the Scout SDK is assembling the necessary artefacts and building the two “Hello World” WAR files. These two WAR files are the only items needed for deploying the “Hello World” application to a web server
2.8. Deploying to Tomcat
As the final step of this tutorial, we deploy the two WAR files representing our “Hello World” application to a Tomcat web server. For this, we first need a working Tomcat installation. If you do not yet have such an installation you may want to read and follow the instructions provided in Appendix Apache Tomcat Installation. To verify a running Tomcat instance, type http://localhost:8080/ into the address bar of the web browser of your choice. You should then see the page shown in Figure 23.
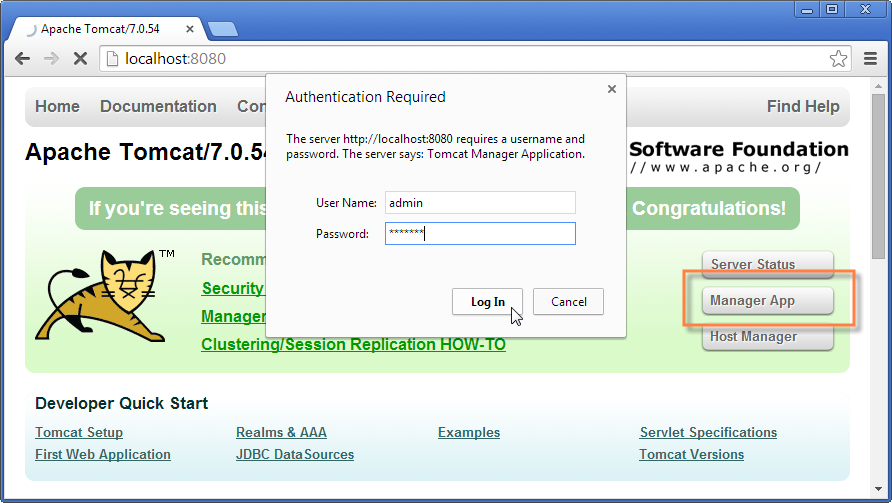
Once the web browser displays the successful running of your Tomcat instance, switch to its “Manager App” by clicking on the button highlighted in Figure 23. After entering user name and password the browser will display the “Tomcat Web Application Manager” as shown in Figure 24. If you don’t know the correct username or password you may look it up in the file tomcat-users.xml as described in Appendix Directories and Files.
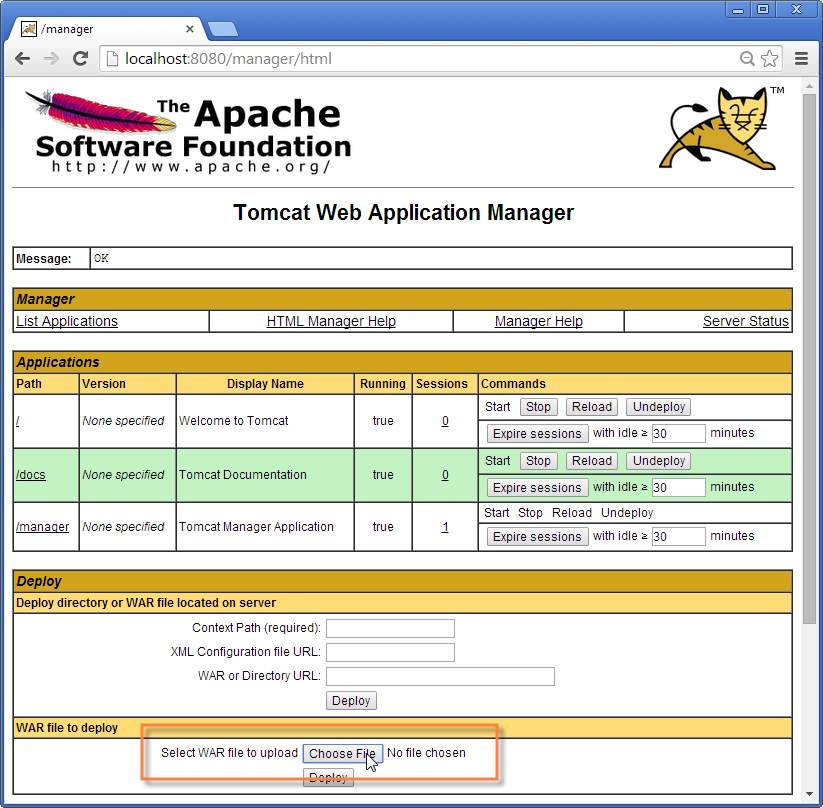
After logging successfully into Tomcat’s manager application, you can select the WAR file(s) to be deployed using button “Choose File” according to the right hand side of Figure 24. After picking your helloworld_server.war and helloworld.war file and closing the file chooser, click on button “Deploy” (located below button “Choose File”) to deploy the application to the Tomcat web server. This will copy the selected WAR file into Tomcats webapps directory and unpack its content into a subdirectory with the same name. Deploying the file helloworld.war will extract its contents into a subdirectory named helloworld. And the file helloworld_server.war will be extracted into subdirectory helloworld_server. You can now connect to the deployed application using the browser of your choice and enter the following address.
http://localhost:8080/helloworld_server/
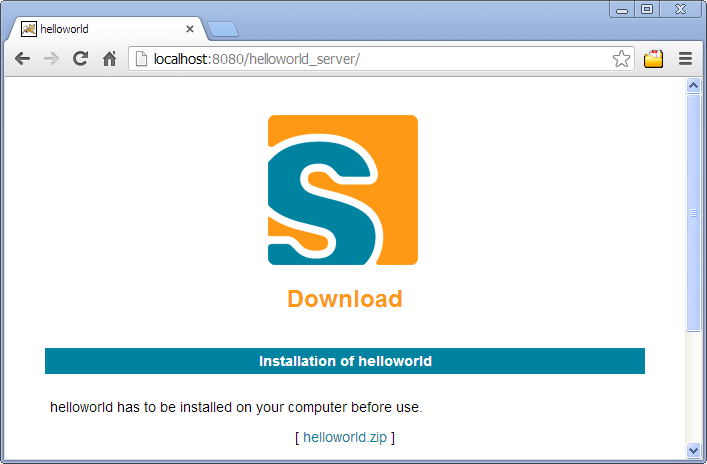
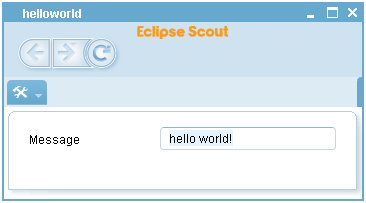
You will then see the home page of the server of your “Hello World” application shown in Figure 25. From here you can download the zipped client application that can be saved in a directory of your choice. After unpacking the zip file, you may start the executable file named helloworld. This will start the “Hello World” client application as shown on the left hand side of Figure 26. To start the “Hello World” web application, open a browser and enter the following address.
http://localhost:8080/helloworld/
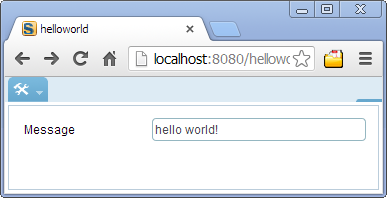
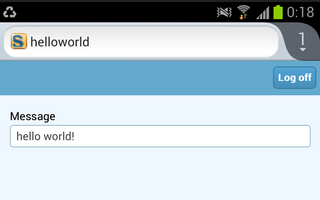
Depending on the device your browser is running on you will be redirected to helloworld/web on a desktop or laptop computer, to helloworld/mobile on a mobile device or to helloworld/mobile if you are connecting from a tablet device. Figure 26 shows screenshots for a desktop client, the web application and the same application in a mobile browser. As demonstrated in these screenshots helloworld/web and helloworld/mobile lead to a different presentation of the same UI optimized to the target form factors of desktop browsers, tablets, and mobile phones.
3. “Hello World” Background
The previous “Hello World” tutorial has been designed to cover the creation of a complete client server application in a minimal amount of time. In this chapter, we will take a deeper look at the “Hello World” and provide background information along the way. The goal is to explain many of the used concepts in the context of a concrete Scout application to allow for a well rounded first impression of the Eclipse Scout framework and the tooling provided by the Scout SDK.
The structure of this chapter is closely related to the “Hello World” tutorial. As you will notice, the order of the material presented here exactly follows the previous tutorial and identical section titles are used where applicable. In addition to Chapter “Hello World” Tutorial, we include Section Walking through the Initial Application to discuss the initial application generated by the Scout SDK.
3.1. Create a new Project
The first thing you need for the creation of a new Scout project is to select a new workspace. For Eclipse, a workspace is a directory where Eclipse can store a set of projects in a single place. As Scout projects typically consist of several Eclipse plugin projects the default (and recommended) setting is to use a single workspace for a single Scout project.


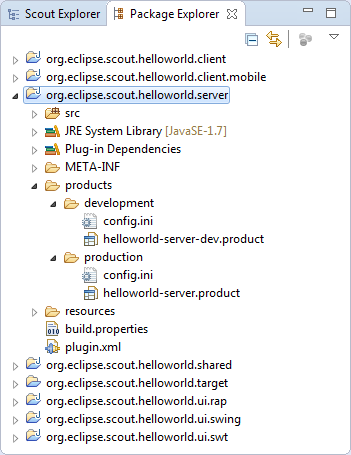
In the case of the “Hello World” application, the workspace contains seven plugin projects as shown on the left side of Figure 27. In the expanded source folder of the client plugin org.eclipse.scout.helloworld.client the organisation of the Java packages is revealed. The Scout Explorer provided on the right side of Figure 27 shows three colored top level nodes below the main project org.eclipse.scout.helloworld.
In the Scout Explorer, the main project node expands to the orange client node org.eclipse.scout.helloworld.client, the green shared node org.eclipse.scout.helloworld.client and the blue server node org.eclipse.scout.helloworld.server. The client node first presents the white user interface (UI) nodes org.eclipse.scout.helloworld.client.ui.* indicating the supported UI technologies. Next, the client mobile node org.eclipse.scout.helloworld.client.mobile is shown. It is responsible for adapting the layout of the user interface suitably for mobile and tablet devices. Finally, after the ClientSession node and the Desktop node, component specific folders allow for a simple navigation to the various client parts.
Comparing the Package Explorer with the Scout Explorer a couple of aspects are notable. First, the number and names of the Eclipse plugin projects is identical in both the Package Explorer and the Scout Explorer view. However, the Scout Explorer recognizes the Scout project structure and explicitly renders the relation between the different Eclipse plugins. In addition, individual node colors are used to indicate the role of each plugin project. Second, the focus of the Scout Explorer lies on the business functionality of the complete client server application. Artefacts only necessary to the underlying Eclipse platform are not even accessible. Third, on the individual elements rendered in the Scout Explorer, the Scout SDK provides menus to start wizards useful to the selected context. In the case of the “Hello World” tutorial we could create the complete application (except for a single line of Java code) using these wizards .
When we revisit the New Scout Project wizard in Figure 7, it now becomes trivial to explain how the Project Name field org.eclipse.scout.helloworld was used as the common prefix for plugin project names and Java package names. Based on the project name, the last part helloworld was used for the Project Alias field. As we have seen in Section Exporting the Application, this project alias is used by the Scout SDK to build the base names of the WAR files in the export step. In turn, after deploying the WAR files as described in Section Deploying to Tomcat, the RAP server application becomes available under the URL http://localhost:8080/helloworld. Should you have a catchy naming for you application in mind, com.mycompany.mycatchyname is therefore a good choice for the Project Name field.
3.2. Walking through the Initial Application
In this section, we will walk you through the central Scout application model components of the “Hello World” example. As each of these components is represented by a Java class in the Scout framework, we can explain the basic concept using the available “Hello World” source code. Below, we will introduce the following Scout components.
-
Desktop
-
Form
-
Form handler
-
Service
-
MainBox
-
Form data
-
Form field
Please note that most of the Java code was initially generated by Scout SDK. In many cases this code can be used “as is” and does not need to be changed. Depending on your requirements, it might very well be that you want to adapt the provided code to fit your specific needs. However, a basic understanding of the most important Scout components should help you to better understand the structure and working of Scout applications.
3.2.1. Desktop
The desktop is the central container of all visible elements of the Scout client application. It inherits from Scout class AbstractDesktop and represents the empty application frame with attached elements, such as the applications menu tree. In the “Hello World” application, it is the Desktop that is first opened when the user starts the client application.
To find the desktop class in the Scout Explorer, we first navigate to the orange client node and double click the Desktop node just below. This will open the associated Java file Desktop.java in the editor view of the Scout SDK. Of interest is the overwritten callback method execOpened shown in Listing 2.
  @Override
  protected void execOpened() throws ProcessingException {
    //If it is a mobile or tablet device, the DesktopExtension in the mobile plugin takes care of starting the correct forms.
    if (!UserAgentUtility.isDesktopDevice()) {
      return;
    }
    DesktopForm desktopForm = new DesktopForm();
    desktopForm.setIconId(Icons.EclipseScout);
    desktopForm.startView();
  }
Method execOpened is called by the Scout framework after the desktop frame becomes visible. The only thing that happens here is the creation of a desktopForm object, that gets assigned an icon before it is started via method startView. This desktop form object holds the Message field text widget that is displayed to the user.[22]. More information regarding form elements are provided in the next section.
3.2.2. Form
Scout forms are UI containers that hold form field widgets. A Scout form always inherits from Scout class AbstractForm and can either be displayed as a dialog in its own window or shown as a view inside of another UI container. In the “Hello World” application a DesktopForm object is created and displayed as a view inside of the desktop element.
To find the desktop form class in the Scout Explorer, expand the orange client node.[23]. Below this node, you will find the Forms folder. Expand this folder to show the DesktopForm as shown in Figure 28. In the Scout Object Property window in the screenshot, we can also see the Display Hint property. Its value is set to ‘View’ to display the desktop form as a view and not as a dialog in its own frame.
Expand the DesktopForm to show its children: Variables, MainBox and Handlers. The Variables sub folder contains variables. They are invisible to the application user. The “Hello World” application is so simple, it does not need variables. The sub folder MainBox contains form fields. These are the visible user interface elements. The main box of our DesktopForm holds the DesktopBox containing the MessageField added with the New Form Field wizard. Finally, the Handlers sub folder contains all available form handlers. The view handler shown in Figure 28 has been added in the initial project creation step.
3.2.3. Form Handler
Form handlers are used to manage the form’s life cycle. Scout form handlers inherit from AbstractFormHandler and allow the implementation of desired behaviour before a form is opened, or after it is closed. This is achieved by overwriting callback methods defined in AbstractFormHandler. The necessary wiring is provided by the Scout framework, either by the initial project creation step or when using one of the provided Scout SDK wizards.
public class DesktopForm extends AbstractForm {

  public class ViewHandler extends AbstractFormHandler {

    @Override
    protected void execLoad() throws ProcessingException {
      IDesktopService service = SERVICES.getService(IDesktopService.class);
      DesktopFormData formData = new DesktopFormData();
      exportFormData(formData);
      formData = service.load(formData);
      importFormData(formData);

    }
  }

  public void startView() throws ProcessingException {
    startInternal(new ViewHandler());
  }
}
In the “Hello World” application, it is the overwritten execLoad method in the ViewHandler that defines what will happen before the desktop form is shown to the user. The corresponding source code is provided in Listing 3. It is this execLoad method where most of the behaviour relevant to the “Hello World” application is implemented. Roughly, this implementation is performing the following steps.
-
Get a reference to the forms server service running on the server.
-
Create a data transfer object (DTO).[24]
-
Pass the empty DTO to the load service method (ask the server for some data).
-
Update the DTO with the content provided by the service load method.
-
Copy the updated information from the DTO into the desired form field.
To open the ViewHandler class in the Java editor of the Scout SDK, double click on the ViewHandler in the Scout Explorer. Your Scout SDK should then be in a state similar to Figure 28. In the lower part of Listing 3 we can see the wiring between the desktop form and the view handler in method startView. Further up, we find method execLoad of the view handler class.
Before we discuss this method’s implementation, let us examine when and how execLoad is actually called. As we have seen in the Desktop class (see Listing 2), the form’s method startView is executed after the desktop form is created. Inside method startView (see Listing 3), the desktop form is started/opened using startInternal. In method startInternal a view handler is then created and passed as a parameter. This eventually leads to the call of our execLoad custom implementation.
We are now ready to dive into the implementation of method execLoad of the desktop form’s view handler. First, a reference to a form service identified by IDesktopService is obtained using SERVICES.getService. Then, a form data object (the DTO) is created and all current form field values are exported into the form data via method exportFormData. Strictly speaking, the exportFormData is not necessary for the use case of the “Hello World” application. But, as this is generated code, there is no benefit when we manually delete the exportFormData command. Next, using the load service method highlighted in Listing 3, new form field values are obtained from the server and assigned to the form data object. Finally, these new values are imported from the form data into the form via the importFormData method. Once the desktop form is ready, showing it to the user is handled by the framework.
To add some background to the implementation of the execLoad above, the next section introduces services and form data objects.
3.2.4. Form Services and Form Data Objects
Form services and form data objects are used in the Scout framework to exchange information between the Scout client and server applications. When needed, a service implemented on the server side can register a corresponding proxy service on the client. This proxy service is invoked by the client as if it were implemented locally. In fact, when we get a service reference using SERVICES.getService, we do not need to know if this service runs locally on the client or remotely on the server.
In the “Hello World” example application, the client’s desktop form has an associated desktop service running on the server. This correspondence between forms and form services is also reflected in the Links section of the Scout Object Properties of the desktop form. As shown in Figure 28, links are provided not only for the desktop form, but for its desktop form data, the corresponding desktop form service as well as for the service interface IDesktopService. On the client, this interface is used to identify and register the proxy service for the desktop service.
To transfer data between the client and the server, the “Hello World” application uses a DesktopFormData object as a DTO. This form data object holds all form variables and values for all the form fields contained in the form. Taking advantage of this correspondence, the Scout framework provides the convenience methods exportFormData and importFormData. As a result, the developer does not need to deal with any mapping code between the form data object and the form fields.
The actual implementation of the desktop form service in class DesktopService is implemented on the server side. As the class DesktopService represents an ordinary Scout service it inherits from AbstractService. It also implements its corresponding IDesktopService interface used for registering both the actual service as well as the proxy service.
3.3. Run the Initial Application
3.3.1. The Launcher Boxes
To run a Scout application the Scout SDK provides launcher boxes in the Scout Object Properties as described in Section Run the Initial Application. These object properties are associated to the top level project node in the Scout Explorer. Using the Edit icon provided in the product launcher section of the Scout Object Properties, the list of launcher boxes can be specified as shown in Figure 29.

3.3.2. Eclipse Product Files
The available products shown on the right side of Figure 29 represent the Eclipse product files created in the initial project creation step. Product files.[25] are used in Eclipse to specify the configuration and content of an executable application. In the case of the “Hello World” project, four executable applications --- with two Eclipse product files for each application --- have been defined by the Scout SDK. The four applications, one for the server application and one for each client technology, have already been discussed in Section Run the Initial Application.
We assume that Scout applications will be run in at least two different environments. Once from within the Eclipse IDE in the development environment, and once by the actual end users outside the Eclipse IDE. This second environment is named production environment. Depending on the complexity of deployment processes there might be some more environments to consider, such as testing and integration environments. This is the reason that the Scout SDK initially creates two product files that are associated with the development and the production environment.
Even in the case of the simple “Hello World” example, the Scout application is started in two target environments. The development environment defines the product in the context of the Scout SDK. To export and run the Scout application outside of the Scout SDK, the production product files are used to define the application when it is to be started on a Tomcat web server. Figure 30 illustrates this situation for the “Hello World” server application. On the left side, the blue server node is selected in the Scout Explorer. This opens the two server launcher boxes for the production and the development environment. On the right side of Figure 30, the corresponding plugin project org.eclipse.scout.helloworld.server is expanded to show the file based organisation of the two product definitions.
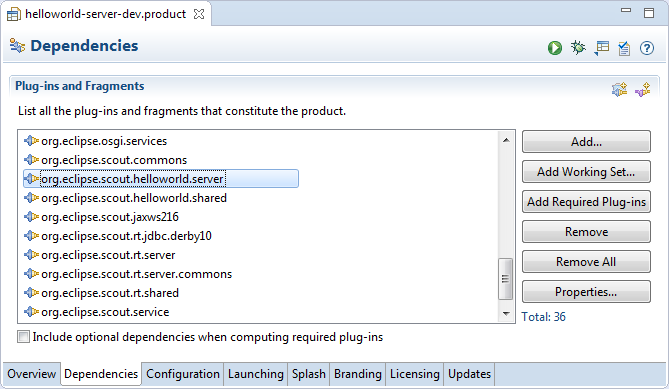
For the case of the “Hello World” example we did not need to edit or change the product files generated by the Scout SDK. However, if your requirements are not met by the provided product files, you may use the Eclipse product file editor. A screenshot of this editor is shown in Figure 31 with the tab Dependencies opened. In the tab Dependencies, the complete list of necessary plugins is provided. Example plugins visible in Figure 31 include the “Hello World” server and shared plugins, Scout framework plugins, and Jetty plugins. The Jetty.[26] plugins are only needed to run the “Hello World” server application inside the Scout SDK. Consequently, Jetty plugins are not listed as a dependency in the Scout server’s production product file.
3.3.3. Eclipse Configuration Files
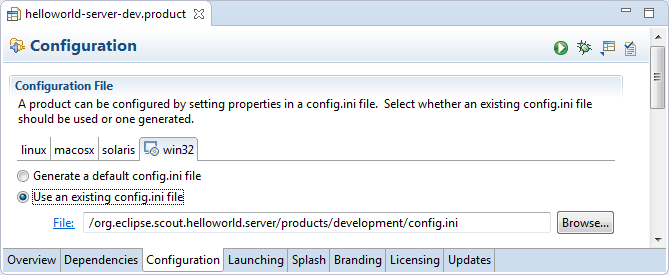
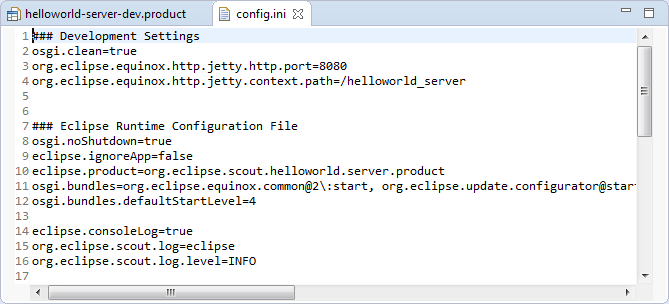
Switching to tab Configuration in the product file editor, shows the selected radio button Use an existing config.ini file and the link to the configuration file provided in the File field as shown in the upper part of Figure 32. Below, a part of the server’s config.ini file is shown. Both the entry in the product file pointing to the configuration file, and the content of the config.ini file has been generated by the Scout SDK during the initial project creation step. As shown in the lower part of Figure 32, Eclipse configuration files have the format of a standard property file. The provided key value pairs are read at startup time if the config.ini file can be found in folder configuration by the Eclipse runtime.
3.3.4. Scout Desktop Client Applications
Having introduced Eclipse product files and configuration files based on the “Hello World” server application, we will now look at the different client applications in turn. With Swing applications.[27] and SWT applications.[28], two alternative UI technologies are currently available to build Scout desktop client applications. More recently, JavaFX.[29] is promoted as a successor to Swing and it is therefore likely, that Scout will provide JavaFX client applications in the future.
When we compare the product files for the Swing and the SWT client applications, it is apparent that both client applications share a large number of plugins. Most importantly, the complete UI model and the business logic is identical for both client applications. In other words, the value created by the Scout developer is contained in the two plugins org.eclipse.scout.helloworld.client and org.eclipse.scout.helloworld.shared. To create an executable client application, we only need to combine these two plugins with a set of plugins specific to the desired UI technology.
After starting the “Hello World” Swing client or the corresponding SWT client application, the client application first reads the startup parameters from its config.ini file. Among other things, this client configuration file contains the parameter server.url to specify the URL to the “Hello World” server. After the startup of the “Hello World” client application, it can then connect to the “Hello World” server application using this address.
3.3.5. Scout Web, Tablet and Mobile Clients
For Scout web, tablet and mobile clients, the Eclipse RAP framework.[30] is used. The RAP framework provides an API that is almost identical to the one provided by SWT and allows to use Java for server-side Ajax.[31]. This setup implies that Scout tablet and mobile clients are not native clients but browser based.[32].
Comparing the product file of the SWT client applications with the RAP application, we observe that the RAP development product does not include any SWT plugins, but a set of RAP and Jetty plugins. In addition, the RAP product also contains the Scout mobile client plugins org.eclipse.scout.rt.client.mobile and org.eclipse.scout.helloworld.client.mobile. These two plugins are responsible for transforming the UI model defined in the “Hello World” client plugin to the different form factors of tablet computers and mobile phones.
If you start the “Hello World” RAP application in your Scout SDK, you are launching a second server application in a Jetty instance on a different port than the “Hello World” server application. As in the case of the desktop client applications, the RAP or Ajax server application knows how to connect to the “Hello World” server application after reading the parameter server.url from its config.ini file.
3.4. The User Interface Part
Using the UI of the “Hello World” application we explain in this section how the Scout UI form model is represented in Java. We also describe how this representation is exploited by the Scout SDK to automatically manage the form data objects used for data transfer between Scout client and Scout server applications. Finally, will have a brief look at internationalization.[33] support of Scout for texts.
@FormData(value = DesktopFormData.class, sdkCommand = FormData.SdkCommand.CREATE)
public class DesktopForm extends AbstractForm {

  @Order(10.0)
  public class MainBox extends AbstractGroupBox {

    @Order(10.0)
    public class DesktopBox extends AbstractGroupBox {

      @Order(10.0)
      public class MessageField extends AbstractStringField {

        @Override
        protected String getConfiguredLabel() {
          return TEXTS.get("Message");
        }
      }
    }
  }
}
As discussed in Section Form Scout forms consist of variables, the main box and a number of form handlers. The main box represents the visible part of Scout’s form model. It may holds any number of form fields. Using container fields such as group boxes, it is possible to define complex structures such as hierarchical UI models containing multiple levels. In the Scout framework the forms structure is represented in the form of inner classes that are located inside of the MainBox class. And the New Form Field wizard of the Scout SDK fully supports this pattern. Listing 4 provides the concrete example using the the desktop form of the “Hello World” tutorial.
Using inner Java classes to model a form’s content is a central aspect of the UI part of the Scout application model. It allows the Scout SDK to easily parse the form’s Java code on the fly and directly reflect changes to the form model in the Scout Explorer and the Scout Property View. However, this is not the only benefit for the Scout SDK. As form data objects hold all form variables and the values of all form fields contained in the form, the Scout SDK can keep the form data classes in sync with the forms of the application. It is important to note that this mechanism only depends on the Java code of the form field class. In consequence, the Scout SDK can update form field classes in the background even when form fields are manually coded into the form’s Java class. This includes adding all the necessary getter and setter methods to access the values of all the fields defined on a form. As a result, Scout developers don’t need to manually update form data objects when the UI model of a form is changed. The Scout SDK takes care of this time consuming and error prone task.
public class HelloworldTextProviderService extends AbstractDynamicNlsTextProviderService {
  @Override
  protected String getDynamicNlsBaseName() {
    return "resources.texts.Texts";
  }
}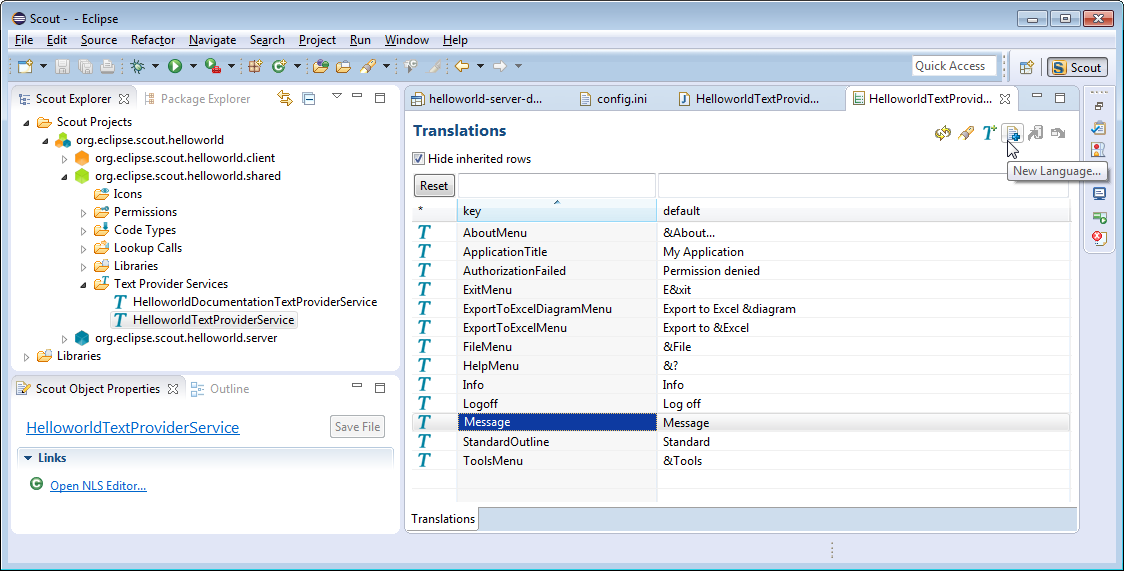
When we did add the Message field to the desktop form of the “Hello World” application we had to enter a new translation entry for the label of the message field as shown in Figure 13. The individual translation entries are then stored in language specific text property files. To modify translated texts we can use the NLS editor.[34] provided by the Scout SDK as shown in Figure 33.
To access the translated label field entry in the application, the Scout SDK generated the implementation of getConfiguredLabel using TEXTS.get("Message") as shown in Listing 4. In the default Scout project setup, calling TEXTS.get uses the DefaultTextProviderService in the background. This text provider service then defines the access path for the text property files to use for the translation. To resolve the provided key, the user’s locale settings are used to access the correct text property file.
3.5. The Server Part
In this background section we take a closer look at Scout services and calling service methods remotely. We will first discuss the setup of an ordinary Scout service. Then, the additional components to call service methods remotely are considered. To explain the concepts in a concrete context, we use the setup of the DesktopService of our “Hello World” example.
3.5.1. Scout Services
Scout services are OSGi services.[35] which in turn are defined by standard Java classes or interfaces. Scout is just adding a convenience layer to cover typical requirements in the context of client server applications. To support Scout developers as much as possible, the Scout SDK offers wizards that generate the necessary classes and interfaces and also take care of service registration.
public class DesktopService extends AbstractService implements IDesktopService {

  //tag::load[]
  @Override
  public DesktopFormData load(DesktopFormData formData) throws ProcessingException {
    formData.getMessage().setValue("Hello World!"); (1)
    return formData;
  }
All Scout services need to extend Scout’s AbstractService class and implement their own corresponding interface. This also applies to the “Hello World” desktop service according to Listing 6. As shown in Figure 16, this service can be located in the Scout Explorer under the blue server node in the Services folder.
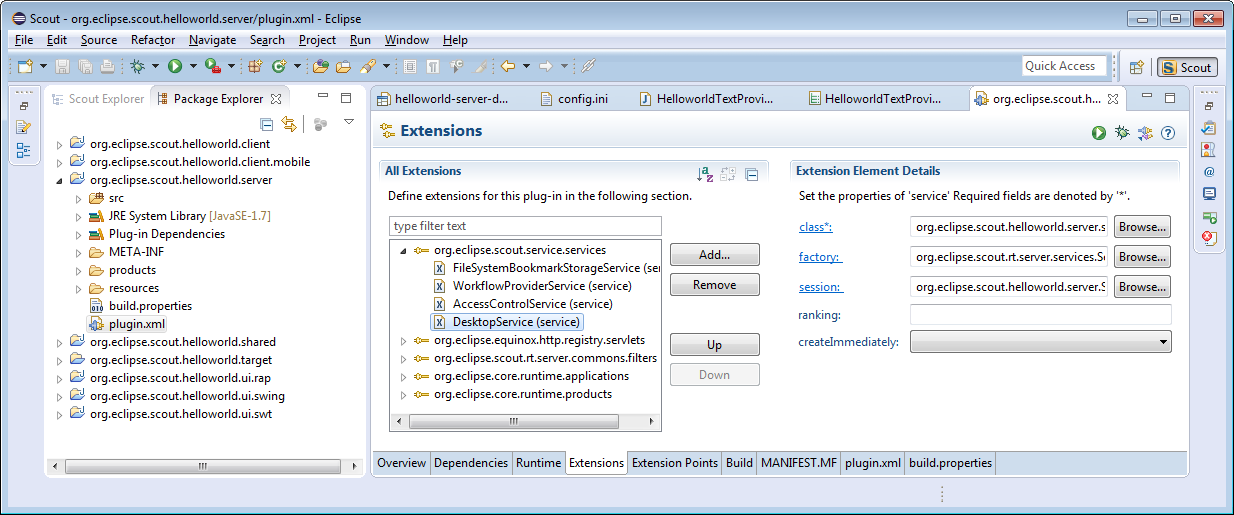
Before Scout services can be accessed and used, they need to be explicitly registered as a service in the correct place. For this registration mechanism, Scout is using Eclipse extension points and extensions.[36] which are conceptually similar to electrical outlets and plugs. And in order to work, as in the case of outlets and plugs, the plug must fit to the outlet. In our “Hello World” example, the extension (plug) is represented by class DesktopService and the service extension point (outlet) is named org.eclipse.scout.service.services. What makes the desktop service fit to the service extension point is the fact that its interface IDesktopService extends Scout’s IService interface.
<?xml version="1.0" encoding="UTF-8"?>
<plugin>

   <extension
         name=""
         point="org.eclipse.scout.service.services">
      <service
            factory="org.eclipse.scout.rt.server.services.ServerServiceFactory"
            class="org.eclipse.scout.helloworld.server.services.DesktopService"
            session="org.eclipse.scout.helloworld.server.ServerSession">
      </service>
   </extension>

</plugin>
The registration of the desktop service under the service extension point is then defined in the plugin.xml file of the “Hello World” server plugin. As shown in Figure 34, the plugin.xml file is located in the root path of plugin org.eclipse.scout.helloworld.server. To modify a plugin.xml, you can either use the Eclipse plugin editor or your favorite text editor. In Figure 34, the registration of the desktop service is shown in the Extensions tab of the plugin editor. For the corresponding XML representation in the plugin.xml file, see Listing 7.
3.5.2. Scout Proxy Services
In the “Hello World” application the load method of the desktop service is called remotely from the client. But so far, we have only seen how the desktop service is implemented and registered in the server application. To call server service methods remotely from Scout client applications, the Scout framework provides client proxy services and the service tunnel. As the name implies, a client proxy service acts as a local proxy service (running in the Scout client application) of a server service (running remotely in the Scout server application).
<?xml version="1.0" encoding="UTF-8"?>
<plugin>

   <extension
         name=""
         point="org.eclipse.scout.service.services">
      <proxy
            factory="org.eclipse.scout.rt.client.services.ClientProxyServiceFactory"
            class="org.eclipse.scout.helloworld.shared.services.IDesktopService">
      </proxy>
   </extension>

</plugin>
Client proxy services are defined by a Java interface located in the shared plugin of the Scout application. As shown in Listing 6 of the desktop service, this service interface is also implemented by the desktop service class in the server plugin. Corresponding to the registration of the desktop service in the server plugin, client proxy services need to be registered in the client’s plugin.xml file. The content of the “Hello World” client plugin configuration file is provided in Listing 8. To create proxy services in Scout clients, the ClientProxyServiceFactory is used. This is also reflected in the extension defined in Listing 8. Internally, this service factory then uses the service tunnel to create the local proxy services.
To call a remote service method from the Scout client application, we first need to obtain a reference to the proxy service. Using the SERVICES.getService method with the interface IDesktopService, we can obtain such a reference as shown in Listing 3 for the view handler of the desktop form. With this reference to the client’s proxy service, calling methods remotely works as if the service would be running locally. Connecting to the server, serializing the method call including parameters (and de serializing the return value) is handled transparently by Scout.
3.6. Add the Rayo Look and Feel
Rayo has been designed in 2009 by BSI for its CRM.[37] application and contact center solution. Since then, Rayo has been copied for Scout web applications and also adapted to work on touch/mobile devices.
The implementation of Rayo for desktop clients is based on the Java Synth look and feel.[38]. However, in a few cases it was necessary to adjust some of the synth classes. In order to do this, the adapted classes are copied form the OpenJDK implementation.[39] As OpenJDK is licenced under the GNU General Public Licence (GPL) with a linking exception it is not possible to distribute Rayo under the Eclipse Public Licence. That is why Rayo is not initially contained in the Eclipse Scout package but needs to be downloaded from the Eclipse Marketplace. Fortunately, there is still no restriction to use Rayo in commercial products. The only remaining restriction applies to modifying Rayo for commercial products. In this case you will be obliged to redistribute your modified version of Rayo under the same licence (GPL with classpath exception).
With Eclipse Scout 3.8 (Juno), the Scout framework also allows to build web clients based on Eclipse RAP. Great care has been taken to ensure, that the look and feel for Scout web applications matches the look and feel of the desktop as closely as possible. As RAP is already distributed under the EPL licence the Rayo for web apps is directly contained in the Scout package. TODO: Describe what to change to use RAP default look and feel
A similar approach was chosen for Rayo on tablets and mobile devices that are supported with Eclipse Scout 3.9 (Kepler). For such devices optimized components are used to take into account the smaller screens and the absence of a mouse (no context menus!) But as far as possible, the Rayo look and feel also applies to touch devices. TODO: Pointer to more info regarding mobile devices.
3.7. Exporting the Application
In this background section we look at the content and organisation of the two WAR files generated by the Scout SDK Export Scout Project wizard. The first WAR file holds the Scout server including a landing page to download the Scout desktop client. The desktop client is provided in the form of a standalone ZIP file. In the second WAR file, the Ajax server based on Eclipse RAP is contained. This Ajax server provides the URLs that can be accessed by web browsers running on desktop computers or tablet and mobile devices.

The content and its organisation of the exported WAR files was not specifically designed for Scout applications. Rather, it is defined according to server-side Equinox.[40], the typical setup for running Eclipse based server applications on a web server. Using file helloworld_server.war as a concrete example, we will first describe the general organisation of the WAR file. Then, we introduce individual artefacts of interest that are contained in this WAR file.
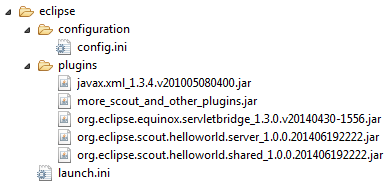
The explicit organisation of the server WAR file is shown in Figure 35. From the left hand side of the figure we can see that on the top level only folder WEB-INF exists in the WAR file. This folder contains all files and directories that are private to the web application. Inside, the web deployment descriptor file web.xml as well as the directories lib and eclipse are located. While the web.xml file and directory lib are standard for servlet based based applications.[41], directory eclipse contains all necessary artefacts for servlet based Eclipse applications.[42]. Such as Eclipse Scout server applications.
On the right hand side of Figure 35 the eclipse specific content of the WAR file is shown. From top to bottom we find the configuration file config.ini introduced in Section Eclipse Configuration Files. In folder plugins the necessary plugins that constitute the eclipse application are located where the plugins are available in the form of JAR files.[43]. This includes plugins for servlet management, the eclipse platform including the servlet bridge, the scout framework parts and of course our “Hello World” server and shared plugin. These “Hello World” jar files exactly match with the plugin projects discussed in Section Create a new Project.
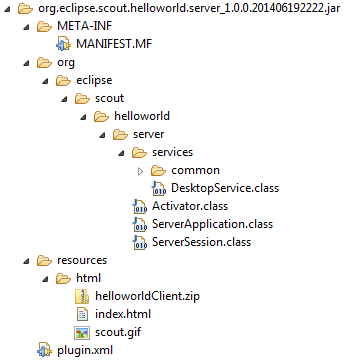
<?xml version="1.0" encoding="UTF-8"?>
<plugin>

   <extension
         name=""
         point="org.eclipse.equinox.http.registry.servlets">
      <servlet
            alias="/"
            class="org.eclipse.scout.rt.server.ResourceServlet">
         <init-param
               name="bundle-name"
               value="org.eclipse.scout.helloworld.server">
         </init-param>
         <init-param
               name="bundle-path"
               value="/resources/html">
         </init-param>
      </servlet>
   </extension>

</plugin>
In Figure 36 some of the content of the “Hello World” server plugin is shown. The first thing to note is that the plugin file conforms to the JAR file format including a META-INF/MANIFEST.MF file and the directory tree containing the Java class files, as the DesktopService.class implemented in Section The Server Part of the “Hello World” tutorial. In folder resources/html the necessary files for the download page shown in Figure 25 including the zipped desktop client are contained. To access this download page the Scout server’s resource servlet ResourceServlet is responsible. It is registered under the servlet registry as shown in Listing 9. With setting "/" of the alias parameter the download page becomes available under the root path of the Scout server application. For the mapping to the contents resources/html the parameter bundle-path is used.
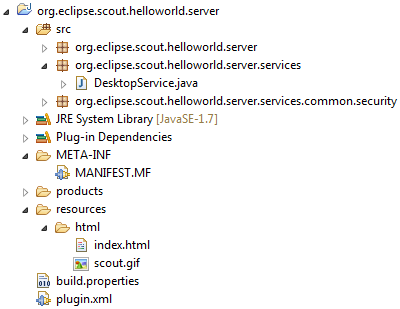
Revisiting the “Hello World” server plugin project in the Eclipse package explorer as shown in Figure 37, we can see how the plugin project elements are transformed and copied into the JAR file. Examples files are plugin.xml and MANIFEST.MF as well as static HTML content of the download page (files index.html and scout.gif). The zipped client is missing of course. It is assembled, zipped and added into the Scout server JAR file by the Export Scout Project wizard of the Scout SDK. In case you need to change/brand/amend the download page for the desktop client, you have now learned where to add and change the corresponding HTML files.
3.8. Deploying to Tomcat
In this section we will discuss two common pitfalls when working with the Scout IDE and Tomcat. The symptoms linked to these problems are Scout server applications that are not starting or Scout applications that fail to properly update.
In usual culprit behind Scout server applications that fail to start is a blocked port 8080. This setting can be created when we try to run both the Jetty web server inside the Scout SDK and the local Tomcat instance. In consequence, either Jetty or Tomcat is not able to bind to port 8080 at startup which makes it impossible for a client to connect to the right server. To avoid such conflicts, make sure that you always stop the Scout server application in the Scout SDK (effectively killing Jetty) before you restart your Tomcat server. Alternatively, you can assign two different ports to your Jetty webserver and your Tomcat webserver.
To modify Jetty’s port number in the Scout SDK you have to update the corresponding properties in the config.ini files of the development products of your Scout server application and all client applications. In the Scout server’s config.ini file the property is named org.eclipse.equinox.http.jetty.http.port, in the client config.ini files the relevant property is called server.url. To change the port number to 8081 for the “Hello World” example in the Scout SDK you could use the following lines in the individual config.ini files.
Scout Server |
org.eclipse.equinox.http.jetty.http.port=8081 |
Scout Desktop Client |
server.url=http://localhost:8081/helloworld_server/process |
Scout Ajax Server |
server.url=http://localhost:8081/helloworld_server/ajax |
The second pitfall is connected to a web application that seems to refuse to update to the content of a freshly generated WAR file. At times it seems that your changes to a deployed WAR file do not find their way to the application actually running. In many cases this is caused by a cached instance of the previous version of your application located in Tomcat’s working directory. To save yourself much frustration, it often helps just to clear Tomcat’s working directory and restart Tomcat. For this, you may follow the following procedure.
-
Stop the Tomcat web server
-
Go to folder work/Catalina/localhost
-
Verify that you are not in Tomcat’s webapps folder
-
Delete all files and directories in folder work/Catalina/localhost
-
Start the Tomcat web server
How you start and stop Tomcat depends on the platform you are running it. If you have installed Tomcat on a Windows box according to Appendix Apache Tomcat Installation it will be running as a service. This means that to stop the Tomcat web server you need to stop the corresponding Windows service. For starting and stopping Tomcat on Mac/Linux/Unix systems, you can use the command line script files startup.sh and shutdown.sh located in Tomcat’s subdirectory bin.
For those interested in more advanced aspects of Apache Tomcat we recommend the article “More about the Cat” by Chua Hock-Chuan.[44].
4. Scout Tooling
In addition to the Scout runtime framework presented in the previous chapter Eclipse Scout also includes a comprehensive tooling, the Scout SDK.
Thanks to this tooling, developing Scout applications is made simpler, more productive and also more robust. Initially, a solid understanding of the Java language is sufficient to start developing Scout applications and only a rough understanding of the underlying Eclipse/OSGi/JEE technologies is required.
The Scout SDK consists of navigation support for the application model defined by the Scout runtime and provides many intuitive component wizards. This creates an ideal environment for beginners to build complete, high-quality Scout applications. Typically Java developers only need a few days of Scout training to start creating their own advanced client server business applications.
The Scout SDK also helps developers to become more productive. Many repetitive and error prone tasks run automatically in the background or are taken care of by the component wizards of the Scout SDK. This starts with the initial creation of a Scout client server application, continues with the wizards to create complete dialogs and pages and includes the automatic management of the data transfer objects needed for the client server communication.
Finally, the application code created by the Scout SDK wizards helps to ensure that the resulting Scout application has a consistent and robust code base and is well aligned with the application model defined by the Scout runtime framework.
4.1. The Scout SDK
The Scout SDK is added to the Eclipse IDE in the form of the Scout perspective.[45]. To illustrate how the perspective works, we will re-use the “Hello World” Scout project from Chapter “Hello World” Tutorial.
The Scout perspective contains two view parts: the Scout Explorer view and Scout Object Properties view. Additionally, the Scout SDK contains a comprehensive set of wizards that support the developer in creating Scout application components.
The Scout Explorer view allows the developer to navigate the Scout application model. Once an element in the Scout Explorer is selected, the Scout Object properties view allows to validate and change properties of the selected element. Depending on the selection in the Scout Explorer, the Scout SDK offers appropriate context menus to start the related wizards.
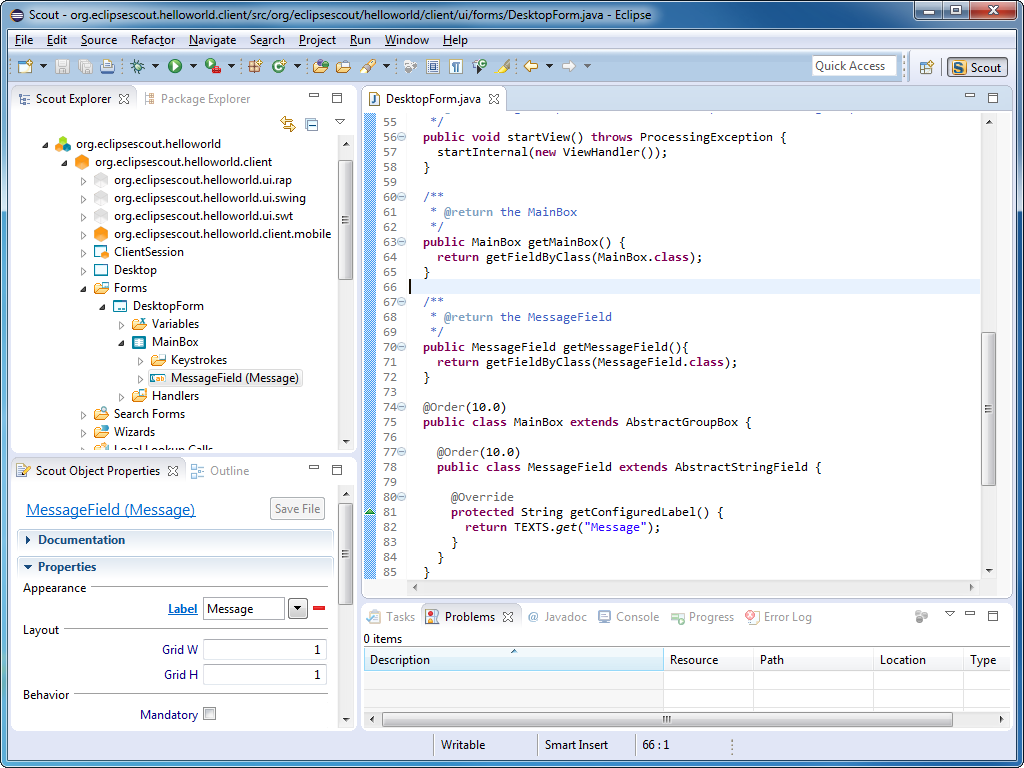
Figure 38 provides a screenshot of the Scout SDK perspective. In the Scout Explorer shown in the upper left part of the screenshot, the message field in the DesktopForm of the “Hello World” application is selected. In the Scout Object Properties located below, the message field’s appearance, layout and behavior properties are displayed. On the right hand side, the corresponding source code is loaded in a Java editor.
When the developer changes a property of the selected element, the Java code is updated accordingly and vice versa. For example clicking the Mandatory property in the Scout Object Properties of the message field will insert the method getConfiguredMandatory to the message field’s class. This demonstrates how the Scout SDK directly works on the Java source code. In fact, the Java source code is almost the only artifact relevant for the Scout SDK to ‘understand’ the Scout application model. Taking advantage of this setup, the Scout SDK implements a full round-trip-engineering from creating the Java code for Scout application components, parsing code changes in the background, and displaying the current implementation of the Scout application in the Scout Explorer and the Scout Object Properties.
Thanks to the round-trip-engineering provided by the Scout SDK, the information presented in the Scout Explorer and the Scout Object Properties always stay in sync with the Java code of the Scout application. Start the Eclipse IDE with the workspace containing an “Hello World” application. Then, navigate to method getConfiguredLabel as shown in Figure 38, and add the java snippet shown below to the class MessageField.
@Override
protected boolean getConfiguredMandatory() {
  return true;
}
After having saved the code change, you can observe that the Mandatory property in the section Behavior of the message field’s Scout Object properties has changed its state. The font of its label is now presented in bold face and underlined, the checkbox is ticked and a red minus icon is shown on the right side of the property. Obviously, the Scout SDK is directly operating on the project’s source code and does not rely or need any external meta data. This provides the flexibility to develop Scout applications with or without the support of the Scout SDK. And this choice offered to the Scout developer is one of the most important features provided by the Scout SDK. The Scout developer may take advantage of the development support provided by the Scout SDK without being restricted by the Scout tooling in any way.
Technically, the Scout SDK is a set of Eclipse plugins that operate on top of the Eclipse JDT and the Eclipse PDE projects. The Java Development Tools (JDT) [46] contain the tooling to support the development of any Java applications, and the Plugin Development Environment (PDE) [47] provides tools to create, develop, test, debug, build and deploy Eclipse plugins, and additional artifacts relevant for Eclipse based applications. As in the case of the Scout Runtime, the plugins representing the Scout SDK, the JDT and the PDE are all located in the plugins directory of your Eclipse installation and named org.eclipse.scout.sdk.*, org.eclipse.jdt.* and org.eclipse.pde.* .
4.2. The Scout Explorer
The Scout Explorer view is responsible for the navigation support within the Scout application model. This navigation support is presented in the form of a tree view and includes the client with its UI components, the server and the shared part of a Scout application. It also includes all Scout application modules of modular Scout applications.[48]. For the actual navigation in the tree representing the Scout application both the mouse or the keyboard can be used.
To expand or collapse a selected node in the Scout Explorer, you may click on the tiny plus icon or the minus icon presented to the left of the node. Alternatively, you can also use the Right or the Left cursor keys.
Once a node in the tree is selected, the Scout Object Properties view presents the associated configuration of the selected element. If the selected element represents a specific application model component, the corresponding Java source code can be accessed through a double click on the node, or hitting the Enter key.
The navigation tree provided in the Scout Explorer view also allows the developer to add elements to the application. Depending on the selected node in the tree, wizards can be launched using the context menus. The wizards support the creation of application components, such as forms on the client side or services on the server side by generating the necessary Java code.
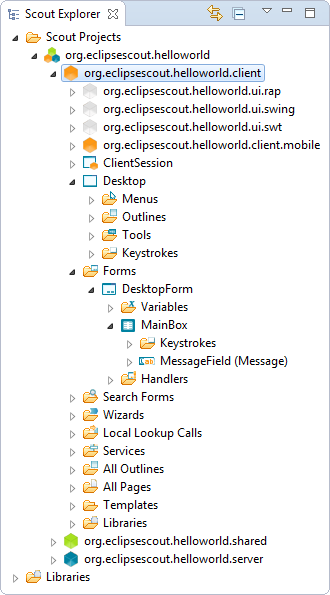
In Figure 39 the top level organization of the client application model is shown as it is represented in the Scout Explorer. All client specific elements are located under the selected orange client node org.eclipsescout.helloworld.client. Right below, the three grey UI plugins which represent the support for the corresponding UI technologies for Swing, SWT and Eclipse RAP. The orange org.eclipsescout.helloworld.client.mobile node contains all elements that are specific to mobile devices such as the MobileHomeForm.
Specific nodes for the client session and the desktop of the Scout client allow access to the corresponding Scout application model components. While the client session is the main entry point for client-server communication, the desktop represents the root component of the visible part of a Scout client application. Below a set of folders group additional client model components according to their type. The forms folder for example holds all available forms, such as the desktop form that we have used in the “Hello World!” tutorial.[49].
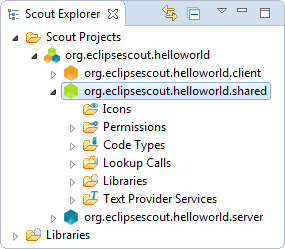
A screenshot of the expanded green shared node org.eclipsescout.helloworld.shared is provided in Figure 40. As the name “shared” suggests, the corresponding plugin holds all application components that are required for both the Scout client and the Scout server application. This includes texts, icons, codes types, permissions and lookup calls. As shown in Figure 40, a separate folder for each resource type is provided under the shared node.
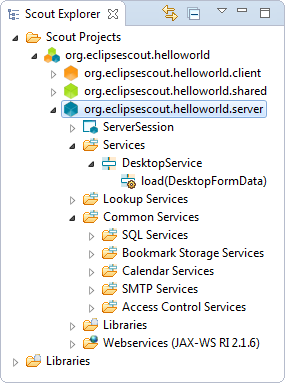
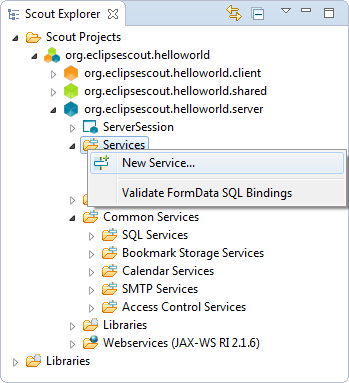
In Figure 41, the blue server node is expanded in the Scout Explorer view. As the primary responsibility of the Scout server application is to answer client requests, its components are mostly related to different types of services. The Services folder holds services related to the processing logic of the application such as retrieving and updating data. The remaining folders group more specific types of server services. Under the Webservices folder the Scout SDK support to provide and consume web services is located.
The right side of Figure 41 illustrates the access to the Scout SDK wizards using the corresponding context menus. The menu shown in the screenshot will start the wizard to add a new Scout server service.
The different colored tree nodes discussed above are all represented by their individual Eclipse plugins. This includes the orange client node, the grey UI nodes, the orange mobile client node, the green shared node and the blue server node. A Scout Swing client for example contains the plugins org.eclipsescout.helloworld.client, org.eclipsescout.helloworld.shared and org.eclipsescout.helloworld.client.ui.swing but not the other UI technology plugins. The Scout server contains the org.eclipsescout.helloworld.server plugin and the org.eclipsescout.helloworld.shared plugin.
4.3. The Scout Object Properties
The Scout Object Properties view provides direct access to configurable properties and operations for the element selected in the Scout Explorer. Before we discuss the typical layout of an object property view we describe the special case of the property view for a complete Scout application. This property view is displayed when the application’s top level node is selected in the Scout Explorer as shown in Figure 8.
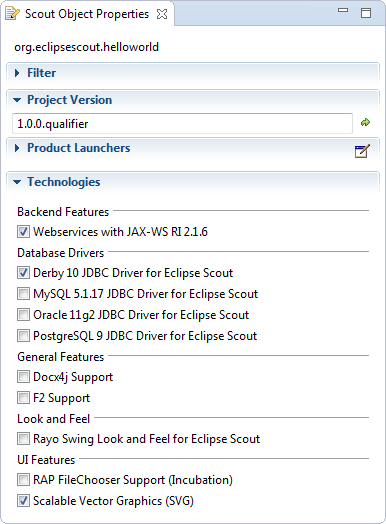
The main elements of the top-level application properties are the sections Product Launchers and the Technologies. As the product launcher section with its launcher boxes has already been covered in Section Run the Initial Application and Section Run the Initial Application we focus on the technologies here. The technologies section allows to add features to the application or remove such elements.
When the selection of a technology checkbox is changed, a message box is shown to the user. This box lists all project resources that are changed when the user confirms the action. Once the dialog is confirmed, the selected resources are modified by the Scout SDK to add or remove the feature.
This is required for features containing licences not compatible to the Eclipse Public Licence (EPL) or features in incubation status, because such features cannot be provided as part of the Eclipse Scout installation package. Instead, the associated artifacts need to be downloaded from a remote updated site first. Before any non-EPL content is downloaded from the internet, the user needs to review and confirm the associated licence. For this, a license confirmation dialog is shown upfront. After confirmation, the required files are downloaded and automatically added to the application. Currently, the procedure described above is used for the following technologies.
-
MySQL JDBC Driver for Eclipse Scout
-
Oracle 11g2 JDBC Driver for Eclipse Scout
-
PostgresSQL 9 JDBC Driver for Eclipse Scout
-
Docx4j Support
-
F2 Support
-
Rayo Swing Look and Feel for Eclipse Scout
-
RAP FileChooser Support (Incubation)
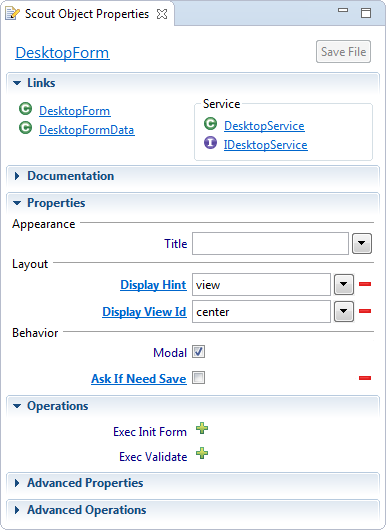
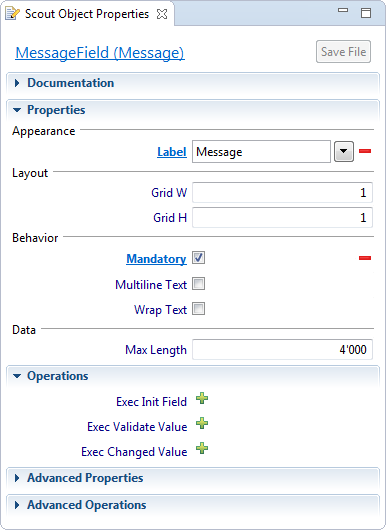
For the description of the Scout Object Properties of typical Scout components we use the example views provided in Figure 43. Both Scout Object Properties example views for the desktop form and the message field are taken from the “Hello World!” application described in Chapter “Hello World” Tutorial. As in the case of the top-level node representing the complete Scout application, the typical layout of the Scout Object Properties view is organized into several expandable sections. The content and ordering of the property sections usually follows the following scheme:
-
Filter
-
Links
-
Properties
-
Operations
-
Advanced Properties
-
Advanced Operations
If a folder node (such as the Forms folder under the orange client node) is selected in the Scout Explorer, the Scout Object Properties only shows a filter section with a filter field. The content in this filter field then restricts the elements below the folder icon accordingly. This feature is especially useful for the development of larger applications containing hundreds of forms or services.
The Links section provides a set of hyperlinks as shown on the left hand side of Figure 43. The provided links all refer to Java classes and interfaces that related to the Scout component represented by the property view.
The available properties of a Scout component are listed in sections Properties and Advanced Properties. Basically, all available Java getConfigured methods of a Scout component are listed in one of the two sections depending on the frequency of their usage. Section Properties shows the often used properties, while the less frequently used properties are provided in section Advanced Properties. The examples in Figure 43 show the thematic organization of the sections into Appearance, Layout, Behavior and other groups.
Access to object operations implemented with Java exec methods is provided in sections Operations and Advanced Operations. Again, the more and less frequently used operations are assigned to individual sections.
For all listed properties and operations the corresponding Javadoc is displayed in the form of a tooltip window. To display the available Javadoc, move the mouse pointer over the method of interest in the Scout Object Properties.[50].
So far, we did only describe the content and organization of the Scout Object Properties. In the reminder of this section we will describe the procedure how to change or update the properties and operations of Scout components. To indicate non-default property values or non-default behavior, the font of the property or operation is switched to underlined bold face. As an example, consider the property Ask If Need Save of the desktop form shown on the left side of Figure 43. The bold font visualizes that this does not correspond to the default behavior of forms. And underlining of this property further indicates, that the label has become a clickable link. Clicking on this label will load the corresponding method into the Java editor in the Scout SDK.
To change a property for a specific Scout component just enter a value in the corresponding field or tick/untick the provided checkbox. In some cases the value may also be chosen from a dropdown list. For the label field shown on the right hand side of Figure 43, the “Message” value refers to the translation of the text key to be used in method getConfiguredLabel. To enter a new label text, start typing the desired translated label and pick the option “New translated text…”.
To reset a property or operation to its default value/behavior, you may click on the red Minus icon provided on the right side of the property field. This will remove the overridden method from the object’s Java code.
4.4. Scout SDK Wizards
The Scout SDK wizards allow the developer to create Scout application model components with just a few clicks. Creation wizards are provided for all major model components such as forms on the client side or services on the server side. The usage of wizards not only makes developing Scout applications efficient but also helps to create robust code and reduces the number of errors.
Scout SDK wizards can do many things. They add and update Java classes, register services in the plugin.xml files, manage plugin dependencies in the MANIFEST.MF files and update Eclipse product files when necessary. All these capabilities hide a lot of the complexity of writing Eclipse based applications. This simplifies the development of Scout application considerably.
In the subsections below, the most commonly used Scout SDK wizards are explained. First, the wizards to create and export complete Scout applications are described. Then, the wizards to create Scout application model components are introduced.
4.4.1. Creating a new Scout Project
The New Scout Project wizard creates a new Scout client server application. In the Scout Explorer, the context menu is provided on the top-level Scout Projects folder. The creation of a form based Scout application has already been introduced in Section Create a new Project for the “Hello World” tutorial. And Section Create a new Project provides background information related to the artifacts created by this wizard. In the text below, we will describe the different steps of the creation wizard individually.
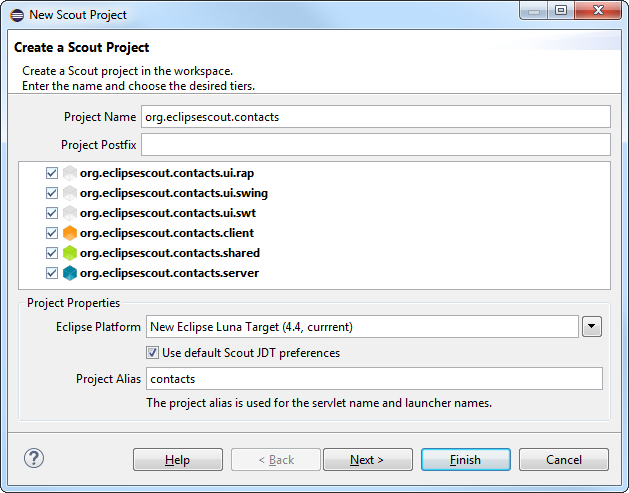
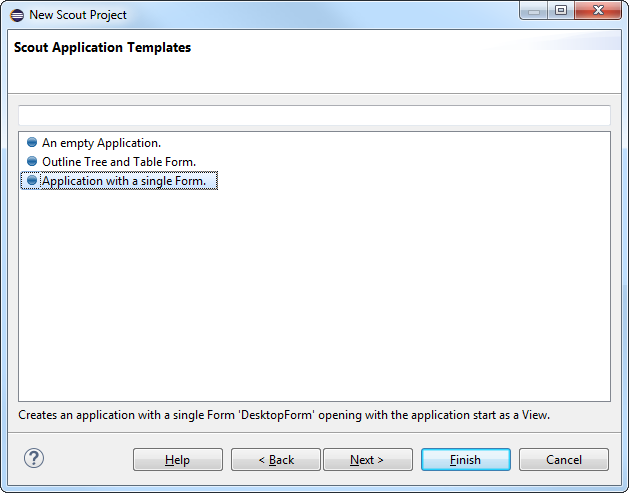
In the first wizard step shown on the left hand side of Figure 44, the project name and the application plugins must be chosen. The Project Name field is used as base name of the application’s plugins and as the Java package base names inside of the plugins. If the project name is written as parts separated by periods, the last part is copied into the Project Alias field.
When building multi module applications, the optional Project Postfix field can be specified to apply a common naming schemes for the different modules. The resulting application plugins (UI, client, shared, server) are then named following the scheme <Project Name>.<plugin>.<Project Postfix>.
In the box below the postfix field the list of possible application plugins is provided. Initially, all possible plugins are checked which is useful to quickly demonstrate a “Hello World” application. However, for a typical setup only one or two UI plugins will be needed. To develop a mobile/web application only the RAP UI plugin is necessary. For a desktop only client, either the Swing or the SWT UI plugin will be needed. And in cases where the client needs to run both on the desktop and as a web/mobile application, the RAP and a desktop UI plugin can be chosen. A Scout application must not necessarily be a client-server application. It is also possible to create a client only or a server only application. But make sure to include the shared plugin in all possible use cases.
In the Eclipse Platform field the Eclipse target platform version can be selected. If you choose another platform version than the running Eclipse instance, the platform must be downloaded from the Eclipse update site. This requires Internet access.
The content of the Alias field is used for the client’s executable file, the name of the servlet representing the Scout server application and to build the product launcher names. And if the Use default Scout JDT preferences field is checked, the Scout default Java development settings are used. Otherwise, you start with no settings and can apply your own template.
As we have seen in the “Hello World” tutorial, it is sufficient to provide a project name in the first wizard step and click on the Finish button to create a form based client server application. But we can also click on the Next button to choose an application template.
The second wizard step shown on the right side of Figure 44 allows to choose a Scout application template for the new project. When choosing the template Empty Application only a minimal code base is created. The other two application templates represent different application types. The template Application with a single Form is the default choice used for the “Hello World” tutorial. Finally, the template Outline Tree and Table Form can be used to build explorer like applications. The outline tree is typically used to navigate between related business entities. And the tables are used to list a number of business entities with their attributes. We will use this template for the creation of a larger Scout application in Chapter A Larger Example. As in the case of the first wizard step, you may click Finish button to start the creation of an initial Scout application. Or, click on Next button and manually step through the third and last wizard step.
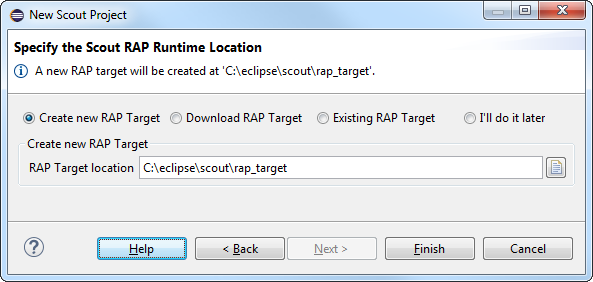
The third wizard step shown in Figure 45 is only available if the RAP UI plugin has been checked in Step 1. Because the RAP runtime must not be installed into the running Eclipse instance, a separate RAP target platform is created and used by the Scout SDK. This target platform then contains all necessary plugins to run the Scout RAP UI. The different options provided by this wizard step are the following:
When choosing the option Create new RAP Target, a new RAP target platform will be created at the location specified. This target platform can then be used by several projects.
Option Download RAP Target will downloaded the target platform into the running workspace. This download will then only be available to the active workspace.
With the option Existing RAP Target an existing RAP target location can be specified. Usually this is a location that has already been created using option 1.
To manually define a RAP target platform choose option I’ll do it later. With this option, the Scout SDK does not create a RAP target platform for you. But note that the created project will not compile before a complete target platform has been created for the Scout application.
4.4.2. Exporting a Scout Project
The Export a Scout Project wizard allows to export a complete Scout client server application as WAR or EAR files. In the Scout Explorer, the context menu is provided on the main application node just below the top-level Scout Projects folder.
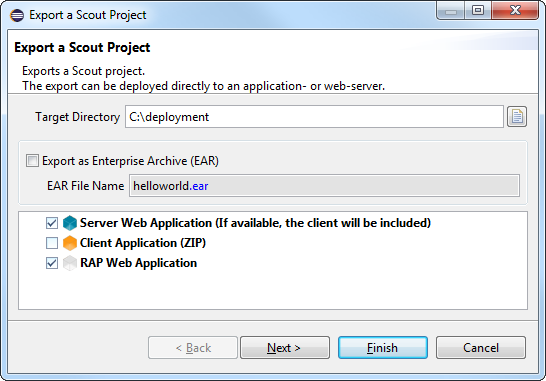
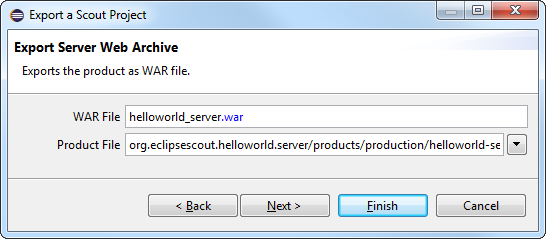
As a simple use case, the usage of the export wizard is described in Section Exporting the Application of the “Hello World” tutorial. And the corresponding background Section Exporting the Application provides information regarding the content and the organization of the WAR files produced by this wizard.
In the first export wizard step shown on the left hand side of Figure 46 the target directory and the type of content to be exported is defined. The Target Directory field is used to define the directory where the generated WAR files will be exported to. Checking the Export as Enterprise Archive (EAR) field the WAR file(s) will be packed into a EAR file using the file name provided in the EAR File Name field.
In the artifact selector box the content to be included in the export can be specified: * The blue Server Web Application node represents the Scout server application. If ticked, the corresponding WAR file will also include a zipped desktop client that will then be provided for download to users (only if a desktop client exists in the current Scout project). * Selecting the orange Client Application (ZIP) node node will put a zipped client into the target directory. * When working with web/mobile applications the necessary RAP server is represented by the grey RAP Web Application node.
The default scenario assumes that you work with a Scout client server application including a SWT desktop client and corresponding web/mobile clients. For this setup you just need to provide a target directory before you can click the Finish button to start the export. To verify/update what the export wizard will create you may click the Next button to move to the second wizard step.
The second wizard step is shown on the right side of Figure 46. The server WAR file name proposed in the WAR File field uses the naming scheme <Project Alias>_server.war. In order for this WAR file to work out-of-the-box it it is recommended to use the proposed value. In the Product File field the server product file to be used for the creation of the WAR file can be specified. Clicking the Next button will move to the next wizard step to select the client product to be exported.
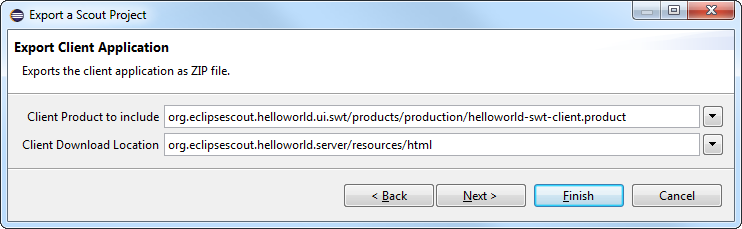
In the third wizard step shown in Figure 47 the client product file can be selected. If the current Scout project defines both a Swing and a SWT client, the default will use the SWT client. Clicking on the dropdown button next to the Client Product to include field will open a Select Product dialog to choose the right product from all available client products. In the Client Download Location field the path to the zipped client inside the server WAR file is defined. In order for this WAR file to work out-of-the-box it is recommended to use the proposed value. With the Next button the last export wizard step is shown.
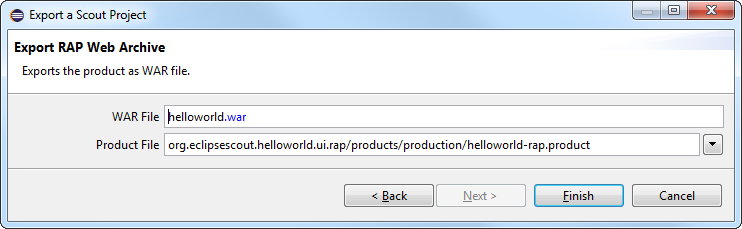
The last export wizard step is shown in Figure 48. A RAP server WAR file name is proposed in the WAR File field based on the naming scheme <Project Alias>.war. In order for this WAR file to work out-of-the-box it is recommended to use the proposed value. In the Product File field the RAP server product file to be used for the creation of the WAR file can be specified. The Finish button will then start the export.
After the wizard has completed the export, all resulting artifacts will be located in the target directory specified in the first wizard step.
4.4.3. Creating new Forms
The New Form wizard allows to create a new form including the necessary form data, permissions and server services. In the Scout Explorer, the context menu is provided on the Forms folder under the orange client node.
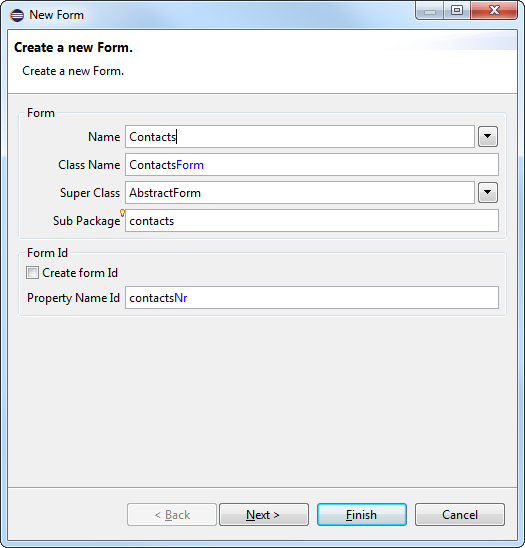
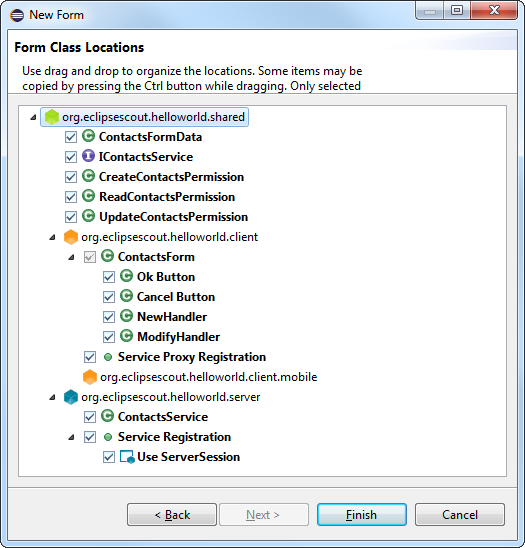
4.4.4. Creating new Form Fields
The New Form Field wizard allows to create a new form field. In the Scout Explorer, the context menu is provided on Scout Explorer nodes representing composite form fields, such as the MainBox node below a form node.
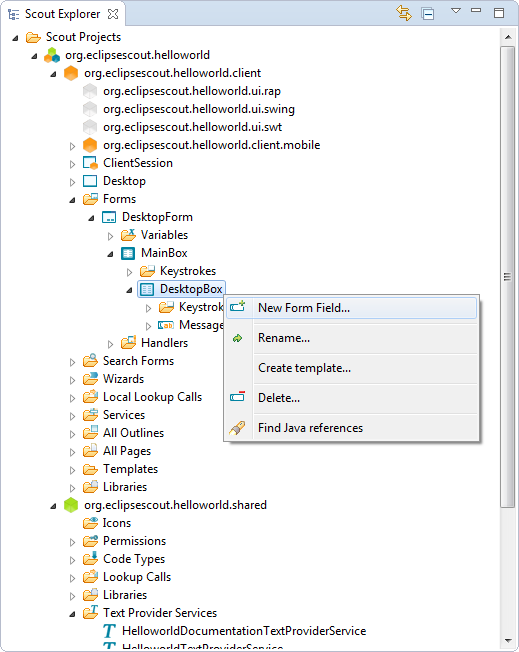

Figure 50 provides screenshots for starting the form field wizard with the context menu and the first wizard page. In the first wizard step, the list of all available Scout form field types is presented. To quickly find the desired form field type, a part of the type name can be entered in the search field above the field type list. In the screenshot on the right hand side of Figure 50 this search field contains the value ‘s’ which filters the field type list accordingly. Once the type of the new form field is selected, the next wizard step can be loaded by clicking on the Next button.
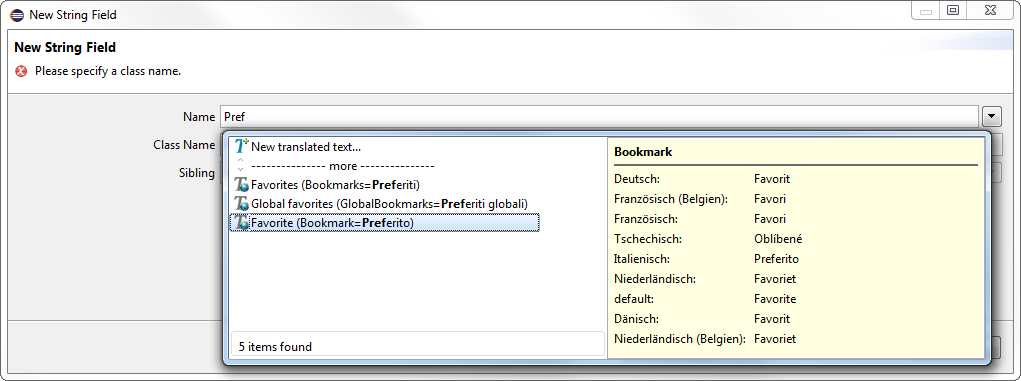
In the second wizard step shown in Figure 51 the remaining creation parameters for the new form field can be specified. The Name field is used to define the content of the field label. For this, a translated text entry has to be defined. By typing a string into the name field, all potentially matching existing translation entries are shown in a dropdown list. As shown in Figure 51 not only the text key is used to find matching entries but also translated text entries. When assigning the label for a preferences string field, the substring “Pref” lists a set of text keys that have a matching entries.
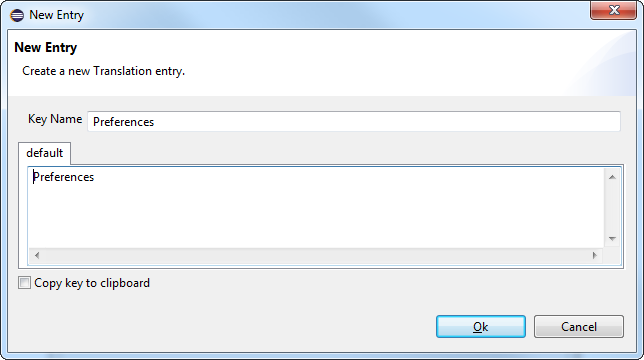
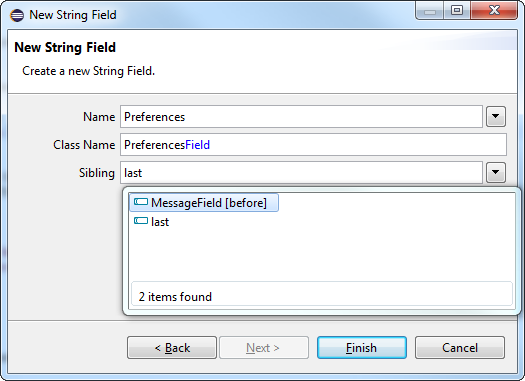
One of the presented options in the list of text entries is the New translated text… entry. A double click on this entry starts the wizard to create a new text entry as shown on the left hand side of Figure 52. The Key Name field holds the text key that is used to access translated text.[51]. In the tabs below the key name field, the text translations for the registered languages can be provided. Make sure to at least provide a text in the default tab. This text will be used in the Scout application if no translation is available that better matches the logged in user’s locale.
Once the name field is filled in, the entered text key is also used to create a proposal for the Class Name field using the pattern <Field Name>Field. In contrast to the label field, the class name field is mandatory. If the field does not need a label the name field can remain empty. In that case, a class name still needs to be provided as described in Section The User Interface Part for the DesktopBox class in the “Hello World” application.
The Sibling field is used to define the ordering of the form fields in the parent container. As shown on the right hand side of Figure 52, the new PreferencesField is to be placed before the message field.
4.4.5. Creating new Outlines
The New Outline wizard allows to create the container to display data of pages. In the Scout Explorer, the context menu is available on the Outlines folder below the Desktop node under the applications client node. The New Outline wizard is shown in Figure 53.
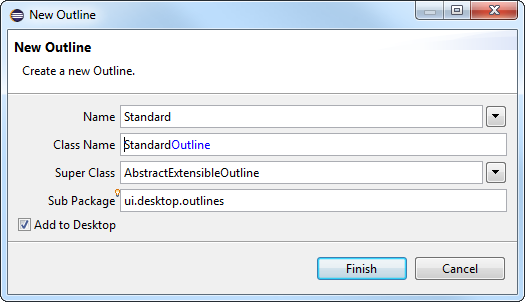
4.4.6. Creating new Pages
The New Page wizard allows to create pages which are shown in the corresponding outlines. In the Scout Explorer, the context menu is available below outlines, below other pages or in the All Pages folder. The New Page wizard is shown in Figure 54.
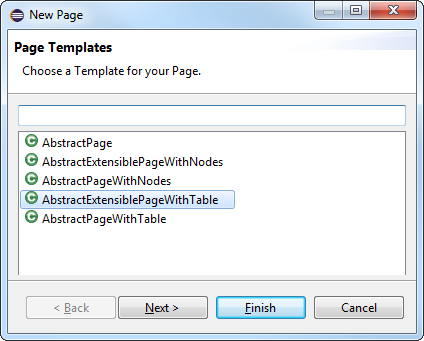
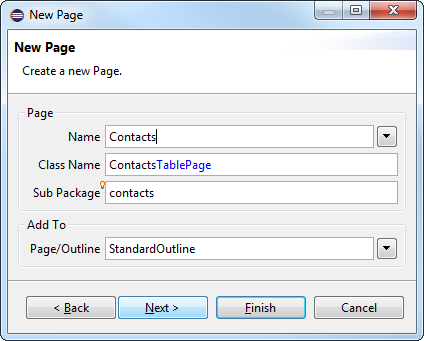
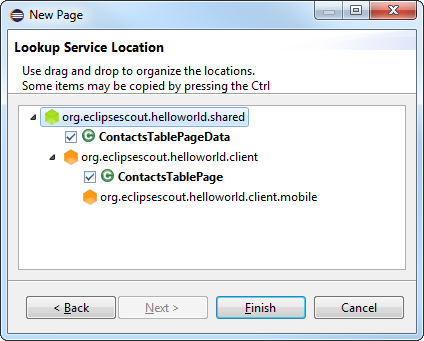
4.4.7. Creating new Table Columns
The New Column wizard allows to create columns in a table. In the Scout Explorer, the context menu is available below tables, on the Columns folder. The New Column wizard is shown in Figure 55.

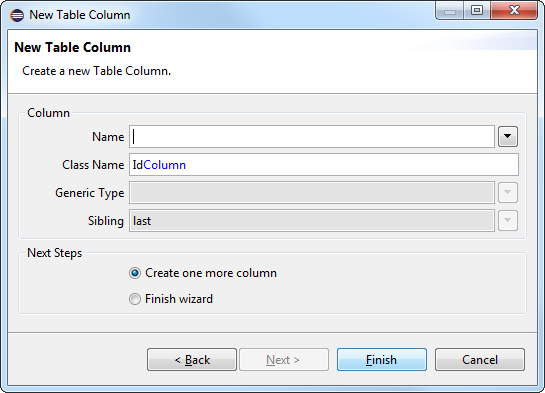
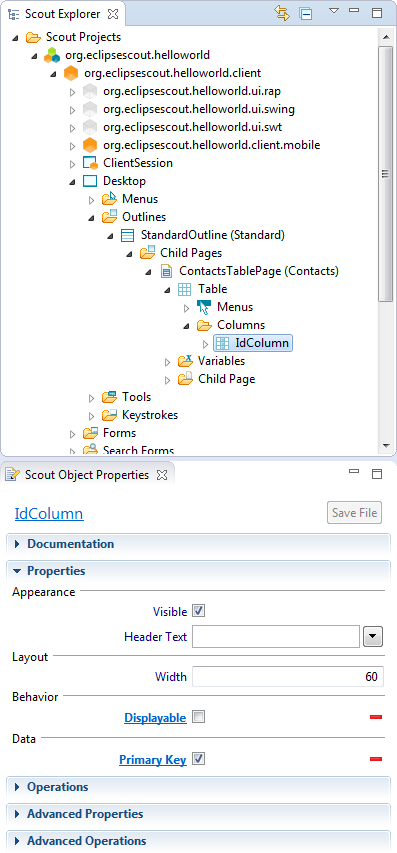
4.4.8. Creating new Search Forms
The New Search Form wizard allows to create a new Scout form to search for elements displayed in pages. In the Scout Explorer, the context menu is provided on the Search Forms folder under the orange client node. If you have already a page and the corresponding column created, you can directly create a search form based on that table as shown in Figure 57.
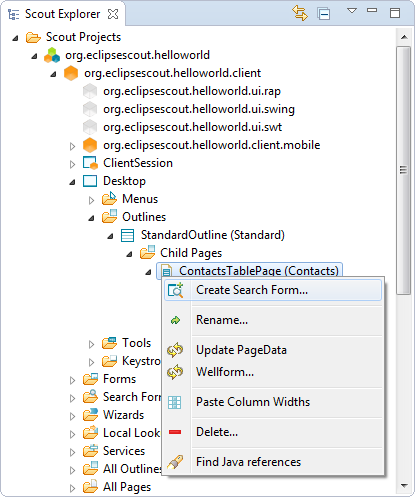
4.4.9. Creating new Services and Operations
The New Service wizard allows to create new services to execute tasks and provide data to a client. In the Scout Explorer, the context menu is provided on the Services folder under the orange client node and the blue server node. This reflects the fact that services may be defined on both the client and the server side.

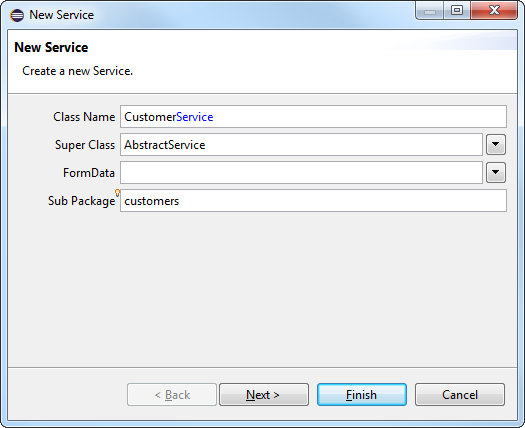
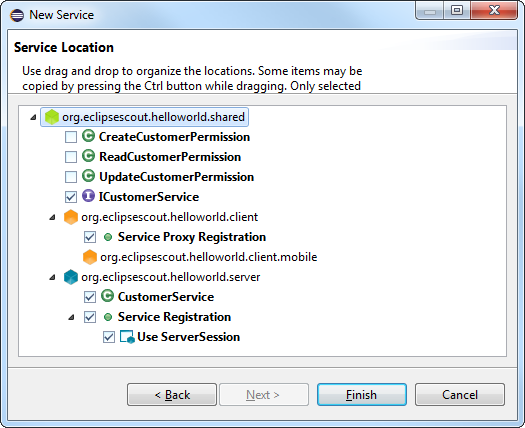
4.4.10. Creating new Code Types and Codes
The New Code Type wizard allows to create new code types. As access to code types and codes is required from both client and server applications they are located in the application’s shared plugin. Consequently, the context menu is provided on the Code Types folder under the green shared node in the Scout Explorer.
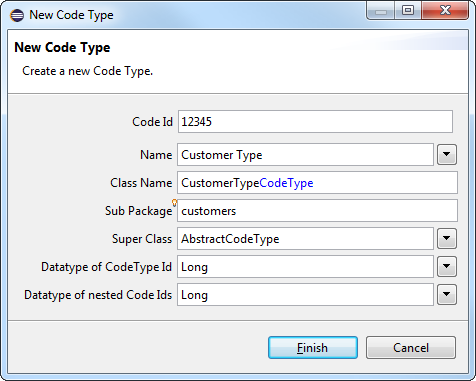
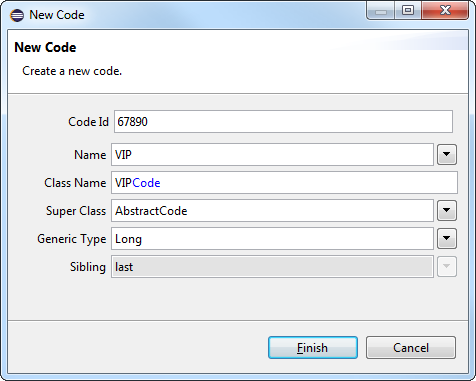
A screenshot of the wizard to create a new code type is shown on the left side of Figure 60. The Code Id field contains the ID that will be assigned to the new code type. Take care to ensure that the content of this field matches with the type provided in the Datatype of CodeType Id field. The Name contains an optional name for the code type, and the Class Name field the name of the Java class to be created. If the name field is filled in, the class name field is automatically derived from the provided name.
The New Code wizard shown on the right side of Figure 60 allows to create individual codes. In the Scout Explorer it can be accessed through the context menu on existing code type nodes. For hierarchical code types, this wizard is also made available on existing codes to create inner codes.
4.4.11. Creating new Library Bundles
The New Library Bundle wizard allows to add functionality provided in standard JAR files to a Scout application. In the Scout Explorer, the context menu is provided on the top-level Libraries folder and individually under the orange client node, the green shared node and the blue server node.
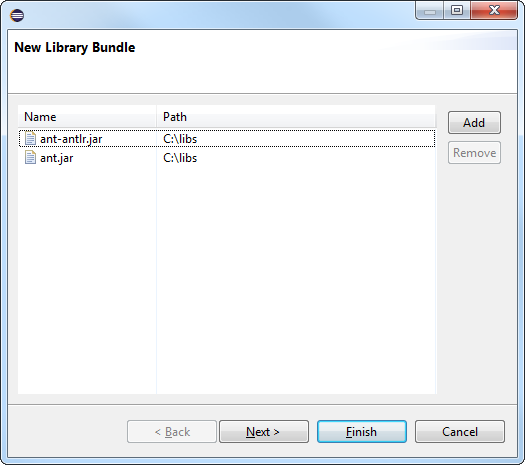
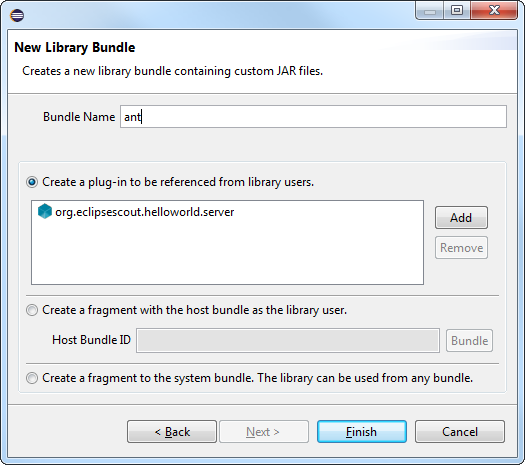
4.4.12. Creating new Application Modules
In some projects it may be desired to split the application into several modules. This allows to split the application into smaller parts and allows to deliver multiple versions with different features (e.g. a "Professional Edition" that contains more functionality). For this an additional set of client, shared and server plugins can be created to group e.g. all the "Professional Edition" features. To create a new module the Create new Scout Bundles wizard can be started by using the context menu on the project node (like org.eclipsescout.helloworld).
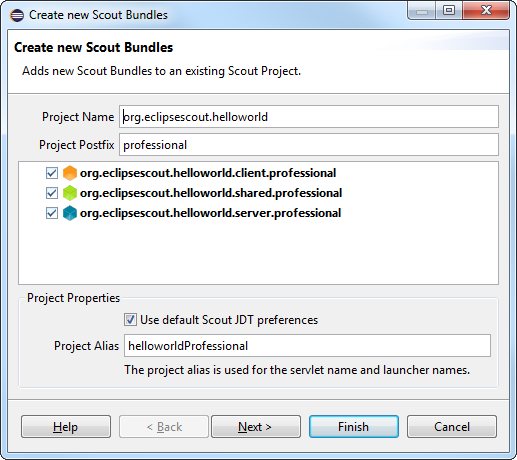
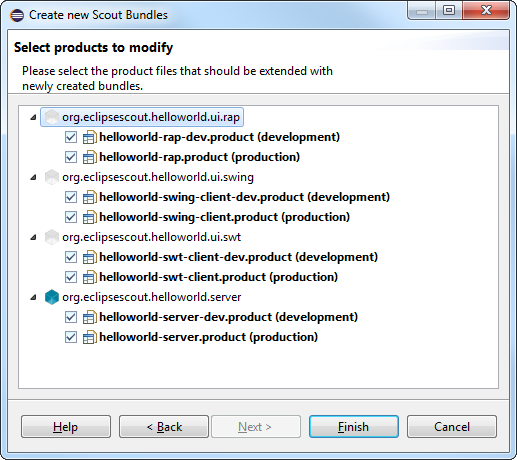
4.4.13. The NLS Editor
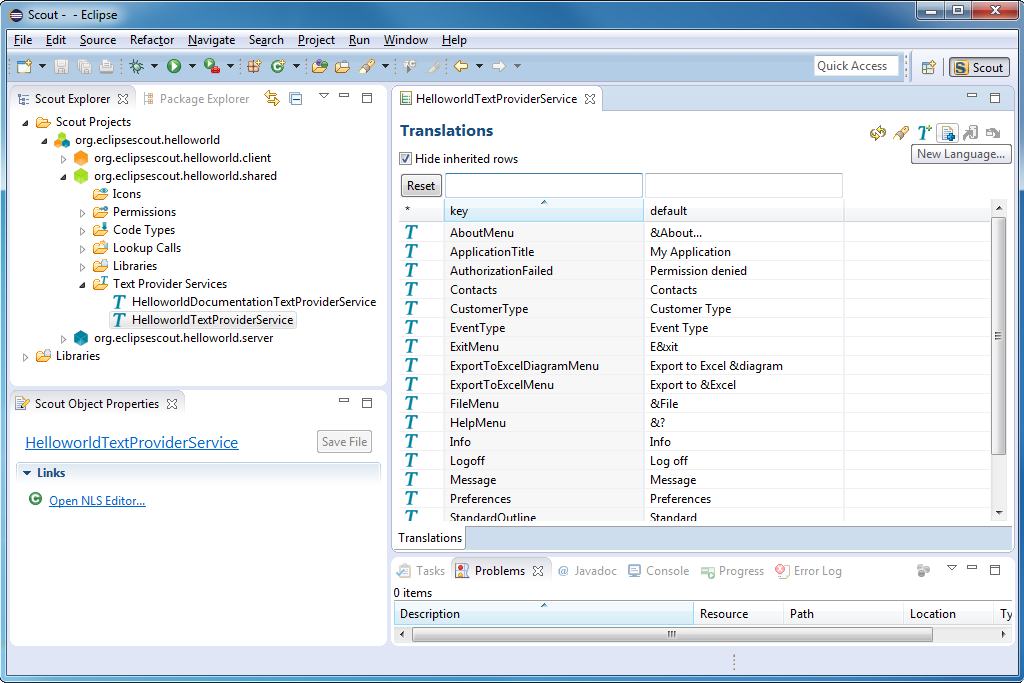
Access to translated texts in Scout applications is provided through text provider services located in the application’s shared plugin. This setup makes translated texts available in the client and the server part of the application. Consequently, the Scout SDK provides access to the NLS Editor to manage translated texts and application languages under the green shared node in the Scout Explorer view as shown in Figure 33.
To open the NLS editor, select the green shared node in the Scout Explorer view and expand its Text Provider Services folder. Then, select the contained element <Project Alias>TextProviderService. As shown in Figure 33, the NLS editor can be opened using the Open NLS Editor … link in the Scout Object Properties view. In the NLS editor translations can be edited individually by pressing F2 or double-clicking into a text cell. This opens the editor to change the text to the desired value. To add a new translated text, the corresponding dialog can be opened by clicking on the button with the ‘T’ icon next to the 'New language' button (shown in Figure 33).
In Scout applications, translated texts are obtained with the method TEXTS.get("key") where "key" represents the language independent text key. In a default Scout project setup, calling TEXTS.get uses the <Project Alias>TextProviderService in the background. And this text provider service defines the access path for the text property files that are located in the applications shared plugin. Typically, these property files are collected in the plugin’s <youraplication>.shared/resources/texts directory according to the right hand side of Figure 64. To resolve the provided text key at runtime, the user’s locale settings is used to access the correct text property file.
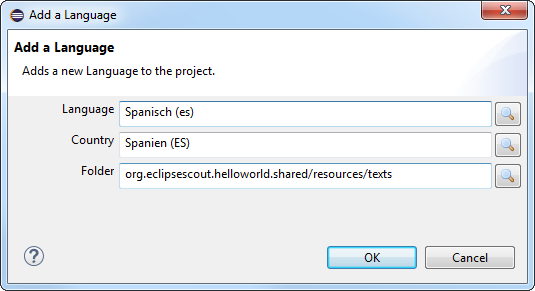
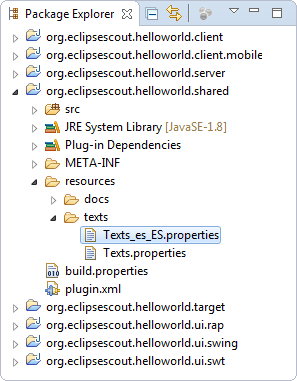
Adding support for a new language to a Scout project is also directly supported by the Scout SDK. To add support for a new translated language, click on the corresponding icon of the NLS editor as shown in Figure 33. In the opened language dialog, add the desired language and country localization and the target directory as shown in Figure 64. A new language properties file is then added to the shared plugin project as shown in Figure 64. The new language is now available as an additional column in the NLS editor and as a separate tab in the dialog to add new translated texts.
5. A Larger Example
In this chapter we will create the “My Contacts” Scout application. This small.[52] application covers additional aspects of the Eclipse Scout framework. The presented demo application borrows heavily from a Scout tutorial published 2012 in the German Java Magazin.[53] for the Scout release 3.8 (Juno). Compared to the 2012 tutorial, the version presented in this chapter has been slightly polished and updated to the Scout release 4.0 (Luna).
According to this step-by-step tutorial, we will build an outline based Scout application featuring a navigation tree and pages to present information in tabular form. In addition, the application also shows how to work with forms to enter and/or update data, menus and context menus. On the server side, we show how to work with databases, how to use logging in Scout applications and how to include standard Java libraries in the form of JAR files.
The chapter is organized as follows. In the first section, the finished demo application is explained from the user perspective. The remaining sections focus on the individual steps to implement the “My Contacts” application. To be able to easily follow the text, we assume that the reader is familiar with the “Hello World” tutorial and the Scout SDK as described in Chapter Scout Tooling.
5.1. The “My Contacts” Application
The “My Contacts” application is a client server application to manage personal contacts. Persistence of entered data is achieved through a database backend.
As social networking services.[54] such as Facebook, LinkedIn or Xing are widely used, the application also provides an example integration with the LinkedIn.[55] platform. The implemented integration allows to download the personal contacts into the local database. In the local database it is possible to mix persons entered manually with contact data downloaded from LinkedIn.
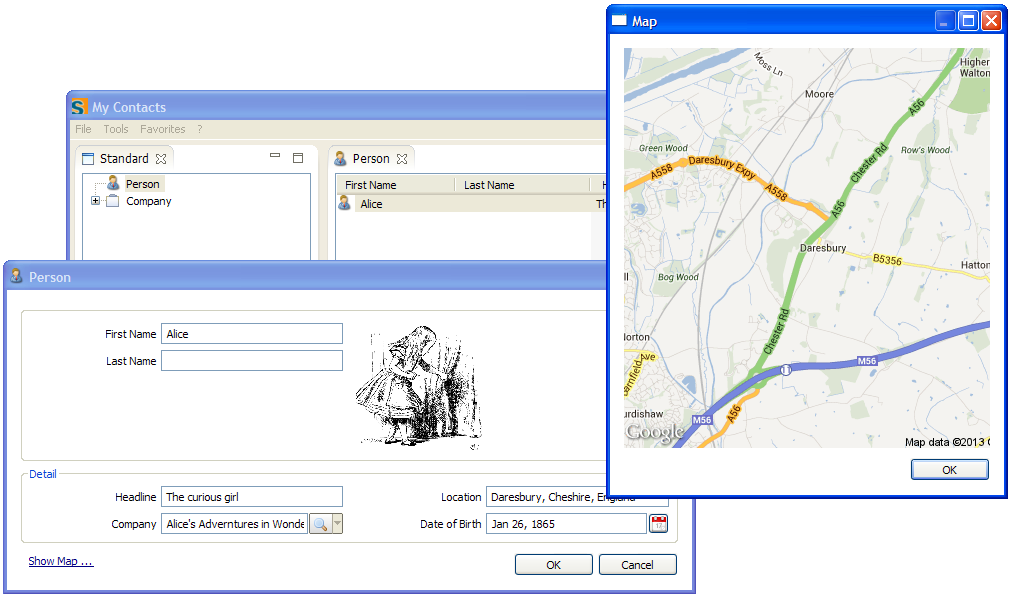
After starting the Scout server application a client application may be started that then connects to the server. In Figure 65 the SWT desktop client is shown. In the background, the main application window is visible showing a navigation tree on the left hand side. On the right side, a table holds the elements corresponding to the selected tree node. Using an edit context menu on the selected table row, a form to edit the relevant data may be opened as shown in the example screen shot for ‘Alice’. Clicking on the link 'Show Map …' in the person form opens the person’s location information in a map form using the data provided by Google Maps Image API.[56].
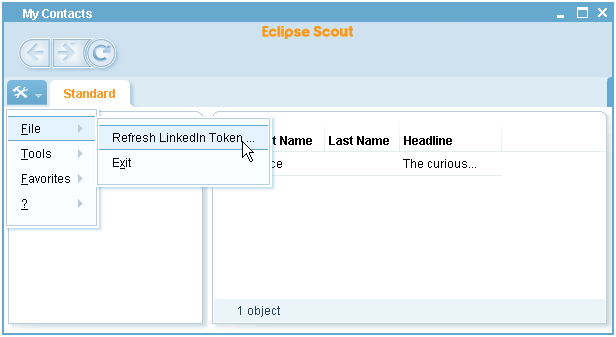
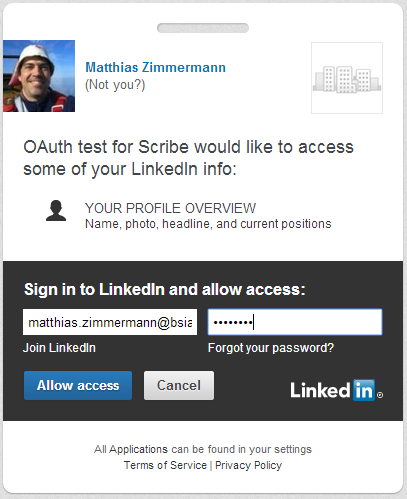
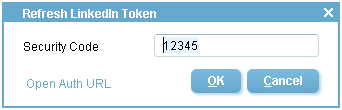
Before any LinkedIn data can be accessed from the “My Contacts” application an access token needs to be retrieved from LinkedIn. To obtain such a token use the menu as shown in Figure 66. This opens the refresh token form shown on the left side of Figure 67.
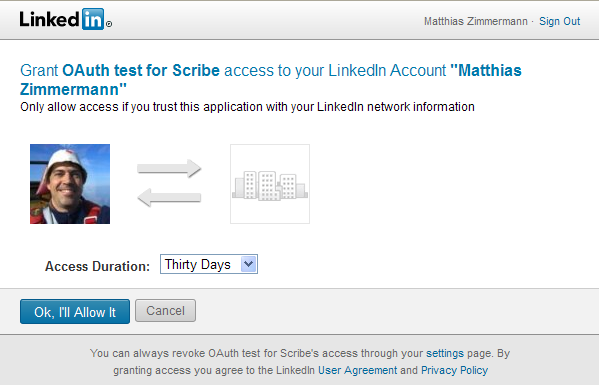
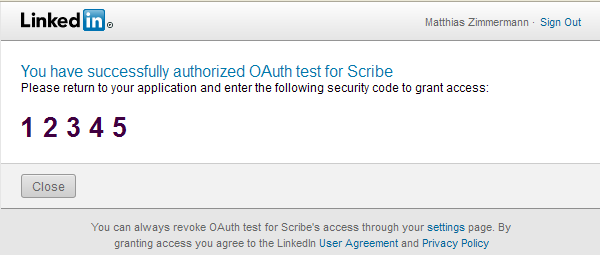
Clicking on the 'Open Auth URL' link then opens the granting page provided by LinkedIn shown on the left hand side of Figure 68. After logging into your LinkedIn account.[57] you can specify the desired access duration and confirm the “OAuth test for Scribe” access.[58] to your LinkedIn data. If the authorization is successful, a security code as shown on the right side of Figure 68 is presented by LinkedIn. This code needs then to be entered into the Security Code field as shown on the right side of Figure 67. Then, click the OK button to refresh the access token.
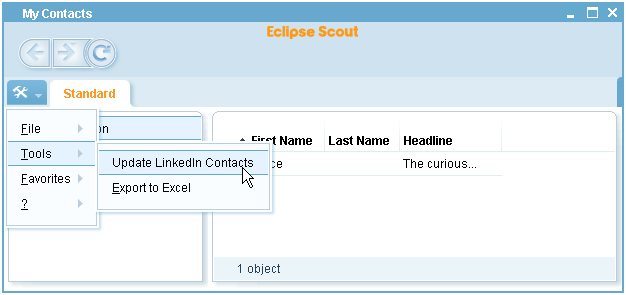
To import/update your LinkedIn contacts into your “My Contacts” application select the menu as shown in Figure 69. Once you have downloaded or entered a number of persons in your “My Contacts” application, try to get yourself familiar with the application’s person table. This is one of the very powerful Scout widgets. Columns may be filtered, moved, hidden or sorted (including multi level sort) using the table header context menus menu.
Editing and viewing of person data is available by the context menu on a selected row. To manually add a person use the context menu available on the table header or in the white area outside the displayed columns.
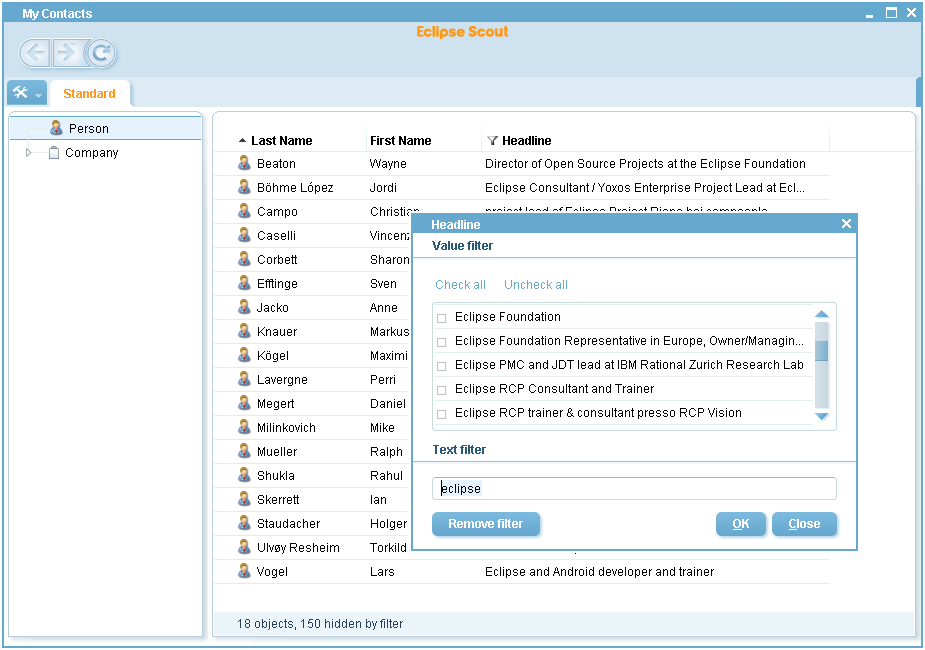
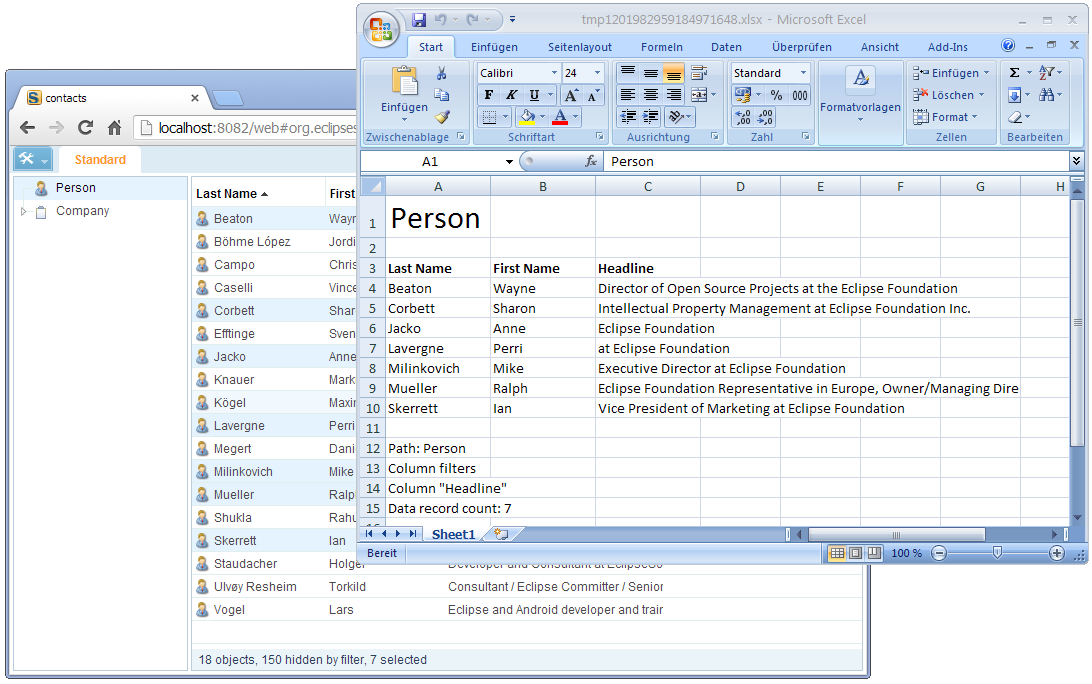
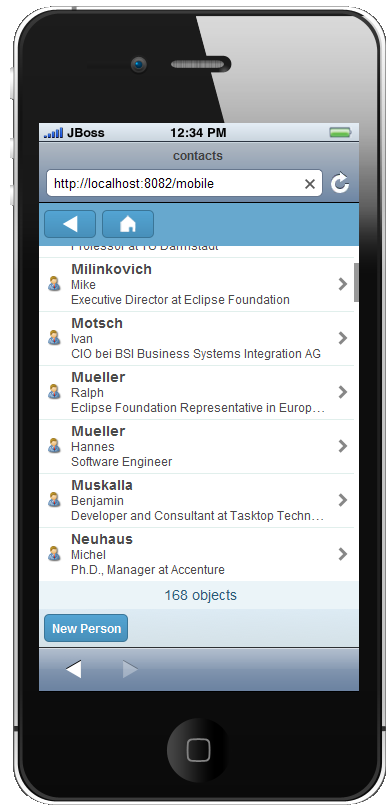
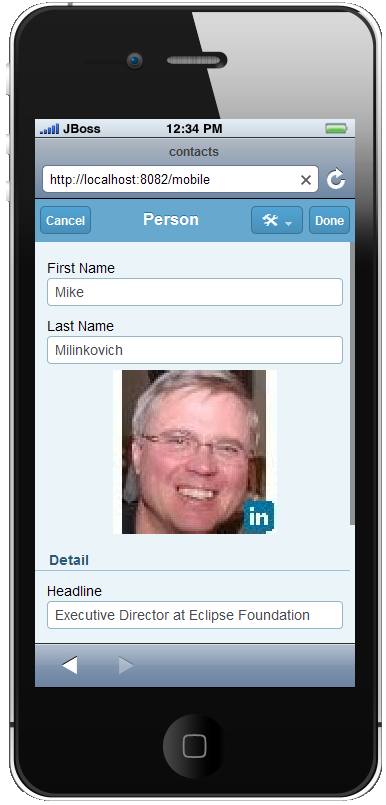
In Figure 71 the “My Contacts” application is running in a web browser. In this example, the menu is used to export the selected row into an Excel sheet. Finally, the “My Contacts” application is also running on iPhone and Android mobile devices out of the box. Two example screens are provided in Figure 72.
Once you no longer feel confident about having the “My Contacts” application accessing you data you can revoke this access permission in the LinkedIn menu “Privacy and Settings”. In the lower part of the settings page switch to the tab “Groups, Companies and Applications” and click on the link “View your applications”. There, you will find again the partner name “OAuth test for Scribe”. To revoke the access, select the associated checkbox and click the “Remove” button. The next time you try to refresh your LinkedIn data from the “My Contacts” application will result in an Error message. Before you can again access data from your LinkedIn account you just need to refresh the access token as described above.
To run the “My Contacts” Scout application without implementing it first, you may take advantage of the fact that the application is hosted in the same Github repository as this book. If you are familiar with Github.[59], fork the Scout Book repository.[60] and start from there. Alternatively, you can follow the description provided in the Scout wiki.[61] to download, install and run the “My Contacts” application.
5.2. Setting up the new Scout project
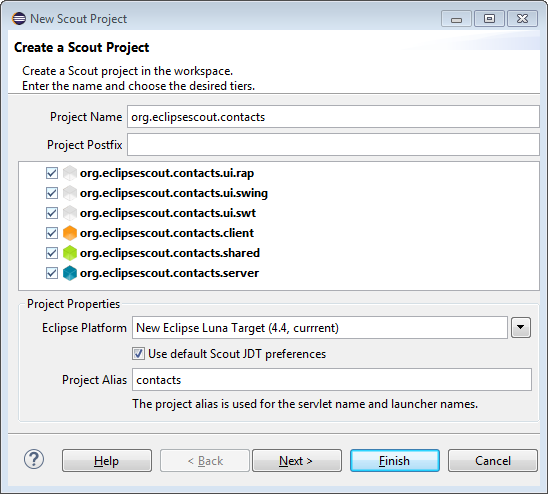
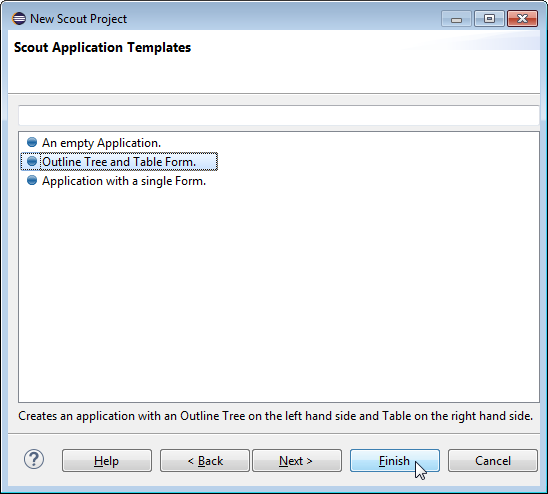
The initial code for the “My Contacts” application is generated using the New Scout Project wizard as described in Section Creating a new Scout Project. For the Project Name field use the name org.eclipsescout.contacts as shown on the left side of Figure 73 and click on the Next button. In the second wizard step select the application template Outline Tree and Table Form as shown on the right side of Figure 73.
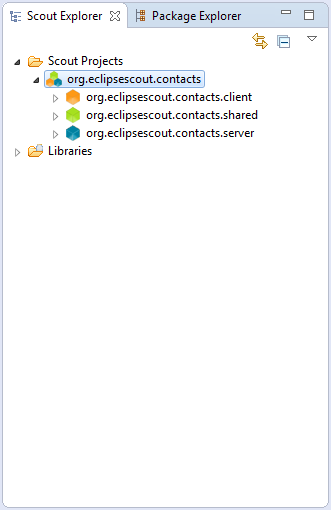
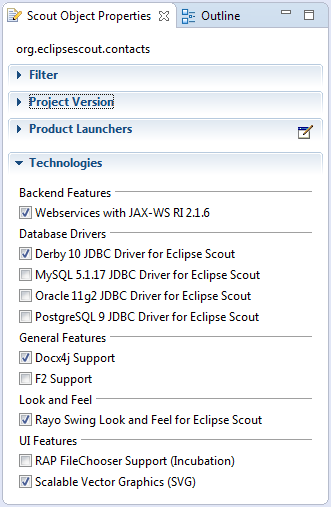
After the Scout SDK has created the initial application code select the top-level org.eclipsescout.contacts node in the Scout Explorer. In the technology section of the corresponding Scout Object Properties select the Derby database driver, the Docx4j support and the Rayo look and feel as shown on the right side of Figure 74. In case you have not yet used the Scout Docx4j support or the Rayo look and feel components, the Scout SDK will need to download these packages from the Eclipse Marketplace.[62] first.
Remark: Adding the Docx4j support will add the menu under tools menu on the application’s desktop. This presence of this feature will then allow to export contacts shown in the application to an Excel sheet. As shown in Listing 10, the ScoutXlsxSpreadsheetAdapter first creates an excel file based on the currently active page in the execAction method. Then the file is opened on the client using the shellOpen method.
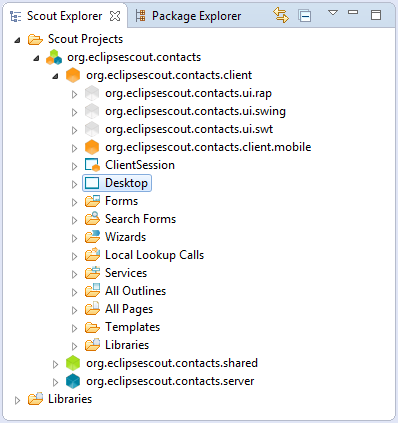
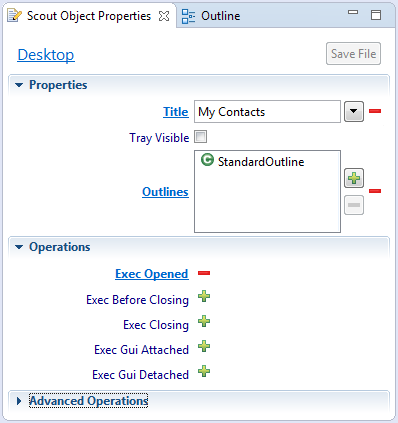
After this initial project setup step we first define the application’s name shown on the main dialog. For this, select the Desktop node under the orange client node in the Scout Explorer. This opens it’s Scout Object Properties as shown in Figure 75. In the Title field enter the string “My Contacts” and create a new translated text entry.
@Override
protected void execOpened() throws ProcessingException {
//If it is a mobile or tablet device, the DesktopExtension in the mobile plugin takes care of starting the correct forms.
if (!UserAgentUtility.isDesktopDevice()) {
return;
}
// outline tree
DefaultOutlineTreeForm treeForm = new DefaultOutlineTreeForm();
treeForm.setIconId(Icons.EclipseScout);
treeForm.startView();
//outline table
DefaultOutlineTableForm tableForm = new DefaultOutlineTableForm();
tableForm.setIconId(Icons.EclipseScout);
tableForm.startView();
IOutline firstOutline = CollectionUtility.firstElement(getAvailableOutlines());
if (firstOutline != null) {
setOutline(firstOutline);
}
}As shown in Listing 11 the application’s organisation into a tree and a table form is explicitly defined in method execOpened. Click on the Exec Opened link in the desktop’s Scout Object Properties to access the Java code of this method. First, using the UserAgentUtility class, the method checks if the client is working with a desktop, a web or a mobile client. If the user is not working with a desktop client, execOpened returns immediately and the tree and table setup is not used. Instead, the MobileHomeForm defined in plugin org.eclipsescout.contacts.client.mobile is used. In case the user is working with a web client or a desktop client, the default tree and table forms are created and started. Finally, the currently active outline is set to the StandardOutline, as this is the only outline defined in this application.
5.3. Adding the Person Page
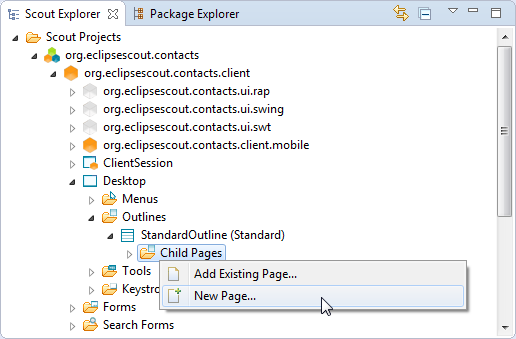
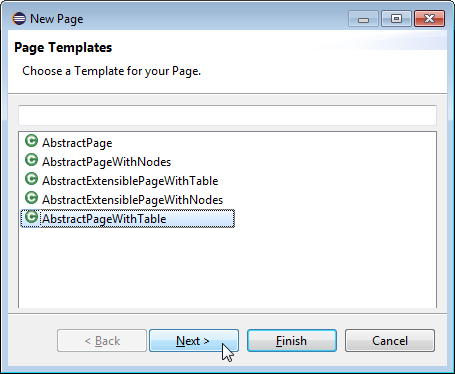
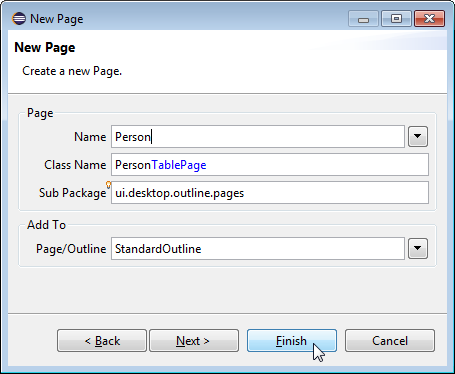
The first UI component we add to the application is the person page. For the desktop clients, this page is represented as a table that will list all available persons in the database of the “My Contacts” application. To start the New Page wizard use the context menu on the Child Pages folder as shown in Figure 77. On the first wizard step select the template AbstractPageWithTable and click the Next button. On the second wizard step, provide the page name “Person” to create a new translated text entry at the same time. Make sure the other fields are filled in as shown in Figure 77 and click the Finish button to close the wizard.
@Override
protected void execCreateChildPages(List<IPage> pageList) throws ProcessingException {
PersonTablePage personTablePage = new PersonTablePage();
pageList.add(personTablePage);
CompanyTablePage companyTablePage = new CompanyTablePage();
pageList.add(companyTablePage);
}Listing 12 shows the created method execCreateChildPages that links the newly created person page to the standard outline. Note that your code will only look the same once you have added the company page in a later step of the implementation of this application.

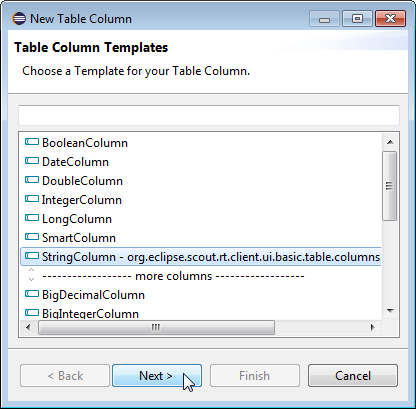
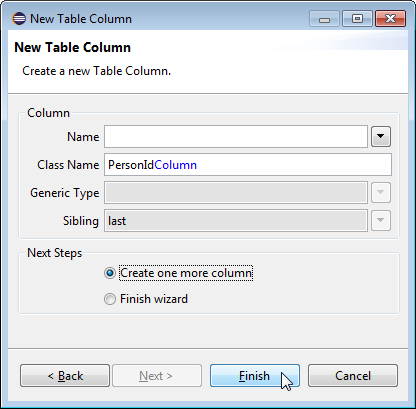
Now, drill down to the Columns folder under the PersonTablePage node as shown in Figure 78. Here we can add the desired table columns to the person page. Start with the column that will hold the person id. For this, start the column wizard as shown on the left side of Figure 78 and select the string column template. In the second wizard step, enter “PersonId” into the Class Name field, select the radio button Create one more column and click on the Finish button. This will restart the column wizard to enter the next columns. Create the remaining string columns with the following names.
-
{First Name}
-
{Last Name}
-
{Headline}
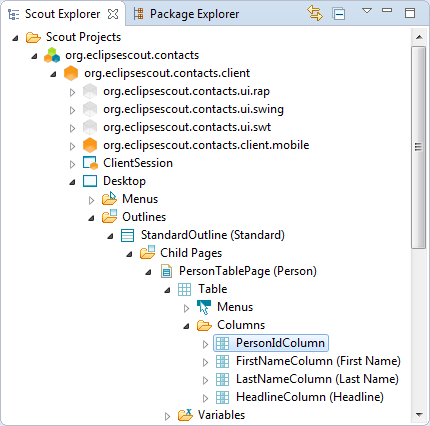
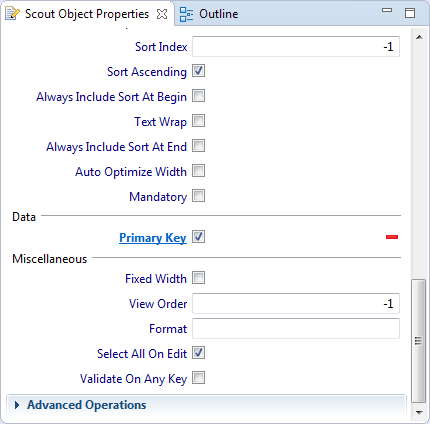
@Order(10.0)
public class PersonIdColumn extends AbstractStringColumn {
@Override
protected boolean getConfiguredDisplayable() {
return false;
}
@Override
protected boolean getConfiguredPrimaryKey() {
return true;
}
}
@Order(20.0)
public class FirstNameColumn extends AbstractStringColumn {
@Override
protected String getConfiguredHeaderText() {
return TEXTS.get("FirstName");
}
}Once you have created all these columns we will mark the person id column as the primary key column for the person page. In the Scout Explorer select the PersonIdColumn node to open the corresponding Scout Object Properties. In this form, deselect the Displayable property to always hide this technical column from the end user. In the properties Advanced Properties section check the Primary Key property. The resulting Java code for the primary key column and the first name column is provided in Listing 13.
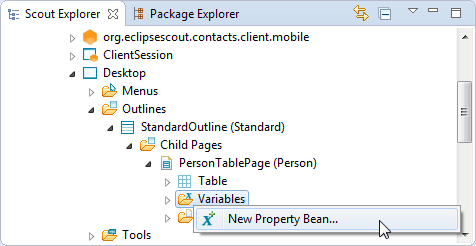
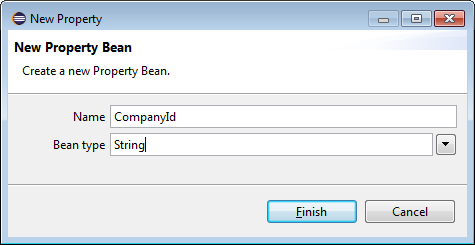
@PageData(PersonTablePageData.class)
public class PersonTablePage extends AbstractPageWithTable<PersonTablePage.Table> {
private String m_companyId;
@FormData
public String getCompanyId() {
return m_companyId;
}
@FormData
public void setCompanyId(String companyId) {
m_companyId = companyId;
}
}As we will later add and link the person page with a company page, we add a company id variable to the person page as shown in Figure 80. For the Java representation of such variables the standard bean pattern is used as shown in Listing 14.
5.4. Adding the Company Page
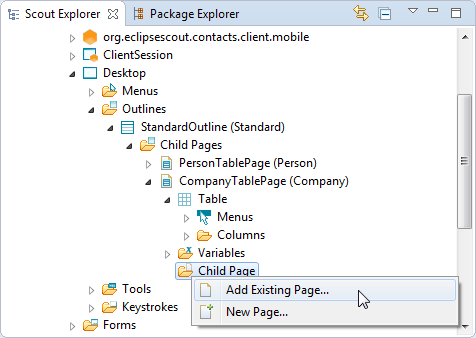
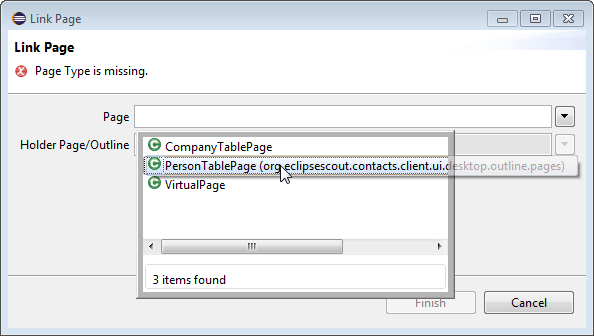
@Override
protected IPage execCreateChildPage(ITableRow row) throws ProcessingException {
PersonTablePage childPage = new PersonTablePage();
childPage.setCompanyId(getTable().getCompanyIdColumn().getValue(row));
return childPage;
}After adding the person page, we also add a company page under the Child Pages node to the standard outline. To add the company page we use the same wizards as described in the previous section for the person page. For the Name field we enter the new translated text “Company” and the columns to add are the following.
-
{Company Id} -
{Name} -
{Location}
As in the case of the person table page, the company id column is used as a primary key column. The Displayable property needs to be set to false and the Primary Key property to true. Now we can link the person page to the company page using the context menu as shown on the left side of Figure 81. In the Link Page wizard, the person page can then be selected according to the right side of Figure 81. In the Java code generated by the Scout SDK the setting of the company id attribute is automatically inserted in method execCreateChildPages. Please note that this convenience added by the Scout SDK wizard only works if the child page defines variables with a naming that matches the defined primary key columns of the parent table.
5.5. Installing the Database
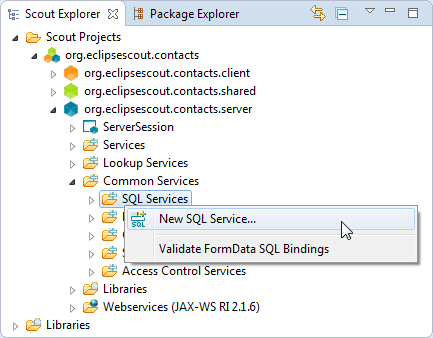
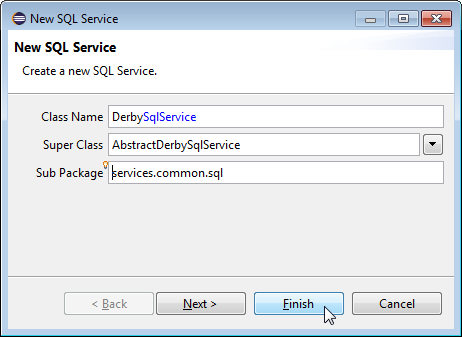
To access a database we first need to install a database service. For the “My Contacts” application, this is done using the New SQL Service wizard on the Scout server under the SQL Services folder as shown in Figure 82. In the first wizard step shown on the right side of the figure, use “DerbySqlService” for the Class Name field. From the drop-down list in the Super Class field choose the AbstractDerbySqlService and click on the Finish button.
config.ini file.
### DataSource
org.eclipsescout.contacts.server.services.common.sql.DerbySqlService#directJdbcConnection=true
org.eclipsescout.contacts.server.services.common.sql.DerbySqlService#jdbcDriverName=org.apache.derby.jdbc.EmbeddedDriver
org.eclipsescout.contacts.server.services.common.sql.DerbySqlService#jdbcMappingName=jdbc:derby:${workspace_loc}/../DB_CONTACT;create=true;territory=en_US
org.eclipsescout.contacts.server.services.common.sql.DerbySqlService#username=contact_user
org.eclipsescout.contacts.server.services.common.sql.DerbySqlService#password=secr3tTo setup the database connection the necessary parameters need to be added to the server’s config.ini file as shown in Listing 16. Comparing the parameter names in this config file with the package name of the created DerbySqlService service class reveals an interesting framework feature. All Scout services can be parameterized using the config.ini file with the pattern <package>.<class name>#<parameter>=<value>. The Scout runtime then sets the service parameters using matching setter methods such as setPassword for the password parameter.
According to the parameter jdbcMappingName=jdbc:derby:${workspace_loc/…} a new Derby database will be created in the same parent directory as the “My Contacts” workspace directory if no database named DB_CONTACT is found there. This setup is handy for development purposes but you may want to set the database parameter to create=false in the config.ini of the production product file.
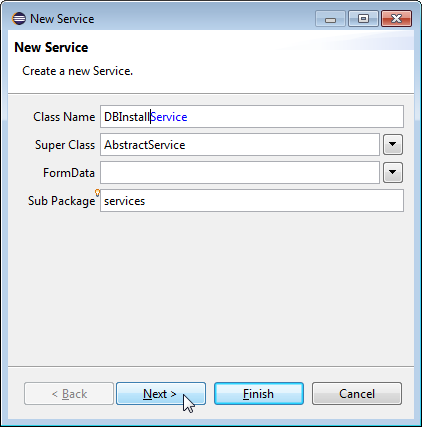
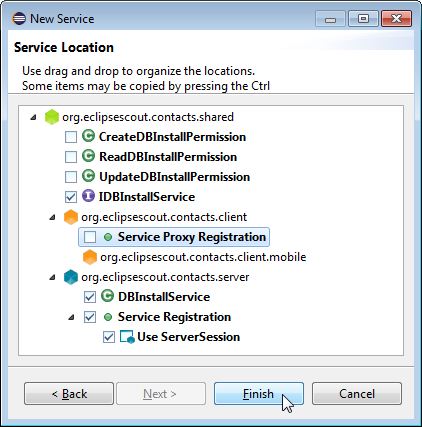
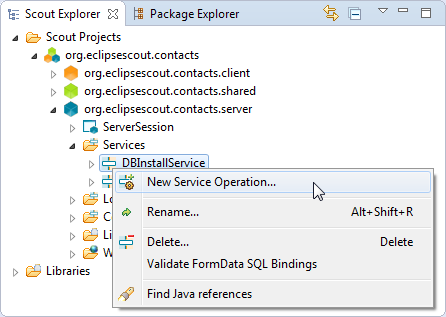
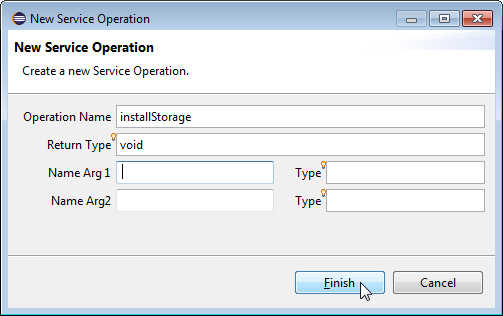
public class DBInstallService extends AbstractService implements IDBInstallService {
private boolean m_doSetup = true;
public void setDoSetup(boolean doSetup) {
m_doSetup = doSetup;
}
@Override
public void installStorage() throws ProcessingException {
boolean addInitialData = true;
if (m_doSetup) {
Set<String> tables = getExistingTables();
createCompanyTable(tables, addInitialData);
createPersonTable(tables, addInitialData);
createUsersParamTable(tables, addInitialData);
}
}
private Set<String> getExistingTables() throws ProcessingException {
Object[][] existingTables = SQL.select("SELECT tablename FROM sys.systables");
HashSet<String> result = new HashSet<String>(existingTables.length);
for (Object[] row : existingTables) {
String table = (row[0] + "").toUpperCase();
result.add(table);
}
return result;
}
}5.5.1. Setting up the Database Schema
Having a working database service and a new (empty) Derby database now allows to create the necessary database schema and populate it with some initial data. For this we add a new DBInstallService service as shown in Figure 83 below the Services node of the Scout server. To this install service we then add the installStorage operation according to Figure 84. The implementation of this method is provided in Listing 17. The method first checks if a setup is required. For this, the member variable m_doSetup is used that might also be set by the setDoSetup setter method via the server’s config.ini file.
private void createCompanyTable(Set<String> tables, boolean addInitialData) throws ProcessingException {
if (!tables.contains("COMPANY")) {
SQL.insert("CREATE TABLE COMPANY ("
+ " company_id VARCHAR(64) NOT NULL CONSTRAINT COMPANY_PK PRIMARY KEY, "
+ " name VARCHAR(64), "
+ " location VARCHAR(64), "
+ " url VARCHAR(64))");
if (addInitialData) {
SQL.insert("INSERT INTO COMPANY (company_id, name, location, url) "
+ "VALUES (:company_id, 'Alice''s Adventures in Wonderland', 'London, England', 'http://en.wikipedia.org/wiki/Alice%27s_Adventures_in_Wonderland')",
new NVPair("company_id", UUID.randomUUID().toString()));
SQL.insert("INSERT INTO COMPANY (company_id, name, location, url) "
+ "VALUES (:company_id, 'BSI Business Systems Integration AG', 'Daettwil, Baden, Switzerland', 'http://www.bsiag.com')",
new NVPair("company_id", UUID.randomUUID().toString()));
}
}
} private void createPersonTable(Set<String> tables, boolean addInitialData) throws ProcessingException {
if (!tables.contains("PERSON")) {
SQL.insert("CREATE TABLE PERSON ("
+ " person_id VARCHAR(64) NOT NULL CONSTRAINT PERSON_PK PRIMARY KEY, "
+ " company_id VARCHAR(64), "
+ " first_name VARCHAR(64), "
+ " last_name VARCHAR(64), "
+ " headline VARCHAR(512), "
+ " location VARCHAR(512), "
+ " date_of_birth DATE, "
+ " picture_url VARCHAR(512), "
+ " CONSTRAINT COMPANY_FK FOREIGN KEY (company_id) REFERENCES COMPANY (company_id))");
if (addInitialData) {
SQL.insert("INSERT INTO PERSON (person_id, first_name, headline, location, company_id, picture_url, date_of_birth)"
+ "VALUES (:person_id, 'Alice', 'The curious girl', 'Daresbury, Cheshire, England', "
+ "(SELECT company_id FROM COMPANY WHERE name = 'Alice''s Adventures in Wonderland'), 'http://www.uergsel.de/uploads/Alice.png', :dob)",
new NVPair("person_id", UUID.randomUUID().toString()),
new NVPair("dob", DateUtility.parse("26.11.1865", "dd.mm.yyyy")));
}
}
} private void createUsersParamTable(Set<String> tables, boolean addInitialData) throws ProcessingException {
if (!tables.contains("USERS_PARAM")) {
SQL.insert("CREATE TABLE USERS_PARAM ("
+ " username VARCHAR(32) NOT NULL, "
+ " param VARCHAR(32) NOT NULL, "
+ " value VARCHAR(512), "
+ " CONSTRAINT PARAM_PK PRIMARY KEY (username, param))");
if (addInitialData) {
// nop
}
}
}Setting up the schema to contain the individual tables for the “My Contacts” application is implemented in a separate method per table. The table definition for the company table is provided in Listing 18. In this method two Scout aspects are of interest.
The first Scout feature used is the absence of a COMMIT statement after the two INSERT INTO statements. This is possible, as all Scout service calls run in a transaction context that is transparent to the Scout developer. If a service method exits without errors, the enclosing transaction is committed. And if any runtime exception occurs in a service call the Scout runtime framework performs a rollback.
The second feature is the parameter binding used in the INSERT INTO statements. When SQL statements are executed using any of the static SQL methods, an internal statement processor replaces all bind variables found in the provided statement string. In Scout, SQL bind variables need to use the pattern :<variable name>. The values for the bind variables can then be provided in the form of additional arguments. In the concrete example of Listing 18, the content for the bind variable :company_id is provided as a NVPair object. [element]_NVPair_s are the simplest possible form to represent bind variables. The first constructor argument is the variable name of the bind variable, in this case company_id. The actual content of the bind variable is provided in the form of an object. Here, the Java runtime class UUID.randomUUID().toString() is used to create a new company key.
Setting up the person table and the user parameter table is defined according to Listing 19 and Listing 20. To create a data object for the persons day of birth, the Scout utility class DateUtility is used.
public class ServerApplication implements IApplication {
private static IScoutLogger logger = ScoutLogManager.getLogger(ServerApplication.class);
@Override
public Object start(IApplicationContext context) throws Exception {
ServerSession serverSession = SERVICES.getService(IServerSessionRegistryService.class).newServerSession(ServerSession.class, Activator.getDefault().getBackendSubject());
ServerJob installJob = new ServerJob("Install contacts DB schema", serverSession) {
@Override
protected IStatus runTransaction(IProgressMonitor monitor) {
try {
SERVICES.getService(IDBInstallService.class).installStorage();
logger.info("Contacts DB schema successfully created");
}
catch (Throwable t) {
return new Status(IStatus.ERROR, Activator.PLUGIN_ID, "Error while installing contacts DB schema", t);
}
return Status.OK_STATUS;
}
};
installJob.schedule();
installJob.join(20000);
logger.info("Contacts server application started");
return EXIT_OK;
}
}The only piece missing to setup the database is calling the installStorage operation during the startup of the “My Contacts” server application. The proper way to implement such a scenario is to schedule an installation job in the ServerApplication class of the Scout server. In the “My Contacts” application this is implemented according to Listing 21. To create a server job, a new server session object needs to be obtained first. However, during the startup time of the server we do not have any logged in users yet. That is why the session is created for the backend subject representing the server application. Using this serverSession object, the installJob can be created. In it’s runTransaction method we can then call the installStorage operation to setup the “My Contacts” database.
5.5.2. Scout Logging
config.ini file.
eclipse.consoleLog=true
org.eclipse.scout.log=eclipse
org.eclipse.scout.log.level=INFOAn additional Scout topic that is touched in this ServerApplication class is the Scout logging. As shown in Listing 21, a static logger object is created using Scout’s ScoutLogManager class. Events can then be logged with the logger.info method where info refers to the log level attached to this message. Similar to the database setup described above, the logging setup is defined in the config.ini file. The default setup defined for the development product is provided in Listing 22. Further information regarding logging in Eclipse Scout is available in the Scout wiki.[63].
5.6. Fetching Data from the Database
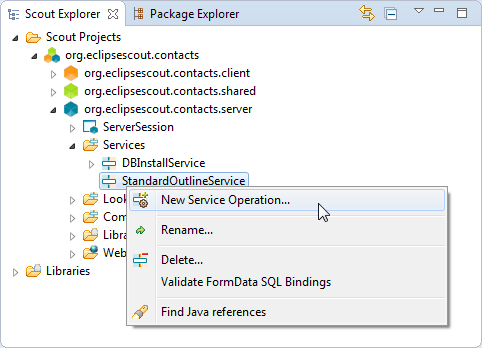
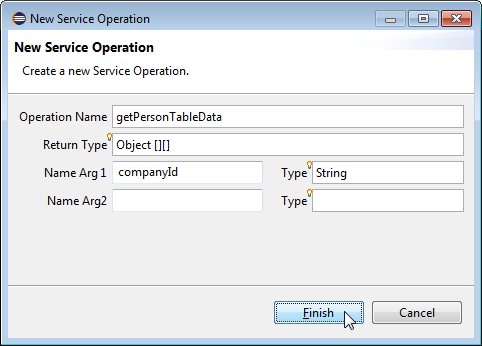
In the section before we have implemented and configured the SQL service to access the Derby database from the Scout server. And during the first server startup, the application’s database schema is created and populated with some initial data.
Now, this SQL service is ready to be used to fetch the data for the client application’s person page and the company page. The best place to implement these data provider methods is in the server’s StandardOutlineService class. This class has been created by the Scout SDK during the initial project creation step. It is meant to hold the operations that fetch the data for populating the elements visible in the outline tree and outline pages.
For the “My Contacts” application, we first create the getPersonTableData operation as shown in Figure 85. In the wizard dialog enter “getPersonTableData” into the Operation Name field. For the return type we simply use a two dimensional object array. As the person page is also displayed under the company page, we need to have a way to only return the persons working for a specific company. To allow for this use case, we add the parameter “companyId” as the first argument to the getPersonTableData operation before we close the wizard with Finish button.
The next operation we need is the getCompanyTableData method. You may use the same creation steps as described above for the person table page data. But for fetching company table data we do not need an additional argument. The company page in the “My Contacts” application will always show all available companies.
public class StandardOutlineService extends AbstractService implements IStandardOutlineService {
@Override
public Object[][] getPersonTableData(String companyId) throws ProcessingException {
String stmt = "SELECT person_id, first_name, last_name, headline FROM PERSON";
if (StringUtility.isNullOrEmpty(companyId)) {
return SQL.select(stmt);
}
return SQL.select(stmt + " WHERE company_id = :companyId",
new NVPair("companyId", companyId));
}
@Override
public Object[][] getCompanyTableData() throws ProcessingException {
return SQL.select("SELECT company_id, name, location FROM COMPANY");
}
}For the actual implementation of the two data fetching operations the code provided in Listing 23 is used. The implementation is straight forward and almost trivial. However, we can use the getPersonTableData example to introduce one of the many Scout utility classes.
The class StringUtility is one of the many utility classes provided by the Scout framework. Here, it is used for the typical null or empty check. To get a quick overview, hit the CtrlShiftT key combination. In the type dialog that appears enter org.eclipse.scout.*Utility into the pattern field. This will display the complete list of the Scout utility classes as shown in Figure 86.
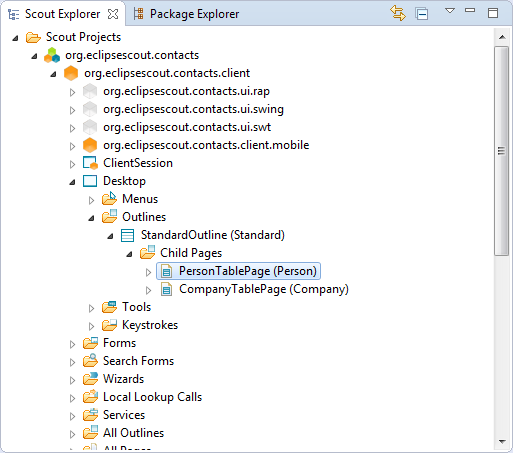
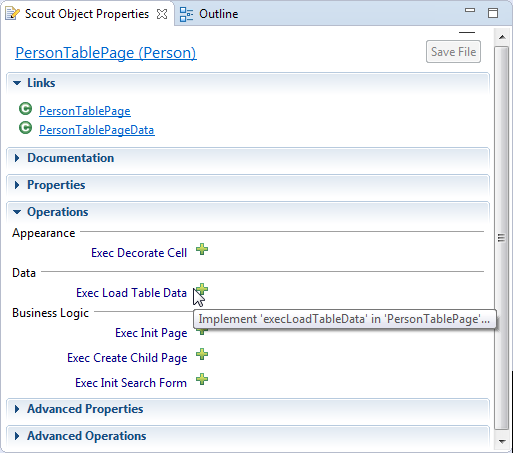
@Override
protected Object[][] execLoadTableData(SearchFilter filter) throws ProcessingException {
return SERVICES.getService(IStandardOutlineService.class).getPersonTableData(getCompanyId());
}As we have implemented the server service methods to load person and company data from the database, we can now use these services to load the data into the client. For this, we first navigate to the PersonTablePage under the orange client node in the Scout SDK. In the corresponding Scout Object Properties we add method execLoadTableData by clicking on the green plus icon as shown in Figure 87. Fetching the actual data is now implemented in a single line of code according to Listing 24.
For the company table page, the process described above can be repeated. The only difference is the implementation of the method execLoadTableData. Here, we can use the server service method getCompanyTableData() to fetch the company data from the server.
5.7. Creating the Person Form
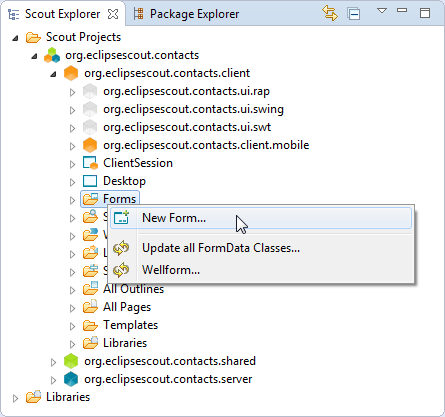
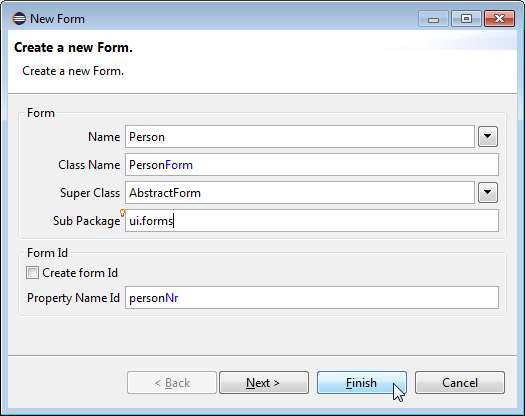
In this section we will create the person form that is used to display and edit the persons stored in the “My Contacts” application. To add the person form use the Scout SDK New Form wizard as shown in Figure 88. In the first wizard step you just need to enter “Person” as a new translated text into the Name field and add “ui.forms” as the sub-package name in the corresponding wizard field. Then click the Finish button.
The wizard will create the necessary artefacts in the application’s client, the shared and the server plugin projects. On the client side the PersonForm class with the necessary form handlers is created, in the shared part, the PersonFormData transfer object is added. On the server side, a PersonProcessService with all necessary service operations referenced by the form handlers is implemented.
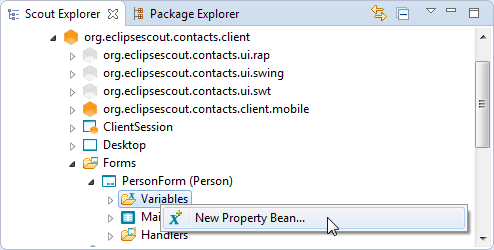
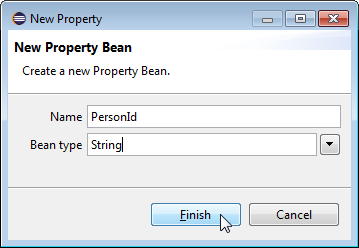
To hold the persons primary key in the person form we also need to add a corresponding variable. For this, use the New Property Bean wizard as shown in Figure 89. In the wizard dialog, enter “PersonId” into the Name field and pick String from the dropdown list provided in the Bean type field. Then, click the Finish button to close the wizard.
5.7.1. Creating the Form Layout with From Fields
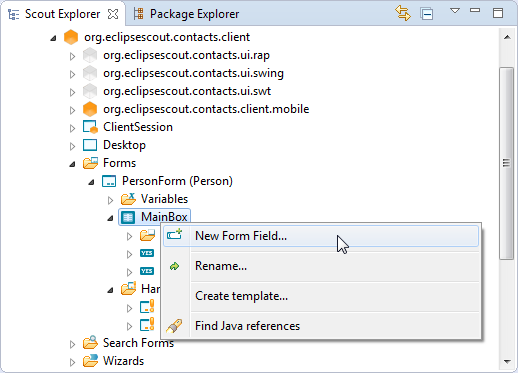
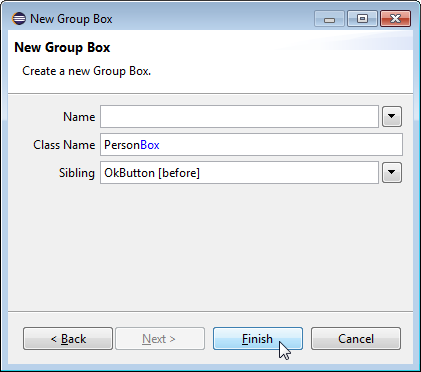
As a next step we create the main layout structure of the person form. According to the screenshot of the person form shown in Figure 65 the form is organized into an upper box including the first name, the last name and a picture field. In the “Details” box in the lower half of the form some additional fields are found, such as the date of birth field. And the bottom of the form holds a “Show Map …” link. We start with the general layout by adding the PersonBox according to Figure 90. In the first step (omitted in Figure 90) of the new form field wizard the field type GroupBox has to be selected. Below the person box we add the detail group box. As before, we select the GroupBox field type and click on the Next button. In the second wizard step we then enter the text “Detail” into the Name field.
We now add the form fields listed below using the the New Form Field wizard multiple times. Most fields are of type StringField and different field types are separately indicated.
-
PersonBox-
“First Name”
-
“Last Name”
-
“Picture URL”
-
PictureField (
ImageField)
-
-
“Detail” DetailBox
-
“Headline”
-
“Location”
-
“Date of Birth” (
DateField)
-
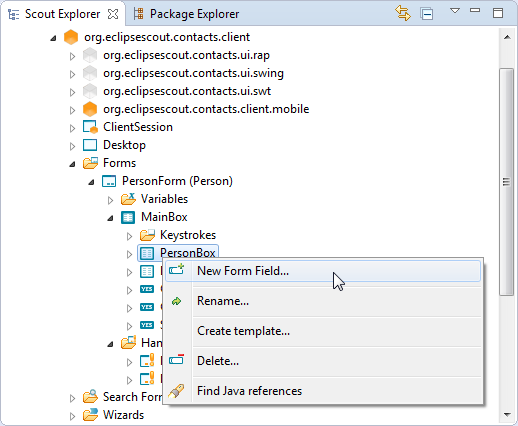
As an example for adding the form fields, the process is illustrated in Figure 91 for the creation of the picture field. In the field list we need to set non default properties for the PictureUrlField field and the PictureField field. The picture URL field will hold an URL pointing to the picture of the person to be displayed. As in the person form only the picture is to be displayed but not the picture URL, we need to make this field invisible. For this, select the PictureUrlField node in the Scout Explorer and then untick the Visible field in the Scout Object Properties. Note that to access the visibility property you need to open the section Advanced Properties first.
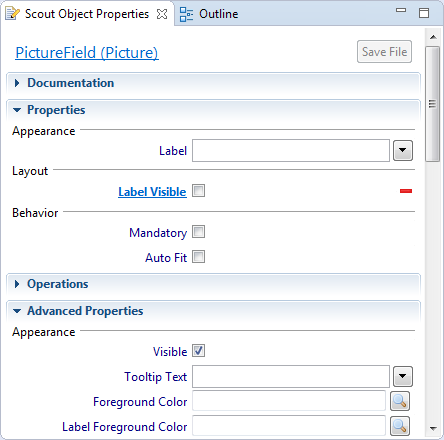
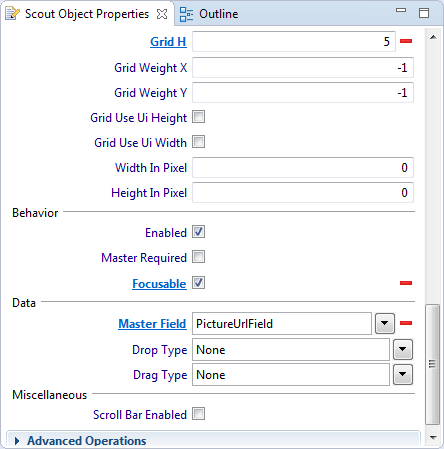
As the configuration of the picture field is more complex than the other fields, the changed properties are shown in the screenshots provided in Figure 92. First, no label is shown for the picture field as shown in the unticked Label Visible field of the Scout Object Properties. Then, property Grid H is set to 5. This results in the picture to cover the vertical space of 5 form fields.
@Override
protected boolean getConfiguredVisible() {
}
@Override
protected boolean getConfiguredLabelVisible() {
return false;
}
@Override
protected Class<? extends IValueField> getConfiguredMasterField() {
return PersonForm.MainBox.PersonBox.PictureURLField.class;
}
@Override
protected void execChangedMasterValue(Object newMasterValue) throws ProcessingException {
try {
URL url = new URL((String) newMasterValue);
setImage(IOUtility.getContent(url.openStream()));
form.startModify();
form.waitFor();Finally, we want the picture to be refreshed whenever the content of the picture URL is changed. For this, the property Master Field is set to the PictureUrlField. The implementation of the corresponding method execChangedMasterValue is provided in Listing 25. As we can see, the Scout helper class IOUtility is used to read the image content from the provided URL. This content is then used to assign the image content with the image field’s method setImage. Method setAutoFit is called to adapt the picture to the dimensions available to the image field.
5.7.2. A simple Form to edit the Picture URL
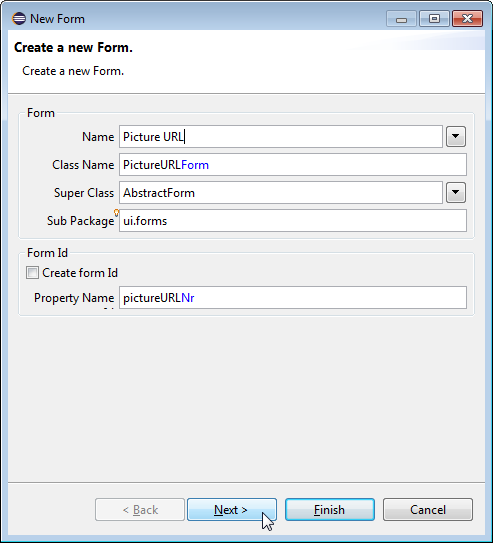

To edit a person’s picture link, we create a simple URL editor form as shown in Figure 93. As we only need this form to update the URL information of a person’s picture field, we do not need any connectivity to the backend of the “My Contacts” application. That is why almost all form and service artefacts are deselected in the second wizard step shown on the right side of Figure 93.
public class PictureURLForm extends AbstractForm {
@Order(10.0)
public class MainBox extends AbstractGroupBox {
@Order(10.0)
public class URLBox extends AbstractGroupBox {
@Order(10.0)
public class PictureURLField extends AbstractStringField {
@Override
protected String getConfiguredLabel() {
return TEXTS.get("PictureURL");
}
}
}
}
}As this form only holds a single URL field, we omit the description of the creation of the URL editor form’s content and provide the resulting Java code instead. In Listing 26 just the form’s MainBox code is shown.
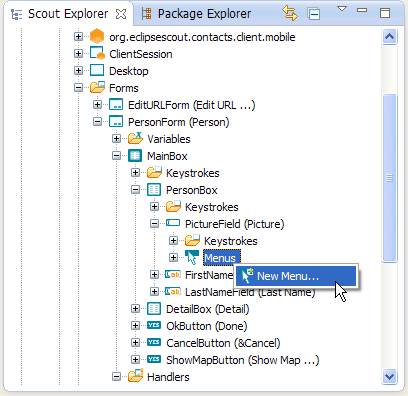
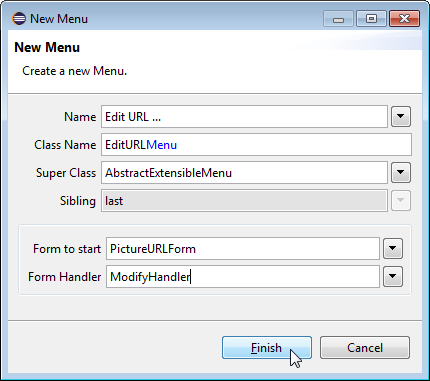
This form is then started via an “Edit URL …” contextmenu on the image field. The creation of this contextmenu is shown in Figure 94. See Listing 27 for the actual implementation of the execAction for this contextmenu.
Once the edit URL form is started with form.startModify() the client waits in method form.waitFor until the form is closed by the user. If the user has changed any field content (the picture URL in our case) and closed the form with the OK button, the method form.isFormStored returns true, and we can copy the new URL from the editor form field into the picture URL field of the person form. Such a change will then trigger method execChangedMasterValue of the PictureField which in turn updates the image shown in the person form.
5.7.3. Linking the Person Form to the Person Page
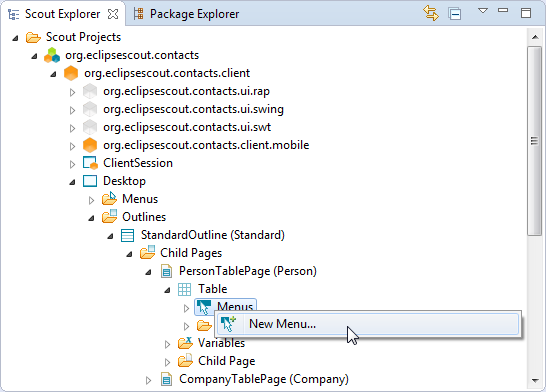
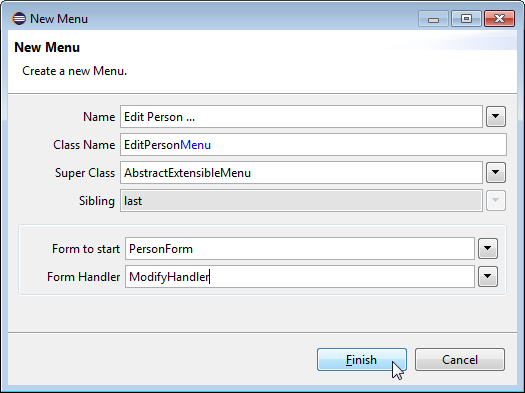
The user of the “My Contacts” application wants to use the person form to show/edit attributes of a specific person. To support this use case, we need to link this form with the “My Contacts” application. As we already have person pages that show some of the person’s attribute, we can now add context menus to this list to open/edit existing persons in the person form and to create new persons as well. This is achieved by using the New Menu wizard on the Menus node of the table of the person page according to Figure 95. In the Name field enter the new translated text “Edit Person …”. The form to start is the PersonForm and the ModifyHandler is the form handler to be used to start the form. As we have defined a meaningful primary key column on the person page and a matching variable is available for the person form, the Scout SDK wizard is generating the necessary code automatically. The implementation of the execAction method provided in [lst-mycontacts.desktop.outline.personpage.editmenu] works out of the box and should not need any manual tuning. Now, you may also add the “New Person …” menu in the same way. Except that you pick the NewHander in the New Menu wizard instead of the modify handler.
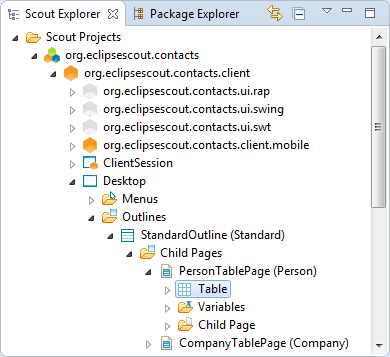
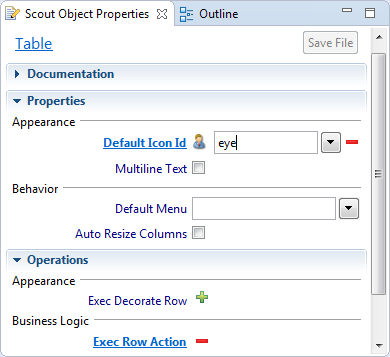
<Enter>.
@Override
protected void execRowAction(ITableRow row) throws ProcessingException {
getMenu(EditPersonMenu.class).execAction();
}To open the person form with a double click on a person row or by hitting the Enter key, you may add a corresponding execRowAction on the person page. This method can be added to the person table by clicking on the green plus icon next to the operation Exec Row Action as shown in Figure 96. For the implementation of this method you may reuse the functionality implemented for the context menu according to Listing 29.
5.7.4. Adding the Company Smartfield
At the current stage of the “My Contacts” application, we have no option to manage the relationship between people and companies. To manage this relation, we now add a company smart field to the person form. This smart field will then hold the current assignment of the person represented in the person form.
A Scout smart field can be viewed as user friendly dropdown field on steroids that also implements search-as-you-type to pick a specific entry. In the simplest case the smart field provides access to a small and locally provided list of key value pairs. But for the intended use in the “My Contacts” application, we will need to access a list of elements provided by the server that will be compiled dynamically at runtime.
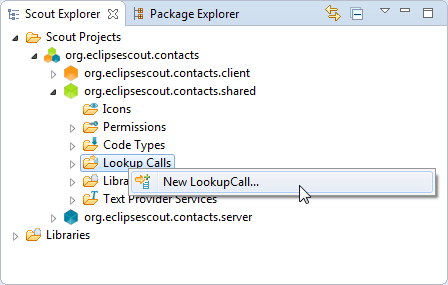
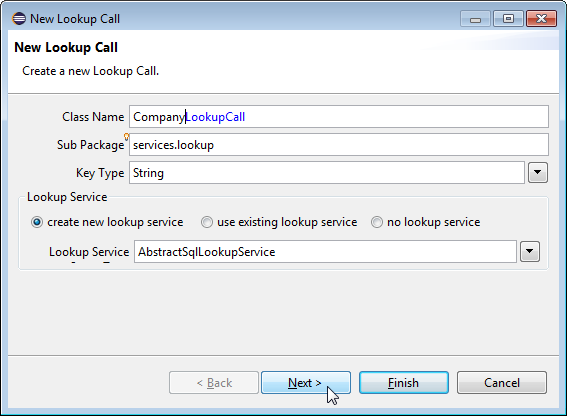
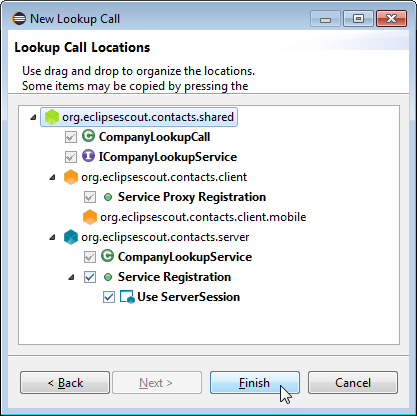
To create the access to this list, we start with the creation of the company lookup call. As shown in Figure 97 the lookup call is added on the Lookup Calls folder under the green shared node of the “My Contacts” application. This opens the New Lookup Call wizard as shown in Figure 98. In the first wizard step, enter “Company” into the Class Name field, “services.lookup” into the Sub Package field and “String” into the Key Type field. Now verify that the wizard step looks the same as the screenshot shown on the left hand side of Figure 98. Before the wizard is closed, click on the Next button to move to the second wizard step. As shown on the right hand side of Figure 98, the wizard will also create a corresponding CompanyLookupService on the application’s server. We can now close this wizard with the Finish button and add the business logic to this company lookup service.
public class CompanyLookupService extends AbstractSqlLookupService<String> implements ICompanyLookupService {
@Override
protected String getConfiguredSqlSelect() {
return "SELECT "
+ "company_id, "
+ "name "
+ "FROM COMPANY "
+ "WHERE 1=1 "
+ "<key> AND company_id = :key </key> "
+ "<text> AND UPPER(name) LIKE UPPER(:text) </text> "
+ "<all> </all> ";
}
}The CompanyLookupCall just created by the Scout SDK wizard is provided in Listing 30. As we can see, the only method implemented is getConfiguredService that points to the specific server service to be used. In the Scout Explorer, the new company lookup service can be found in the Lookup Services folder under the blue server node of the application. In this service, we need to implement method getConfiguredSqlSelect as shown in Listing 31. For Scout lookup services, specific key, text and all criteria blocks need to be provided. This criteria are included in the SELECT statement using the <key>, <text> and <all> tags as shown in the listing. The Scout runtime uses the <key>-block in cases where a specific key is already assigned to the smart field. The <text>-block is used as a query criteria to create the dynamic search-as-you-type hit list based on the (sub)string entered by the user so far. Finally, the <all>-block is used to define the hit list to be shown when the user does not enter any text into the smart field but clicks on the field’s search icon instead. The bind variable :key and :text are provided by Scout and hold the value of the assigned key or the text entered into the smart field.
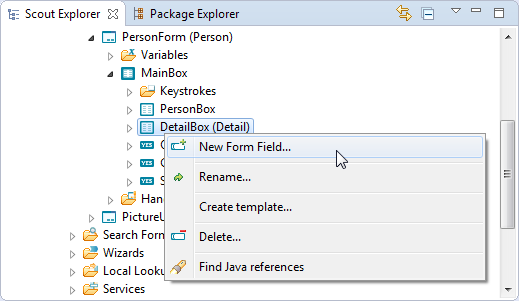
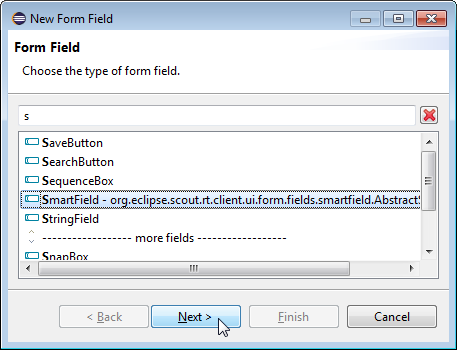
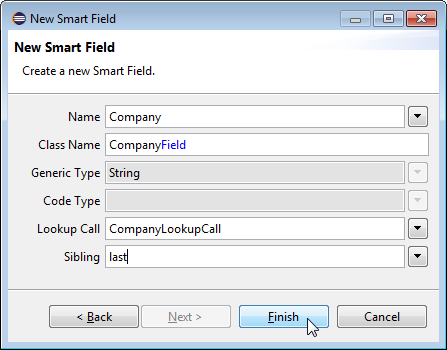
We are now ready to add the company smart field to the person form. To start the New Form Field wizard we use the context menu on the DetailBox of the person form as shown in Figure 100. In the first wizard step, we chose the SmartField entry as the field type and click the Next button. Then, we enter “Company” into the Name field as shown on the right hand side of Figure 100. Make sure that you select the String entry in the Generic Type field as we are using string values to identify companies in the “My Contacts” application. And in the LookupCall field, we can now select the CompanyLookupCall that we have just created before. Finally, the position of the new company smart field can be set in the Sibling field before the location field before the wizard is closed with the Finish button.
@Override
protected String getConfiguredLabel() {
return TEXTS.get("DateOfBirth");
}
}
@Order(40.0)
public class CompanyField extends AbstractSmartField<String> {
@Override
protected String getConfiguredLabel() {
return TEXTS.get("Company");
}The implementation of the company smart field created by the Scout SDK wizard is provided in Listing 32. A look at the implementation of the CompanyField class shows the wiring with the company lookup service.
5.7.5. Adding the Map Form
We now want to add the “Map” form shown in the front of Figure 65. The purpose of this form is to show a map corresponding to the address entered into the location field of the person form using the Google Maps Image API.[64]. This implies that map images will only be shown in the map form if the entered address can be parsed by the Google Maps Image API.
To create the maps form we start the New Form wizard and enter the new translated text “Map” into the Name field and “ui.forms” into the Sub Package field of the first wizard step. Then, we click the Next button to configure the artefacts to be created by the wizard. For the map form we can use the configuration as shown on the right hand side of Figure 93 with the difference that we do not need the cancel button. Having deselected all artefacts except for the ok button and the modify handler, the wizard can be closed with the Finish button.
After the form creation wizard has been closed, we can add an “Address” variable to the form by starting the New Property Bean wizard on the Variables node of the newly created map form. In the property bean wizard, enter “Address” into the Name field and set the Bean type field to String.
As the next step, the map image field is added to the from. For this, start the New Form Field wizard directly on the form’s MainBox node. In the first form field wizard step, select ImageField as the field type and click on the Next button. Now enter “Map” into the Class Name field and close the second wizard step with the Finish button. To set the properties of the new map field, select the MapField node below the main box node of the map form. In the MapField's Scout Object Properties untick the Label Visible property and add an execInitField method by clicking on the green plus icon next to this operation. The configuration of the map field can then be completed in section Advanced Properties. Here, we set the Grid H property to 6 and update the Width in Pixel property and the Height in Pixel property to a value of 400 each.
@Override
protected void execInitField() throws ProcessingException {
String address = StringUtility.nvl(getAddress(), "");
String size = "" + getConfiguredHeightInPixel() + "x" + getConfiguredWidthInPixel();
String url = null;
try {
url = "http://maps.googleapis.com/maps/api/staticmap?center=" +
URLEncoder.encode(address, "ISO-8859-1") +
"&zoom=13&size=" + size + "&maptype=roadmap&sensor=false";
setImage(IOUtility.getContent((new URL(url)).openStream()));
}
catch (Exception e) {
setErrorStatus(new ProcessingStatus("Bad Link: '" + url + "', please check",
ProcessingStatus.ERROR));
setImage(null);
e.printStackTrace();
}
}
}To add the Java code to display the map in the image field, click on the execInitField link in the Scout Object Properties of the map field. According to the implementation provided in Listing 33, an URL for the Maps Image API is first constructed. This url also contains the content of the map form’s address variable and the configured dimension of the map field. The map picture returned by the Google API is then read using IOUtility.getContent and directly fed into the image fields setImage method.
The last step involving the implementation of the map form feature is its integration into the person form. As visible on the lower left part of the person form shown in Figure 65, a Show Map … link is available. We now add such a link to the person form including the necessary wiring for opening the newly created map form. For this, navigate to the person form in the Scout SDK and click on its MainBox node below. Then, open the context menu on the MainBox node and start the New Form Field wizard. In the first wizard step, select the LinkButton from the available field types and click the Next button to load the second wizard step. Here, just enter the new translated text “Show Map …” into the Name field and close the wizard with the Finish button.
execClickAction a new map form is first created, the the address variable is set with the content of the person’s location and the form is opened with
startModify.
public class OkButton extends AbstractOkButton {
}
@Order(40.0)
public class CancelButton extends AbstractCancelButton {
}
@Order(50.0)
public class ShowMapButton extends AbstractLinkButton {
@Override
protected String getConfiguredLabel() {
return TEXTS.get("ShowMap");
}
@OverrideTo add the necessary wiring code to the link button double click the ShowMapButton node in the Scout Explorer and implement its execClickAction method. As shown in Listing 34, we only need to create a new map form in the click action, set its address variable and open the form with form.startModify.
5.8. Managing Person Data on the Server Side
MapForm mapForm = new MapForm();
mapForm.setAddress(getLocationField().getValue());
mapForm.startModify();
}
}
}
public class ModifyHandler extends AbstractFormHandler {
@Override
protected void execLoad() throws ProcessingException {
IPersonService service = SERVICES.getService(IPersonService.class);
PersonFormData formData = new PersonFormData();
exportFormData(formData);
formData = service.load(formData);
importFormData(formData);
setEnabledPermission(new UpdatePersonPermission());
}
@Override
protected void execStore() throws ProcessingException {In the “My Contacts” client application the person form is opened via the context menues “Edit Person …” and “New Person …” on the person page. And for each context menu, the person form is started with the corresponding form handler. The new handler is used to start the form in the mode to create new persons while the modify handler is implemented to start the form for updating existing persons. When we look at the implementation of the modify handler provided in Listing 35, we see that it only contains the two methods execLoad and execStore. As described in Section Form Handler of the “Hello World” tutorial, execLoad is called by the Scout framework when the form is started. And method execStore is called by the Scout framework after the user has clicked the OK button of a form.
public class PersonService extends AbstractService implements IPersonService {
@Override
public PersonFormData load(PersonFormData formData) throws ProcessingException {
if (!ACCESS.check(new ReadPersonPermission())) {
throw new VetoException(TEXTS.get("AuthorizationFailed"));
}
SQL.selectInto("SELECT "
+ "picture_url, "
+ "first_name, "
+ "last_name, "
+ "company_id, "
+ "headline, "
+ "location, "
+ "date_of_birth "
+ "FROM PERSON "
+ "WHERE PERSON_ID = :personId "
+ "INTO "
+ ":pictureURL, "
+ ":firstName, "
+ ":lastName, "
+ ":company, "
+ ":headline, "
+ ":location, "
+ ":dateOfBirth",
formData);
return formData;
}
@Override
public PersonFormData store(PersonFormData formData) throws ProcessingException {
if (!ACCESS.check(new UpdatePersonPermission())) {
throw new VetoException(TEXTS.get("AuthorizationFailed"));
}
SQL.update("UPDATE PERSON SET "
+ "picture_url = :pictureURL, "
+ "first_name = :firstName, "
+ "last_name = :lastName, "
+ "headline = :headline, "
+ "company_id = :company, "
+ "location = :location, "
+ "date_of_birth = :dateOfBirth "
+ "WHERE person_id = :personId ",
formData);
return formData;
}
}In both the execLoad and the execStore methods, the person service is used. In execLoad by calling service.load to fetch the person’s data from the Scout server, and in execStore by calling service.store to transfer the updated data to the Scout server. The implementation of the Scout server’s load and store methods for the PersonService is provided in Listing 36. To load the correct person data, the load method expects the person’s id as an input parameter personId in the formData.
For the data binding between the formData and the attributes in the database tables Scout provides support in the methods of the SQL class. This support is first searching for the pattern “:<variable>” in the provided SQL statement. For all such patterns found, the binding to the corresponding getVariable and setVariable methods of the form data object is performed by the Scout framework at runtime.
The implementation of the person form’s new handler is implemented similar to it’s modify handler. Instead of calling the service operations load and store, the methods prepareCreate and create are used. In principle, method prepareCreate is not needed for the “My Contacts” application. As its implementation has been created by the Scout SDK wizard, it does not do any harm and the method can be left unchanged.
public class PersonService extends AbstractService implements IPersonService {
@Override
public PersonFormData create(PersonFormData formData) throws ProcessingException {
if (!ACCESS.check(new CreatePersonPermission())) {
throw new VetoException(TEXTS.get("AuthorizationFailed"));
}
if (StringUtility.isNullOrEmpty(formData.getPersonId())) {
formData.setPersonId(UUID.randomUUID().toString());
}
SQL.insert("INSERT INTO PERSON (person_id) "
+ "SELECT :personId "
+ "FROM PERSON "
+ "WHERE person_id = :personId "
+ "HAVING count(*) = 0",
formData);
return store(formData);
}
}In Listing 37 the implementation of the PersonService's create method is provided. First, the implementation checks if the provided form data contains a person id. If the person has been entered manually, a person id is initially missing and a new one needs to be created and assigned. For this, method randomUUID() of the Java class java.util.UUID is used. The only responsibility of the INSERT statement following the person id check is to make sure we will have a row in the PERSON table for the person to be created. To save all the other form data parameters, we can reuse the previously implemented store method.
5.9. Creating the Company Form
Creating the company form and the necessary backend services is not described here. Instead, this task is left as an exercise to the reader and in the text below some minimal guidelines are provided.
To create the company form, start with the New Form wizard as in the case of the person form. This will then create all necessary artefacts including the forms, the server service, and the form data for the communication between the client and the server. And don’t forget to add a companyId variable to the company form. To decide on the fields that need to be on the company form you may check the setup of the database schema provided in Listing 18. If in doubt about what to do, please refer to the procedure used to create the person form.
In case you get lost completely, you may download the “My Contacts” application from this books Github repository as described in the Scout wiki.[65].
5.10. Adding the Scribe Library to the Application
To access data from sites such as LinkedIn, Xing, Google+ or Facebook, most social networks provide an API that requires user authentication. The current defacto standard for such authentication is the Open Authentication Protocol (OAuth).[66]
The big advantage of the OAuth standard is the authentication based on access tokens. If an application such as the “My Contacts” example is in possession of an access token, it can fetch data from the hosting site or even act on the users behalf. The access token itself just contains two values, the token and the secret. And both values are completely separate from the user’s username and password credentials. This means that an access token may be safely stored in other applications. Should such an application or its data get compromised, the username and password are still save and the user just has to remove/invalidate the compromised access token.
For the “My Contacts” application we use the Scribe Java library.[67] This library makes accessing social services very simple. At the same time the Scribe library is used here to demonstrate the integration of external Java libraries in Scout applications.

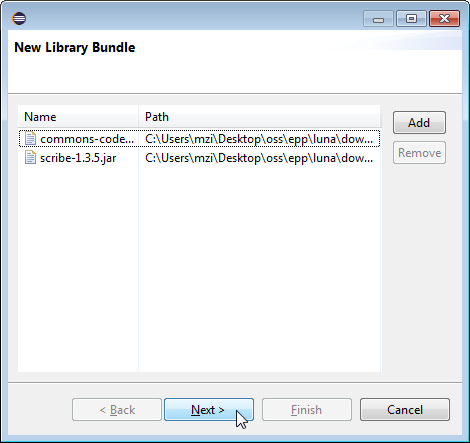
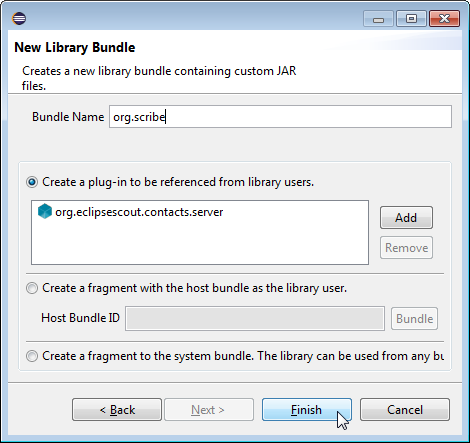
As we will use the Scribe library only on the Scout server side start the Scout SDK New Library Bundle wizard below the blue server node as shown in Figure 101. In the first wizard step shown on the left side of Figure 102 add the files scribe-1.3.5.jar and commons-codec-1.9.jar.[68] using the Add button. Once the two JAR files are listed in the library list of the wizard click the Next button. On the second wizard step, enter “org.scribe” into the Bundle Name field as shown on the right side of Figure 102. Then, close the wizard with the Finish button.
The Scout SDK wizard then creates the corresponding library plugin and updates the server product files and the plugin dependencies of the applications server plugin accordingly. Once the wizard has completed the classes defined in the two JAR files can directly be accessed from the “My Contact” application’s server plugin.
5.11. Integrating LinkedIn Access with Scribe
public class LinkedInService extends AbstractService implements ILinkedInService {
private final static String LINKEDIN_TOKEN = "linkedin_access_token";
private final static String LINKEDIN_SECRET = "linkedin_access_secret";
private final static String LINKEDIN_CONNECTIONS = "http://api.linkedin.com/v1/people/~/connections";
private static IScoutLogger LOG = ScoutLogManager.getLogger(LinkedInService.class);
private OAuthService m_service = null;
private Token m_requestToken = null;
private Token m_accessToken = null;
@Override
public void initializeService(ServiceRegistration registration) {
super.initializeService(registration);
m_service = new ServiceBuilder()
.provider(LinkedInApi.withScopes("r_network"))
.apiKey("CiEgwWDkA5BFpNrc0RfGyVuSlOh4tig5kOTZ9q97qcXNrFl7zqk-Ts7DqRGaKDCV")
.apiSecret("dhho4dfoCmiQXrkw4yslork5XWLFnPSuMR-8gscPVjY4jqFFHPYWJKgpFl4uLTM6")
.build();
}
}To access the LinkedIn data with Scribe we first create a new service LinkedInService with the New Service wizard in the Services folder under the blue server node. In the wizard, enter “LinkedIn” into the Class Name field and “services” into the Sub Package field. Before we add any service operations to the LinkedIn service, the service initialization method is implemented according to Listing 38. This initialization is not discussed further here. Instead, the interested reader is referred to the corresponding LinkedInExample on the Scribe web pages.[69].
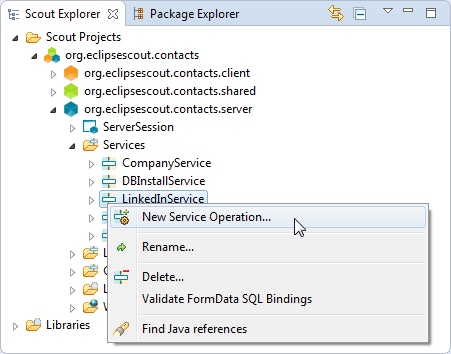
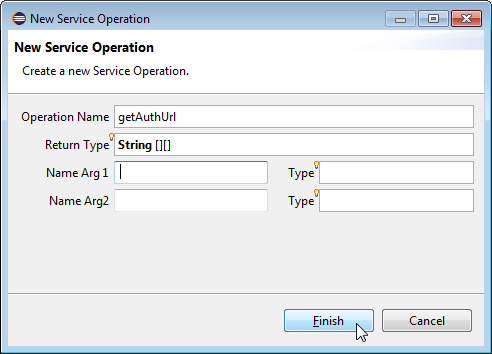
@Override
public String getAuthUrl() throws ProcessingException {
m_requestToken = m_service.getRequestToken();
String authLink = m_service.getAuthorizationUrl(m_requestToken);
return authLink;
}The first service operation getAuthUrl is added according to Figure 103. This operation will return the necessary information to create a request token and provides a link to open in a web browser to start the authentication against the LinkedIn account. For its implementation see Listing 39.
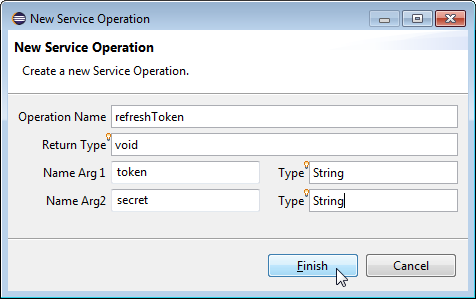
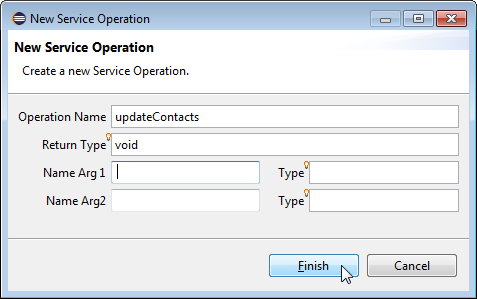
The next operations we add are used to refresh the users access token stored in the “My Contacts” application and to refresh or download the users contacts stored in the user’s LinkedIn account. See Figure 104 for the necessary details for the creation of the two methods. The New Service Operation wizard only allows to provide two parameters. As we need three parameters for the method refreshToken, we have to amend the security code parameter manually. For this, first update the interface ILinkedInService and amend the parameter list with the additional String parameter securityCode. Then, open class LinkedInService and add the String parameter securityCode according to interface just updated before.
@Override
public void refreshToken(String securityCode) throws ProcessingException {
// turn request token into access token
m_accessToken = m_service.getAccessToken(m_requestToken, new Verifier(securityCode));
// make sure current user has param records for linkedin token
String userName = ServerSession.get().getUserId();
SQL.insert("INSERT INTO USERS_PARAM (username, param) ("
+ "SELECT :username as username, :param as param "
+ "FROM USERS_PARAM "
+ "WHERE username = :username AND param = :param HAVING count(*) = 0"
+ ")",
new NVPair("username", userName), new NVPair("param", LINKEDIN_TOKEN));
SQL.insert("INSERT INTO USERS_PARAM (username, param) ("
+ "SELECT :username as username, :param as param "
+ "FROM USERS_PARAM "
+ "WHERE username = :username AND param = :param HAVING count(*) = 0"
+ ")",
new NVPair("username", userName), new NVPair("param", LINKEDIN_SECRET));
// update param records with new access token
SQL.update("UPDATE USERS_PARAM set value = :value "
+ "WHERE param = :param AND username = :username",
new NVPair("value", m_accessToken.getToken()),
new NVPair("username", userName), new NVPair("param", LINKEDIN_TOKEN));
SQL.update("UPDATE USERS_PARAM set value = :value "
+ "WHERE param = :param AND username = :username",
new NVPair("value", m_accessToken.getSecret()),
new NVPair("username", userName), new NVPair("param", LINKEDIN_SECRET));
}Method refreshToken can now be implemented according to Listing 40. Using the provided token parameters and the security code, the access token is created using the m_service.getAccessToken method. Then, the user id of the currently logged in user is obtained with ServerSession.get().getUserId(). Once we have both the access token and the user id available in method {refreshToken}, we can store the token and the secret values for the current user in table USERS_PARAM according to Listing 40.
private NodeList readContacts() throws ProcessingException {
// check if we need to load the access token
if (m_accessToken == null) {
m_accessToken = getToken();
}
// create singned linkedin request and get response
OAuthRequest request = new OAuthRequest(Verb.GET, LINKEDIN_CONNECTIONS);
m_service.signRequest(m_accessToken, request);
Response response = request.send();
// parse linkedin response stream
Element element = null;
try {
DocumentBuilder builder = DocumentBuilderFactory.newInstance().newDocumentBuilder();
Document document = builder.parse(response.getStream());
element = document.getDocumentElement();
}
catch (Exception e) {
throw new ProcessingException(e.getMessage(), e);
}
// basic error handling
if (element.getNodeName().equals("error")) {
LOG.error(DomUtility.getString(element));
throw new ProcessingException(DomUtility.getString(element));
}
return element.getChildNodes();
} private Token getToken() throws ProcessingException {
String userName = ServerSession.get().getUserId();
StringHolder value = new StringHolder();
StringHolder secret = new StringHolder();
SQL.selectInto("SELECT value INTO :value FROM USERS_PARAM "
+ "WHERE param = :param AND username = :username",
new NVPair("value", value),
new NVPair("param", LINKEDIN_TOKEN),
new NVPair("username", userName));
SQL.selectInto("SELECT value INTO :secret FROM USERS_PARAM "
+ "WHERE param = :param AND username = :username",
new NVPair("secret", secret),
new NVPair("param", LINKEDIN_SECRET),
new NVPair("username", userName));
if (StringUtility.isNullOrEmpty(value.getValue())) {
String message = "No valid LinkedIn token stored for user "
+ "'" + userName + "'. Please (re)create a token";
LOG.error(message);
throw new ProcessingException(message);
}
return new Token(value.getValue(), secret.getValue());
}
}The next step is to add a method readContacts to fetch the list of contacts from a LinkedIn account. According to Listing 41, this private LinkedInService method reads the data from LinkedIn into a DOM tree.[70]. For this, a signed OAuth request is first created using the access token provided by method getToken according to Listing 42. The request specified by constant LINKEDIN_CONNECTIONS is defined as http://api.linkedin.com/v1/people/textasciitilde/connections. According to the API specification.[71], this returns all connections of the user in the response. The response in the form of an XML document can then be parsed and returned in the form of a node list.
To sign the request to fetch the data from LinkedIn, the access token is retrieved from the database of the “My Contact” application using method getToken. According to the implementation provided in Listing 41 the user id is first obtained from the user’s server session. The necessary parameters to create the access token are then retrieved from the USERS_PARAM table.
<?xml version="1.0" encoding="UTF-16"?>
<person>
<id>f7R6wGcblj</id>
<first-name>Mike</first-name>
<last-name>Milinkovich</last-name>
<headline>Executive Director at Eclipse Foundation</headline>
<picture-url>http://m3.licdn.com/mpr/mprx/0_IUM7Se9vBU...SbRbQZ4</picture-url>
<site-standard-profile-request>
<url>http://www.linkedin.com/profile/view?id=14949387...05720*s114280*</url>
</site-standard-profile-request>
<location>
<name>Ottawa, Canada Area</name>
<country>
<code>ca</code>
</country>
</location>
<industry>Computer Software</industry>
</person>Before we proceed, we take a look at the actual form of the data that will be provided by the LinkedIn API. From the sample XML extract provided in Listing 43, we can identify the person id f7R6wGcblj, the first name Mike and some other attribute names with associated attribute values. A closer look reveals the identity of the person to be Mike Milinkovich, a well known character in the Eclipse community. For the purpose of the “My Contacts” application it is sufficient to be able to extract the top-level elements that hold the name, headline, and location information. As the location string is contained in a name element inside the location element of the person, we need to be able to extract the content of either top level elements or the level directly below. To simplify access to this data provided by the LinkedIn API we implement a small helper class named DomUtility.

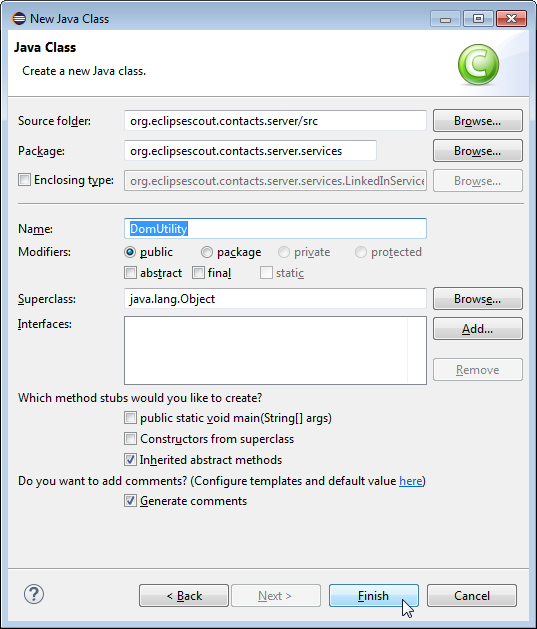
public class DomUtility {
private static Node getSubElement(Node parent, String name) {
NodeList nodes = ((Element) parent).getElementsByTagName(name);
if (nodes.getLength() == 0) {
return null;
}
return nodes.item(0);
}
public static String getValue(Node node, String name) {
Node n = getSubElement(node, name);
if (n == null) {
return "";
}
return n.getTextContent();
}
public static String getValue(Node node, String name, String subName) {
Node n = getSubElement(node, name);
if (n == null) {
return "";
}
return getValue(n, subName);
}
public static String getString(Element element) {
Document document = element.getOwnerDocument();
DOMImplementationLS domImplLS = (DOMImplementationLS) document.getImplementation();
LSSerializer serializer = domImplLS.createLSSerializer();
return serializer.writeToString(element);
}
}For adding the class DomUtility, the Eclipse New Java Class wizard can be used according to Figure 105. This wizard can by started by pressing the CTRL+n keys. In the first wizard step select the class element under the Java folder and click the Next button. And in the second wizard step ensure that the new class will be created in the org.eclipsescout.contacts.server.services package. Then enter “DomUtility” into the Name field and close the wizard with the Finish button. The implementation of the class is provided in Listing 44. Before the class can be saved, the necessary imports need to be fixed by pressing CTRL+SHIFT+o and selecting the components provided in the org.w3c.dom packages.
@Override
public void updateContacts() throws ProcessingException {
try {
IPersonService service = SERVICES.getService(IPersonService.class);
NodeList persons = readContacts();
for (int i = 0; i < persons.getLength(); i++) {
if (persons.item(i) instanceof Element) {
Element person = (Element) persons.item(i);
LOG.info(DomUtility.getString(person));
// load existing person data
PersonFormData formData = new PersonFormData();
formData.setPersonId(DomUtility.getValue(person, "id"));
service.load(formData);
formData.getPictureURL().setValue(
DomUtility.getValue(person, "picture-url"));
formData.getFirstName().setValue(
DomUtility.getValue(person, "first-name"));
formData.getLastName().setValue(
DomUtility.getValue(person, "last-name"));
formData.getHeadline().setValue(
StringUtility.substring(DomUtility.getValue(person, "headline"), 0, 64));
formData.getLocation().setValue(
DomUtility.getValue(person, "location", "name"));
// save new/updated person data
service.create(formData);
}
}
}
catch (Exception e) {
throw new ProcessingException("LinkedIn Error", e);
}
}We now have finished all necessary parts to implement the method updateContacts of the server service LinkedInService according to Listing 45. In this method a service reference to the person process service is obtained first. Then, the LinkedIn contacts provided by method readContacts are stored in a persons list object. Finally, each person can be updated with the data available from LinkedIn. To update a single person the following steps are performed in the person loop. First, a form data is created and its id parameter is set to DomUtility.getValue(person, "id"). Using the load method of the person process service the person’s attributes are loaded from the server’s database. The LinkedIn attributes are then used to update the corresponding form data. With service.create(formData) the updated form data is then stored in the “My Contacts” database.
5.12. Fetching Contacts from LinkedIn
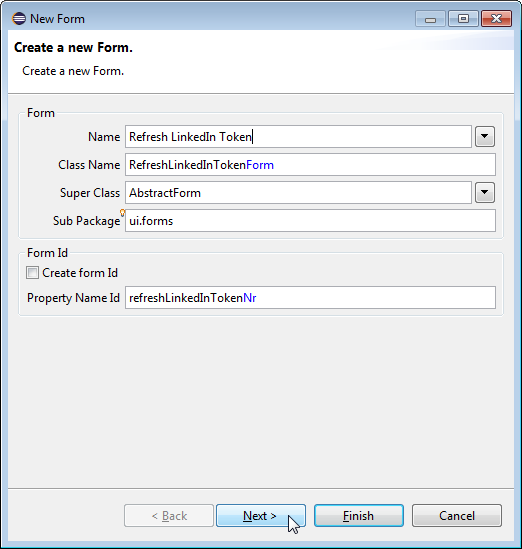

The last piece that is missing to complete the “My Contacts” application is the user interface for the LinkedIn integration. To allow the user to create/refresh an access token, we need to implement the refresh token form shown in Figure 66 at the beginning of this chapter. To create the form code, we use the New Form wizard of the Scout SDK as shown in Figure 106. For the Name field enter a new translated text “Refresh LinkedIn Token” and fill ui.forms into the Sub Package field field. Then, click the Next button to switch to the second wizard step. Here, deselect the elements that will not be needed for the implementation of the refresh form according to the right hand side of Figure 106. Once the form has been created by the wizard, add the a Token and a Secret form variable of type string under the form’s Variables folder.
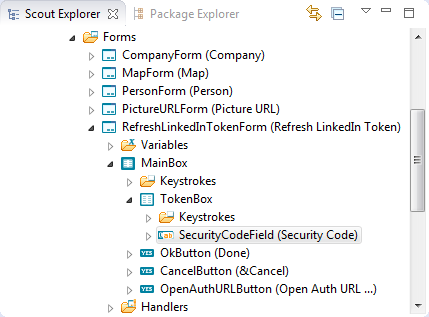
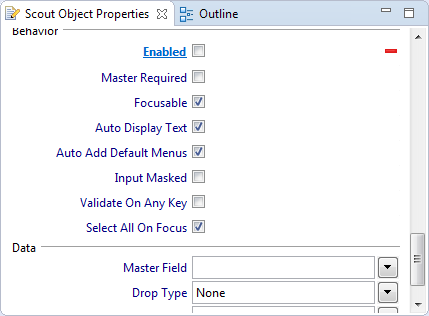
The next step is to add the desired layout and the necessary form fields. First, use the New Form Field wizard to add a new group box TokenBox to the MainBox node. And into the TokenBox add a “Security Code” string field as shown on the left hand side of Figure 107. To provide a clickable link that opens a web browser with the LinkedIn authentication link, add a “Open Auth URL …” link of type LinkButton to the main box. To make the user to first click the authentication link button before he tries to fill any content into the security code field we initially disable this field. For this, first click on the security code field in the Scout Explorer and then open the Advanced Properties section of the fields Scout Object Properties. As shown on the right side of Figure 107, deselect the Enabled property.
public class RefreshLinkedInTokenForm extends AbstractForm {
@Order(10.0)
public class MainBox extends AbstractGroupBox {
@Order(10.0)
public class TokenBox extends AbstractGroupBox {
@Order(10.0)
public class SecurityCodeField extends AbstractStringField {
@Override
protected boolean getConfiguredEnabled() {
return false;
}
@Override
protected String getConfiguredLabel() {
return TEXTS.get("SecurityCode");
}
}
}
@Order(40.0)
public class OpenAuthURLButton extends AbstractLinkButton {
@Override
protected String getConfiguredLabel() {
return TEXTS.get("OpenAuthURL");
}
@Override
protected void execClickAction() throws ProcessingException {
String authUrl = SERVICES.getService(ILinkedInService.class).getAuthUrl();
SERVICES.getService(IShellService.class).shellOpen(authUrl);
getSecurityCodeField().setEnabled(true);
}
}
}
}The implementation of the forms' structure is provided in Listing 46. In the execClickAction method of the OpenAuthURLButton link button the necessary information for the auth link is obtained from the server. For this, we are using the getAuthUrl operation implemented in the previous section. The parameters to create the request token are saved in the form’s token and secret variables. Then, the auth link is opened in a web browser with the shellOpen method of the client’s shell service. Finally, after opening the web browser we can enable the security field with getSecurityCodeField().setEnabled(true).
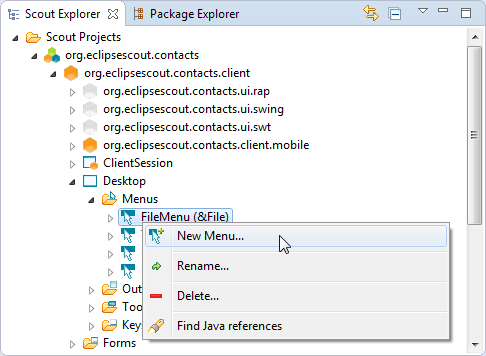
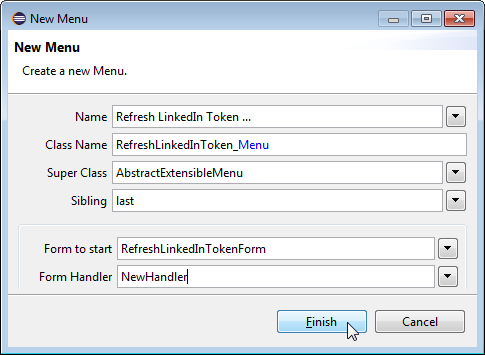
We can now integrate the form to refresh the LinkedIn access token under the applications “File” menu. This is done using the New Menu wizard as shown in Figure 108. Enter the translated text “Refresh LinkedIn Token …” into the wizard’s Name field and pick the element Exit Menu [before] from the dropdown box of the Sibling field. In the Form to start field select the newly created refresh token form and use the NewHandler entry in the Form Handler field. To close the wizard, click the Finish button.
The implementation of the refresh menu is shown in Listing 47. In method execAction(), we need to amend the part after starting the refresh token form. If the method form.isFormStored() returns true, the user has modified the secure code field and it is fair to assume that the user wants to create/refresh his LinkedIn access token. For this, we first retrieve the necessary parameters to call the backend service operation refreshToken implemented in the previous chapter.
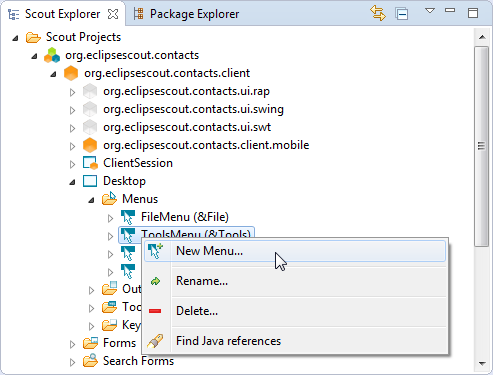
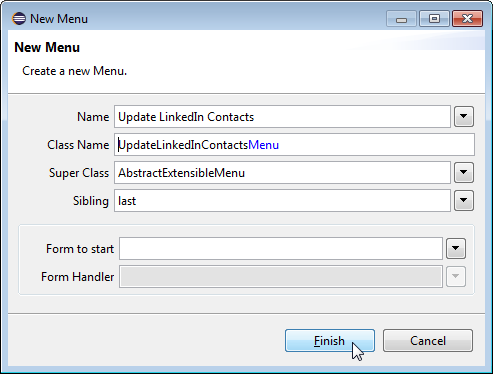
    @Order(20.0)
    public class ExportToExcelMenu extends AbstractExtensibleMenu {

      @Override
      protected String getConfiguredText() {
        return TEXTS.get("ExportToExcelMenu");
      }

      @Override
      protected void execAction() throws ProcessingException {
        if (getOutline() != null && getOutline().getActivePage() != null) {
          ScoutXlsxSpreadsheetAdapter s = new ScoutXlsxSpreadsheetAdapter();
          File xlsx = s.exportPage(null, 0, 0, getOutline().getActivePage());
          SERVICES.getService(IShellService.class).shellOpen(xlsx.getAbsolutePath());
        }
      }
    }
}As the last missing component of the “My Contacts” application, we add the menu to fetch the LinkedIn contacts and update the database accordingly. The menu entry is created as a sub menu of the “Tools” menu. For this, use the new menu wizard on the ToolsMenu node as shown in Figure 109. The implementation of the menu’s execAction method shown in Listing 48 is trivial. We only need to call the operation of the LinkedInService implemented in the server part of the “My Contacts” application.
Appendix A: Licence and Copyright
This appendix first provides a summary of the Creative Commons (CC-BY) licence used for this book. The licence is followed by the complete list of the contributing individuals, and the full licence text.
A.1. Licence Summary
This work is licensed under the Creative Commons Attribution License. To view a copy of this license, visit https://creativecommons.org/licenses/by/3.0/ or send a letter to Creative Commons, 559 Nathan Abbott Way, Stanford, California 94305, USA.
A summary of the license is given below, followed by the full legal text.
You are free:
-
to Share ---to copy, distribute and transmit the work
-
to Remix---to adapt the work
-
to make commercial use of the work
Under the following conditions:
Attribution ---You must attribute the work in the manner specified by the author or licensor (but not in any way that suggests that they endorse you or your use of the work).
With the understanding that:
Waiver ---Any of the above conditions can be waived if you get permission from the copyright holder.
Public Domain ---Where the work or any of its elements is in the public domain under applicable law, that status is in no way affected by the license.
Other Rights ---In no way are any of the following rights affected by the license:
-
Your fair dealing or fair use rights, or other applicable copyright exceptions and limitations;
-
The author’s moral rights;
-
Rights other persons may have either in the work itself or in how the work is used, such as publicity or privacy rights.
Notice ---For any reuse or distribution, you must make clear to others the license terms of this work. The best way to do this is with a link to https://creativecommons.org/licenses/by/3.0/.
A.2. Contributing Individuals
Copyright (c) 2012-2014.
In the text below, all contributing individuals are listed in alphabetical order by name. For contributions in the form of GitHub pull requests, the name should match the one provided in the corresponding public profile.
Bresson Jeremie, Fihlon Marcus, Nick Matthias, Schroeder Alex, Zimmermann Matthias
A.3. Full Licence Text
The full licence text is available online at http://creativecommons.org/licenses/by/3.0/legalcode
Appendix B: Scout Installation
B.1. Overview
This chapter walks you through the installation of Eclipse Scout. The installation description (as well as the rest of this book) is written and tested for Eclipse Scout 4.0 which is delivered as integral part of the Eclipse Luna release train, 2014. Detailed information regarding the scheduling of this release train is provided in the Eclipse wiki.[72].
We assume that you have not installed any software relevant for the content of this book. This is why the Scout installation chapter starts with the installation of the Java Development Kit (JDK). Consequently, you will have to skip some of the sections depending on your existing setup.
In the text below, installation routines are described separately for Windows, Mac, and Linux. As Scout applications have been built primarily on the Windows platform in the past, Scout also has the highest maturity level on this platform.
B.2. Download and Install a JDK
The first step to install Scout is to have an existing and working installation of a JDK version 7 or 8. It is currently recommended to go for the most recent download of Java 7.
Using Scout with Java 8 is possible and has been tested as part of Eclipse release train testing.[73]. We are currently not aware of any productive installation so far, but this is likely to change in the near future as Oracle’s published end of public updates for Java 7 is scheduled for April 2015.[74].
You may still use Scout with Java 6. However, this version is no longer tested with Scout and has reached Oracle’s end of public updates on February 2013. Older Java versions will no longer work together with the Scout framework.
Currently, we recommend to install the Oracle JDK 7 together with Scout. Although, using OpenJDK with Scout should work too. To successfully install the JDK you need to have at least local admin rights. You also need to know your hardware architecture in order to download the correct JDK installer.
For Windows, the steps necessary to determine your hardware architecture are described on Microsoft’s support site.[75]. For Linux several ways to determine if your os is running with 32 or with 64 bits can be found on the web.[76] For Mac this step is simple, as only a 64 bit package is provided on JDK the download page.
Once you know your hardware architecture, go to Oracle’s official download site.[77] and accept the licence agreement by clicking on the appropriate radio button. Then, select the Windows x64 package if you are running 64-bit Windows as shown in Figure 110. If you are running 32-bit Windows, go for the Windows x86 package. It is also recommended to download the Java SE 7 Documentation. The Java API documentation package is available from the official download site.[78], located further down under section Additional Resources.
B.3. Download and Install Scout
Before you can install Scout make sure that you have a working Java Development Kit (JDK) installation of version 7 or 8. To download the Eclipse Scout package visit the official Eclipse download page as shown in Figure 111.
If the download page shows the wrong platform, manually select the correct platform in the dropdown list. As shown in Figure 111, the Scout package is available as a 32 bit and a 46 bit package. Make sure to pick the package that matches your JDK installation. You can check your installation on the command line as follows.
console-prompt>java -version
java version "1.7.0_55"
Java(TM) SE Runtime Environment (build 1.7.0_55-b13)
Java HotSpot(TM) 64-Bit Server VM (build 24.55-b03, mixed mode)
If the output explicitly mentions the 64 bit installation as shown above, you have a 64 bit installation. Otherwise, you have a 32 bit JDK installed. Now you can select the correct Scout package from the Eclipse download site. After the package selection, confirm the suggested download mirror as shown in Figure 112.
As the Scout package is a simple ZIP (or tar.gz) file, you may unpack its content to a folder of your choice. Inside the eclipse sub-folder, you will then find the Eclipse executable file, such as the eclipse.exe file on a Windows plattform. Starting the Eclipse executable brings up the workspace launcher as shown in Figure 113.
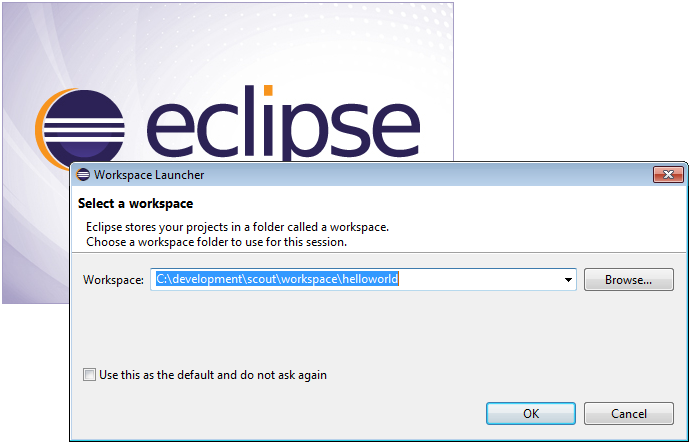
Into the Workspace field you enter an empty target directory for your first Scout project. After clicking the Ok button, the Eclipse IDE creates any directories that do not yet exist and opens the specified workspace. When opening a new workspace for the first time, Eclipse then displays the welcome screen shown in Figure 114.
To close the welcome page and open the Scout perspective in the Eclipse IDE click on the Workbench icon. As a result the empty Scout perspective is displayed according to Figure 115.
Congratulations, you just have successfully completed the Eclipse Scout installation!
If you have only installed a single JDK you will not need to change the default eclipse.ini file of your Eclipse installation. In case you have installed multiple JDKs coming with their individual Java Runtime Environments (JREs), you might want to explicitly specifiy which JRE to use. Open the file eclipse.ini in a editor of your choice and insert the following two lines at the top of the file:
-vm
C:\java\jre7\bin\javaw.exe
where the second line specifies the exact path to the JRE to be used to start your Eclipse Scout installation.
If you have explicitly specified the JRE to be used you verify this in the running Eclipse installation. Fist, select the menu to open the about dialog. Then, click on the Installation Details button and switch to the Configuration tab. In the long list of system properties you will find lines similar to the ones shown below.
*** Date: Donnerstag, 19. Juni 2014 10:37:17 Normalzeit

*** Platform Details:

*** System properties:
...
-vm
C:\java\jre7\bin\javaw.exe
...
sun.java.command=... vm C:\java\jre7\bin\javaw.exe -vmargs ...
You have now successfully completed the Eclipse Scout installation on your Windows environment. With this running Scout installation you may skip the following section on how to add Scout to an existing Eclipse installation.
B.4. Add Scout to your Eclipse Installation
This section describes the installation of Scout into an existing Eclipse installation. As the audience of this section is assumed to be familiar with Eclipse, we do not describe how you got your Eclipse installation in the first place. For the provided screenshots we start from the popular package Eclipse IDE for Java EE Developers.
To add Scout to your existing Eclipse installation, you need to start Eclipse. Then select the menu as shown in Figure 116 to open the install dialog.
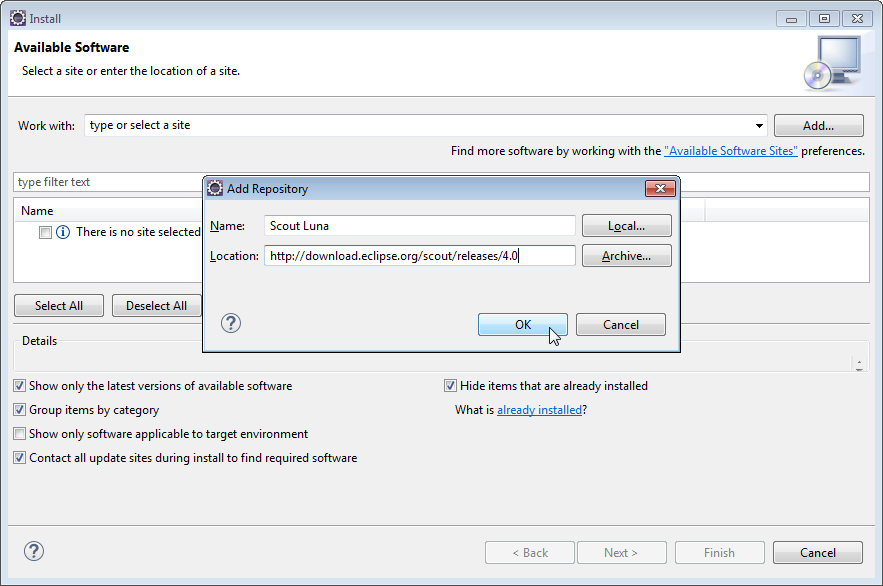
In the install dialog, click on the Add… button to enter the link to the Scout repository. This opens the popup dialog Add Repository As shown in Figure 117, you may use “Scout Luna” for the Name field. For the Location field enter the Scout release repository as specified below. http://download.eclipse.org/scout/releases/4.0.
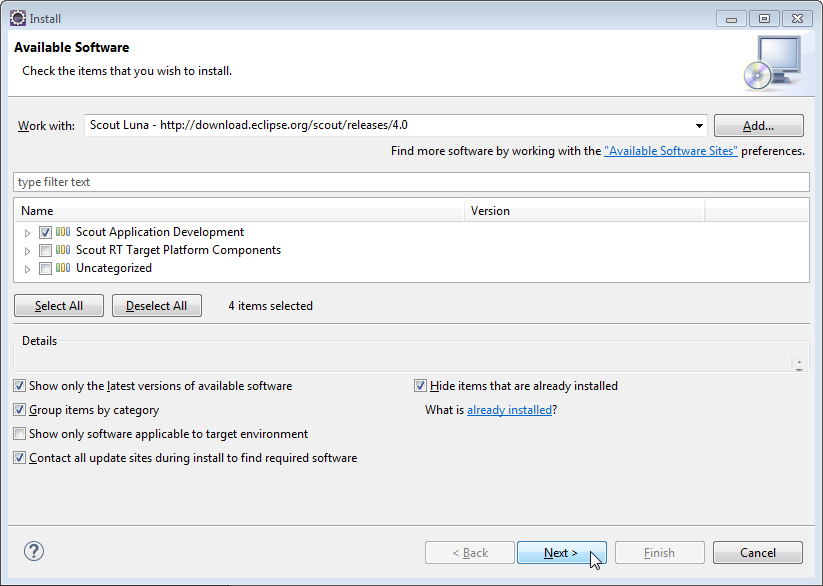
After the Eclipse IDE has connected to the Scout repository, select the Scout feature Scout Application Development as shown in Figure 118. Then, move through the installation with the Next button. On the last installation step, accept the presented EPL terms by clicking on the appropriate radio button. To complete the installation, click the Finish button and accept the request for a restart of Eclipse. After the restart of the Eclipse IDE, you may add the Scout perspective using the menu and selecting the Scout perspective from the presented list. Clicking on the Scout perspective button should then result in a state very similar to Figure 115.
B.5. Verifying the Installation
After you can start your Eclipse Scout package you need to verify that Scout is working as intended. The simplest way to verify your Scout installation is to create a “Hello World” Scout project and run the corresponding Scout application as described in Chapter “Hello World” Tutorial.
Appendix C: Apache Tomcat Installation
Apache Tomcat is an open source web server that is a widely used implementation of the Java Servlet Specification. Specifically, Tomcat works very well to run the server part of Scout client server applications. In case you are interested in getting some general context around Tomcat you could start with the Wikipedia article.[83]. Then get introduced to its core component “Tomcat Catalina”.[84] before you switch to the official Tomcat homepage.[85].
This section is not really a step by step download and installation guide. Rather, it points you to the proper places for downloading and installing Tomcat. We recommend to work with Tomcat version 7.0. Start your download from the official download site.[86].

Once you have downloaded and installed Tomcat 7 (see the sections below for plattform specific guidelines) you can start the corresponding service or deamon. To verify that Tomcat is actually running open a web browser of your choice and type http://localhost:8080 into the address bar. You should then see a confirmation of the successful installation according to Figure 119.
C.1. Platform Specific Instructions
According to the Tomcat setup installation for Windows.[87] download the package “32-bit/64-bit Windows Service Installer” from the Tomcat 7 download site. Then, start the installer and accept the proposed default settings.
For installing Tomcat on OS X systems download the “tar.gz” package from the Tomcat 7 download site. Then, follow the installation guide.[88] provided by Wolf Paulus.
For Linux systems download the “tar.gz” package from the Tomcat 7 download site. Then, follow the description of the Unix setup.[89] to run Tomcat as a deamon. If you use Ubuntu, you may want to follow the tutorial.[90] for downloading and installing Tomcat provided by Lars Vogel.
C.2. Directories and Files
Tomcat’s installation directory follows the same organisation on all platforms. Here, we will only introduce the most important aspects of the Tomcat installation for the purpose of this book.
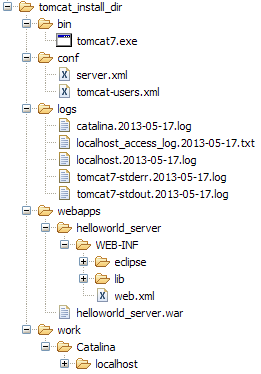
webapps.
Note that some folders and many files of a Tomcat installation are not represented in Figure 120. We just want to provide a basic understanding of the most important parts to operate the web server in the context of this book. In the bin folder, the executable programs are contained, including scripts to start and stop the Tomcat instance.
The conf folder contains a set of XML and property configuration file. The file server.xml represents Tomcat’s main configuration file. It is used to configure general web server aspects such as the port number of its connectors for the client server communication. For the default setup, port number 8080 is used for the communication between clients applications and the web server. The file tomcat-users.xml contains a database of users, passwords and associated roles.
Folder logs contains various logfiles of Tomcat itself as well as host and web application log files. XXX need to provide more on what is where (especially application logs and exact setup to generate log entries from scout apps).
The folder needed for deploying web applications into a Tomcat instance is called webapps. It can be used as the target for copying WAR files into the web server. The installation of the WAR file then extracts its content into the corresponding directory structure as shown in Figure 120 in the case of the file helloworld_server.war.
Finally, folder work contains Tomcat’s runtime “cache” for the deployed web applications. It is organized according to the hierarchy of the engine (Catalina), the host (localhost), and the web application (helloworld_server).
C.3. The Tomcat Manager Application
Tomcat comes with the pre installed “Manager App”. This application is useful to manage web applications and perform tasks such as deploying a web application from a WAR file, or starting and stopping installed web applications. A comprehensive documentation for the “Manager App” can be found under the Tomcat homepage.[91]. Here we only show how to start this application from the hompage of a running Tomcat installation.
To access this application you can switch to the “Manager App” with a click on the corresponding button on the right hand side. The button can be found on the right hand side of Figure 119. Before you are allowed to start this application, you need to provide username and password credentials of a user associated with Tomcats’s manager-gui role.
  <tomcat-users>
    <!--
    NOTE: By default, no user is included in the "manager-gui" role required
    to operate the "/manager/html" web application. If you wish to use it
    you must define such a user - the username and password are arbitrary.
    -->
    <user name="admin" password="s3cret" roles="manager-gui"/>
  </tomcat-users>
To get at user names and passwords you can open file tomcat-users.xml located in Tomcat’s conf directory. In this file the active users with their passwords and associated roles are stored. See Listing [lst-tomcat.users] for an example. From the content of this file, we see that user admin has password s3cret and also posesses the necessary role manager-gui to access the “Manager App”. If file tomcat-users.xml does not contain any user with this role, you can simply add new user with this role to the existing users. Alternatively, you also can add the necessary role to an existing user. Just append a comma to the existing right(s) followed by the string manager-gui. Note that you will need to restart your Tomcat application after adapting the content of file tomcat-users.xml.
With working credentials you can now start the “Manager App” as described the “Hello World” tutorial in Section Deploying to Tomcat.