|
This document is referring to a past Scout release. Please click here for the recent version. Looking for something else? Visit https://eclipsescout.github.io for all Scout related documentation. |
!!! WORK IN PROGRESS !!!
Scout Architecture and Concepts are described here.
Scout Platform
Scout contains a platform which provides basic functionality required by many software applications. The following list gives some examples for which tasks the platform is responsible for:
1. Application Lifecycle
The lifecycle of a Scout application is controlled by implementations of org.eclipse.scout.rt.platform.IPlatform.
This interface contains methods to start and stop the application and to retrieve the Bean Manager associated with this application.
The class org.eclipse.scout.rt.platform.Platform provides access to the current platform instance. On first access the platform is automatically created and started.
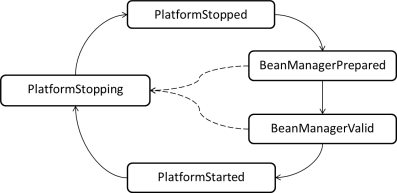
During its startup, the platform transitions through several states. Depending on the state of the platform some components may already be initialized and ready to use while others are not available yet.
See enum org.eclipse.scout.rt.platform.IPlatform.State for a description of each state and what may be used in a certain state.
1.1. Platform Listener
To participate in the application startup or shutdown a platform listener can be created.
For this a class implementing org.eclipse.scout.rt.platform.IPlatformListener must be created. The listener is automatically a bean and must therefore not be registered anywhere.
See Bean Manager to learn more about bean management in Scout and how the listener becomes a bean.
As soon as the state of the platform changes the listener will be notified.
public class MyListener implements IPlatformListener {
  @Override
  public void stateChanged(PlatformEvent event) {
    if (event.getState() == IPlatform.State.PlatformStarted) {
      // do some work as soon as the platform has been started completely
    }
  }
}| As platform listeners may run as part of the startup or shutdown not the full Scout platform may be available. Depending on the state some tasks cannot be performed or some platform models are not available yet! |
2. Class Inventory
Scout applications use an inventory containing the classes available together with some meta data about them. This allows finding classes available on the classpath by certain criteria:
-
All subclasses of a certain base class (also known as type hierarchy)
-
All classes having a specific annotation.
This class inventory can be accessed as described in listing class inventory.
IClassInventory classInventory = ClassInventory.get();

// get all classes below IService
Set<IClassInfo> services = classInventory.getAllKnownSubClasses(IService.class);

// get all classes having a Bean annotation (directly on them self).
Set<IClassInfo> classesHavingBeanAnnot = classInventory.getKnownAnnotatedTypes(Bean.class);
2.1. scout.xml
In its static initializer, the ClassInventory collects classes in projects containing a resource called META-INF/scout.xml.
Scanning all classes would be unnecessarily slow and consume too much memory.
The file scout.xml is just an empty xml file. Scout itself also includes scout.xml files in all its projects.
The format XML was chosen to allow adding exclusions in large projects, but this feature is not implemented right now.
It is recommended to add an emtpy scout.xml file into the META-INF folder of your projects, such that the classes are available in the 'ClassInventory'.
|
Scout uses Jandex [1] to build the class inventory. The meta data to find classes can be pre-computed during build time into an index file describing the contents of the jar file. See the jandex project for details.
3. Bean Manager
The Scout bean manager is a dynamic registry for beans. Beans are normal Java classes usually having some meta data describing the characteristics of the class.
The bean manager can be changed at any time. This means beans can be registered or unregistered while the application is running. For this the bean manager contains methods to register and unregister beans. Furthermore methods to retrieve beans are provided.
The next sections describe how beans are registered, the different meta data of beans, how instances are created, how they can be retrieved and finally how the bean decoration works.
3.1. Bean registration
Usually beans are registered during application startup. The application startup can be intercepted using platform listeners as described in section Platform Listener.
public class RegisterBeansListener implements IPlatformListener {
  @Override
  public void stateChanged(PlatformEvent event) {
    if (event.getState() == IPlatform.State.BeanManagerPrepared) {
      // register the class directly
      BEANS.getBeanManager().registerClass(BeanSingletonClass.class);

      // Or register with meta information
      BeanMetaData beanData = new BeanMetaData(BeanClass.class).withApplicationScoped(true);
      BEANS.getBeanManager().registerBean(beanData);
    }
  }
}
There is also a predefined bean registration built into the Scout runtime. This automatically registers all classes having an org.eclipse.scout.rt.platform.@Bean annotation. Therefore it is usually sufficient to only annotate a class with @Bean to have it available in the bean manager as shown in listing bean class.
@Bean
public class BeanClass {
}
As the @Bean annotation is an java.lang.annotation.@Inherited annotation, this automatically registers all child classes too. This means that also interfaces may be @Bean annotated making all implementations automatically available in the bean manager! Furthermore other annotations may be @Bean annotated making all classes holding these annotations automatically to beans as well.
|
If you inherit a @Bean annotation from one of you super types but don’t want to be automatically registered into the bean manger you can use the org.eclipse.scout.rt.platform.@IgnoreBean annotation. Those classes will then be skipped.
|
3.1.1. @TunnelToServer
There is a built in annotation org.eclipse.scout.rt.shared.@TunnelToServer. Interfaces marked with this annotation are called on the server. The server itself ignores this annotation.
To achieve this a bean is registered on client side for each of those interfaces. Because the platform cannot directly create an instance for these beans a specific producer is registered which creates a proxy that delegates the call to the server. Please note that this annotation is not inherited. Therefore if an interface extends a tunnel-to-server interface and the new methods of this interface should be called on the server as well the new child interface has to repeat the annotation!
The proxy is created only once for a specific interface bean.
3.2. Bean Scopes
The most important meta data of a bean is the scope. It describes how many instances of a bean can exist in a single application. There are two different possibilities:
-
Unlimited instances: Each bean retrieval results in a new instance of the bean. This is the default.
-
Only one instance: There can only be one instance by Scout platform. From an application point of view this can be seen as singleton. The instance is created on first use and each subsequent retrieval of the bean results in this same cached instance.
As like all bean meta data this characteristic can be provided in two different ways:
-
With a Java annotation on the bean class as shown in the listing application scoped bean class.
-
With bean meta data as shown in listing register beans.
@ApplicationScoped
public class BeanSingletonClass {
}
So the Java annotation org.eclipse.scout.rt.platform.@ApplicationScoped describes a bean having singleton characteristics.
Also @ApplicationScoped is an @Inherited annotation. Therefore all child classes automatically inherit this characteristic like with the @Bean annotation.
|
3.3. Bean Creation
It is not only possible to influence the number of instances to be created as learned before. It is also possible to create beans eagerly, execute methods after creation (like constructors) or to delegate the bean creation completely. These topics are described in the next sections.
3.3.1. Eager Beans
By default beans are created on each request. An exception are the beans marked to be application scoped (as shown in section Bean Scopes). Those beans are only created on first request (lazy). This means if a bean is never requested while the application is running, there will never be an instance of this class.
But sometimes it is necessary to create beans already at the application startup (eager). This can be done by marking the bean as org.eclipse.scout.rt.platform.@CreateImmediately. All classes holding this annotation must also be marked as @ApplicationScoped! These beans will then be created as part of the application startup.
3.4. Bean Retrieval
To retrieve a bean the class org.eclipse.scout.rt.platform.BEANS should be used. This class provides (amongst others) the following methods:
BeanSingletonClass bean = BEANS.get(BeanSingletonClass.class);
BeanClass beanOrNull = BEANS.opt(BeanClass.class);-
The
get()method throws an exception if there is not a single bean result. So if no bean can be found or if multiple equivalent bean candidates are available this method fails! -
The
opt()method requires a single or no bean result. It fails if multiple equivalent bean candidates are available and returnsnullif no one can be found. -
The
all()method returns all beans in the correct order. The list may also contain no beans at all.
There are now two more annotations that have an effect on which beans are returned if multiple beans match a certain class. Consider the following example bean hierarchy:
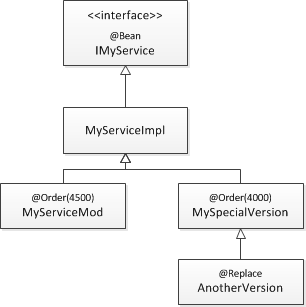
In this situation 4 bean candidates are available: MyServiceImpl, MyServiceMod, MySpecialVersion and AnotherVersion.
But which one is returned by BEANS.get(IMyService.class)? Or by BEANS.get(MySpecialVersion.class)?
This can be influenced with the org.eclipse.scout.rt.platform.@Order and org.eclipse.scout.rt.platform.@Replace annotations.
The next sections describe the idea behind these annotations and gives some examples.
3.4.1. @Order
This annotation works exactly the same as in the Scout user interface where it brings classes into an order. It allows to assign a double value to a class. All beans of a certain type are sorted according to this value in ascending order. This means a low order value is equivalent with a low position in a list (come first).
Please note that the @Order annotation is not inherited so that each bean must declare its own value where it fits in.
The @Order annotation value may be inherited in case it replaces. See the next section for details.
|
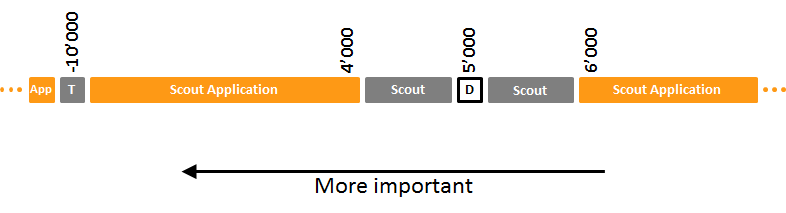
If a bean does not declare an order value, the default of 5000 is used. Scout itself uses orders from 4001 to 5999.
So for user applications the value 4000 and below can be used to declare more important beans.
For testing bean mocks the value -10'000 can be used which then usually comes before each normal Scout or application bean.
3.4.2. @Replace
The @Replace annotation can be set to beans having another bean as super class. This means that the original bean (the super class) is no longer available in the Scout bean manager and only the new child class is returned.
If the replacing bean (the child class) has no own @Order annotation defined but the replaced bean (the super class) has an @Order value, this order is inherited to the child. This is the only special case in which the @Order annotation value is inherited!
3.4.3. Examples
The next examples use the bean situation as shown in figure bean hierarchy. In this situation the bean manager actually contains 3 beans:
-
AnotherVersionwith@Orderof 4000. This bean has no own order and would therefore get the default order of 5000. But because it is replacing another bean it inherits its order. -
MyServiceModwith@Orderof 4500. This bean declares its own order. -
MyServiceImplwith@Orderof 5000. This bean gets the default order of 5000 because it does not declare an order.
The bean MySpecialVersion is not part of the bean manager because it has been replaced by AnotherVersion.
-
BEANS.get(IMyService.class): ReturnsAnotherVersioninstance. The result cannot be an exact match because the requested type is an interface. Therefore of all candidates there is one single candidate with lowest order (comes first). -
BEANS.get(MyServiceImpl.class): ReturnsMyServiceImplbecause there is an exact match available. -
BEANS.get(MySpecialVersion.class): ReturnsAnotherVersion. The result cannot be an exact match because there is no exact bean with this class in the bean manager (MySpecialVersionhas been replaced). Therefore onlyAnotherVersionremains as candidate in the hierarchy belowMySpecialVersion. -
BEANS.get(MyServiceMod.class): ReturnsMyServiceModbecause there is no other candidate. -
BEANS.all(IMyService.class): Returns a list with all beans sorted by@Order. This results in:AnotherVersion,MyServiceMod,MyServiceImpl.
If MyServiceMod would have no @Order annotation, there would be two bean candidates available with the same default order of 5000: MyServiceImpl and MyServiceMod. In this case a call to BEANS.get(IMyService.class) would fail because there are several equivalent candidates. Equivalent candidates means they have the same @Order value and the system cannot decide which one is the right one.
|
3.5. Bean Decoration
Bean decorations allow to wrap interfaces with a proxy to intercept each method call to the interface of a bean and apply some custom logic.
For this a IBeanDecorationFactory has to be implemented. This is one single factory instance for the entire application. It decides which decorators are created for a bean request.
The factory is asked for decorators on every bean retrieval. This allows to write bean decoration factories depending on dynamic conditions.
As bean decoration factories are beans themselves, it is sufficient to create an implementation of org.eclipse.scout.rt.platform.IBeanDecorationFactory and to ensure this implementation is used (see Bean Retrieval).
This factory receives the bean to be decorated and the originally requested bean class to decide which decorators it should create.
In case no decoration is required the factory may return null. Then the original bean is used without decorations.
Decorations are only supported if the class obtained by the bean manager (e.g. by using BEANS.get()) is an interface!
|
It is best practice to mark all annotations that are interpreted in the bean decoration factory with the annotation org.eclipse.scout.rt.platform.@BeanInvocationHint. However this annotation has no effect at runtime and is only for documentation reasons.
|
The sample in listing bean decoration wraps each call to the server with a profiler decorator that measures how long a server call takes.
@Replace
public class ProfilerDecorationFactory extends SimpleBeanDecorationFactory {
  @Override
  public <T> IBeanDecorator<T> decorate(IBean<T> bean, Class<? extends T> queryType) {
    return new BackendCallProfilerDecorator<>(super.decorate(bean, queryType));
  }
}

public class BackendCallProfilerDecorator<T> implements IBeanDecorator<T> {

  private final IBeanDecorator<T> m_inner;

  public BackendCallProfilerDecorator(IBeanDecorator<T> inner) {
    m_inner = inner;
  }

  @Override
  public Object invoke(IBeanInvocationContext<T> context) {
    final String className;
    if (context.getTargetObject() == null) {
      className = context.getTargetMethod().getDeclaringClass().getSimpleName();
    }
    else {
      className = context.getTargetObject().getClass().getSimpleName();
    }

    String timerName = className + '.' + context.getTargetMethod().getName();
    TuningUtility.startTimer();
    try {
      if (m_inner != null) {
        // delegate to the next decorator in the chain
        return m_inner.invoke(context);
      }
      // forward to real bean
      return context.proceed();
    }
    finally {
      TuningUtility.stopTimer(timerName);
    }
  }
}
4. Configuration Management
Applications usually require some kind of configuration mechanism to use the same binaries in a different environment or situation. Scout applications provide a configuration mechanism using properties files [2].
For each property a class cares about default values and value validation. These classes share the org.eclipse.scout.rt.platform.config.IConfigProperty interface and are normal application scoped beans providing access to a specific configuration value as shown in listing config properties.
import org.eclipse.scout.rt.platform.config.AbstractLongConfigProperty;

/**
 * Property of data type {@link Long} with key 'my.custom.timeout' and default value '3600L'.
 */
public class MyCustomTimeoutProperty extends AbstractLongConfigProperty {

  @Override
  public String getKey() {
    return "my.custom.timeout"; (1)
  }

  @Override
  protected Long getDefaultValue() {
    return 3600L; (2)
  }
}| 1 | key |
| 2 | default value |
To read the configured value you can use the CONFIG class as demonstrated in Listing.
Long value = CONFIG.getPropertyValue(MyCustomTimeoutProperty.class);The given property key is searched in the following environments:
-
In the system properties (
java.lang.System.getProperty(String)). -
In the properties file. The properties file can be
-
a file on the local filesystem where the system property with key
config.propertiesholds the absolute path to the file or -
a file on the classpath with path
/config.properties(recommended).
-
-
In the environment variables of the system (
java.lang.System.getenv(String)).
4.1. Additional examples
Because the property a class are managed by the bean manager, you can use all the mechanisms to change the behavior (@Replace in particular).
Listing demonstrates how you can use the replace annotation to change the existing ApplicationNameProperty class.
The value is no longer fetched via the config mechanism, because the createValue() method is overriden.
In this case a fixed value is returned.
import org.eclipse.scout.rt.platform.IgnoreBean;
import org.eclipse.scout.rt.platform.Replace;
import org.eclipse.scout.rt.platform.config.PlatformConfigProperties.ApplicationNameProperty;

@Replace
public class ApplicationNameConstant extends ApplicationNameProperty {
  @Override
  protected String createValue() {
    return "Contacts Application";
  }
}
The next example presented in Listing uses the same idea.
In this case, the getKey() method is overriden to read the value from an other key as demonstrated is the Listing.
import org.eclipse.scout.rt.platform.IgnoreBean;
import org.eclipse.scout.rt.platform.Replace;
import org.eclipse.scout.rt.platform.config.PlatformConfigProperties.ApplicationNameProperty;

@Replace
public class ApplicationNamePropertyRedirection extends ApplicationNameProperty {

  @Override
  public String getKey() {
    return "myproject.application.name";
  }
}### Redirected Application Config
myproject.application.name=My Project ApplicationWorking with exceptions
6. Scout Runtime Exceptions
6.1. PlatformException
Base runtime exception of the Scout platform, which allows for message formatting anchors and context information to be associated.
There is a single constructor which accepts the exception’s message, and optionally a variable number of arguments. Typically, a potential cause is given as its argument. The message allows further the use of formatting anchors in the form of {} pairs. The respective formatting arguments are provided via the constructor’s varArg parameter. If the last argument is of the type Throwable and not referenced as formatting anchor in the message, that Throwable is used as the exception’s cause. Internally, SLF4J MessageFormatter is used to provide substitution functionality. Hence, The format is the very same as if using SLF4j Logger.
Further, PlatformException allows to associate context information, which are available in Log4j diagnostic context map (MDC) upon logging the exception.
Exception cause = new Exception();

// Create a PlatformException with a message
new PlatformException("Failed to persist data");

// Create a PlatformException with a message and cause
new PlatformException("Failed to persist data", cause);

// Create a PlatformException with a message with formatting anchors
new PlatformException("Failed to persist data [entity={}, id={}]", "person", 123);

// Create a PlatformException with a message containing formatting anchors and a cause
new PlatformException("Failed to persist data [entity={}, id={}]", "person", 123, cause);

// Create a PlatformException with context information associated
new PlatformException("Failed to persist data", cause)
    .withContextInfo("entity", "person")
    .withContextInfo("id", 123);
6.2. ProcessingException
Represents a PlatformException and is thrown in case of a processing failure, and which can be associated with an exception error code and severity.
6.3. VetoException
Represents a ProcessingException with VETO character. If thrown server-side, exceptions of this type are transported to the client and typically visualized in the form of a message box.
6.4. AssertionException
Represents a PlatformException and indicates an assertion error about the application’s assumptions about expected values.
6.5. ThreadInterruptedException
Represents a PlatformException and indicates that a thread was interrupted while waiting for some condition to become true, e.g. while waiting for a job to complete. Unlike java.lang.InterruptedException, the thread’s interrupted status is not cleared when catching this exception.
6.6. FutureCancelledException
Represents a PlatformException and indicates that the result of a job cannot be retrieved, or the IFuture’s completion not be awaited because the job was cancelled.
6.7. TimedOutException
Represents a PlatformException and indicates that the maximal wait time elapsed while waiting for some condition to become true, e.g. while waiting a job to complete.
6.8. TransactionRequiredException
Represents a PlatformException and is thrown if a ServerRunContext requires a transaction to be available.
7. Exception handling
An exception handler is the central point for exception handling. It provides a single method 'handle' which accepts a Throwable, and which never throws an exception. It is implemented as a bean, meaning managed by the bean manager to allow easy replacement, e.g. to use a different handler when running client or server side.
By default, a ProcessingException is logged according to its severity, a VetoException, ThreadInterruptedException or FutureCancelledException logged in DEBUG level, and any other exception logged as an ERROR. If running client side, exceptions are additionally visualized and showed to the user.
8. Exception translation
Exception translators are used to translate an exception into another exception.
Also, they unwrap the cause of wrapper exceptions, like UndeclaredThrowableException, or InvocationTargetException, or ExecutionException. If the exception is of the type Error, it is normally not translated, but re-thrown instead. That is because an Error indicates a serious problem due to an abnormal condition.
8.1. DefaultExceptionTranslator
Use this translator to work with checked exceptions and runtime exceptions, but not with Throwable.
If given an Exception, or a RuntimeException, or if being a subclass thereof, that exception is returned as given. Otherwise, a PlatformException is returned which wraps the given Throwable.
8.2. DefaultRuntimeExceptionTranslator
Use this translator to work with runtime exceptions. When working with RunContext or IFuture, some methods optionally accept a translator. If not specified, this translator is used by default.
If given a RuntimeException, it is returned as given. For a checked exception, a PlatformException is returned which wraps the given checked exception.
8.3. PlatformExceptionTranslator
Use this translator to work with PlatformExceptions.
If given a PlatformException, it is returned as given. For all other exceptions (checked or unchecked), a PlatformException is returned which wraps the given exception.
Typically, this translator is used if you require to add some context information via PlatformException.withContextInfo(String, Object, Object).
try {
  // do something
}
catch (Exception e) {
  throw BEANS.get(PlatformExceptionTranslator.class).translate(e)
      .withContextInfo("cid", "12345")
      .withContextInfo("user", Subject.getSubject(AccessController.getContext()))
      .withContextInfo("job", IFuture.CURRENT.get());
}
8.4. NullExceptionTranslator
Use this translator to work with Throwable as given.
Also, if given a wrapped exception like UndeclaredThrowableException, InvocationTargetException or ExecutionException, that exception is returned as given without unwrapping its cause.
For instance, this translator can be used if working with the Job API, e.g. to distinguish between a FutureCancelledException thrown by the job’s runnable, or because the job was effectively cancelled.
9. Exception Logging
Scout framework logs via SLF4J (Simple Logging Facade for Java). It serves as a simple facade or abstraction for various logging frameworks (e.g. java.util.logging, logback, log4j) allowing the end user to plug in the desired logging framework at deployment time.
SLF4J allows the use of formatting anchors in the form of {} pairs in the message which will be replaced by the respective argument. If the last argument is of the type Throwable and not referenced as formatting anchor in the message, that Throwable is used as the exception.
Exception e = new Exception();

org.slf4j.Logger logger = LoggerFactory.getLogger(getClass());

// Log a message
logger.error("Failed to persist data");

// Log a message with exception
logger.error("Failed to persist data", e);

// Log a message with formatting anchors
logger.error("Failed to persist data [entity={}, id={}]", "person", 123);

// Log a message and exception with a message containing formatting anchors
logger.error("Failed to persist data [entity={}, id={}]", "person", 123, e);
JobManager
10. Functionality
-
immediate, delayed or timed execution
-
single (one-shot) or repetitive execution (based on Quartz schedule plans)
-
listen for job lifecycle events
-
wait for job completion
-
job cancellation
-
limitation of the maximal concurrently level among jobs
-
RunContextbased execution -
configurable thread pool size (core pool size, max pool size)
-
association of job execution hints to select jobs (e.g. to cancel or await job’s completion)
-
named jobs and threads to ease debugging
11. Job
A job is defined as some work to be executed asynchronously and is associated with a JobInput to describe how to run that work. The work is given to the job manager in the form of a Runnable or Callable. The only difference is, that a Runnable represents a 'fire-and-forget' action, meaning that the submitter of the job does not expect the job to return a result. On the other hand, a Callable returns the computation’s result, which the submitter can await for. Of course, a runnable’s completion can also be waited for.
public class Work implements IRunnable {

  @Override
  public void run() throws Exception {
    // do some work
  }
}public class WorkWithResult implements Callable<String> {
@Override
public String call() throws Exception {
// do some work
return "result";
}
}Upon scheduling a job, the job manager returns a IFuture to interact with the job, e.g. to cancel its execution, or to await its completion. The job itself can also access its IFuture, namely via IFuture.CURRENT() ThreadLocal.
public class Job implements IRunnable {

  @Override
  public void run() throws Exception {
    IFuture<?> myFuture = IFuture.CURRENT.get();
  }
}
12. Scheduling a Job
The job manager provides two scheduling methods, which only differ in the work they accept for execution (callable or runnable).
IFuture<Void> schedule(IRunnable runnable, JobInput input); (1)

<RESULT> IFuture<RESULT> schedule(Callable<RESULT> callable, JobInput input); (2)| 1 | Use to schedule a runnable which does not return a result to the submitter |
| 2 | Use to schedule a callable which does return a result to the submitter |
The second and mandatory argument to be provided is the JobInput, which tells the job manager how to run the job. Learn more about JobInput.
The following snippet illustrates how a job is actually scheduled.
IJobManager jobManager = BEANS.get(IJobManager.class); (1)

jobManager.schedule(new IRunnable() { (2)

  @Override
  public void run() throws Exception {
    // do something
  }
}, BEANS.get(JobInput.class)); (3)| 1 | Obtain the job manager via bean manager (application scoped bean) |
| 2 | Provide the work to be executed (either runnable or callable) |
| 3 | Provide the JobInput to instrument job execution |
This looks a little bit clumsy, which is why Scout provides you with the Jobs class to simplify dealing with the job manager, and to support you in the creation of job related artifacts like JobInput, filter builders and more. Most importantly, it allows to schedule jobs in a shorter and more readable form.
Jobs.schedule(new IRunnable() {

  @Override
  public void run() throws Exception {
    // do something
  }
}, Jobs.newInput());
13. JobInput
The job input tells the job manager how to run the job. It further names the job to ease debugging, declares in which context to run the job, and how to deal with unhandled exceptions. The job input itself is a bean, useful if adding some additional features to the job manager. The API of JobInput supports for method chaining for reduced and more solid code.
Jobs.schedule(new IRunnable() {

  @Override
  public void run() throws Exception {
    // do something
  }
}, Jobs.newInput()
    .withName("job name") (1)
    .withRunContext(ClientRunContexts.copyCurrent()) (2)
    .withExecutionTrigger(Jobs.newExecutionTrigger()
        .withStartIn(10, TimeUnit.SECONDS) (3)
        .withSchedule(FixedDelayScheduleBuilder.repeatForever(5, TimeUnit.SECONDS))) (4)
    .withExceptionHandling(new ExceptionHandler() { (5)

      @Override
      public void handle(Throwable t) {
        System.err.println(t);
      }
    }, true));
This snippet instructs the job manager to run the job as following:
| 1 | Give the job a name. |
| 2 | Run the job in the current calling context, meaning in the very same context as the submitter is running when giving this job to the job manager. By copying the current context, the job will also be cancelled upon cancellation of the current RunContext. |
| 3 | Commence execution in 10 seconds (delayed execution). |
| 4 | Execute the job repeatedly, with a delay of 5 seconds between the termination of one and the commencement of the next execution. Also, repeat the job infinitely, until being cancelled. |
| 5 | Print any uncaught exception to the error console, and do not propagate the exception to the submitter, nor cancel the job upon an uncaught exception. |
The following paragraphs describe the functionality of JobInput in more detail.
13.1. JobInput.withName
To optionally specify the name of the job, which is used to name the worker thread (only in development environment) and for logging purpose. Optionally, formatting anchors in the form of {} pairs can be used in the name, which will be replaced by the respective argument.
Jobs.newInput()
    .withName("Sending emails [from={}, to={}]", "frank", "john@eclipse.org, jack@eclipse.org");
13.2. JobInput.withRunContext
To optionally specify the RunContext to be installed during job execution.
The RunMonitor associated with the RunContext will be used as the job’s monitor, meaning that cancellation requests to the job future or the context’s monitor are equivalent. If no context is given, the job manager ensures a monitor to be installed, so that executing code can always query its cancellation status via RunMonitor.CURRENT.get().isCancelled().
13.3. JobInput.withExecutionTrigger
To optionally set the trigger to define the schedule upon which the job will commence execution. If not set, the job will commence execution immediately after being scheduled, and will execute exactly once.
The trigger mechanism is provided by Quartz Scheduler, meaning that you can profit from the powerful Quartz schedule capabilities.
For more information, see http://www.quartz-scheduler.org.
Use the static factory method Jobs.newExecutionTrigger() to get an instance:
// Schedules a delayed single executing job
Jobs.newInput()
    .withName("job")
    .withExecutionTrigger(Jobs.newExecutionTrigger()
        .withStartIn(10, TimeUnit.SECONDS));

// Schedules a repeatedly running job at a fixed rate (every hour), which ends in 24 hours
Jobs.newInput()
    .withName("job")
    .withExecutionTrigger(Jobs.newExecutionTrigger()
        .withEndIn(1, TimeUnit.DAYS)
        .withSchedule(SimpleScheduleBuilder.repeatHourlyForever()));

// Schedules a job which runs at 10:15am every Monday, Tuesday, Wednesday, Thursday and Friday
Jobs.newInput()
    .withName("job")
    .withExecutionTrigger(Jobs.newExecutionTrigger()
        .withSchedule(CronScheduleBuilder.cronSchedule("0 15 10 ? * MON-FRI")));
Learn more about ExecutionTrigger.
13.4. JobInput.withExecutionSemaphore
To optionally control the maximal concurrently level among jobs assigned to the same semaphore.
With a semaphore in place, this job only commences execution, once a permit is free or gets available. If free, the job commences execution immediately at the next reasonable opportunity, unless no worker thread is available.
A semaphore initialized to one allows to run jobs in a mutually exclusive manner, and a semaphore initialized to zero to run no job at all. The number of total permits available can be changed at any time, which allows to adapt the maximal concurrency level to some dynamic criteria like time of day or system load. However, a semaphore can be sealed, meaning that the number of permits cannot be changed anymore, and any attempts will be rejected.
A new semaphore instance can be obtained via Jobs class.
IExecutionSemaphore semaphore = Jobs.newExecutionSemaphore(5); (1)

for (int i = 0; i < 100; i++) {
  Jobs.schedule(new IRunnable() { (2)

    @Override
    public void run() throws Exception {
      // doing something
    }
  }, Jobs.newInput()
      .withName("job-{}", i)
      .withExecutionSemaphore(semaphore)); (3)
}| 1 | Create a new ExecutionSemaphore via Jobs class. The semaphore is initialized with 5 permits, meaning that at any given time, there are no more than 5 jobs running concurrently. |
| 2 | Schedule 100 jobs in a row. |
| 3 | Set the semaphore to limit the maximal concurrency level to 5 jobs. |
Learn more about ExecutionSemaphore.
13.5. JobInput.withExecutionHint
To associate the job with an execution hint. An execution hint is simply a marker to mark a job, and can be evaluated by filters to select jobs, e.g. to listen to job lifecycle events of some particular jobs, or to wait for some particular jobs to complete, or to cancel some particular jobs. A job may have multiple hints associated. Further, hints can be registered directly on the future via IFuture.addExecutionHint(hint), or removed via IFuture.removeExecutionHint(hint).
13.6. JobInput.withExceptionHandling
To control how to deal with uncaught exceptions.
By default, an uncaught exception is handled by ExceptionHandler bean and then propagated to the submitter, unless the submitter is not waiting for the job to complete via IFuture.awaitDoneAndGet().
This method expects two arguments: an optional exception handler, and a boolean flag indicating whether to swallow exceptions. 'Swallow' is independent of the specified exception handler, and indicates whether an exception should be propagated to the submitter, or swallowed otherwise.
If running a repetitive job with swallowing set to true, the job will continue its repetitive execution upon an uncaught exception. If set to false, the execution would exit.
13.7. JobInput.withThreadName
To set the thread name of the worker thread that will execute the job.
13.8. JobInput.withExpirationTime
To set the maximal expiration time upon which the job must commence execution. If elapsed, the job is cancelled and does not commence execution. By default, a job never expires.
For a job that executes once, the expiration is evaluated just before it commences execution. For a job with a repeating schedule, it is evaluated before every single execution.
In contrast, the trigger’s end time specifies the time at which the trigger will no longer fire. However, if fired, the job may not be executed immediately at this time, which depends on whether having to compete for an execution permit first. So the end time may already have elapsed once commencing execution. In contrast, the expiration time is evaluated just before starting execution.
14. IFuture
A future represents the result of an asynchronous computation, and is returned by the job manager upon scheduling a job. The future provides functionality to await for the job to complete, or to get its computation result or exception, or to cancel its execution, and more.
Learn more about job cancellation in section Job cancellation.
Learn more about listening for job lifecycle events in section Subscribe for job lifecycle events.
Learn more about awaiting the job’s completion in section Awaiting job completion.
15. Job states
Upon scheduling a job, the job transitions different states. The current state of a job can be queried from its associated IFuture.
| state | description |
|---|---|
SCHEDULED |
Indicates that a job was given to the job manager for execution. |
REJECTED |
Indicates that a job was rejected for execution. This might happen if the job manager has been shutdown, or if no more worker threads are available. |
PENDING |
Indicates that a job’s execution is pending, either because scheduled with a delay, or because of being a repetitive job while waiting for the commencement of the next execution. |
RUNNING |
Indicates that a job is running. |
DONE |
Indicates that a job finished execution, either normally or because it was cancelled. Use |
WAITING_FOR_PERMIT |
Indicates that a semaphore aware job is competing for a permit to become available. |
WAITING_FOR_BLOCKING_CONDITION |
Indicates that a job is blocked by a blocking condition, and is waiting for it to fall. |
| The state 'done' does not necessarily imply that the job already finished execution. That is because a job also enters 'done' state upon cancellation, but may still continue execution. |
16. Future filter
A future filter is a filter which can be passed to various methods of the job manager to select some futures. The filter must implement IFilter interface, and has a single method to accept futures of interest.
public class FutureFilter implements IFilter<IFuture<?>> {

  @Override
  public boolean accept(IFuture<?> future) {
    // Accept or reject the future
    return false;
  }
}
Scout provides you with FutureFilterBuilder class to ease building filters which match multiple criteria joined by logical 'AND' operation.
IFilter<IFuture<?>> filter = Jobs.newFutureFilterBuilder() (1)
    .andMatchExecutionHint("computation") (2)
    .andMatchNotState(JobState.PENDING) (3)
    .andAreSingleExecuting() (4)
    .andMatchNotFuture(IFuture.CURRENT.get()) (5)
    .andMatchRunContext(ClientRunContext.class) (6)
    .andMatch(new SessionFutureFilter(ISession.CURRENT.get())) (7)
.toFilter(); (8)| 1 | Returns an instance of the future filter builder |
| 2 | Specifies to match only futures associated with execution hint 'computation' |
| 3 | Specifies to match only jobs not in state pending |
| 4 | Specifies to match only single executing jobs, meaning no recurring jobs |
| 5 | Specifies to exclude the current future (if any) |
| 6 | Specifies to match only jobs running on behalf of a ClientRunContext |
| 7 | Specifies to match only jobs of the current session |
| 8 | Builds the filters to get a Filter instance |
Fore more information, refer to the JavaDoc of FutureFilterBuilder.
17. Event filter
A job event filter is a filter which can be given to job manager to subscribe for job lifecycle events. The filter must implement IFilter interface, and has a single method to accept events of interest.
public class EventFilter implements IFilter<JobEvent> {

  @Override
  public boolean accept(JobEvent event) {
    // Accept or reject the event
    return false;
  }
}
Scout provides you with JobEventFilterBuilder class to ease building filters which match multiple criteria joined by logical 'AND' operation.
IFilter<JobEvent> filter = Jobs.newEventFilterBuilder() (1)
    .andMatchEventType(JobEventType.JOB_STATE_CHANGED) (2)
    .andMatchState(JobState.RUNNING) (3)
    .andMatch(new SessionJobEventFilter(ISession.CURRENT.get())) (4)
    .andMatchExecutionHint("computation") (5)
.toFilter(); (6)| 1 | Returns an instance of the job event filter builder |
| 2 | Specifies to match all events representing a job state change |
| 3 | Specifies to match only events for jobs which transitioned into running state |
| 4 | Specifies to match only events for jobs of the current session |
| 5 | Specifies to match only events for jobs which are associated with the execution hint 'computation' |
| 6 | Builds the filters to get a Filter instance |
Fore more information, refer to the JavaDoc of JobEventFilterBuilder.
18. Job cancellation
A job can be cancelled in two ways, either directly via its IFuture, or via job manager. Both expect you to provide a boolean flag indicating whether to interrupt the executing working thread. Upon cancellation, the job immediately enters 'done' state. Learn more about Job states. If cancelling via job manager, a future filter must be given to select the jobs to be cancelled. Learn more about Future filter
The cancellation attempt will be ignored if the job has already completed or was cancelled. If not running yet, the job will never run. If the job has already started, then the interruptIfRunning parameter determines whether the thread executing the job should be interrupted in an attempt to stop the job.
In the following some examples:
// Schedule a job
IFuture<?> future = Jobs.schedule(new Work(), Jobs.newInput());

// Cancel the job via its future
future.cancel(false);Jobs.getJobManager().cancel(Jobs.newFutureFilterBuilder()
.andMatchFuture(future1, future2, future3)
.toFilter(), false);Jobs.getJobManager().cancel(Jobs.newFutureFilterBuilder()
.andMatchExecutionHint("computation")
.andMatch(new SessionFutureFilter(ISession.CURRENT.get()))
.toFilter(), false);A job can query its current cancellation status via RunMonitor.CURRENT.get().isCancelled(). If doing some long running operations, it is recommended for the job to regularly check for cancellation.
A job which is scheduled to run on a copy of the submitting RunContext, it gets also cancelled once the RunMonitor of that context gets cancelled.
|
19. Subscribe for job lifecycle events
Sometimes it is useful to register for some job lifecycle events. The following event types can be subscribed for:
| state | description |
|---|---|
JOB_STATE_CHANGED |
Signals that a job transitioned to a new JobState, e.g. form JobState.SCHEDULED to JobState.RUNNING. |
JOB_EXECUTION_HINT_ADDED |
Signals that an execution hint was added to a job. |
JOB_EXECUTION_HINT_REMOVED |
Signals that an execution hint was removed from a job. |
JOB_MANAGER_SHUTDOWN |
Signals that the job manager was shutdown. |
The listener is registered via job manager as following:
Jobs.getJobManager().addListener(Jobs.newEventFilterBuilder() (1)
    .andMatchEventType(JobEventType.JOB_STATE_CHANGED)
    .andMatchState(JobState.RUNNING)
    .andMatch(new SessionJobEventFilter(ISession.CURRENT.get()))
    .toFilter(), new IJobListener() {

      @Override
      public void changed(JobEvent event) {
        IFuture<?> future = event.getData().getFuture(); (2)
        System.out.println("Job commences execution: " + future.getJobInput().getName());
      }
});| 1 | Subscribe for all events related to jobs just about to commence execution, and which belong to the current session |
| 2 | Get the future this event was fired for |
If interested in only events of a single future, the listener can be registered directly on the future.
future.addListener(Jobs.newEventFilterBuilder()
    .andMatchEventType(JobEventType.JOB_STATE_CHANGED)
    .andMatchState(JobState.RUNNING)
    .toFilter(), new IJobListener() {

      @Override
      public void changed(JobEvent event) {
        System.out.println("Job commences execution");
      }
    });
20. Awaiting job completion
A job’s completion can be either awaited on its IFuture, or via job manager - the first optionally allows to consume the job’s computation result, whereas the second allows multiple futures to be awaited for.
20.1. Difference between 'done' and 'finished' state
When awaiting futures, the definition of 'done' and 'finished' state should be understood - 'done' means that the future completed either normally, or was cancelled. But, if cancelled while running, the job may still continue its execution, whereas a job which not commenced execution yet, will never do so. The latter typically applies for jobs scheduled with a delay. However, 'finished' state differs from 'done' state insofar as a cancelled, currently running job enters 'finished' state only upon its actual completion. Otherwise, if not cancelled, or cancelled before executing, it is equivalent to 'done' state. In most situations, it is sufficient to await for the future’s done state, especially because a cancelled job cannot return a result to the submitter anyway.
20.2. Awaiting a single future’s 'done' state
Besides of some overloaded methods, IFuture basically provides two methods to wait for a future to enter 'done' state, namely awaitDone and awaitDoneAndGet, with the difference that the latter additionally returns the job’s result or exception. If the future is already done, those methods will return immediately. For both methods, there exists an overloaded version to wait for at most a given time, which once elapsed results in a TimedOutException thrown.
Further, awaitDoneAndGet allows to specify an [IExceptionTranslator] to control exception translation. By default, DefaultRuntimeExceptionTranslator is used, meaning that a RuntimeException is propagated as it is, whereas a checked exception would be wrapped into a PlatformException. If you require checked exceptions to be thrown as they are, use DefaultExceptionTranslator instead, or even NullExceptionTranslator to work with the raw ExecutionException as being thrown by Java Executor framework.
IFuture<String> future = Jobs.schedule(new Callable<String>() {

  @Override
  public String call() throws Exception {
    // doing something
    return "computation result";
  }
}, Jobs.newInput());

// Wait until done without consuming the result
future.awaitDone(); (1)
future.awaitDone(10, TimeUnit.SECONDS); (2)

// Wait until done and consume the result
String result = future.awaitDoneAndGet(); (3)
result = future.awaitDoneAndGet(10, TimeUnit.SECONDS); (4)

// Wait until done, consume the result, and use a specific exception translator
result = future.awaitDoneAndGet(DefaultExceptionTranslator.class); (5)
result = future.awaitDoneAndGet(10, TimeUnit.SECONDS, DefaultExceptionTranslator.class); (6)| 1 | Waits if necessary for the job to complete, or until cancelled. This method does not throw an exception if cancelled or the computation failed, but throws ThreadInterruptedException if the current thread was interrupted while waiting. |
| 2 | Waits if necessary for at most 10 seconds for the job to complete, or until cancelled, or the timeout elapses. This method does not throw an exception if cancelled, or the computation failed, but throws TimedOutException if waiting timeout elapsed, or throws ThreadInterruptedException if the current thread was interrupted while waiting. |
| 3 | Waits if necessary for the job to complete, and then returns its result, if available, or throws its exception according to DefaultRuntimeExceptionTranslator, or throws FutureCancelledException if cancelled, or throws ThreadInterruptedException if the current thread was interrupted while waiting. |
| 4 | Waits if necessary for at most 10 seconds for the job to complete, and then returns its result, if available, or throws its exception according to DefaultRuntimeExceptionTranslator, or throws FutureCancelledException if cancelled, or throws TimedOutException if waiting timeout elapsed, or throws ThreadInterruptedException if the current thread was interrupted while waiting. |
| 5 | Waits if necessary for the job to complete, and then returns its result, if available, or throws its exception according to the given DefaultExceptionTranslator, or throws FutureCancelledException if cancelled, or throws ThreadInterruptedException if the current thread was interrupted while waiting. |
| 6 | Waits if necessary for at most the given time for the job to complete, and then returns its result, if available, or throws its exception according to the given DefaultExceptionTranslator, or throws FutureCancelledException if cancelled, or throws TimedOutException if waiting timeout elapsed, or throws ThreadInterruptedException if the current thread was interrupted while waiting. |
It is further possible to await asynchronously on a future to enter done state by registering a callback via whenDone method. The advantage over registering a listener is that the callback is invoked even if the future already entered done state upon registration.
future.whenDone(new IDoneHandler<String>() {

  @Override
  public void onDone(DoneEvent<String> event) {
    // invoked upon entering done state.
  }
}, ClientRunContexts.copyCurrent());
Because invoked in another thread, this method optionally accepts a RunContext to be applied when being invoked.
20.3. Awaiting a single future’s 'finished' state
Use the method awaitFinished to wait for the job to finish, meaning that the job either completed normally or by an exception, or that it will never commence execution due to a premature cancellation. To learn more about the difference between 'done' and 'finished' state, click here.
Please note that this method does not return the job’s result, because by Java Future definition, a cancelled job cannot provide a result.
IFuture<String> future = Jobs.schedule(new Callable<String>() {

  @Override
  public String call() throws Exception {
    // doing something
    return "computation result";
  }
}, Jobs.newInput());

// Wait until finished
future.awaitFinished(10, TimeUnit.SECONDS);
20.4. Awaiting multiple future’s 'done' state
Job Manager allows to await for multiple futures at once. The filter to be provided limits the futures to await for. This method requires you to provide a maximal time to wait.
Filters can be plugged by using logical filters like AndFilter or OrFilter, or negated by enclosing a filter in NotFilter. Also see Future filter to create a filter to match multiple criteria joined by logical 'AND' operation.
// Wait for some futures
Jobs.getJobManager().awaitDone(Jobs.newFutureFilterBuilder() (1)
    .andMatchFuture(future1, future2, future3)
    .toFilter(), 1, TimeUnit.MINUTES);

// Wait for all futures marked as 'reporting' jobs of the current session
Jobs.getJobManager().awaitDone(Jobs.newFutureFilterBuilder() (2)
    .andMatchExecutionHint("reporting")
    .andMatch(new SessionFutureFilter(ISession.CURRENT.get()))
.toFilter(), 1, TimeUnit.MINUTES);| 1 | Waits if necessary for at most 1 minute for all three futures to complete, or until cancelled, or the timeout elapses. |
| 2 | Waits if necessary for at most 1 minute until all jobs marked as 'reporting' jobs of the current session complete, or until cancelled, or the timeout elapses. |
20.5. Awaiting multiple future’s 'finished' state
Use the method awaitFinished to wait for multiple jobs to finish, meaning that the jobs either completed normally or by an exception, or that they will never commence execution due to a premature cancellation. To learn more about the difference between 'done' and 'finished' state, click here.
// Wait for some futures
Jobs.getJobManager().awaitFinished(Jobs.newFutureFilterBuilder() (1)
    .andMatchFuture(future1, future2, future3)
    .toFilter(), 1, TimeUnit.MINUTES);

// Wait for all futures marked as 'reporting' jobs of the current session
Jobs.getJobManager().awaitFinished(Jobs.newFutureFilterBuilder() (2)
    .andMatchExecutionHint("reporting")
    .andMatch(new SessionFutureFilter(ISession.CURRENT.get()))
.toFilter(), 1, TimeUnit.MINUTES);| 1 | Waits if necessary for at most 1 minute for all three futures to finish, or until cancelled, or the timeout elapses. |
| 2 | Waits if necessary for at most 1 minute until all jobs marked as 'reporting' jobs of the current session finish, or until cancelled, or the timeout elapses. |
21. Uncaught job exceptions
If a job throws an exception, that exception is handled by ExceptionHandler, and propagated to the submitter. However, the exception is only propagated if having a waiting submitter. Also, an uncaught exception causes repetitive jobs to terminate.
This default behavior as described can be changed via JobInput.withExceptionHandling.
22. Blocking condition
A blocking condition allows a thread to wait for a condition to become true. That is similar to the Java Object’s 'wait/notify' mechanism, but with some additional functionality regarding semaphore aware jobs. If a semaphore aware job enters a blocking condition, it releases ownership of the permit, which allows another job of that same semaphore to commence execution. Upon the condition becomes true, the job then must compete for a permit anew.
A condition can be used across multiple threads to wait for the same condition. Also, a condition is reusable upon invalidation. And finally, a condition can be used even if not running within a job.
A blocking condition is often used by model jobs to wait for something to happen, but to allow another model job to run while waiting. A typical use case would be to wait for a MessageBox to be closed.
22.1. Example of a blocking condition
You are running in a semaphore aware job and require to do some long running operation. During that time you do not require to be the permit owner. A simple but wrong approach would be the following:
// Schedule a long running operation.
IFuture<?> future = Jobs.schedule(new LongRunningOperation(), Jobs.newInput());

// Wait until done.
future.awaitDone();
The problem with this approach is, that you still are the permit owner while waiting, meaning that you possibly prevent other jobs from running. Instead, you could use a blocking condition for that to achieve:
// Create a blocking condition.
final IBlockingCondition operationCompleted = Jobs.newBlockingCondition(true);

// Schedule a long running operation.
IFuture<Void> future = Jobs.schedule(new LongRunningOperation(), Jobs.newInput());

// Register done callback to unblock the condition.
future.whenDone(new IDoneHandler<Void>() {

  @Override
  public void onDone(DoneEvent<Void> event) {
    // Let the waiting job re-acquire a permit and continue execution.
    operationCompleted.setBlocking(false);
  }
}, null);

// Wait until done. Thereby, the permit of the current job is released for the time while waiting.
operationCompleted.waitForUninterruptibly();
23. ExecutionSemaphore
Represents a fair counting semaphore used in Job API to control the maximal number of jobs running concurrently.
Jobs which are assigned to the same semaphore run concurrently until they reach the maximal concurrency level defined for that semaphore. Subsequent tasks then wait in the queue until a permit becomes available.
A semaphore initialized to one allows to run jobs in a mutually exclusive manner, and a semaphore initialized to zero to run no job at all. The number of total permits available can be changed at any time, which allows to adapt the maximal concurrency level to some dynamic criteria like time of day or system load. However, once calling seal(), the number of permits cannot be changed anymore, and any attempts will result in an AssertionException. By default, a semaphore is unbounded.
24. ExecutionTrigger
Component that defines the schedule upon which a job will commence execution.
A trigger can be as simple as a 'one-shot' execution at some specific point in time in the future, or represent a schedule which executes a job on a repeatedly basis. The latter can be configured to run infinitely, or to end at a specific point in time. It is further possible to define rather complex triggers, like to execute a job every second Friday at noon, but with the exclusion of all the business’s holidays.
See the various schedule builders provided by Quartz Scheduler:
SimpleScheduleBuilder, CronScheduleBuilder, CalendarIntervalScheduleBuilder, DailyTimeIntervalScheduleBuilder. The most powerful builder is CronScheduleBuilder. Cron is a UNIX tool with powerful and proven scheduling capabilities. For more information, see http://www.quartz-scheduler.org.
Additionally, Scout provides you with FixedDelayScheduleBuilder to run a job with a fixed delay between the termination of one execution and the commencement of the next execution.
Use the static factory method 'Jobs.newExecutionTrigger()' to get an instance.
24.1. Misfiring
Regardless of the schedule used, job manager guarantees no concurrent execution of the same job. That may happen, if using a repeatedly schedule with the job not terminated its last execution yet, but the schedule’s trigger would like to fire for the next execution already. Such a situation is called a misfiring. The action to be taken upon a misfiring is configurable via the schedule’s misfiring policy. A policy can be to run the job immediately upon termination of the previous execution, or to just ignore that missed firing. See the JavaDoc of the schedule for more information.
25. Stopping the platform
Upon stopping the platform, the job manager will also be shutdown. If having a [IPlatformListener] to perform some cleanup work, and which requires the job manager to be still functional, that listener must be annotated with an @Order less than IJobManager.DESTROY_ORDER, which is 5'900. If not specifying an @Order explicitly, the listener will have the default order of 5, meaning being invoked before job manager shutdown anyway.
26. ModelJobs
Model jobs exist client side only, and are used to interact with the Scout client model to read and write model values in a serial manner per session. That enables no synchronization to be used when interacting with the model.
By definition, a model job requires to be run on behalf of a [ClientRunContext] with a [IClientSession] set, and must have the session’s model job semaphore set as its ExecutionSemaphore. That causes all such jobs to be run in sequence in the model thread. At any given time, there is only one model thread active per client session.
The class ModelJobs is a helper class, and is for convenience purpose to facilitate the creation of model job related artifacts, and to schedule model jobs.
ModelJobs.schedule(new IRunnable() { (1)

  @Override
  public void run() throws Exception {
    // doing something in model thread
  }
}, ModelJobs.newInput(ClientRunContexts.copyCurrent()) (2)
.withName("Doing something in model thread"));| 1 | Schedules the work to be executed in the model thread |
| 2 | Creates the JobInput to become a model job, meaning with the session’s model job semaphore set |
For model jobs, it is also allowed to run according to a Quartz schedule plan, or to be executed with a delay. Then the model permit is acquired just before each execution, and not upon being scheduled.
Furthermore, the class ModelJobs provides some useful static methods:
// Returns true if the current thread represents the model thread for the current client session. At any given time, there is only one model thread active per client session.
ModelJobs.isModelThread();

// Returns true if the given Future belongs to a model job.
ModelJobs.isModelJob(IFuture.CURRENT.get());

// Returns a builder to create a filter for future objects representing a model job.
ModelJobs.newFutureFilterBuilder();

// Returns a builder to create a filter for JobEvent objects originating from model jobs.
ModelJobs.newEventFilterBuilder();

// Instructs the job manager that the current model job is willing to temporarily yield its current model job permit. It is rarely appropriate to use this method. It may be useful for debugging or testing purposes.
ModelJobs.yield();
27. Configuration
Job manager can be configured with the following config properties.
| property | default value | description |
|---|---|---|
scout.jobmanager.corePoolSize |
25 |
The number of threads to keep in the pool, even if they are idle |
scout.jobmanager.prestartCoreThreads |
true if running in productive environment, else false |
Specifies whether all threads of the core-pool should be started upon job manager startup, so that they are idle waiting for work. |
scout.jobmanager.maximumPoolSize |
infinite |
The maximal number of threads to be created once the core-pool-size is exceeded. |
scout.jobmanager.keepAliveTime |
60 |
The time limit (in seconds) for which threads, which are created upon exceeding the 'core-pool-size' limit, may remain idle before being terminated. |
scout.jobmanager.allowCoreThreadTimeOut |
false |
Specifies whether threads of the core-pool should be terminated after being idle for longer than 'keepAliveTime'. |
28. Extending job manager
Job manager is implemented as an application scoped bean, and which can be replaced. To do so, create a class which extends JobManager, and annotate it with @Replace annotation. Most likely, you like to use the EE container’s ThreadPoolExecutor, or to contribute some behavior to the callable chain which finally executes the job.
To change the executor, overwrite createExecutor method and return the executor of your choice. But do not forget to register a rejection handler to reject futures upon rejection. Also, overwrite shutdownExecutor to not shutdown the container’s executor.
To contribute some behavior to the callable chain, overwrite the method interceptCallableChain and contribute your decorator or interceptor. Refer to the method’s JavaDoc for more information.
29. Scheduling examples
This sections contains some common scheduling examples.
Jobs.schedule(new IRunnable() {

  @Override
  public void run() throws Exception {
    // doing something
  }
}, Jobs.newInput()
    .withName("Running once")
.withRunContext(ClientRunContexts.copyCurrent()));Jobs.schedule(new IRunnable() {
@Override
public void run() throws Exception {
// doing something
}
}, Jobs.newInput()
.withName("Running in 10 seconds")
.withRunContext(ClientRunContexts.copyCurrent())
.withExecutionTrigger(Jobs.newExecutionTrigger()
.withStartIn(10, TimeUnit.SECONDS))); // delay of 10 secondsJobs.schedule(new IRunnable() {
@Override
public void run() throws Exception {
// doing something
}
}, Jobs.newInput()
.withName("Running every minute")
.withRunContext(ClientRunContexts.copyCurrent())
.withExecutionTrigger(Jobs.newExecutionTrigger()
.withStartIn(1, TimeUnit.MINUTES) (1)
.withSchedule(SimpleScheduleBuilder.simpleSchedule() (2)
.withIntervalInMinutes(1) (3)
.repeatForever()))); (4)| 1 | Configure to fire in 1 minute for the first time |
| 2 | Use Quartz simple schedule to achieve fixed-rate execution |
| 3 | Repetitively fire every minute |
| 4 | Repeat forever |
Jobs.schedule(new IRunnable() {

  @Override
  public void run() throws Exception {
    // doing something
  }
}, Jobs.newInput()
    .withName("Running every minute for total 60 times")
    .withRunContext(ClientRunContexts.copyCurrent())
    .withExecutionTrigger(Jobs.newExecutionTrigger()
        .withStartIn(1, TimeUnit.MINUTES) (1)
        .withSchedule(SimpleScheduleBuilder.simpleSchedule() (2)
            .withIntervalInMinutes(1) (3)
.withRepeatCount(59)))); (4)| 1 | Configure to fire in 1 minute for the first time |
| 2 | Use Quartz simple schedule to achieve fixed-rate execution |
| 3 | Repetitively fire every minute |
| 4 | Repeat 59 times, plus the initial execution |
Jobs.schedule(new IRunnable() {

  @Override
  public void run() throws Exception {
    // doing something
  }
}, Jobs.newInput()
    .withName("Running forever with a delay of 1 minute between the termination of the previous and the next execution")
    .withRunContext(ClientRunContexts.copyCurrent())
    .withExecutionTrigger(Jobs.newExecutionTrigger()
        .withStartIn(1, TimeUnit.MINUTES) (1)
.withSchedule(FixedDelayScheduleBuilder.repeatForever(1, TimeUnit.MINUTES)))); (2)| 1 | Configure to fire in 1 minute for the first time |
| 2 | Use fixed delay schedule |
Jobs.schedule(new IRunnable() {

  @Override
  public void run() throws Exception {
    // doing something
  }
}, Jobs.newInput()
    .withName("Running 60 times with a delay of 1 minute between the termination of the previous and the next execution")
    .withRunContext(ClientRunContexts.copyCurrent())
    .withExecutionTrigger(Jobs.newExecutionTrigger()
        .withStartIn(1, TimeUnit.MINUTES) (1)
.withSchedule(FixedDelayScheduleBuilder.repeatForTotalCount(60, 1, TimeUnit.MINUTES)))); (2)| 1 | Configure to fire in 1 minute for the first time |
| 2 | Use fixed delay schedule |
Jobs.schedule(new IRunnable() {

  @Override
  public void run() throws Exception {
    // doing something
  }
}, Jobs.newInput()
    .withName("Running at 10:15am every Monday, Tuesday, Wednesday, Thursday and Friday")
    .withRunContext(ClientRunContexts.copyCurrent())
    .withExecutionTrigger(Jobs.newExecutionTrigger()
.withSchedule(CronScheduleBuilder.cronSchedule("0 15 10 ? * MON-FRI")))); (1)| 1 | Cron format: [second] [minute] [hour] [day_of_month] [month] [day_of_week] [year]? |
Jobs.schedule(new IRunnable() {

  @Override
  public void run() throws Exception {
    // doing something
  }
}, Jobs.newInput()
    .withName("Running every minute starting at 14:00 and ending at 14:05, every day")
    .withRunContext(ClientRunContexts.copyCurrent())
    .withExecutionTrigger(Jobs.newExecutionTrigger()
.withSchedule(CronScheduleBuilder.cronSchedule("0 0-5 14 * * ?")))); (1)| 1 | Cron format: [second] [minute] [hour] [day_of_month] [month] [day_of_week] [year]? |
IExecutionSemaphore semaphore = Jobs.newExecutionSemaphore(5); (1)

for (int i = 0; i < 100; i++) {
  Jobs.schedule(new IRunnable() {

    @Override
    public void run() throws Exception {
      // doing something
    }
  }, Jobs.newInput()
      .withName("job-{}", i)
      .withExecutionSemaphore(semaphore)); (2)
}| 1 | Create the execution semaphore initialized with 5 permits |
| 2 | Set the execution semaphore to the job subject for limited concurrency |
Jobs.getJobManager().cancel(Jobs.newFutureFilterBuilder()
    .andMatch(new SessionFutureFilter(ISession.CURRENT.get()))
.toFilter(), true);public class CancellableWork implements IRunnable {
@Override
public void run() throws Exception {
// do first chunk of operations
if (RunMonitor.CURRENT.get().isCancelled()) {
return;
}
// do next chunk of operations
if (RunMonitor.CURRENT.get().isCancelled()) {
return;
}
// do next chunk of operations
}
}// Create a blocking condition.
final IBlockingCondition operationCompleted = Jobs.newBlockingCondition(true);
// Schedule a long running operation.
IFuture<Void> future = Jobs.schedule(new LongRunningOperation(), Jobs.newInput());
// Register done callback to unblock the condition.
future.whenDone(new IDoneHandler<Void>() {
@Override
public void onDone(DoneEvent<Void> event) {
// Let the waiting job re-acquire a permit and continue execution.
operationCompleted.setBlocking(false);
}
}, null);
// Wait until done. Thereby, the permit of the current job is released for the time while waiting.
operationCompleted.waitForUninterruptibly();RunContext
Mostly, code is run on behalf of some semantic context, for example as a particular Subject and with some context related ThreadLocals set, e.g. the user’s session and its Locale. Scout provides you with different RunContexts, such as ClientRunContext or ServerRunContext. They all share some common characteristics like Subject, Locale and RunMonitor, but also provide some additional functionality like transaction boundaries if using ServerRunContext. Also, a RunContext facilitates propagation of state among different threads. In order to ease readability, the 'setter-methods' of the RunContext support method chaining.
All a RunContext does is to provide some setter methods to construct the context, and a run and call method to run an action on behalf of that context. Thereby, the only difference among those two methods is their argument. Whereas run takes a IRunnable instance, call takes a Callable to additionally return a result to the caller. The action is run in the current thread, meaning that the caller is blocked until completion.
By default, a RunContext is associated with a RunMonitor, and the monitor’s cancellation status can be queried via RunMonitor.CURRENT.get().isCancelled(). The monitor allows for hard cancellation, meaning that the executing thread is interrupted upon cancellation. For instance if waiting on an interruptible construct like Object.wait() or IFuture.awaitDone(), the waiting thread returns with an interruption exception.
30. Factory methods to create a RunContext
Typically, a RunContext is created from a respective factory like RunContexts to create a RunContext, or ServerRunContexts to create a ServerRunContext, or ClientRunContexts to create a ClientRunContext. Internally, the BeanManager is asked to provide a new instance of the RunContext, which allows you to replace the default implementation of a RunContext in an easy way. The factories declare two factory methods: empty() and copyCurrent(). Whereas empty() provides you an empty RunContext, copyCurrent() takes a snapshot of the current calling context and initializes the RunContext accordingly. That is useful if only some few values are to be changed, or, if using ServerRunContext, to run the code on behalf of a new transaction.
The following snippet illustrates the creation of an empty RunContext initialized with a particular Subject and Locale.
RunContextSubject subject = new Subject(); (1)
subject.getPrincipals().add(new SimplePrincipal("john"));
subject.setReadOnly();
RunContexts.empty()
.withSubject(subject)
.withLocale(Locale.US)
.run(new IRunnable() { (2)
@Override
public void run() throws Exception {
// run some code (3)
System.out.println(NlsLocale.CURRENT.get()); // > Locale.US
System.out.println(Subject.getSubject(AccessController.getContext())); // > john
}
});| 1 | create the Subject to do some work on behalf |
| 2 | Create and initialize the RunContext |
| 3 | This code is run on behalf of the RunContext |
The following snippet illustrates the creation of a 'snapshot' of the current calling RunContext with another Locale set.
RunContextRunContexts.copyCurrent()
.withLocale(Locale.US)
.run(new IRunnable() {
@Override
public void run() throws Exception {
// run some code
}
});An important difference is related to the RunMonitor. By using the copyCurrent() factory method, the context’s monitor is additionally registered as child monitor of the monitor of the current calling context. That way, a cancellation request to the calling context is propagated down to this context as well. Of course, that behavior can be overwritten by providing another monitor yourself.
31. Properties of a RunContext
The following properties are declared on a RunContext and are inherited by ServerRunContext and ClientRunContext.
| property | description | accessibility |
|---|---|---|
runMonitor |
Monitor to query the cancellation status of the context. * must not be |
RunMonitor.CURRENT.get() |
subject |
Subject to run the code on behalf |
Subject.getSubject(AccessController.getContext()) |
locale |
Locale to be bound to the Locale |
NlsLocale.CURRENT.get() |
propertyMap |
Properties to be bound to the Property |
PropertyMap.CURRENT.get() |
32. Properties of a ServerRunContext
A ServerRunContext controls propagation of server-side state and sets the transaction boundaries, and is a specialization of RunContext.
| property | description | accessibility |
|---|---|---|
session |
Session to be bound to Session |
ISession.CURRENT.get() |
transactionScope |
To control transaction boundaries. By default, a new transaction is started, and committed or rolled back upon completion. * Use |
ITransaction.CURRENT.get() |
transaction |
Sets the transaction to be used to run the runnable. Has only an effect, if transaction scope is set to TransactionScope.REQUIRED or TransactionScope.MANDATORY. Normally, this property should not be set manually. |
ITransaction.CURRENT.get() |
clientNotificationCollector |
To associate the context with the given ClientNotificationCollector, meaning that any code running on behalf of this context has that collector set in ClientNotificationCollector.CURRENT thread-local. |
ClientNotificationCollector.CURRENT.get() |
clientNodeId |
Associates this context with the given 'client node ID', meaning that any code running on behalf of this context has that id set in IClientNodeId.CURRENT thread-local. |
IClientNodeId.CURRENT.get() |
33. Properties of a ClientRunContext
A ClientRunContext controls propagation of client-side state, and is a specialization of RunContext.
| property | description | accessibility |
|---|---|---|
session |
Session to be bound to Session |
ISession.CURRENT.get() |
form |
Associates this context with the given |
IForm.CURRENT.get() |
outline |
Associates this context with the given |
IOutline.CURRENT.get() |
desktop |
Associates this context with the given |
IDesktop.CURRENT.get() |
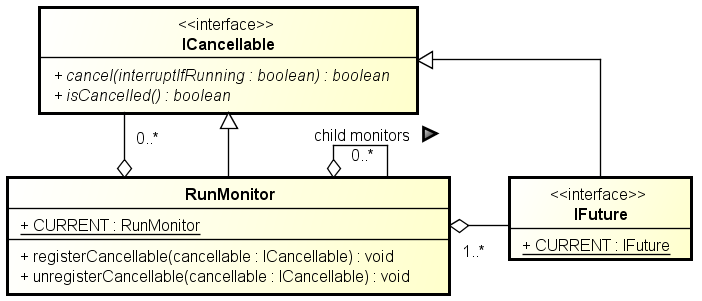
RunMonitor
A RunMonitor allows the registration of ICancellable objects, which are cancelled upon cancellation of this monitor. A RunMonitor is associated with every RunContext and IFuture, meaning that executing code can always query its current cancellation status via RunMonitor.CURRENT.get().isCancelled().
A RunMonitor itself is also of the type ICancellable, meaning that it can be registered within another monitor as well. That way, a monitor hierarchy can be created with support of nested cancellation. That is exactly what is done when creating a copy of the current calling context, namely that the new monitor is registered as ICancellable within the monitor of the current calling context. Cancellation only works top-down, and not bottom up, meaning that a parent monitor is not cancelled once a child monitor is cancelled.
When registering a ICancellable and this monitor is already cancelled, the ICancellable is cancelled immediately.
Furthermore, a job’s Future is linked with the job’s RunMonitor, meaning that cancellation requests targeted to the Future are also propagated to the RunMonitor, and vice versa.
The following figure illustrates the RunMonitor and its associations.
Secure Output
This chapter describes how HTML Output can be handled in a secure way.
Scout applications often display potentially dangerous data, e.g. user input or data from other systems. Encoding this input in such a way, that it can not be executed, prevents security vulnerabilities like cross-site scripting.
34. Encoding by Default
By default, all input in the Scout model is encoded. Examples are values/labels in value fields, cells in tables, message in message box. The reason behind this default choice is that developers do not have to think about output encoding in the standard case and are therefore less likely to forget output encoding and introduce a security vulnerability.
Example: In the following string field, the HTML <b> tag is encoded as <b>bold text</b>:

public class StringField extends AbstractStringField {
  @Override
  protected void execInitField() {
    setValue("...<b>Bold text</b>...");
  }
35. Html Enabled
Sometimes developers may want to use HTML in the Scout model.
Examples are
-
Simple styling of dynamic content, such as addresses or texts in message boxes
-
Text containing application-internal or external links
-
Html or XML content received from other systems, such as e-mails or html pages
Html input should only partially be encoded or not at all.
To disable the encoding of the whole value, the property HtmlEnabled can be used:
public class NoEncodingStringField extends AbstractStringField {
  @Override
  protected boolean getConfiguredHtmlEnabled() {
    return false;
  }
@Override
protected void execInitField() {
  setValue("...<b>Bold text</b>...");
}
There are several ways to implement the use cases above. Some typical implementations are described in the following sections.
35.1. CSS Class and Other Model Properties
Often using HTML in value fields or table cells is not necessary for styling. Very basic styling can be done for example by setting the CSS class.
35.2. HTML Builder
For creating simple HTML files or fragments with encoded user input, the class org.eclipse.scout.rt.platform.html.HTML can be used. It is also easily possible to create application internal and external link with this approach.
35.3. Styling in the UI-Layer
For more complex HTML, using IBeanField in the scout model and implementing the styling in the UI-Layer is often the preferred way.
Links are possible as well.
35.4. Manual Encoding
It is also possible to encode any String manually using StringUtility.htmlEncode(String). org.eclipse.scout.rt.platform.html.HTML uses this method internally for encoding.
However, using HTML is recommended, where possible, because it is more concise and leads to less errors.
35.5. Using a White-List Filter
If HTML or XML from external sources or more complex HTML are used in the Scout model, using a white-list filter might be the best way to avoid security bugs. Libraries, such as JSoup provide such a white-list filter. Scout currently does not include any services or utilities for using white-list filters, because the configuration and usage is very use-case-specific and would therefore not add much benefit.
Client Notifications
In a scout application, typically, the scout client requests some data from the scout server. Sometimes, however, the communication needs go the other way: The scout server needs to inform the scout client about something. With client notifications it is possible to do so.

36. Examples
Example scenarios for client notifications are:
-
some data shared by client and server has changed (e.g. a cache on the client is no longer up-to-date, or a shared variable has changed)
-
a new incoming phone call is available for a specific client and should be shown in the GUI
-
a user wants to send a message to another user
Scout itself uses client notifications to synchronize code type and permission caches and session shared variables.
37. Data Flow
A client notification message is just a serializable object. It is published on the server and can be addressed either to all client nodes or only to a specific session or user. On the UI server side, handlers can be used to react upon incoming notifications.
Client notification handlers may change the state of the client model. In case of visible changes in the UI, these changes are automatically reflected in the UI.
In case of multiple server nodes, the client notifications are synchronized using cluster notifications to ensure that all UI servers receive the notifications.
38. Push Technology
Client notifications are implemented using long polling as described below, because long polling works reliably in most corporate networks with proxy servers between server and client
as well as with security policies that do not allow server push.
With long polling, the client requests notifications from the server repeatedly. If no new notifications are available on the server, instead of sending an empty response, the server holds the request open and waits until new notifications are available or a timeout is reached.
In addition to the long polling mechanism, pending client notifications are also transferred to the client along with the response of regular client requests.
39. Components
A client notification can be published on the server using the ClientNotificationRegistry.
Publishing can be done either in a non-transactional or transactional way (only processed, when the transaction is committed).
The UI Server either receives the notifications via the ClientNotificationPoller or in case of transactional notifications
together with the response of a regular service request. The notification is then dispatched to the corresponding handler.
When a client notifications is published on the server, it is automatically synchronized with the other server nodes (by default).
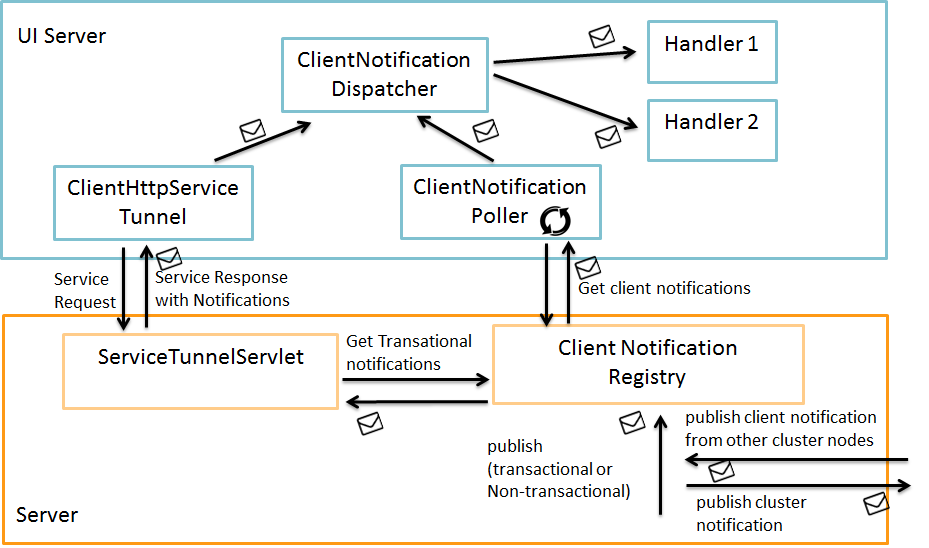
39.1. Multiple Server Nodes
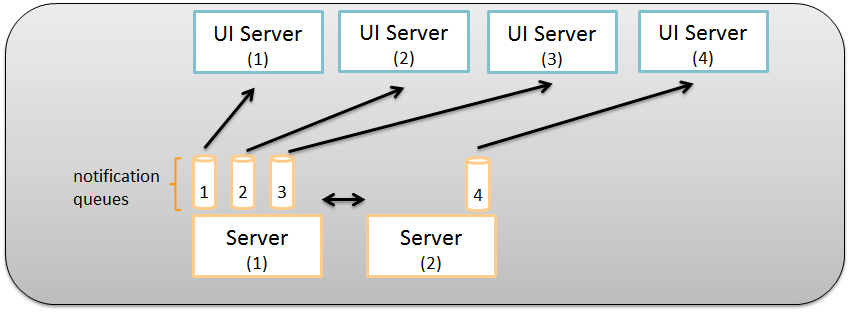
In order to deal with multiple ui-server nodes, the server holds a single notifications queue per ui-server node.
In this queues only the relevant notifications need to be kept: If a client notification is addressed to a session or user, that does not exist on a ui-server node, it is not added to the queue.
Sessions and corresponding users are registered on the server upon creation (and de-registered after destruction).
40. Publishing
BEANS.get(ClientNotificationRegistry.class).putForUser("admin", new PersonTableChangedNotification());There are several options to choose from when publishing a new client notification:
40.1. ClientNotificationAddress
The ClientNotificationAddress determines which how the client notification needs to be dispatched and handled.
A client notification can be addressed to
-
all nodes
-
all sessions
-
one or more specific session
-
one or more specific user
40.2. Transactional vs. Non-transactional
Client notifications can be published in a transactional or non-transactional way.
-
Transactional means that the client notifications are only published once the transaction is committed. If the transaction fails, client notifications are disregarded.
-
Non-transactional means that client notifications are published immediately without considering any transactions.
40.3. Distributing to all Cluster Nodes
Generally, it makes sense to distribute the client notifications automatically to all other server cluster nodes (if available). This is achieved using ClusterNotifications.
It is however also possible to publish client notifications without cluster distribution. E.g. in case of client notifications already received from other cluster nodes.
40.4. Coalescing Notifications
It is possible that a service generates a lot of client notifications that are obsolete once a newer notification is created. In this case a coalescer can be created to reduce the notifications:
public class BookmarkNotificationCoalescer implements ICoalescer<BookmarkChangedClientNotification> {

  @Override
  public List<BookmarkChangedClientNotification> coalesce(List<BookmarkChangedClientNotification> notifications) {
    // reduce to one
    return CollectionUtility.arrayList(CollectionUtility.firstElement(notifications));
  }
}
41. Handling
The ClientNotificationDispatcher is responsible for dispatching the client notifications to the correct handler.
41.1. Creating a Client Notification Handler
To create a new client notification handler for a specific client notification, all you need to do is creating a class implementing
org.eclipse.scout.rt.shared.notification.INotificationHandler<T>, where T is the type (or subtype) of the notification to handle.
The new handler does not need to be registered anywhere. It is available via jandex class inventory.
MessageNotificationspublic class MessageNotificationHandler implements INotificationHandler<MessageNotification> {
@Override
public void handleNotification(final MessageNotification notification) {41.2. Handling Notifications Temporarily
Sometimes it is necessary to start and stop handling notification dynamically, (e.g. when a form is opened) in this case AbstractObservableNotificationHandler
can be used to add and remove listeners.
41.3. Asynchronous Dispatching
Dispatching is always done asynchronously. However, in case of transactional notifications, a service call blocks until all transactional notifications returned with the service response are handled.
This behavior was implemented to simplify for example the usage of shared caches:
CodeService cs = BEANS.get(CodeService.class);
cs.reloadCodeType(UiThemeCodeType.class);

//client-side reload triggered by client notifications is finished
List<? extends ICode<String>> reloadedCodes = cs.getCodeType(UiThemeCodeType.class).getCodes();
In the example above, it is guaranteed, that the codetype is up-to-date as soon as reloadCodeType is finished.
41.4. Updating Scout Model
Notification handlers are never called from a scout model thread. If the scout model needs to be updated when handling notifications, a model job needs to be created for that task.
@Override
public void handleNotification(final MessageNotification notification) {
  ModelJobs.schedule(new IRunnable() {
    @Override
    public void run() throws Exception {
      UserNodePage userPage = getUserNodePage();
      String buddy = notification.getSenderName();

      if (userPage != null) {
        ChatForm form = userPage.getChatForm(buddy);
        if (form != null) {
          form.getHistoryField().addMessage(false, buddy, form.getUserName(), new Date(), notification.getMessage());
        }
      }
    }
  }, ModelJobs.newInput(ClientRunContexts.copyCurrent()));
}| Make sure to always run updates to the scout models in a model job (forms, pages, …): Use ModelJobs.schedule(…) where necessary in notification handlers. |
Webservices with JAX-WS
The Java API for XML-Based Web Services (JAX-WS) is a Java programming language API for creating web services. JAX-WS is one of the Java XML programming APIs, and is part of the Java EE platform.
Scout facilitates working with webservices, supports you in the generation of artifacts, and provides the following functionality:
42. Functionality
-
ready to go Maven profile for easy webservice stub and artifact generation
-
full JAX-WS 2.2 compliance
-
JAX-WS implementor independence
-
provides an up front port type EntryPoint to enforce for authentication, and to run web requests in a RunContext
-
adds cancellation support for on-going webservice requests
-
provides a port cache for webservice consumers
-
allows to participate in 2PC protocol for webservice consumers
-
allows to provide 'init parameters' to handlers
43. JAX-WS implementor and deployment
43.1. JAX-WS version and implementor
The JAX-WS Scout integration provides a thin layer on top of JAX-WS implementors to facilitate working with webservices. It depends on the JAX-WS 2.2.x API as specified in JSR 224. It is implementor neutral, and was tested with with the following implementations:
-
JAX-WS RI (reference implementation) as shipped with Java 7 and Java 8
-
JAX-WS METRO (2.2.10)
-
Apache CXF (3.1.3)
The integration does not require you to bundle the JAX-WS implementor with your application, which is a prerequisite for running in an EE container.
43.2. Running JAX-WS in a servlet container
A servlet container like Apache Tomcat typically does not ship with a JAX-WS implementor. As the actual implementor, you can either use JAX-WS RI as shipped with the JRE, or provide a separate implementor like JAX-WS METRO or Apache CXF in the form of a Maven dependency. However, JAX-WS RI does not provide a servlet based entry point, because the Servlet API is not part of the Java SE specification.
When publishing webservices, it therefore is easiest to ship with a separate implementor: Declare a respective Maven dependency in your webbapp project - that is the Maven module typically containing the application’s web.xml.
43.3. Running JAX-WS in a EE container
When running in an EE container, the container typically ships with a JAX-WS implementor. It is highly recommended to use that implementor, primarily to avoid classloading issues, and to further profit from the container’s monitoring and authentication facility. Refer to the containers documentation for more information.
43.4. Configure JAX-WS implementor
JAX-WS Scout integration is prepared to run with different implementors. Unfortunately, some implementors do not implement the JSR exactly, or some important functionality is missing in the JSR. To address this fact without loosing implementor independence, the delegate bean JaxWsImplementorSpecifics exists.
As of now, Scout ships with three such implementor specific classes, which are activated via config.properties by setting the property jaxws.implementor with its fully qualified class name. By default, JAX-WS METRO implementor is installed.
For instance, support for Apache CXF implementor is activated as following:
jaxws.implementor=org.eclipse.scout.rt.server.jaxws.implementor.JaxWsCxfSpecifics| class | description |
|---|---|
JaxWsRISpecifics |
implementor specifics for JAX-WS Reference Implementation (RI) as contained in JRE |
JaxWsMetroSpecifics |
implementor specifics for JAX-WS METRO implementation |
JaxWsCxfSpecifics |
implementor specifics for Apache JAX-WS CXF implementation |
Of course, other implementors can be used as well. For that to work, install your own JaxWsImplementorSpecifics class, and reference its fully qualified name in config.properties.
43.4.1. JaxWsImplementorSpecifics
This class encapsulates functionality that is defined in JAX-WS JSR 224, but may diverge among JAX-WS implementors. As of now, the following points are addressed:
-
missing support in JSR to set socket connect and read timeout;
-
proprietary 'property' to set response code in Apache CXF;
-
when working with Apache CXF, response header must be set directly onto Servlet Response, and not via
MessageContext; -
when working with JAX-WS METRO or JAX-WS RI, the handler’s return value is ignored in one-way communication; instead, the chain must be exited by throwing a webservice exception;
Learn more about how to configure a JAX-WS implementor: Configure JAX-WS implementor
43.4.2. Configure JAX-WS Maven dependency in pom.xml
The effective dependency to the JAX-WS implementor is to be specified in the pom.xml of the webapp module (not the server module). That allows for running with a different implementor depending on the environment, e.g. to provide the implementor yourself when starting the application from within your IDE in Jetty, or to use the container’s implementor when deploying to an EE enabled application server. Even if providing the very same implementor for all environments yourself, it is good practice to do the configuration in the webapp module.
A generally applicable configuration cannot be given, because the effective configuration depends on the implementor you choose, and whether it is already shipped with the application server you use. However, if JAX-WS RI is sufficient, you do not have to specify an implementor at all because already contained in JRE.
If running in an EE application server, refer to the containers documentation for more information.
maven Listing provides sample configuration for shipping with JAX_WS METRO and maven Listing does the same for Apache CXF
<!-- JAX-WS METRO not bundled with JRE -->
<dependency>
  <groupId>com.sun.xml.ws</groupId>
  <artifactId>jaxws-rt</artifactId>
  <version>...</version>
</dependency><!-- JAX-WS Apache CXF -->
<dependency>
<groupId>org.apache.cxf</groupId>
<artifactId>cxf-rt-frontend-jaxws</artifactId>
<version>...</version>
</dependency>
<dependency>
<groupId>org.apache.cxf</groupId>
<artifactId>cxf-rt-transports-http</artifactId>
<version>...</version>
</dependency>
<dependency>
<groupId>org.springframework</groupId>
<artifactId>spring-web</artifactId>
<version>...</version>
</dependency>43.4.3. Configure JAX-WS servlet in web.xml
This section describes the configuration of the entry point Servlet to publish webservices. If working with webservice consumers only, no configuration is required.
Similar to the pom.xml as described in Configure JAX-WS Maven dependency in pom.xml, the web.xml differs from implementor to implementor, and whether the implementor is already shipped with the application server. Nevertheless, the following web.xml Listing show a sample configuration for JAX-WS METRO and web.xml Listing for Apache CXF.
<!-- JAX-WS METRO not bundled with JRE -->
<context-param>
  <param-name>com.sun.xml.ws.server.http.publishStatusPage</param-name>
  <param-value>true</param-value>
</context-param>
<context-param>
  <param-name>com.sun.xml.ws.server.http.publishWSDL</param-name>
  <param-value>true</param-value>
</context-param>
<listener>
  <listener-class>com.sun.xml.ws.transport.http.servlet.WSServletContextListener</listener-class>
</listener>
<servlet>
  <servlet-name>jaxws</servlet-name>
  <servlet-class>com.sun.xml.ws.transport.http.servlet.WSServlet</servlet-class>
</servlet>
<servlet-mapping>
  <servlet-name>jaxws</servlet-name>
  <url-pattern>/jaxws/*</url-pattern> (1)
</servlet-mapping>| 1 | the base URL where to publish the webservice endpoints |
<!-- JAX-WS Apache CXF -->
<servlet>
  <display-name>CXF Servlet</display-name>
  <servlet-name>jaxws</servlet-name>
  <servlet-class>org.apache.cxf.transport.servlet.CXFServlet</servlet-class>
  <init-param>
    <param-name>config-location</param-name>
    <param-value>/WEB-INF/cxf-jaxws.xml</param-value> (1)
  </init-param>
  <load-on-startup>1</load-on-startup>
</servlet>
<servlet-mapping>
  <servlet-name>jaxws</servlet-name>
  <url-pattern>/jaxws/*</url-pattern> (2)
</servlet-mapping>| 1 | Apache CXF specific configuration file for endpoints to be published. See Apache CXF for more information. |
| 2 | the base URL where to publish the webservice endpoints |
But, if running in an EE container, it is most likely that a Servlet configuration must not be configured, because the endpoints are discovered by the application server, or registered in a vendor specific way. Refer to the containers documentation for more information.
| Some application servers like Oracle WebLogic Server (WLS) allow the port types to be registered as a Servlet in web.xml. However, this is vendor specific, and works despite the fact that port type does not implement 'javax.servlet.Servlet'. |
| Do not forget to exclude the webservice’s Servlet URL pattern from authentication filter. |
44. Modularization
Scout JAX-WS integration does not prescribe how to organize your webservices in terms of Maven modules. You could either put all your webservices directly into the server module, or create a separate jaxws module containing all webservices, or even create a separate jaxws module for each webservice. Most often, the second approach of a single, separate jaxws module, which the server module depends on, is chosen.
This is mainly because of the following benefits:
-
annotation processing must not be enabled for the entire server module
-
one module to build all webservice artifacts at once
-
easier to work with shared element types among webservices
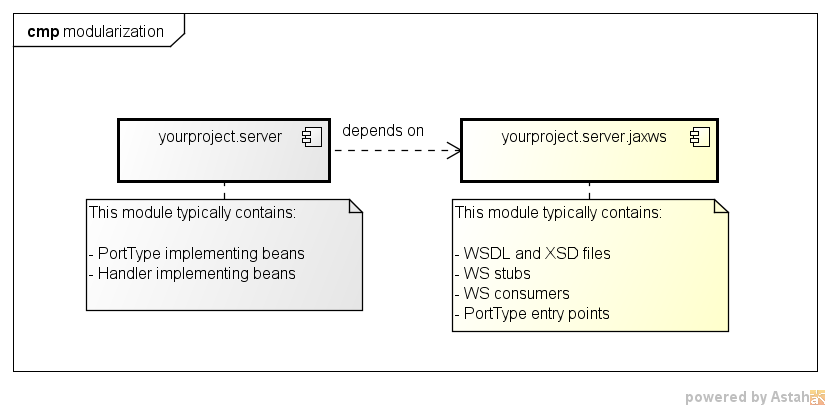
It is important to note, that the server depends on the jaxws module, and not vice versa. The jaxws module is primarily of technical nature, meaning that it knows how to generate its WS artifacts, and also contains those. However, implementing port type beans and even implementing handler beans are typically put into the server module to the access service and database layer. On the other hand, WS clients may be put into jaxws module, because they rarely contain any project specific business logic.
You may ask yourself, how the jaxws module can access the implementing port type and handlers located in the server module. That works because of the indirection via bean manager, and because there is a flat classpath at runtime.
See The concept of an Entry Point for more information.
45. Build webservice stubs and artifacts
45.1. Configure webservice stub generation via wsimport
The Maven plugin 'org.codehaus.mojo:jaxws-maven-plugin' with the goal 'wsimport' is used to generate a webservice stub from a WSDL file and its referenced XSD schema files. If your Maven module inherits from the Scout module 'maven_rt_plugin_config-master', the 'jaxws' profile is available, which activates automatically upon the presence of a 'WEB-INF/wsdl' folder. Instead of inheriting from that module, you can alternatively copy the 'jaxws' profile into your projects parent POM module.
This profile is for convenience purpose, and provides a ready-to-go configuration to generate webservice stubs and webservice provider artifacts. It configures the 'jaxws-maven-plugin' to look for WSDL and XSD files in the folder 'src/main/resources/WEB-INF/wsdl', and for binding files in the folder '/src/main/resources/WEB-INF/binding'. Upon generation, the stub will be put into the folder 'target/generated-sources/wsimport'.
The profiles requires the Scout runtime version to be specified, and which is used to refer to org.eclipse.scout.jaxws.apt module to generate webservice provider artifacts. However, this version is typically defined in pom.xml of the parent module, because also used to refer to other Scout runtime artifacts.
<properties>
  <org.eclipse.scout.rt.version>5.2.0-SNAPSHOT</org.eclipse.scout.rt.version>
</properties>
If your project design envisions a separate JAR module per WSDL, you simply have to set the property 'jaxws.wsdl.file' with the name of your WSDL file in the module’s pom.xml (example in Listing).
<properties>
  <jaxws.wsdl.file>YourWebService.wsdl</jaxws.wsdl.file> (1)
</properties>| 1 | name of the wsdl file |
Otherwise, if having multiple WSDL files in your JAR module, some little more configuration is required, namely a respective execution section per WSDL file.
Thereby, the 'id' of the execution section must be unique.
Scout 'jaxws' profile already provides one such section, which is used to generate the stub for a single WSDL file (see such configuration in Listing), and names it 'wsimport-1'.
It is simplest to name the subsequent execution sections 'wsimport-2', 'wsimport-3', and so on.
For each execution section, you must configure its unique id, the goal 'wsimport', and in the configuration section the respective wsdlLocation and wsdlFile.
For 'wsimport' to work, wsdlLocation is not required.
However, that location will be referenced in generated artifacts to set the wsdl location via @WebService and @WebServiceClient.
The complete configuration is presented in Listing.
If you decide to configure multiple WSDL files in your POM as described in Listing, the configuration defined in the parent POM (maven_rt_plugin_config-master) and expecting a configuration as presented in Listing needs to be overridden, therefore one of your execution id needs to be wsimport-1.
|
<build>
  <plugins>
    <plugin>
      <groupId>org.codehaus.mojo</groupId>
      <artifactId>jaxws-maven-plugin</artifactId>
      <executions>
        <!-- YourFirstWebService.wsdl -->
        <execution> (1)
          <!-- DO NOT CHANGE THE ID: 'wsimport-1';
               it overrides an execution defined in the parent pom -->
          <id>wsimport-1</id> (2)
          <goals>
            <goal>wsimport</goal> (3)
          </goals>
          <configuration>
            <wsdlLocation>WEB-INF/wsdl/YourFirstWebService.wsdl</wsdlLocation> (4)
            <wsdlFiles>
              <wsdlFile>YourFirstWebService.wsdl</wsdlFile> (5)
            </wsdlFiles>
          </configuration>
        </execution>

        <!-- YourSecondWebService.wsdl -->
        <execution> (6)
          <id>wsimport-2</id>
          <goals>
            <goal>wsimport</goal>
          </goals>
          <configuration>
            <wsdlLocation>WEB-INF/wsdl/YourSecondWebService.wsdl</wsdlLocation>
            <wsdlFiles>
              <wsdlFile>YourSecondWebService.wsdl</wsdlFile>
            </wsdlFiles>
          </configuration>
        </execution>

        ...

      </executions>
    </plugin>
  </plugins>
</build>| 1 | declare an execution section for each WSDL file |
| 2 | give the section a unique id (wsimport-1, wsimport-2, wsimport-3, …) |
| 3 | specify the goal 'wsimport' to build the webservice stub |
| 4 | specify the project relative path to the WSDL file |
| 5 | specify the relative path to the WSDL file (relative to 'WEB-INF/wsdl') |
| 6 | declare an execution section for the next WSDL file |
Further, you can overwrite any configuration as defined by 'jaxws-maven-plugin'. See http://www.mojohaus.org/jaxws-maven-plugin/ for supported configuration properties.
Also, it is good practice to create a separate folder for each WSDL file, which also contains all its referenced XSD schemas. Then, do not forget to change the properties wsdlLocation and wsdlFile accordingly.
45.2. Customize WSDL components and XSD schema elements via binding files
By default, all XML files contained in folder 'WEB-INF/binding' are used as binding files. But, most often, you will have a global binding file, which applies to all your WSDL files, and some custom binding files different per WSDL file and XSD schema files. See how to explicitly configure binding files in Listing.
<!-- YourFirstWebService.wsdl -->
<execution>
  ...
  <configuration>
    ...
    <bindingFiles>
      <bindingFile>global-bindings.xml</bindingFile> (1)
      <bindingFile>your-first-webservice-ws-bindings.xml</bindingFile> (2)
      <bindingFile>your-first-webservice-xs-bindings.xml</bindingFile> (3)
    </bindingFiles>
  </configuration>
</execution>

<!-- YourSecondWebService.wsdl -->
<execution>
  ...
  <configuration>
    ...
    <bindingFiles>
      <bindingFile>global-bindings.xml</bindingFile> (1)
      <bindingFile>your-second-webservice-ws-bindings.xml</bindingFile> (2)
      <bindingFile>your-second-webservice-xs-bindings.xml</bindingFile> (3)
    </bindingFiles>
  </configuration>
</execution>| 1 | global binding file which applies to all XSD schema elements. See global binding file Listing for an example. |
| 2 | custom binding file to customize the webservice’s WSDL components in the namespace http://java.sun.com/xml/ns/jaxws. See WS binding File Listing for an example. |
| 3 | custom binding file to customize the webservice’s XSD schema elements in the namespace http://java.sun.com/xml/ns/jaxb. See XS binding File Listing for an example. |
With binding files in place, you can customize almost every WSDL component and XSD element that can be mapped to Java, such as the service endpoint interface class, packages, method name, parameter name, exception class, etc.
The global binding file typically contains some customization for common data types like java.util.Date or java.util.Calendar, whereas the custom binding files are specific for a WSDL or XSD schema. See XML adapters to work with java.util.Date and java.util.Calendar.
<bindings version="2.0"
  xmlns="http://java.sun.com/xml/ns/jaxb"
  xmlns:xsd="http://www.w3.org/2001/XMLSchema"
  xmlns:xjc="http://java.sun.com/xml/ns/jaxb/xjc">
  <globalBindings>
    <xjc:javaType
      name="java.util.Date"
      xmlType="xsd:date"
      adapter="org.eclipse.scout.rt.server.jaxws.adapter.UtcDateAdapter" />
    <xjc:javaType
      name="java.util.Date"
      xmlType="xsd:time"
      adapter="org.eclipse.scout.rt.server.jaxws.adapter.UtcTimeAdapter" />
    <xjc:javaType
      name="java.util.Date"
      xmlType="xsd:dateTime"
      adapter="org.eclipse.scout.rt.server.jaxws.adapter.UtcDateTimeAdapter" />
  </globalBindings>
</bindings>
By default, generated artifacts are put into the package corresponding to the element’s namespace. Sometimes, you like to control the package names, but you want to do that on a per-namespace basis, and not put all the artifacts of a webservice into the very same package. That is mainly to omit collisions, and to have artifacts shared among webservices not duplicated.
Two separate binding files are required to customize WSDL components and XSD schema elements.
That is because WSDL component customization is to be done in 'jaxws' namespace http://java.sun.com/xml/ns/jaxws, whereas XSD schema element customization in 'jaxb' namespace http://java.sun.com/xml/ns/jaxb.
<!-- binding to customize webservice components (xmlns=http://java.sun.com/xml/ns/jaxws) -->
<bindings xmlns="http://java.sun.com/xml/ns/jaxws"> (1)
    <package name="org.eclipse.ws.yourfirstwebservice"/> (2)
</bindings>| 1 | customization via jaxws namespace: http://java.sun.com/xml/ns/jaxws |
| 2 | instructs to put all webservice components (port type, service) into package org.eclipse.ws.yourfirstwebservice |
<!-- binding to customize xsd schema elements (xmlns=http://java.sun.com/xml/ns/jaxb) -->
<bindings xmlns="http://java.sun.com/xml/ns/jaxb" version="2.1"> (1)
  <!-- namespace http://eclipse.org/public/services/ws/soap  -->
  <bindings scd="x-schema::tns" xmlns:tns="http://eclipse.org/public/services/ws/soap">
    <schemaBindings>
      <package name="org.eclipse.ws.yourfirstwebservice" /> (2)
    </schemaBindings>
  </bindings>

  <!-- namespace http://eclipse.org/public/services/ws/common/soap -->
  <bindings scd="x-schema::tns" xmlns:tns="http://eclipse.org/public/services/ws/common/soap">
    <schemaBindings>
      <package name="org.eclipse.ws.common" /> (3)
    </schemaBindings>
  </bindings>
</bindings>| 1 | customization via jaxb namespace: http://java.sun.com/xml/ns/jaxb |
| 2 | instructs to put all XSD schema elements in namespace http://eclipse.org/public/services/ws/soap into package org.eclipse.ws.yourfirstwebservice |
| 3 | instructs to put all XSD schema elements in namespace http://eclipse.org/public/services/ws/common/soap into package org.eclipse.ws.common |
| wsimport allows to directly configure the package name for files to be generated (packageName). However, this is discouraged, because all artifacts are put into the very same package. Use package customization on a per-namespace basis instead. |
| For shared webservice artifacts, you can also use XJC binding compiler to generate those artifacts in advance, and then provide the resulting episode binding file (META-INF/sun-jaxb.episode) to wsimport. See http://www.mojohaus.org/jaxb2-maven-plugin/Documentation/v2.2/xjc-mojo.html for more information. |
45.3. Annotation Processing Tool (APT)
Annotation Processing (APT) is a tool which can be enabled to fire for annotated types during compilation. In JAX-WS Scout integration, it is used as a trigger to generate webservice port type implementations. Such an auto-generated port type implementation is called an entry point. It is to be published as the webservice’s endpoint, and acts as an interceptor for webservice requests. It optionally enforces for authentication, and makes the request to be executed in a RunContext. Then, it handles the web request to the effectively implementing port type bean for actual processing.
The entry point generated simplifies the actual port type implementation by removing lot of glue code to be written by hand otherwise. Of course, this entry point is just for convenience purpose, and it is up to you to make use of this artifact.
When using 'jaxws' Scout Maven profile, annotation processing is enabled for that module by default. But, an entry point for a webservice port type will only be generated if enabled for that port type, meaning that a class annotated with WebServiceEntryPoint pointing to that very endpoint interface is found in this module. Anyway, for a sole webservice consumer, it makes no sense to generate an entry point at all.
45.3.1. Enable Annotation Processing Tool (APT) in Eclipse IDE
In Eclipse IDE, the workspace build ignores annotation processing as configured in pom.xml. Instead, it must be enabled separately with the following files. Nevertheless, to simply run Maven build with annotation support from within Eclipse IDE, those files are not required.
file |
description |
Enables APT for this module via the property org.eclipse.jdt.core.compiler.processAnnotations=enabled |
|
Enables APT for this module via the property org.eclipse.jdt.apt.aptEnabled=true |
|
Specifies the annotation processor to be used (JaxWsAnnotationProcessor) and dependent artifacts |
45.4. Build webservice stubs and APT artifacts from console
Simply run mvn clean compile on the project. If you are experiencing some problems, run with -X debug flag to get a more detailed error message.
45.5. Build webservice stubs and APT artifacts from within Eclipse IDE
In the Eclipse IDE, there are three ways to generate webservice stubs and APT artifacts.
-
the implicit way on behalf of the workspace build and m2e integration (automatically, but sometimes not reliable)
-
the explicit but potentially slow way by doing a 'Update Maven Project' with 'clean projects' checked (Alt+F5)
-
the explicit and faster way by running a Maven build for that project. Thereto, right-click on the project or pom.xml, then select the menu 'Run As | Maven build…', then choose 'clean compile' as its goal and check 'Resolve workspace artifacts', and finally click 'Run'. Afterwards, do not forget to refresh the project by pressing F5.
If the webservice stub(s) or APT artifacts are not generated (anew or at all), delete the target folder manually, and continue according to procedure number three. A possible reason might be the presence of 'target\jaxws\wsartifact-hash'. Then, for each webservice, a 'hash file' is computed by 'wsimport', so that regeneration only occurs upon a change of WSDL or XSD files.
45.6. Exclude derived resources from version control
Stub and APT artifacts are derived resources, and should be excluded from version control. When working with Eclipse IDE, this is done automatically by eGit, because it adds derived resources to .gitignore (if configured to do so).
45.7. JaxWsAnnotationProcessor
JaxWsAnnotationProcessor is an annotation processor provided by Scout JAX-WS integration to generate an entry point for an endpoint interface during compilation. The instructions how to generate the entry point is given via a Java class or Java interface annotated with WebServiceEntryPoint annotation.
46. Provide a webservice
In this chapter, you will learn how to publish a webservice provider via an entry point.
46.1. The concept of an Entry Point
An entry point implements the endpoint interface (or port type interface), and is published as the webservice endpoint for that endpoint interface. The entry point itself is auto generated by JaxWsAnnotationProcessor during compile time, based on instructions as given by the respective class/interface annotated with WebServiceEntryPoint annotation. The entry point is responsible to enforce authentication and to run the web request in a RunContext. In turn, the request is propagated to the bean implementing the endpoint interface.
Interaction of entry point and port type illustrates the endpoint’s class hierarchy and the message flow for a web request.
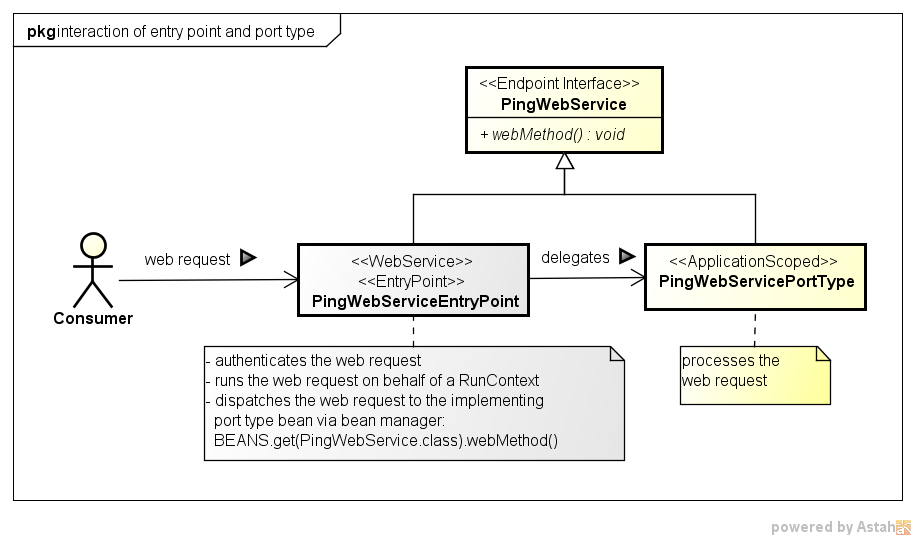
As you can see, both, entry point and port type implement the endpoint interface. But it is the entry point which is actually installed as the webservice endpoint, and which receives web requests. However, the webservice itself is implemented in the implementing bean, which typically is located in server module. See Modularization for more information. Upon a web request, the entry point simply intercepts the web request, and then invokes the web method on the implementing bean for further processing.
See an example of an implementing port type bean, which is invoked by entry point.
Do not forget to annotate the implementing bean with ApplicationScoped annotation in order to be found by bean manager.
|
46.2. Generate an Entry Point as an endpoint interface
This section describes the steps required to generate an entry point. For demonstration purposes, a simple ping webservice is used, which provides a single method 'ping' to accept and return a String object.
See the WSDL file of ping webservice: PingWebService.wsdl
See the endpoint interface of ping webservice: PingWebServicePortType.java
To generate an entry point for the webservice’s endpoint interface, create an interface as following in your jaxws project.
@WebServiceEntryPoint(endpointInterface = PingWebServicePortType.class) (2)
interface PingWebServiceEntryPointDefinition { (1)
}| 1 | Create an interface or class to act as an anchor for the WebServiceEntryPoint annotation. This class or interface has no special meaning, except that it declares the annotation to be interpreted by annotation processor. |
| 2 | Reference the endpoint interface for which an entry point should be generated for. Typically, the endpoint interface is generated by 'wsimport' and is annotated with WebService annotation. |
It is important to understand, that the interface PingWebServiceEntryPointDefinition solely acts as the anchor for the WebServiceEntryPoint annotation. This class or interface has no special meaning, except that it declares the annotation to be interpreted by annotation processor. Typically, this class is called Entry Point Definition.
If running mvn clean compile, an entry point is generated for that endpoint interface.
See the entry point as generated for ping webservice: PingWebServicePortTypeEntryPoint.java
If you should experience some problems in the entry point generation, refer to Build webservice stubs and APT artifacts from within Eclipse IDE, or Build webservice stubs and APT artifacts from console.
46.3. Instrument the Entry Point generation
This section gives an overview on how to configure the entry point to be generated.
| attribute | description |
|---|---|
endpointInterface |
Specifies the endpoint interface for which to generate an entry point for. |
entryPointName |
Specifies the class name of the entry point generated. If not set, the name is like the name of the endpoint interface suffixed with EntryPoint. |
entryPointPackage |
Specifies the package name of the entry point generated. If not set, the package name is the same as of the element declaring this WebServiceEntryPoint annotation. |
serviceName |
Specifies the service name as declared in the WSDL file, and must be set if publishing the webservice via auto discovery in an EE container. Both, 'serviceName' and 'portName' uniquely identify a webservice endpoint to be published. |
portName |
Specifies the name of the port as declared in the WSDL file, and must be set if publishing the webservice via auto discovery in an EE container. Both, 'serviceName' and 'portName' uniquely identify a webservice endpoint to be published. |
wsdlLocation |
Specifies the location of the WSDL document. If not set, the location is derived from WebServiceClient annotation which is typically initialized with the 'wsdlLocation' as provided to 'wsimport'. |
authentication |
Specifies the authentication mechanism to be installed, and in which |
handlerChain |
Specifies the handlers to be installed. The order of the handlers is as declared. A handler is looked up as a bean, and must implement |
Besides the instructions which can be set via WebServiceEntryPoint annotation, it is further possible to contribute other annotations to the entry point. Simply declare the annotation of your choice as a sibling annotation to WebServiceEntryPoint annotation. In turn, this annotation will be added to the entry point as well. This may be useful to enable some vendor specific features, or e.g. to enable MTOM to efficiently send binary data to a client.
That also applies for WebService annotation to overwrite values as declared in the WSDL file.
Further, you can also provide your own handler chain binding file. However, handlers and authentication as declared via WebServiceEntryPoint annotation are ignored then.
| Handlers registered via handlerChain must be beans, meaning either annotated with @Bean or @ApplicationScoped. |
| The binding to the concrete endpoint is done via 'endpointInterface' attribute. If a WSDL declares multiple services, create a separate entry point definition for each service to be published. |
| Annotate the Entry Point Definition class with `IgnoreWebServiceEntryPoint' to not generate an entry point for that definition. This is primarily used while developing an entry point, or for documenting purpose. |
Some fields require you to provide a Java class. Such fields are mostly of the annotation type Clazz, which accepts either the concrete Class, or its 'fully qualified name'. Use the latter if the class is not visible from within jaxws module.However, if ever possible specify a Class. Because most classes are looked up via bean manager, this can be achieved with an interface located in 'jaxws' module, but with an implementation in 'server' module.
|
46.3.1. Configure Authentication
The field 'authentication' on WebServiceEntryPoint configures what authentication mechanism to install on the webservice endpoint, and in which RunContext to run authenticated webservice requests. It consists of the Authentication Method to challenge the client to provide credentials, and the Credential Verifier to verify request’s credentials against a data source.
By default, authentication is disabled. If enabled, an AuthenticationHandler is generated and registered in the handler chain as very first handler. The position can be changed via order field on Authentication annotation.
The following properties can be set.
method |
Specifies the authentication method to be used to challenge the client to provide credentials. By default, |
verifier |
Specifies against which data source credentials are to be verified. By default, |
order |
Specifies the position where to register the authentication handler in the handler chain. By default, it is registered as the very first handler. |
principalProducer |
Indicates the principal producer to use to create principals to represent authenticated users. By default, SimplePrincipalProducer is used. |
runContextProducer |
Indicates which RunContext to use to run authenticated webservice requests. By default, |
| If using container based authentication (authentication enforced by the application server), use ContainerBasedAuthenticationMethod as authentication method, and do not configure a credential verifier. |
46.4. Example of an Entry Point definition
@WebServiceEntryPoint(
    endpointInterface = PingWebServicePortType.class, (1)
    entryPointName = "PingWebServiceEntryPoint",
    entryPointPackage = "org.eclipse.scout.docs.ws.ping",
    serviceName = "PingWebService",
    portName = "PingWebServicePort",
    handlerChain = {(2)
        @Handler(@Clazz(CorrelationIdHandler.class)), (3)
        @Handler(value = @Clazz(IPAddressFilter.class) , initParams = { (4)
            @InitParam(key = "rangeFrom", value = "192.200.0.0"),
            @InitParam(key = "rangeTo", value = "192.255.0.0")}),
        @Handler(@Clazz(LogHandler.class)), (5)
    },
    authentication = @Authentication( (6)
        order = 2, (7)
        method = @Clazz(BasicAuthenticationMethod.class) , (8)
        verifier = @Clazz(ConfigFileCredentialVerifier.class) ) ) (9)
@MTOM (10)| 1 | References the endpoint interface for which to generate an entry point for. |
| 2 | Declares the handlers to be installed on that entry point. The order is as declared. |
| 3 | Registers the 'CorrelationIdHandler' as the first handler to set a correlation ID onto the current message context. See Propagate state among Handlers and port type for more information about state propagation. |
| 4 | Registers the 'IpAddressFilter' as the second handler to filter for IP addresses. Also, this handler is parameterized with 'init params' to configure the valid IP range. |
| 5 | Registers the LogHandler as the third handler to log SOAP messages. |
| 6 | Configures the webservice’s authentication. |
| 7 | Configures the 'AuthHandler' to be put at position 2 (0-based), meaning in between of IpAddressFilter and LogHandler. By default, AuthHandler would be the very first handler in the handler chain. |
| 8 | Configures to use BASIC AUTH as authentication method. |
| 9 | Configures to verify user’s credentials against 'config.properties' file. |
| 10 | Specification of an MTOM annotation to be added to the entry point. |
This configuration generates the following artifacts:
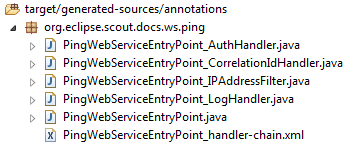
All artifacts are generated into the package 'org.eclipse.scout.docs.ws.ping', as specified by the definition. The entry point itself is generated into 'PingWebServiceEntryPoint.java'. Further, for each handler, a respective handler delegate is generated. That allows handlers to be looked up via bean manager, and to run the handlers on behalf of a RunContext. Also, an AuthHandler is generated to authenticate web requests as configured.
The handler-chain XML file generated looks as following. As specified, the authentication handler is installed as the third handler.
<handler-chains xmlns="http://java.sun.com/xml/ns/javaee">
  <handler-chain>
    <!-- Executed as 4. handler-->
    <handler>
      <handler-class>org.eclipse.scout.docs.ws.ping.PingWebServiceEntryPoint_LogHandler</handler-class>
    </handler>
  </handler-chain>
  <handler-chain>
    <!-- Executed as 3. handler-->
    <handler>
      <handler-class>org.eclipse.scout.docs.ws.ping.PingWebServiceEntryPoint_AuthHandler</handler-class>
    </handler>
  </handler-chain>
  <handler-chain>
    <!-- Executed as 2. handler-->
    <handler>
      <handler-class>org.eclipse.scout.docs.ws.ping.PingWebServiceEntryPoint_IPAddressFilter</handler-class>
    </handler>
  </handler-chain>
  <handler-chain>
    <!-- Executed as 1. handler-->
    <handler>
      <handler-class>org.eclipse.scout.docs.ws.ping.PingWebServiceEntryPoint_CorrelationIdHandler</handler-class>
    </handler>
  </handler-chain>
</handler-chains>
The following listing shows the beginning of the entry point generated. As you can see, the handler-chain XML file is referenced via HandlerChain annotation, and the MTOM annotation was added as well.
@WebService(name = "PingWebServicePortType",
    targetNamespace = "http://scout.eclipse.org/docs/ws/PingWebService/",
    endpointInterface = "org.eclipse.scout.docs.snippets.JaxWsSnippet.PingWebServicePortType",
    serviceName = "PingWebService",
    portName = "PingWebServicePort")
@MTOM
@HandlerChain(file = "PingWebServiceEntryPoint_handler-chain.xml")
public class PingWebServiceEntryPoint implements org.eclipse.scout.docs.snippets.JaxWsSnippet.PingWebServicePortType {
46.5. Configure JAX-WS Handlers
See listing for an example of how to configure JAX-WS handlers.
JAX-WS handlers are configured directly on the entry point definition via the array field handlerChain. In turn, JaxWsAnnotationProcessor generates a 'handler XML file' with the handler’s order preserved, and which is registered in entry point via annotation handlerChain.
A handler can be initialized with static 'init parameters', which will be injected into the handler instance. For the injection to work, declare a member of the type Map in the handler class, and annotate it with javax.annotation.Resource annotation.
Because handlers are looked up via bean manager, a handler must be annotated with ApplicationScoped annotation.
If a handler requires to be run in a RunContext, annotate the handler with RunWithRunContext annotation, and optionally specify a RunContextProducer. If the web request is authenticated upon entering the handler, the RunContext is run on behalf of the authenticated user. Otherwise, if not authenticated yet, it is invoked with the Subject as configured in jaxws.provider.user.handler config property.
@ApplicationScoped (1)
@RunWithRunContext (2)
public class IPAddressFilter implements SOAPHandler<SOAPMessageContext> {

  @Resource
  private Map<String, String> m_initParams; (3)

  @Override
  public boolean handleMessage(SOAPMessageContext context) {
    String rangeForm = m_initParams.get("rangeFrom"); (4)
    String rangeTo = m_initParams.get("rangeTo");
    // ...
    return true;
  }

  @Override
  public boolean handleFault(SOAPMessageContext context) {
    return true;
  }

  @Override
  public Set<QName> getHeaders() {
    return Collections.emptySet();
  }

  @Override
  public void close(MessageContext context) {
  }
}| 1 | Annotate the Handler with ApplicationScoped annotation, so it can be looked up via bean manager |
| 2 | Optionally annotate the Handler with RunWithRunContext annotation, so the handler is invoked in a RunContext |
| 3 | Declare a Map member annotated with Resource annotation to make injection of 'init parameters' work |
| 4 | Access injected 'init parameters' |
46.6. Propagate state among Handlers and port type
Sometimes it is useful to share state among handlers, and even with the port type. This can be done via javax.xml.ws.handler.MessageContext. By default, a property put onto message context is only available in the handler chain. To make it available to the port type as well, set its scope to 'APPLICATION' accordingly.
The following listings gives an example of how to propagate state among handlers and port type.
@ApplicationScoped
public class CorrelationIdHandler implements SOAPHandler<SOAPMessageContext> {

  @Override
  public boolean handleMessage(SOAPMessageContext context) {
    context.put("cid", UUID.randomUUID().toString()); (1)
    context.setScope("cid", Scope.APPLICATION); (2)
    return true;
  }

  @Override
  public boolean handleFault(SOAPMessageContext context) {
    return true;
  }

  @Override
  public Set<QName> getHeaders() {
    return Collections.emptySet();
  }

  @Override
  public void close(MessageContext context) {
  }
}| 1 | Put the 'correlation ID' onto message context. |
| 2 | Set scope to APPLICATION to be accessible in port type. By default, the scope if HANDLER only. |
@ApplicationScoped
public class CorrelationIdLogger implements SOAPHandler<SOAPMessageContext> {

  @Override
  public boolean handleMessage(SOAPMessageContext context) {
    String correlationId = (String) context.get("cid"); (1)
    // ...
    return true;
  }

  @Override
  public boolean handleFault(SOAPMessageContext context) {
    return true;
  }

  @Override
  public void close(MessageContext context) {
  }

  @Override
  public Set<QName> getHeaders() {
    return Collections.emptySet();
  }
}| 1 | Get the 'correlation ID' from message context. |
@ApplicationScoped
public class CorrelationIdPortType implements PingWebServicePortType {

  @Override
  public String ping(String ping) {
    MessageContext currentMsgCtx = IWebServiceContext.CURRENT.get().getMessageContext(); (1)
    String correlationId = (String) currentMsgCtx.get("cid"); (2)
    // ...
    return ping;
  }
}| 1 | Get the current message context via thread local IWebServiceContext |
| 2 | Get the 'correlation ID' from message context. |
46.7. JAX-WS Correlation ID Propagation
Scout’s JAX-WS integration already provides complete support for reading a correlation ID from the HTTP header named X-Scout-Correlation-Id of the incoming web service request and propagates it to the RunContext that executes the actual service operation. A new correlation ID is created if the HTTP header is empty or missing.
| The CorrelationIdHandler example above just illustrates the capabilities of a SOAPHandler. |
| You have to implement your own handler if the consumer provides a correlation ID in another header parameter or as part of the request’s payload. |
@WebServiceEntryPoint(
    endpointInterface = PingWebServicePortType.class,
    entryPointName = "PingWebServiceEntryPoint",
    entryPointPackage = "org.eclipse.scout.docs.ws.ping2",
    serviceName = "PingWebService",
    portName = "PingWebServicePort",
    handlerChain = {
        @Handler(@Clazz(WsProviderCorrelationIdHandler.class)), (1)
        @Handler(@Clazz(LogHandler.class)),
    },
    authentication = @Authentication(
        method = @Clazz(BasicAuthenticationMethod.class) ,
verifier = @Clazz(ConfigFileCredentialVerifier.class) ) )| 1 | Add the correlation ID handler at the beginning of the handler chain to ensure that all handlers can use its value (especially the LogHandler has to be added after the correlation ID handler). |
46.8. Registration of webservice endpoints
The registration of webservice endpoints depends on the implementor you use, and whether you are running in an EE container with webservice auto discovery enabled.
When running in an EE container, webservice providers are typically found by their presence. In order to be found, such webservice providers must be annotated with WebService annotation, and must have the coordinates 'serviceName' and 'portName' set. Still, most application servers allow for manual registration as well. E.g. if using Oracle WebLogic Server (WLS), endpoints to be published can be registered directly in 'web.xml' as a Servlet. However, this is vendor specific. Refer to the container’s documentation for more information.
If not running in an EE container, the registration is implementor specific. In the following, an example for JAX-WS METRO and Apache CXF is given.
46.8.1. JAX-WS METRO
During startup, JAX-WS METRO looks for the file '/WEB-INF/sun-jaxws.xml', which contains the endpoint definitions.
<jws:endpoints xmlns:jws="http://java.sun.com/xml/ns/jax-ws/ri/runtime" version="2.0">

  <!-- PingWebService -->
  <jws:endpoint
      name="PingService"
      implementation="org.eclipse.scout.docs.ws.ping.PingWebServiceEntryPoint"
      service="{http://scout.eclipse.org/docs/ws/PingWebService/}PingWebService"
      port="{http://scout.eclipse.org/docs/ws/PingWebService/}PingWebServiceSOAP"
      url-pattern="/jaxws/PingWebService"/>
</jws:endpoints>
46.8.2. Apache CXF
During startup, Apache CXF looks for the config file as specified in 'web.xml' via 'config-location'. See web.xml Listing for more information.
<beans xmlns="http://www.springframework.org/schema/beans"
  xmlns:xsi="http://www.w3.org/2001/XMLSchema-instance"
  xmlns:jaxws="http://cxf.apache.org/jaxws"
  xsi:schemaLocation=" http://www.springframework.org/schema/beans
    http://www.springframework.org/schema/beans/spring-beans.xsd
    http://cxf.apache.org/jaxws http://cxf.apache.org/schemas/jaxws.xsd">
  <import resource="classpath:META-INF/cxf/cxf.xml" />

  <!-- PingWebService -->
  <jaxws:endpoint id="PingWebService"
    implementor="org.eclipse.scout.docs.ws.ping.PingWebServiceEntryPoint"
    address="/PingWebService" />
</beans>| As the webservice endpoint, specify the fully qualified name to the entry point, and not to the implementing port type. |
|
Depending on the implementor, a HTML page may be provided to see all webservices published. For JAX-WS METRO, enter the URL to a concrete webservice, e.g. http://localhost:8080/jaxws/PingWebService. For Apache CXF, enter the base URL where the webservices are published, e.g. http://localhost:8080/jaxws. |
47. Consume a webservice
Communication with a webservice endpoint is done based on the webservice’s port generated by 'wsimport'. Learn more how to generate a webservice stub from a WSDL file.
To interact with a webservice endpoint, create a concrete 'WebServiceClient' class which extends from AbstractWebServiceClient, and specify the endpoint’s coordinates ('service' and 'port') via its bounded type parameters.
public class PingWebServiceClient extends AbstractWebServiceClient<PingWebService, PingWebServicePortType> { (1)
}| 1 | Specify 'service' and 'port' via bounded type parameters |
A WS-Client can be configured with some default values like the endpoint URL, credentials, timeouts and more. However, the configuration can also be set or overwritten later when creating the InvocationContext.
See also Default configuration of WS-Clients.
public class PingWebServiceClient1 extends AbstractWebServiceClient<PingWebService, PingWebServicePortType> {

  @Override
  protected Class<? extends IConfigProperty<String>> getConfiguredEndpointUrlProperty() {
    return JaxWsPingEndpointUrlProperty.class; (1)
  }

  @Override
  protected Class<? extends IConfigProperty<String>> getConfiguredUsernameProperty() {
    return JaxWsPingUsernameProperty.class; (2)
  }

  @Override
  protected Class<? extends IConfigProperty<String>> getConfiguredPasswordProperty() {
    return JaxWsPingPasswordProperty.class; (2)
  }

  @Override
  protected Class<? extends IConfigProperty<Integer>> getConfiguredConnectTimeoutProperty() {
    return JaxWsPingConnectTimeoutProperty.class; (3)
  }

  @Override
  protected Class<? extends IConfigProperty<Integer>> getConfiguredReadTimeoutProperty() {
    return JaxWsPingReadTimeoutProperty.class; (3)
  }
}| 1 | Specifies the endpoint URL |
| 2 | Specifies credentials |
| 3 | Specifies timeouts |
47.1. Invoke a webservice
A webservice operation is invoked on behalf of an invocation context, which is associated with a dedicated port, and which specifies the data to be included in the web request. Upon a webservice call, the invocation context should be discarded.
PingWebServicePortType port = BEANS.get(PingWebServiceClient.class).newInvocationContext().getPort(); (1)

port.ping("Hello world"); (2)| 1 | Obtain a new invocation context and port via WS-Client |
| 2 | Invoke the webservice operation |
Invoking newInvocationContext() returns a new context and port instance. The context returned inherits all properties as configured for the WS-Client (endpoint URL, credentials, timeouts, …), but which can be overwritten for the scope of this context.
The following listing illustrates how to set/overwrite properties.
final InvocationContext<PingWebServicePortType> context = BEANS.get(PingWebServiceClient.class).newInvocationContext();

PingWebServicePortType port = context
    .withUsername("test-user") (1)
    .withPassword("secret")
    .withConnectTimeout(10, TimeUnit.SECONDS) (2)
    .withoutReadTimeout() (3)
    .withHttpRequestHeader("X-ENV", "integration") (4)
    .getPort();

port.ping("Hello world"); (5)| 1 | Set the credentials |
| 2 | Change the connect timeout to 10s |
| 3 | Unset the read timeout |
| 4 | Add a HTTP request header |
| 5 | Invoke the webservice operation |
The WS-Client provides port instances via a preemptive port cache. This cache improves performance because port creation may be an expensive operation due to WSDL/schema validation. The cache is based on a 'corePoolSize', meaning that that number of ports is created on a preemptively basis. If more ports than that number are required, they are are created on demand, and additionally added to the cache until expired, which is useful at a high load.
| The JAX-WS specification does not specify thread safety of a port instance. Therefore, a port should not be used concurrently among threads. Further, JAX-WS API does not support to reset the Port’s request and response context, which is why a port should only be used for a single webservice call. |
47.2. Cancel a webservice request
The WS-Client supports for cancellation of webservice requests. Internally, every web request is run in another thread, which the calling thread waits for to complete. Upon cancellation, that other thread is interrupted, and the calling thread released with a WebServiceRequestCancelledException. However, depending on the JAX-WS implementor, the web request may still be running, because JAX-WS API does not support the cancellation of a web request.
47.3. Get information about the last web request
The invocation context allows you to access HTTP status code and HTTP headers of the last web request.
final InvocationContext<PingWebServicePortType> context = BEANS.get(PingWebServiceClient.class).newInvocationContext();

String pingResult = context.getPort().ping("Hello world");

// Get HTTP status code
int httpStatusCode = context.getHttpStatusCode();

// Get HTTP response header
List<String> httpResponseHeader = context.getHttpResponseHeader("X-CUSTOM-HEADER");
47.4. Propagate state to Handlers
An invocation context can be associated with request context properties, which are propagated to handlers and JAX-WS implementor.
BEANS.get(PingWebServiceClient.class).newInvocationContext()
    .withRequestContextProperty("cid", UUID.randomUUID().toString()) (1)
.getPort().ping("Hello world"); (2)| 1 | Propagate the correlation ID |
| 2 | Invoke the web operation |
Learn more how to access context properties from within a handler.
47.5. Install handlers and provide credentials for authentication
To install a handler, overwrite execInstallHandlers and add the handler to the given List. The handlers are invoked in the order as added to the handler-chain. By default, there is no handler installed.
The method execInstallHandlers is invoked upon preemptive creation of the port. Consequently, you cannot do any assumption about the calling thread.
If a handler requires to run in another RunContext than the calling context, annotate it with RunWithRunContext annotation, e.g. to start a new transaction to log into database.
If the endpoint requires to authenticate requests, an authentication handler is typically added to the list, e.g. BasicAuthenticationHandler for 'Basic authentication', or WsseUsernameTokenAuthenticationHandler for 'Message Level WS-Security authentication', or some other handler to provide credentials.
public class PingWebServiceClient2 extends AbstractWebServiceClient<PingWebService, PingWebServicePortType> {

  @Override
  protected void execInstallHandlers(List<javax.xml.ws.handler.Handler<?>> handlerChain) {
    handlerChain.add(new BasicAuthenticationHandler());
    handlerChain.add(BEANS.get(LogHandler.class));
  }
}
The credentials as provided via InvocationContext can be accessed via request context with the property InvocationContext.PROP_USERNAME and InvocationContext.PROP_PASSWORD.
|
47.6. JAX-WS Client Correlation ID Propagation
The current context’s correlation ID can be forwarded to the consumed web service. Scout provides a handler that sets the X-Scout-Correlation-Id HTTP header on the outgoing request.
public class PingWebServiceClient3 extends AbstractWebServiceClient<PingWebService, PingWebServicePortType> {

  @Override
  protected void execInstallHandlers(List<javax.xml.ws.handler.Handler<?>> handlerChain) {
    handlerChain.add(new BasicAuthenticationHandler());
    handlerChain.add(BEANS.get(LogHandler.class));
    handlerChain.add(BEANS.get(WsConsumerCorrelationIdHandler.class)); (1)
  }
}| 1 | The handler can be at any position in the handler chain. |
47.7. Default configuration of WS-Clients
The following properties can be set globally for all WS-Clients. However, a WS-Client can overwrite any of this values.
| property | description | default value |
|---|---|---|
jaxws.consumer.portCache.enabled |
To indicate whether to use a preemptive port cache for WS-Clients. |
true |
jaxws.consumer.portCache.corePoolSize |
Number of ports to be preemptively cached to speed up webservice calls. |
10 |
jaxws.consumer.portCache.ttl |
Maximum time in seconds to retain ports in the cache if the 'corePoolSize' is exceeded. That typically occurs at high load, or if 'corePoolSize' is undersized. |
15 minutes |
jaxws.consumer.connectTimeout |
Connect timeout in milliseconds to abort a webservice request, if establishment of the HTTP connection takes longer than this timeout. A timeout of null means an infinite timeout. |
infinite |
jaxws.consumer.readTimeout |
Read timeout in milliseconds to abort a webservice request, if it takes longer than this timeout for data to be available for read. A timeout of null means an infinite timeout. |
infinite |
48. XML adapters to work with java.util.Date and java.util.Calendar
Scout ships with some XML adapters to not have to work with XMLGregorianCalendar, but with java.util.Date instead.
It is recommended to configure your global binding file accordingly. See global binding file Listing for an example.
See the adapter’s JavaDoc for more detailed information.
| adapter | description |
|---|---|
UtcDateAdapter |
Use this adapter to work with UTC xsd:dates. A UTC date is also known as 'zulu' date, and has 'GMT+-00:00'. Unlike |
UtcTimeAdapter |
Use this adapter to work with UTC xsd:times. A UTC time is also known as 'zulu' time, and has 'GMT+-00:00'. Unlike |
UtcDateTimeAdapter |
Use this adapter to work with UTC xsd:dateTimes. A UTC time is also known as 'zulu' time, and has 'GMT+-00:00'. This adapter converts xsd:dateTime into UTC milliseconds, by respecting the timezone as provided. If the timezone is missing, the date is interpreted as UTC-time, and not local to the default JVM timezone. To convert a |
| adapter | description |
|---|---|
CalendarDateAdapter |
Use this adapter to work with |
CalendarTimeAdapter |
Use this adapter to work with |
CalendarDateTimeAdapter |
Adapter to convert a xsd:dateTime to a |
| adapter | description |
|---|---|
DefaultTimezoneDateAdapter |
Use this adapter to work with xsd:dates in the default timezone of the Java Virtual Machine. Depending on the JVM installation, the timezone may differ: 'GMT+-XX:XX'. Unlike |
DefaultTimezoneTimeAdapter |
Use this adapter to work with xsd:times in the default timezone of the Java Virtual Machine. Depending on the JVM installation, the timezone may differ: 'GMT+-XX:XX'. Unlike DefaultTimezoneDateTimeAdapter, this adapter sets year, month and day to the epoch, which is defined as 1970-01-01 in UTC. |
DefaultTimezoneDateTimeAdapter |
Use this adapter to work with xsd:dateTimes in the default timezone of the Java Virtual Machine. Depending on the JVM installation, the timezone may differ: 'GMT+-XX:XX'. |
49. JAX-WS Appendix
49.1. PingWebService.wsdl
<?xml version="1.0" encoding="UTF-8" standalone="no"?>
<wsdl:definitions name="PingWebService"
  targetNamespace="http://scout.eclipse.org/docs/ws/PingWebService/"
  xmlns:tns="http://scout.eclipse.org/docs/ws/PingWebService/"
  xmlns:soap="http://schemas.xmlsoap.org/wsdl/soap/"
  xmlns:wsdl="http://schemas.xmlsoap.org/wsdl/"
  xmlns:xsd="http://www.w3.org/2001/XMLSchema">
  <wsdl:types>
    <xsd:schema targetNamespace="http://scout.eclipse.org/docs/ws/PingWebService/">
      <xsd:element name="pingRequest" type="xsd:string"/>
      <xsd:element name="pingResponse" type="xsd:string"/>
    </xsd:schema>
  </wsdl:types>
  <wsdl:message name="pingRequest">
    <wsdl:part element="tns:pingRequest" name="ping" />
  </wsdl:message>
  <wsdl:message name="pingResponse">
    <wsdl:part element="tns:pingResponse" name="parameters" />
  </wsdl:message>
  <wsdl:portType name="PingWebServicePortType">
    <wsdl:operation name="ping">
      <wsdl:input message="tns:pingRequest" />
      <wsdl:output message="tns:pingResponse" />
    </wsdl:operation>
  </wsdl:portType>
  <wsdl:binding name="PingWebServiceSOAP" type="tns:PingWebServicePortType">
    <soap:binding style="document"
      transport="http://schemas.xmlsoap.org/soap/http" />
    <wsdl:operation name="ping">
      <soap:operation soapAction="http://scout.eclipse.org/docs/ws/PingWebService/ping" />
      <wsdl:input>
        <soap:body use="literal" />
      </wsdl:input>
      <wsdl:output>
        <soap:body use="literal" />
      </wsdl:output>
    </wsdl:operation>
  </wsdl:binding>
  <wsdl:service name="PingWebService">
    <wsdl:port binding="tns:PingWebServiceSOAP" name="PingWebServiceSOAP">
      <soap:address location="http://scout.eclipse.org/docs/ws/PingWebService/" />
    </wsdl:port>
  </wsdl:service>
</wsdl:definitions>
49.2. PingWebServicePortType.java
@WebService(name = "PingWebServicePortType", targetNamespace = "http://scout.eclipse.org/docs/ws/PingWebService/")
@SOAPBinding(parameterStyle = SOAPBinding.ParameterStyle.BARE)
public interface PingWebServicePortType {

  @WebMethod(action = "http://scout.eclipse.org/docs/ws/PingWebService/ping")
  @WebResult(name = "pingResponse", targetNamespace = "http://scout.eclipse.org/docs/ws/PingWebService/", partName = "parameters")
  String ping(@WebParam(name = "pingRequest", targetNamespace = "http://scout.eclipse.org/docs/ws/PingWebService/", partName = "ping") String ping);
}
49.3. PingWebServicePortTypeEntryPoint.java
@Generated(value = "org.eclipse.scout.jaxws.apt.JaxWsAnnotationProcessor", date = "2016-01-25T14:22:58:583+0100", comments = "EntryPoint to run webservice requests on behalf of a RunContext")
@WebService(name = "PingWebServicePortType", targetNamespace = "http://scout.eclipse.org/docs/ws/PingWebService/", endpointInterface = "org.eclipse.scout.docs.ws.pingwebservice.PingWebServicePortType")
public class PingWebServicePortTypeEntryPoint implements org.eclipse.scout.docs.ws.pingwebservice.PingWebServicePortType {

  @Resource
  protected WebServiceContext m_webServiceContext;

  @Override
  public String ping(final String ping) {
    final RunContext servletRunContext = JaxWsServletRunContexts.copyCurrent().withWebServiceContext(m_webServiceContext);
    final RunContext requestRunContext = MessageContexts.getRunContext(m_webServiceContext.getMessageContext());
    try {
      return servletRunContext.call(new Callable<String>() {

        @Override
        public final String call() throws Exception {
          if (requestRunContext == null) {
            return BEANS.get(org.eclipse.scout.docs.ws.pingwebservice.PingWebServicePortType.class).ping(ping);
          }
          else {
            return requestRunContext.call(new Callable<String>() {

              @Override
              public final String call() throws Exception {
                return BEANS.get(org.eclipse.scout.docs.ws.pingwebservice.PingWebServicePortType.class).ping(ping);
              }
            }, DefaultExceptionTranslator.class);
          }
        }
      }, DefaultExceptionTranslator.class);
    }
    catch (Exception e) {
      throw handleUndeclaredFault(e);
    }
  }

  protected RuntimeException handleUndeclaredFault(final Exception e) {
    if (e instanceof RuntimeException) {
      throw (RuntimeException) e;
    }
    else {
      throw new HTTPException(HttpServletResponse.SC_INTERNAL_SERVER_ERROR);
    }
  }
}
49.4. PingWebServicePortTypeBean.java
@ApplicationScoped
public class PingWebServicePortTypeBean implements PingWebServicePortType {

  @Override
  public String ping(String ping) {
    return "ping: " + ping;
  }
}
49.5. .settings/org.eclipse.jdt.core.prefs file to enable APT in Eclipse IDE
...
org.eclipse.jdt.core.compiler.processAnnotations=enabled
...
49.6. .settings/org.eclipse.jdt.apt.core.prefs file to enable APT in Eclipse IDE
org.eclipse.jdt.apt.aptEnabled=true
org.eclipse.jdt.apt.genSrcDir=target/generated-sources/annotations
org.eclipse.jdt.apt.processorOptions/consoleLog=true
org.eclipse.jdt.apt.reconcileEnabled=true
49.7. .factorypath file to enable APT in Eclipse IDE
<!-- Replace 'XXX-VERSION-XXX' by the respective Scout RT version -->
<factorypath>
    <factorypathentry kind="VARJAR" id="M2_REPO/org/eclipse/scout/rt/org.eclipse.scout.jaxws.apt/XXX-VERSION-XXX/org.eclipse.scout.jaxws.apt-XXX-VERSION-XXX.jar" enabled="true" runInBatchMode="false"/>
    <factorypathentry kind="VARJAR" id="M2_REPO/com/unquietcode/tools/jcodemodel/codemodel/1.0.3/codemodel-1.0.3.jar" enabled="true" runInBatchMode="false"/>
    <factorypathentry kind="VARJAR" id="M2_REPO/org/eclipse/scout/rt/org.eclipse.scout.rt.platform/XXX-VERSION-XXX/org.eclipse.scout.rt.platform-XXX-VERSION-XXX.jar" enabled="true" runInBatchMode="false"/>
    <factorypathentry kind="VARJAR" id="M2_REPO/org/eclipse/scout/rt/org.eclipse.scout.rt.server.jaxws/XXX-VERSION-XXX/org.eclipse.scout.rt.server.jaxws-XXX-VERSION-XXX.jar" enabled="true" runInBatchMode="false"/>
    <factorypathentry kind="VARJAR" id="M2_REPO/javax/servlet/javax.servlet-api/3.1.0/javax.servlet-api-3.1.0.jar" enabled="true" runInBatchMode="false"/>
    <factorypathentry kind="VARJAR" id="M2_REPO/org/slf4j/slf4j-api/1.7.12/slf4j-api-1.7.12.jar" enabled="true" runInBatchMode="false"/>
</factorypath>
49.8. Authentication Method
The authentication method specifies the protocol to challenge the webservice client to provide credentials.
Scout provides an implementation for BASIC and WSSE_UsernameToken. You can implement your own authentication method by implementing IAuthenticationMethod interface.
49.8.1. BasicAuthenticationMethod
Authentication method to apply Basic Access Authentication. This requires requests to provide a valid user name and password to access content. User’s credentials are transported in HTTP headers. Basic authentication also works across firewalls and proxy servers.
However, the disadvantage of Basic authentication is that it transmits unencrypted base64-encoded passwords across the network. Therefore, you only should use this authentication when you know that the connection between the client and the server is secure. The connection should be established either over a dedicated line or by using Secure Sockets Layer (SSL) encryption and Transport Layer Security (TLS).
49.8.2. WsseUsernameTokenMethod
Authentication method to apply Message Level WS-Security with UsernameToken Authentication. This requires requests to provide a valid user name and password to access content. User’s credentials are included in SOAP message headers.
However, the disadvantage of WSSE UsernameToken Authentication is that it transmits unencrypted passwords across the network. Therefore, you only should use this authentication when you know that the connection between the client and the server is secure. The connection should be established either over a dedicated line or by using Secure Sockets Layer (SSL) encryption and Transport Layer Security (TLS).
49.9. Credential Verifier
Verifies user’s credentials against a data source like database, config.properties, Active Directory, or others.
Scout provides an implementation for verification against users in config.properties. You can implement your own verifier by implementing ICredentialVerifier interface.
If you require to run in a specific RunContext like a transaction for user’s verification, annotate the verifier with RunWithRunContext annotation, and specify a RunContextProducer accordingly.
|
49.9.1. ConfigFileCredentialVerifier
Credential verifier against credentials configured in config.properties file.
By default, this verifier expects the passwords in 'config.properties' to be a hash produced with SHA-512 algorithm. To support you in password hash generation, ConfigFileCredentialVerifier provides a static Java main method.
Credentials are loaded from property scout.auth.credentials. Multiple credentials are separated with the semicolon, username and password with the colon. If using hashed passwords (by default), the password’s salt and hash are separated with the dot.
To work with plaintext passwords, set the property scout.auth.credentials.plaintext to true.
Example of hashed passwords: scott:SALT.PASSWORD-HASH;jack:SALT.PASSWORD-HASH;john:SALT.PASSWORD-HASH
Example of plaintext passwords: scott:XXXX;jack:XXXX;john:XXXX
Default HTTP Response Headers
All Scout HTTP servlets delegate to a central authority to append HTTP response headers. This is the bean HttpServletControl.
It enables developers to control which headers that should be added to the HTTP response for each servlet and request.
The next sections describe the headers that are added to any response by default. Beside these also the following headers may be of interest for an end user application (consider adding them to your application if possible):
| Please note that not all headers are supported in all user agents! |
50. X-Frame-Options
The X-Frame-Options HTTP response header [3] can be used to indicate whether or not a user agent should be allowed to render a page in a <frame>, <iframe> or <object>.
Sites can use this to avoid clickjacking [4] attacks, by ensuring that their content is not embedded into other sites.
The X-Frame-Options header is described in RFC 7034 [5].
In Scout this header is set to SAMEORIGIN which allows the page to be displayed in a frame on the same origin (scheme, host and port) as the page itself only.
51. X-XSS-Protection
This header enables the XSS [6] filter built into most recent user agents. It’s usually enabled by default anyway, so the role of this header is to re-enable the filter for the website if it was disabled by the user. The X-XSS-Protection header is described in controlling-the-xss-filter.
In Scout this header is configured to enable XSS protections and instructs the user-agent to block a page from loading if reflected XSS is detected.
52. Content Security Policy
Content Security Policy is a HTTP response header that helps you reduce XSS risks on modern user agents by declaring what dynamic resources are allowed to load [7]. The CSP header is described in Level 1 and Level 2. There is also a working draft for a Level 3.
Scout makes use of Level 1 (and one directive from Level 2) and sets by default the following settings:
-
JavaScript [8]: Only accepts JavaScript resources from the same origin (same scheme, host and port). Inline JavaScript is allowed and unsafe dynamic code evaluation (like
eval(string),setTimeout(string),setInterval(string),new Function(string)) is allowed as well. -
Stylesheets (CSS) [9]: Only accepts Stylesheet resources from the same origin (same scheme, host and port). Inline style attributes are allowed.
-
Frames [10]: All sources are allowed because the iframes created by the Scout BrowserField run in the sandbox mode and therefore handle the security policy on their own.
-
All other types (Image,
WebSocket[11],EventSource[12], AJAX calls [13], fonts,<object>[14],<embed>[15],<applet>[16],<audio>[17] and<video>[18]) only allow resources from the same origin (same scheme, host and port).
If a resource is blocked because it violates the CSP a report is created and logged on server side using level warning. This is done in the class ContentSecurityPolicyReportHandler.
This enables admins to monitor the application and to react if a CSP violation is detected.
Session Cookie (JSESSIONID Cookie) Configuration Validation
The UiServlet checks if the session cookie is configured safely. The validation is only performed on first access to the UiServlet. There is no automatic validation on the backend server side or on any custom servlets!
If the validation fails, a corresponding error message is logged to the server and an exception is thrown making the UiServlet inaccessible. Because of security reasons the exception shown to the user includes no details about the error. These can only be seen on the server side log.
53. HttpOnly
First the existence of the HttpOnly flag is checked. The servlet container will then add this flag to the Set-Cookie HTTP response header. If the user agent supports this flag, the cookie cannot be accessed through a client side script. As a result even if a cross-site scripting (XSS) flaw exists and a user accidentally accesses a link that exploits this flaw, the user agent will not reveal the cookie to a third party.
For a list of user agents supporting this feature please refer to OWASP.
It is recommended to always enable this flag.
Since Java Servlet 3.0 specification this property can be set in the configuration in the deployment descriptor WEB-INF/web.xml:
<?xml version="1.0" encoding="UTF-8"?>
<web-app
    xmlns="http://xmlns.jcp.org/xml/ns/javaee"
    xmlns:xsi="http://www.w3.org/2001/XMLSchema-instance"
    xsi:schemaLocation="http://xmlns.jcp.org/xml/ns/javaee http://xmlns.jcp.org/xml/ns/javaee/web-app_3_1.xsd"
    version="3.1">
  ...
  <session-config>
    ...
    <cookie-config>
      <http-only>true</http-only> (1)
      ...
    </cookie-config>
    ...
  </session-config>
  ...
</web-app>| 1 | The HttpOnly flag activated |
54. Secure
Second the existence of the Secure flag is checked. The servlet container will then add this flag to the Set-Cookie HTTP response header. The purpose of the secure flag is to prevent cookies from being observed by unauthorized parties due to the transmission of a the cookie in clear text. Therefore setting this flag will prevent the user agent from transmitting the session id over an unencrypted channel.
Since Java Servlet 3.0 specification this property can be set in the configuration in the deployment descriptor WEB-INF/web.xml:
<?xml version="1.0" encoding="UTF-8"?>
<web-app
    xmlns="http://xmlns.jcp.org/xml/ns/javaee"
    xmlns:xsi="http://www.w3.org/2001/XMLSchema-instance"
    xsi:schemaLocation="http://xmlns.jcp.org/xml/ns/javaee http://xmlns.jcp.org/xml/ns/javaee/web-app_3_1.xsd"
    version="3.1">
  ...
  <session-config>
    ...
    <cookie-config>
      <secure>true</secure> (1)
      ...
    </cookie-config>
    ...
  </session-config>
  ...
</web-app>| 1 | The Secure flag activated |
This of course only makes sense if the application is exposed to the end user using an encrypted channel like HTTPS (which is hardly recommended).
Unfortunately for the UI server it is not possible to detect if an application uses a secured channel. Consider the following example: The servlet container is protected by a reverse proxy. The communication between the user agent and the proxy is encrypted while the channel between the proxy and the servlet container is not. In this scenario the container cannot know that from a user agent point of view the channel is secured.
Because of this the validation assumes that the channel from the user agent to the entering node is secured and by default checks for the Secure flag. In case this assumption is not true and an unencrypted channel must be used this validation step can be disabled by setting the following property in the config.propertis file:
scout.auth.cookie.session.validate.secure=false
This skips the Secure flag check completely. In this scenario (not using https) it is also required to remove the secure tag from the cookie config in the WEB-INF/web.xml.
Appendix A: Licence and Copyright
This appendix first provides a summary of the Creative Commons (CC-BY) licence used for this book. The licence is followed by the complete list of the contributing individuals, and the full licence text.
A.1. Licence Summary
This work is licensed under the Creative Commons Attribution License. To view a copy of this license, visit https://creativecommons.org/licenses/by/3.0/ or send a letter to Creative Commons, 559 Nathan Abbott Way, Stanford, California 94305, USA.
A summary of the license is given below, followed by the full legal text.
You are free:
-
to Share ---to copy, distribute and transmit the work
-
to Remix---to adapt the work
-
to make commercial use of the work
Under the following conditions:
Attribution ---You must attribute the work in the manner specified by the author or licensor (but not in any way that suggests that they endorse you or your use of the work).
With the understanding that:
Waiver ---Any of the above conditions can be waived if you get permission from the copyright holder.
Public Domain ---Where the work or any of its elements is in the public domain under applicable law, that status is in no way affected by the license.
Other Rights ---In no way are any of the following rights affected by the license:
-
Your fair dealing or fair use rights, or other applicable copyright exceptions and limitations;
-
The author’s moral rights;
-
Rights other persons may have either in the work itself or in how the work is used, such as publicity or privacy rights.
Notice ---For any reuse or distribution, you must make clear to others the license terms of this work. The best way to do this is with a link to https://creativecommons.org/licenses/by/3.0/.
A.2. Contributing Individuals
Copyright (c) 2012-2014.
In the text below, all contributing individuals are listed in alphabetical order by name. For contributions in the form of GitHub pull requests, the name should match the one provided in the corresponding public profile.
Bresson Jeremie, Fihlon Marcus, Nick Matthias, Schroeder Alex, Zimmermann Matthias
A.3. Full Licence Text
The full licence text is available online at http://creativecommons.org/licenses/by/3.0/legalcode
| Do you want to improve this document? Have a look at the sources on GitHub. |