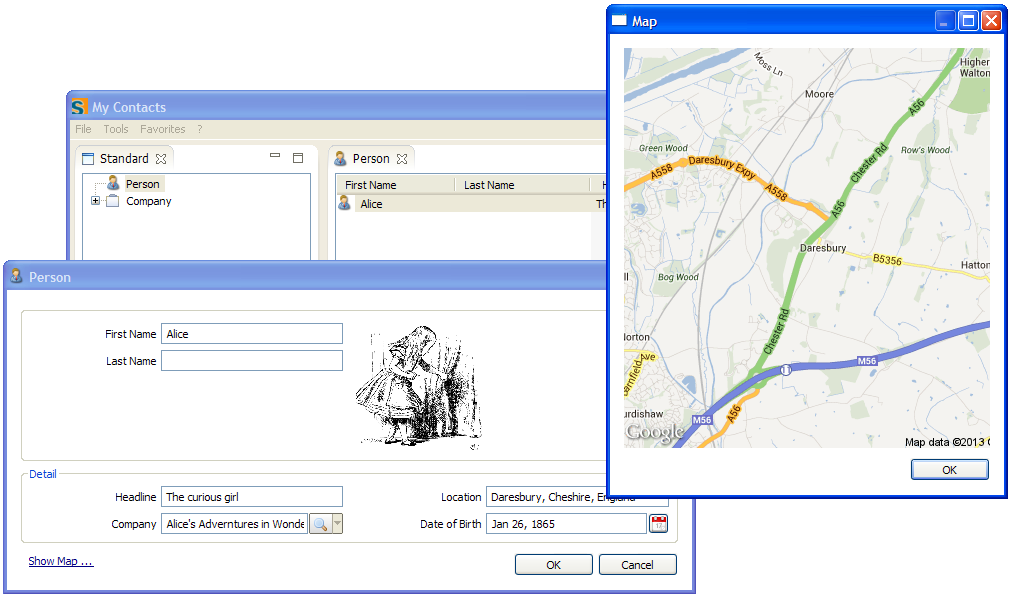
Figure 5.1: The SWT client of the ”My Contacts” application.
In this chapter we will create the ”My Contacts” Scout application. This small1 application covers additional aspects of the Eclipse Scout framework. The presented demo application borrows heavily from a Scout tutorial published 2012 in the German Java Magazin2 for the Scout release 3.8 (Juno). Compared to the 2012 tutorial, the version presented in this chapter has been slightly polished and updated to the Scout release 3.9 (Kepler).
Specifically, we will build an outline based Scout application featuring a navigation tree and pages to present information in tabular form. In addition, the application also shows how to work with forms to enter and/or update data, menus and context menus. On the server side, we show how to work with databases, how to use logging in Scout applications and how to include standard Java libraries available in JAR files.
The chapter is organized as follows. In the first section, the finished demo application is explained from the user perspective. The remaining sections focus on the individual steps to implement the ”My Contacts” application. To follow the description of the implementation the reader is assumed to be familiar with the ”Hello World” tutorial and the Scout SDK as described in Chapter 4.
The ”My Contacts” application is a client server application to manage personal contacts. Persistence of entered data is achieved through a database backend.
As social networking services3 such as Facebook, LinkedIn or Xing are widely used, the application also provides an example integration with the LinkedIn4 platform. The implemented integration allows to download the personal contacts into the local database. In the local database it is possible to mix persons entered manually with contact data downloaded from LinkedIn.
After starting the Scout server application a client application may be started that then connects to the server. In Figure 5.1 the SWT desktop client is shown. In the background, the main application window is visible showing a navigation tree on the left hand side. On the right side, a table holds the elements corresponding to the selected tree node. Using an edit context menu on the selected table row, a form to edit the relevant data may be opened as shown in the example screen shot for ’Alice’. Clicking on the link ’Show Map ...’ in the person form opens the person’s location information in a map form using the data provided by Google Maps Image API5 .

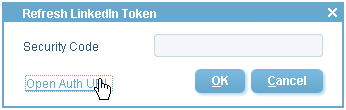
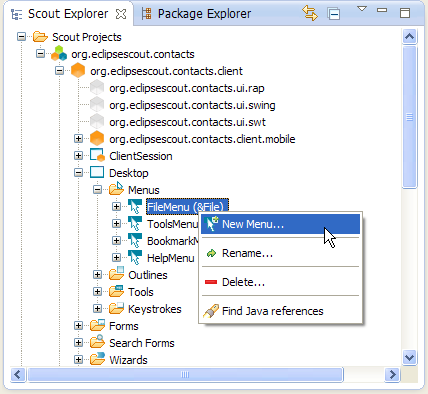
Before any LinkedIn data can be accessed from the ”My Contacts” application an access token needs to be retrieved from LinkedIn. To obtain such a token use the Refresh LinkedIn Token ... menu as shown in Figure 5.2. This opens the refresh token form shown on the left side of Figure 5.3.
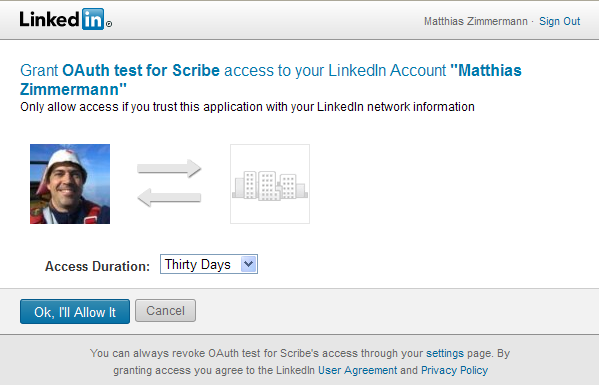
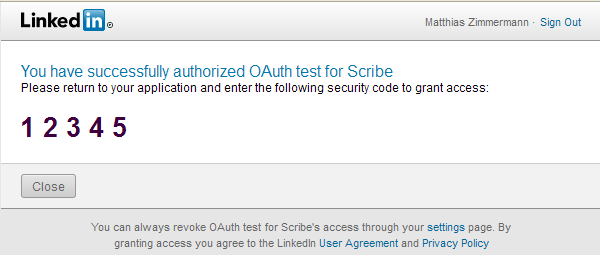
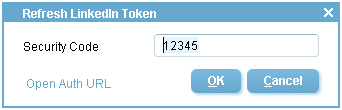
Clicking on the ’Open Auth URL’ link then opens the granting page provided by LinkedIn shown on the left hand side of Figure 5.4. After logging into your LinkedIn account6 you can specify the desired access duration and confirm the ”OAuth test for Scribe” access7 to your LinkedIn data. If the authorization is successful, a security code as shown on the right side of Figure 5.4 is presented by LinkedIn. This code needs then to be entered into the Security Code field as shown on the right side of Figure 5.3. Then, click the OK button to refresh the access token.
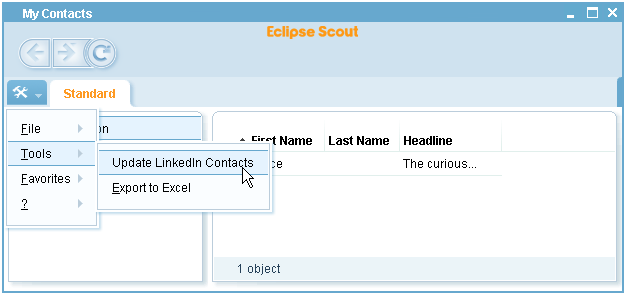
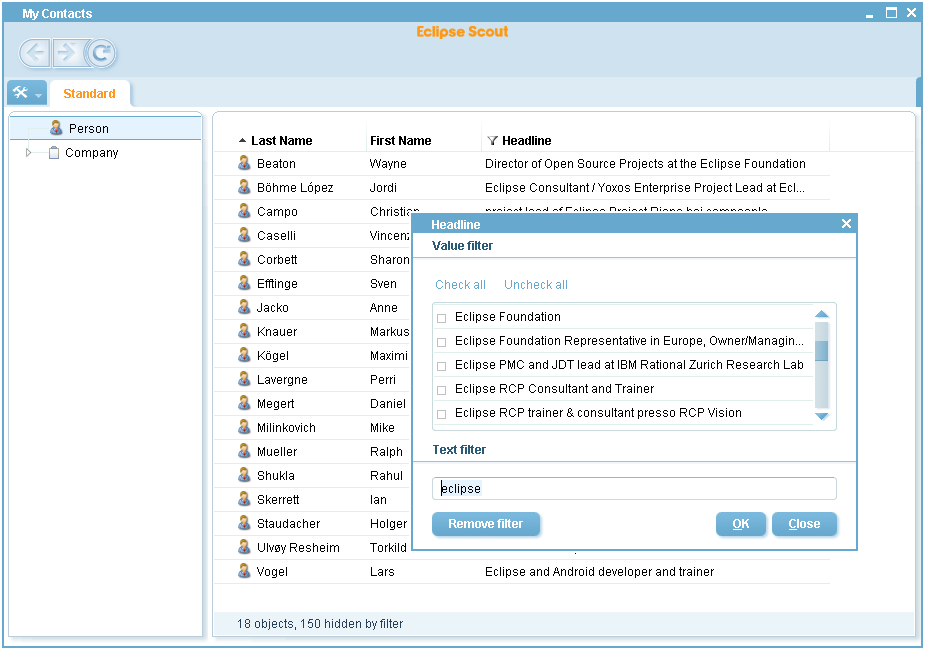
To import/update your LinkedIn contacts into your ”My Contacts” application select the Update LinkedIn Contacts menu as shown in Figure 5.5. Once you have downloaded or entered a number of persons in your ”My Contacts” application, try to get yourself familiar with the application’s person table. This is one of the very powerful Scout widgets. Columns may be filtered, moved, hidden or sorted (including multi level sort) using the table header context menus Organize Columns... menu and Column Filter... menu.
Editing and viewing of person data is available by the Edit Person... context menu on a selected row. To manually add a person use the New Person... context menu available on the table header or in the white area outside the displayed columns.
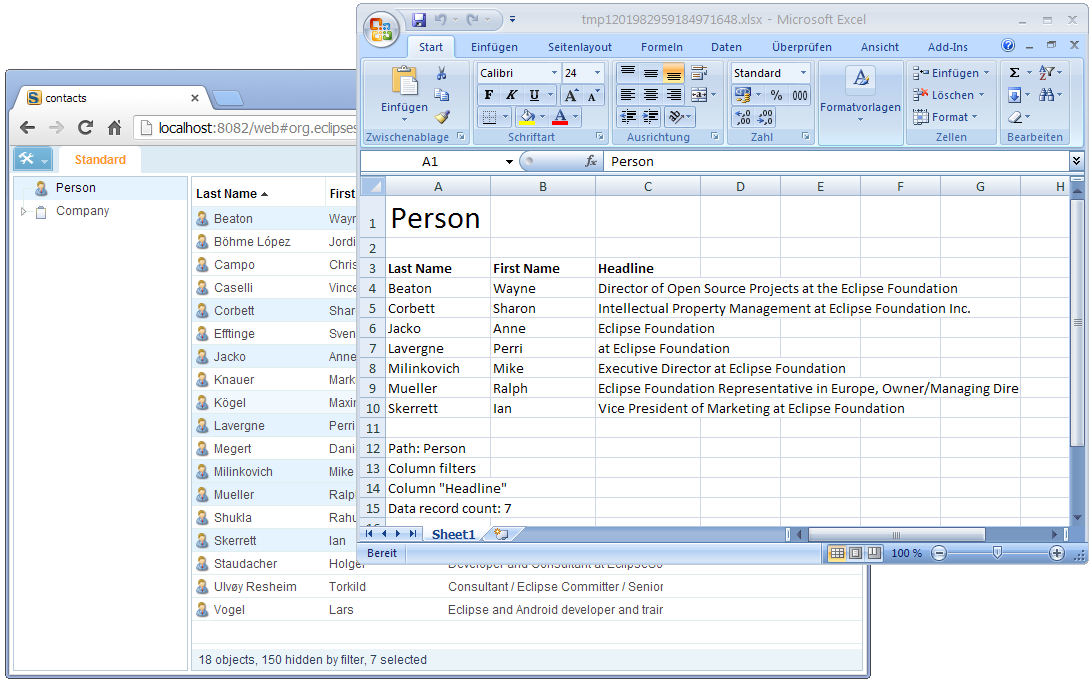
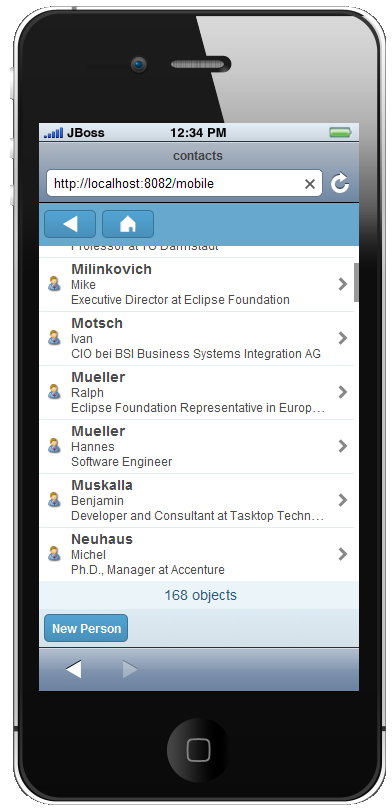
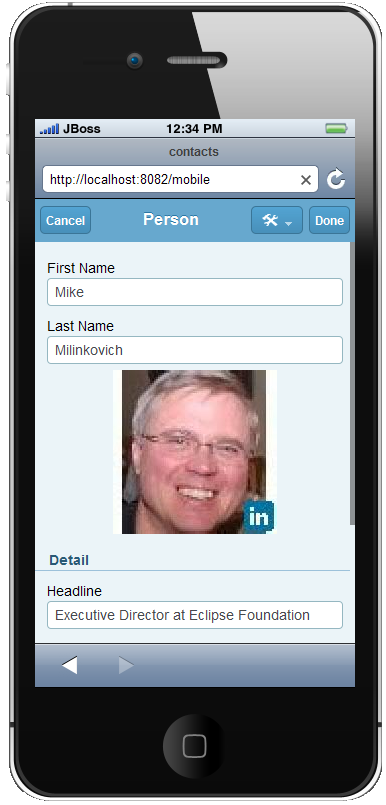
In Figure 5.7 the ”My Contacts” application is running in a web browser. In this example, the Tools—Export to Excel menu is used to export the selected row into an Excel sheet. Finally, the ”My Contacts” application is also running on iPhone and Android mobile devices out of the box. Two example screens are provided in Figure 5.8.
Once you no longer feel confident about having the ”My Contacts” application accessing you data you can revoke this access permission in the LinkedIn menu ”Privacy and Settings”. In the lower part of the settings page switch to the tab ”Groups, Companies and Applications” and click on the link ”View your applications”. There, you will find again the partner name ”OAuth test for Scribe”. To revoke the access, select the associated checkbox and click the ”Remove” button. The next time you try to refresh your LinkedIn data from the ”My Contacts” application will result in an Error message. Before you can again access data from your LinkedIn account you just need to refresh the access token as described above.
To run the ”My Contacts” Scout application without implementing it first, you may take advantage of the fact that the application is hosted in the same Github repository as this book. If you are familiar with Github8 , fork the Scout Book repository9 and start from there. Alternatively, you can follow the description provided in the Scout wiki10 to download, install and run the ”My Contacts” application.
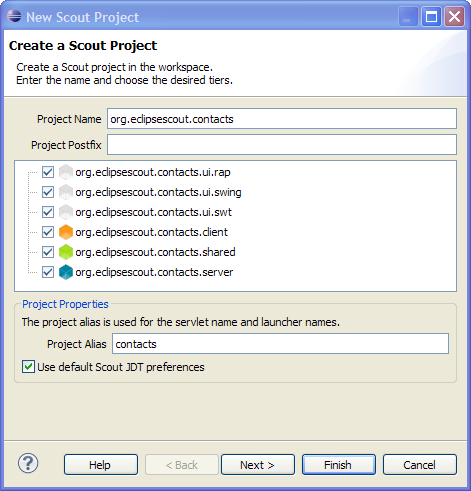
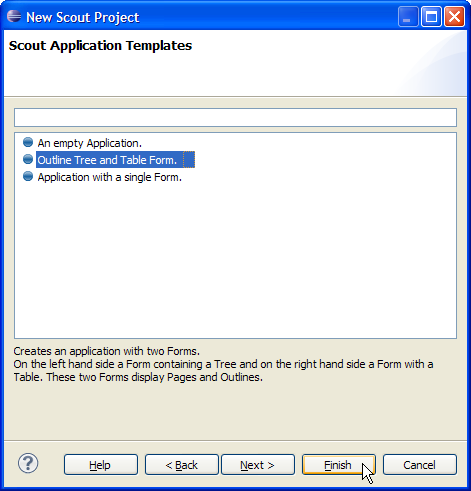
The initial code for the ”My Contacts” application is generated using the New Scout Project wizard as described in Section 4.5.1. For the Project Name field use the name org.eclipsescout.contacts as shown on the left side of Figure 5.9 and click on the Next button. In the second wizard step select the application template Outline Tree and Table Form as shown on the right side of Figure 5.9.
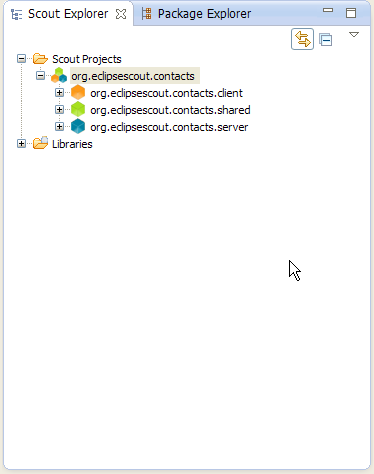
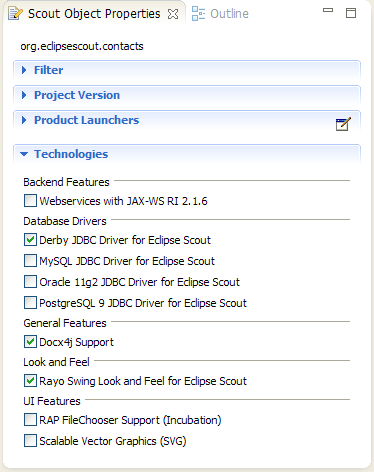
After the Scout SDK has created the initial application code select the top-level org.eclipsescout.contacts node in the Scout Explorer. In the technology section of the corresponding Scout Object Properties select the Derby database driver, the Docx4j support and the Rayo look and feel as shown on the right side of Figure 5.10. In case you have not yet used the Scout Docx4j support or the Rayo look and feel components, the Scout SDK will need to download these packages from the Eclipse Marketplace11 first.
Adding the Docx4j support will also add the Export to Excel menu under tools menu on the application’s desktop. As shown in Listing 5.1, the ScoutXlsxSpreadsheetAdapter first creates an excel file based on the currently active page in the execAction method. Then the file is opened on the client using the shellOpen method.
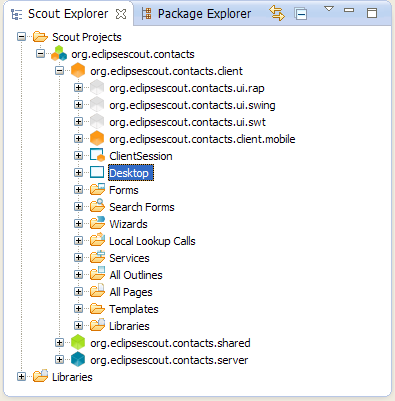
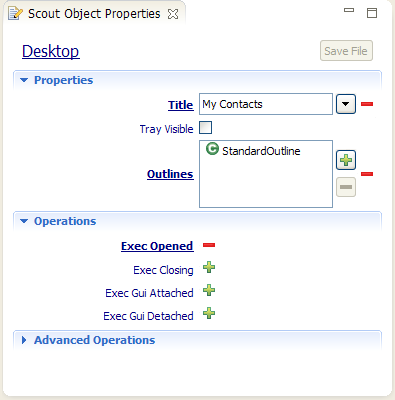
To set the applications name select the Desktop node in the Scout Explorer to access it’s Scout Object Properties as shown in Figure 5.11. In the Title field enter the string ”My Contacts” and create a new translated text entry.
As shown in Listing 5.2 the application’s organisation into a tree and a table form is explicitly defined in method execOpened. Click on the Exec Opened link in the Scout Object Properties to access the Java code of this method. First, using the UserAgentUtility class, the method checks if the client is working with a desktop or a web client. If not, the method returns and the tree and table setup is not used. Instead, the MobileHomeForm defined in plugin org.eclipsescout.contacts.client.mobile is used. In case the user is working with a web client or a desktop client, default tree and table forms are created and started. Finally, the currently active outline is set to the StandardOutline, as this is the only outline defined in this application.
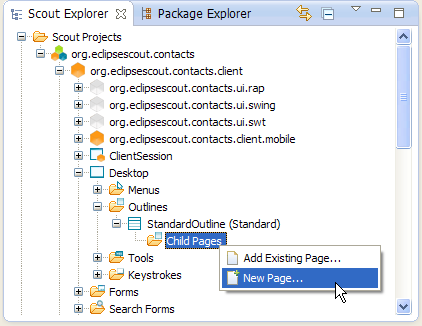
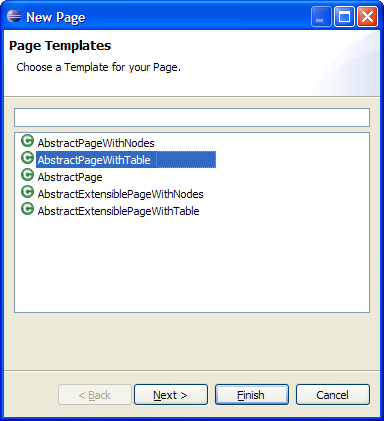
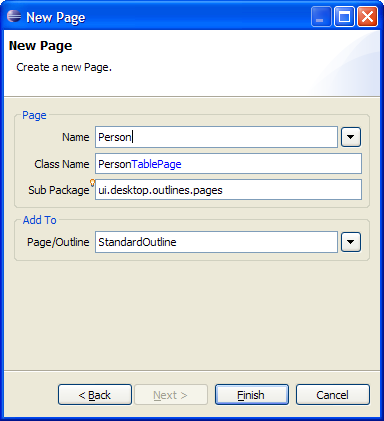
The first UI component we add to the application is the person page. For the desktop clients, this page is represented as a table that will list all available persons in the database of the ”My Contacts” application. To start the New Page wizard use the New Page... context menu on the Child Pages folder as shown in Figure 5.12. On the first wizard step select the template AbstractPageWithTable and click the Next button. On the second wizard step, provide the page name ”Person” to create a new translated text entry at the same time. Make sure the other fields are filled in as shown in Figure 5.12 and click the Finish button to close the wizard.
Listing 5.3 shows the created method execCreateChildPages that links the newly created person page to the standard outline. Note that your code will only look the same once you have added the company page in a later step of the implementation of this application.
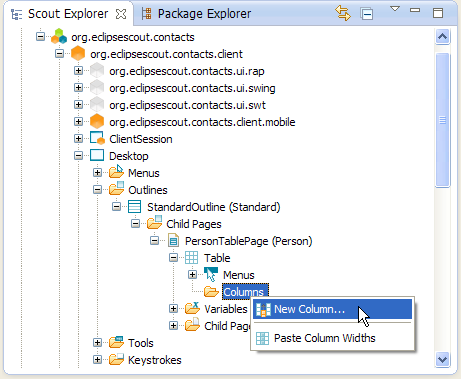
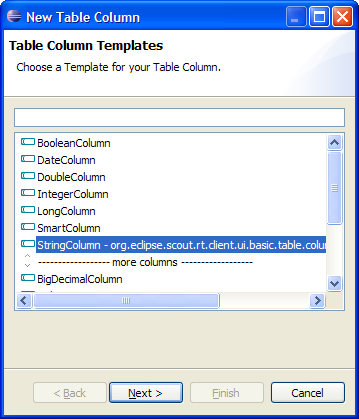
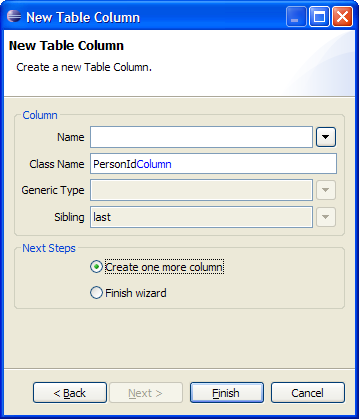
Now, drill down to the Columns folder under the PersonTablePage node as shown in Figure 5.14. Here we can add the desired table columns to the person page. Start with the column that will hold the person id. For this, start the column wizard as shown on the left side of Figure 5.14 and select the string column template. In the second wizard step, enter ”PersonId” into the Class Name field,select the radio button Create one more column and click on the Finish button. This will restart the column wizard to enter the next columns. Create the remaining string columns with the following names.
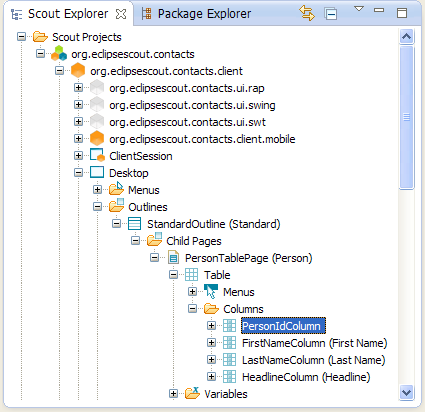
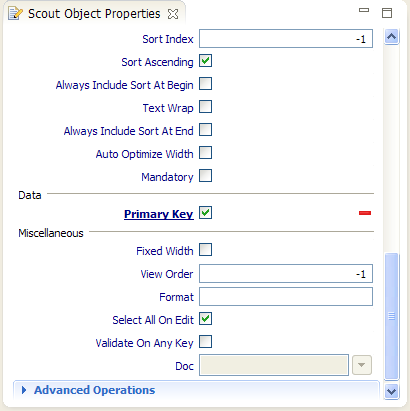
Once you have created all these columns we will mark the person id column as the primary key column for the person page. In the Scout Explorer select the PersonIdColumn node to open the corresponding Scout Object Properties. In this form, deselect the Displayable property to always hide this technical column from the end user. In the properties Advanced Properties section check the Primary Key property. The resulting Java code for the primary key column and the first name column is provided in Listing 5.5.
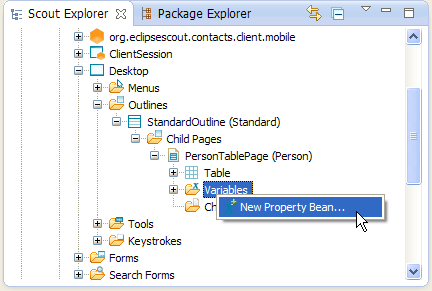
As we will later add and link the person page with a company page, we add a company id variable to the person page as shown in Figure 5.15. For the Java representation of such variables the standard bean pattern is used as shown in Listing 5.5.
After adding the person page, we add a company page to the standard outline. To add the company page we use the same wizards as described in the previous section for the person page. For the Name field we enter the new translated text ”Company” and the columns to add are the following.
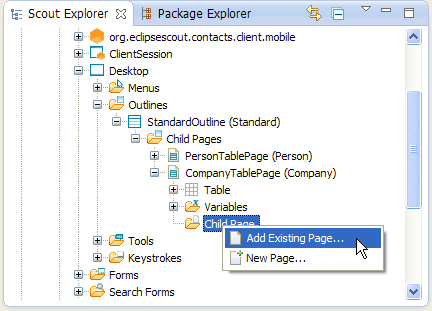
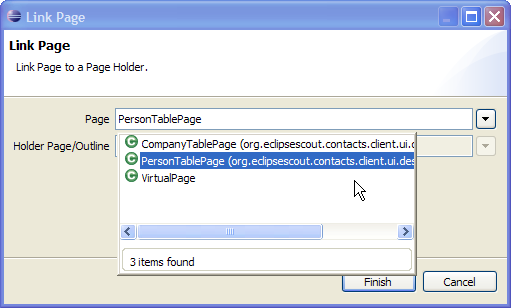
As in the case of the person table page, the company id column is used as a primary key column. The Displayable property needs to be set to false and the Primary Key property to true. Now we can link the person page to the company page using the Add Existing Page... context menu as shown on the left side of Figure 5.16. In the Link Page wizard, the person page can then be selected according to the right side of Figure 5.16. In the Java code generated by the Scout SDK the setting of the company id attribute is automatically inserted in method execCreateChildPages. Please note that this convenience added by the Scout SDK wizard only works if the child page defines variables with a naming that matches the defined primary key columns of the parent table.
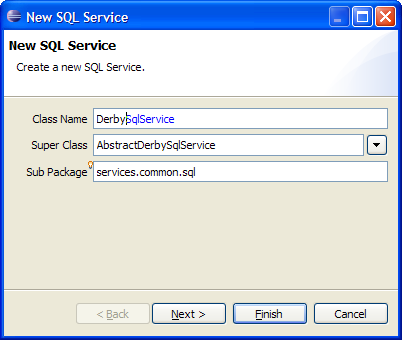
To access a database we first need to install a database service. For the ”My Contacts” application, this is done using the New SQL Service wizard on the Scout server under the SQL Services folder as shown in Figure 5.17. In the first wizard step shown on the right side of the figure, use ”DerbySqlService” for the Class Name field. From the drop-down list in the Super Class field choose the AbstractDerbySqlService and click on the Finish button.
To setup the database connection the necessary parameters need to be added to the server’s config.ini file as shown in Listing 5.7. Comparing the parameter names in this config file with the package name of the created DerbySqlService service class reveals an interesting framework feature. All Scout services can be parameterized using the config.ini file with the pattern <package>.<class name>#<parameter>=<value>. The Scout runtime then sets the service parameters using matching setter methods such as setPassword for the password parameter.
According to the parameter jdbcMappingName=jdbc:derby:${workspace_loc}/... a new Derby database will be created in the same parent directory as the ”My Contacts” workspace directory if no database named DB_CONTACT is found there. This setup is handy for development purposes but you may want to set the database parameter to create=false in the config.ini of the production product file.
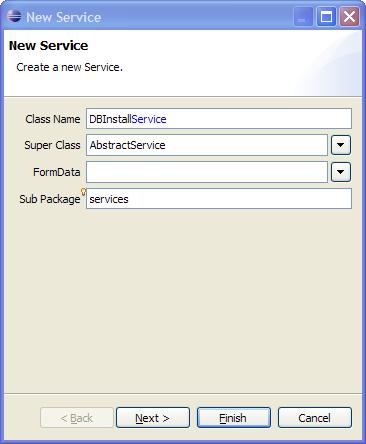
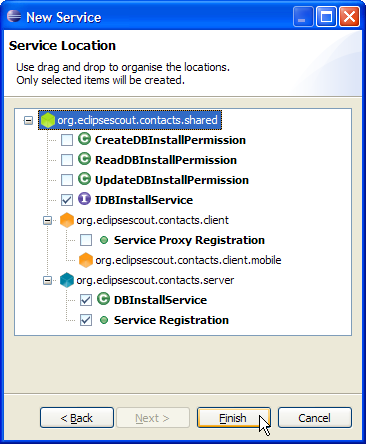
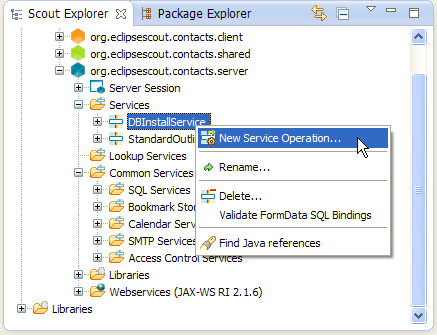
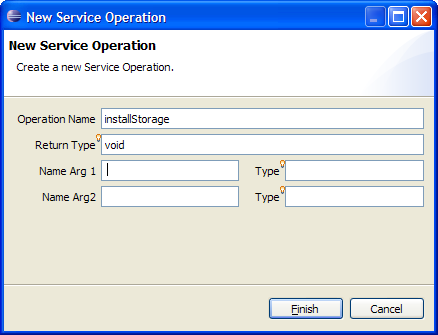
Having a working database service and a new (empty) Derby database now allows to create the necessary database schema and populate it with some initial data. For this we add a new DBInstallService service as shown in Figure 5.18. To this install service we then add the installStorage operation according to Figure 5.19. The implementation of this method is provided in Listing 5.8. The method first checks if a setup is required. For this, the member variable m_doSetup is used that might also be set by the setDoSetup setter method via the server’s config.ini file.
Setting up the schema to contain the individual tables for the ”My Contacts” application is implemented in a separate method per table. The table definition for the company table is provided in Listing 5.9. In this method two Scout aspects are of interest.
The first Scout feature used is the absence of a COMMIT statement after the two INSERT INTO statements. This is possible, as all Scout service calls run in a transaction context that is transparent to the Scout developer. If a service method exits without errors, the enclosing transaction is committed. And if any runtime exception occurs in a service call the Scout runtime framework performs a rollback.
The second feature is the parameter binding used in the INSERT INTO statements. When SQL statements are executed using any of the static SQL methods, an internal statement processor replaces all bind variables found in the provided statement string. In Scout, SQL bind variables need to use the pattern :<variable name>. The values for the bind variables can then be provided in the form of additional arguments. In the concrete example of Listing 5.9, the content for the bind variable :company_id is provided as a NVPair object. NVPairs are the simplest possible form to represent bind variables. The first constructor argument is the variable name of the bind variable, in this case company_id. The actual content of the bind variable is provided in the form of an object. Here, the Java runtime class UUID.randomUUID().toString() is used to create a new company key.
Setting up the person table and the user parameter table is defined according to Listing 5.10 and Listing 5.11. To create a data object for the persons day of birth, the Scout utility class DateUtility is used.
The only piece missing to setup the database is calling the installStorage operation during the startup of the ”My Contacts” server application. The proper way to implement such a scenario is to schedule an installation job in the ServerApplication class of the Scout server. In the ”My Contacts” application this is implemented according to Listing 5.12. To create a server job, a new server session object needs to be obtained first. However, during the startup time of the server we do not have any logged in users yet. That is why the session is created for the backend subject representing the server application. Using this serverSession object, the installJob can be created. In it’s runTransaction method we can then call the installStorage operation to setup the ”My Contacts” database.
An additional Scout topic that is touched in this ServerApplication class is the Scout logging. As shown in Listing 5.12, a static logger object is created using Scout’s ScoutLogManager class. Events can then be logged with the logger.info method where info refers to the log level attached to this message. Similar to the database setup described above, the logging setup can be defined in config.ini file. The default setup defined for the development product is provided in Listing 5.13. Further information regarding logging in Eclipse Scout is available in the Scout wiki12 .
In the section before, we have implemented the access to the Derby database for the Scout server. And during the server startup, the application’s database schema can now be created and populated with some initial data.
Here, this schema and the implemented database access is used to fetch the data for the client application’s person page and the company page. The best place to implement these data provider methods is in the server’s StandardOutlineService class. This class has been created by the Scout SDK during the initial project creation step. It is meant to hold the operations that fetch the data for populating the elements visible in the outline tree and outline pages.
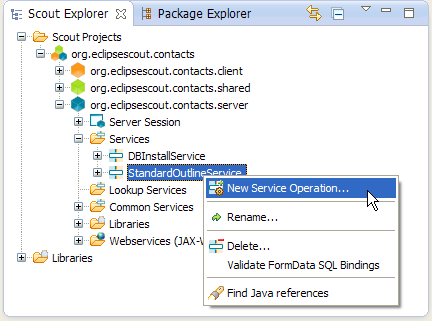
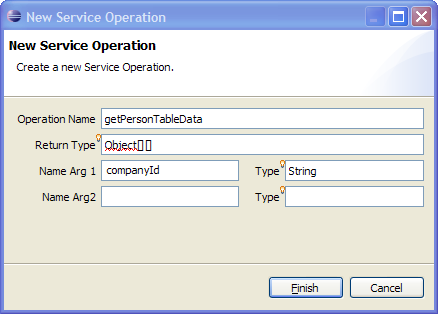
For the ”My Contacts” application, we first create the getPersonTableData operation as shown in Figure 5.20. In the wizard dialog enter ”getPersonTableData” into the Operation Name field. For the return type we simply use a two dimensional object array. As the person page is also displayed under the company page, we need to have a way to only return the persons working for a specific company. To allow for this use case, we add the parameter ”companyId” as the first argument to the getPersonTableData operation before we close the wizard with Finish button.
The next operation we need is the getCompanyTableData method. You may use the same creation steps as described above for the person table page data. But for fetching company table data we do not need an additional argument. The company page in the ”My Contacts” application will always show all available companies.
For the actual implementation of the two data fetching operations the code provided in Listing 5.14 is used. The implementation is straight forward and almost trivial. However, we can use the getPersonTableData example to introduce one of the many Scout utility classes.
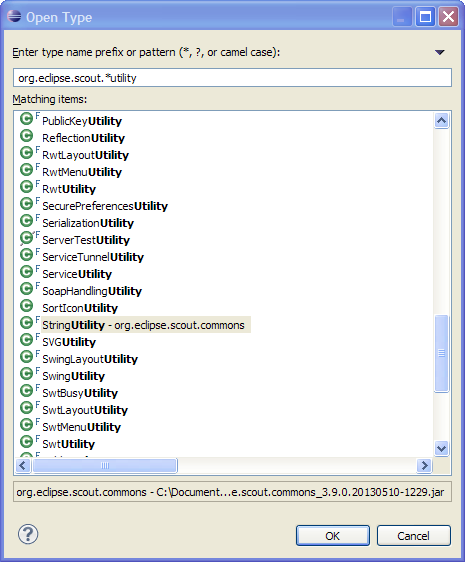
The class StringUtility is one of the many utility classes provided by the Scout framework. Here, it is used for the typical null or empty check. To get a quick overview, hit the <Ctrl><Shift><T> key combination. In the type dialog that appears enter org.eclipse.scout.*Utility into the pattern field. This will display the complete list of the Scout utility classes as shown in Figure 5.21.
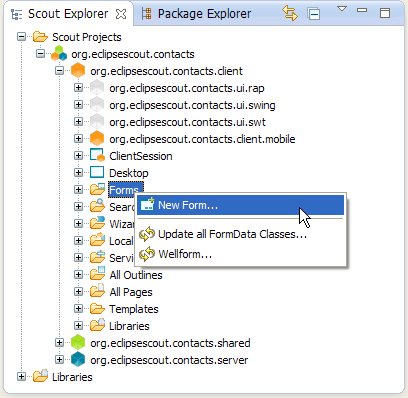
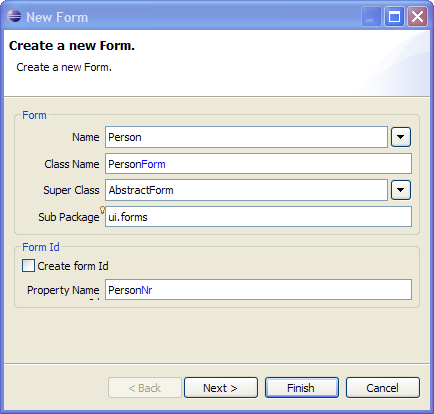
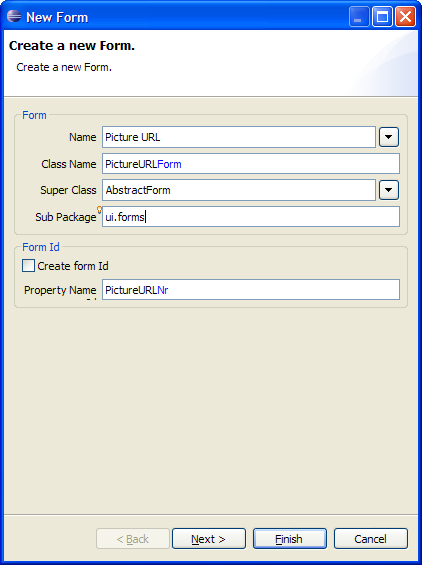
In this section we will create the person form that is used to display and edit the persons stored in the ”My Contacts” application. To add the person form use the Scout SDK New Form wizard as shown in Figure 5.22. In the first wizard step you just need to enter ”Person” as a new translated text into the Name field and add ”ui.forms” as the sub-package name in the corresponding wizard field. Then click the Finish button.
The wizard will create the necessary artefacts in the application’s client, the shared and the server plugin projects. On the client side the PersonForm class with the necessary form handlers is created, in the shared part, the PersonFormData transfer object is added. On the server side, a PersonProcessService with all necessary service operations referenced by the form handlers is implemented.
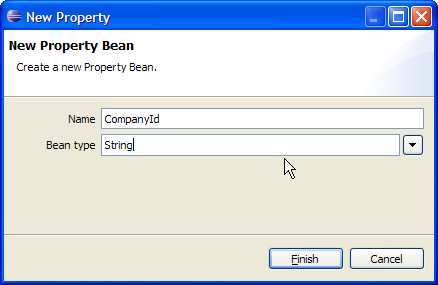
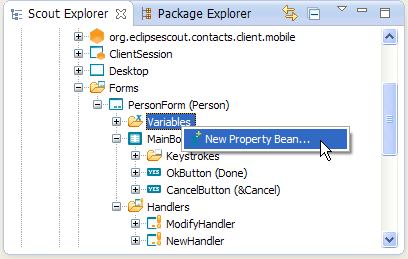
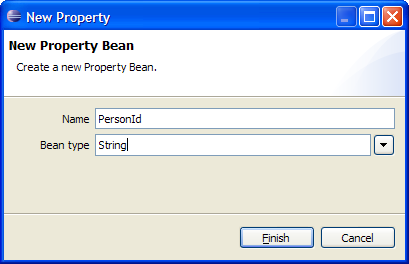
To hold the persons primary key in the person form we also need to add a corresponding variable. For this, use the New Property Bean wizard as shown in Figure 5.23. In the wizard dialog, enter ”PersonId” into the Name field and pick String from the dropdown list provided in the Bean type field. Then, click the Finish button to close the wizard.
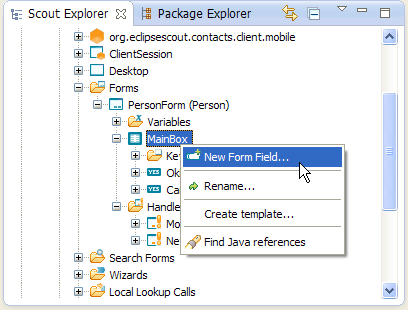
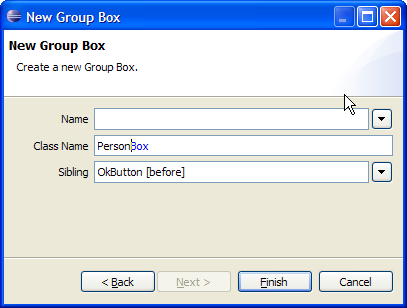
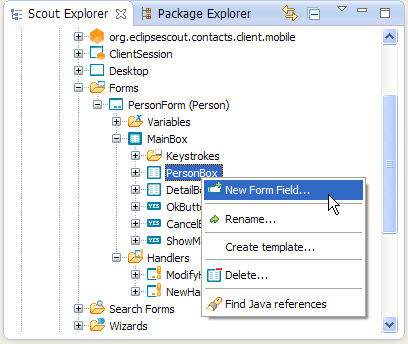
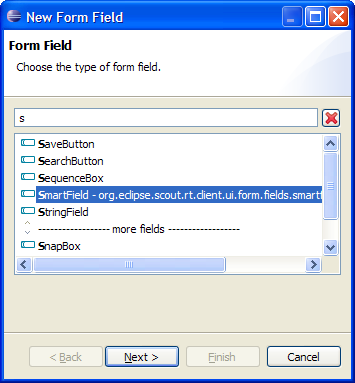
As a next step we create the main layout structure of the person form. According to the screenshot of the person form shown in Figure 5.1 the form is organized into an upper box including the first name, the last name and a picture field. In the ”Details” box in the lower half of the form some additional fields are found, such as the date of birth field. The bottom of the form holds a ”Show Map ...” link. We start with the general layout by adding the PersonBox according to Figure 5.24. And again on the person’s from MainBox node we add a second group box field using the label ”Detail”. The link is added with the New Form Field wizard too. In the first wizard step select the type LinkButton and use a new translated text ”Show Map ...” for the Name field
We now add the form fields listed below using the the New Form Field wizard multiple times. Most fields are of type StringField and different field types are separately indicated.
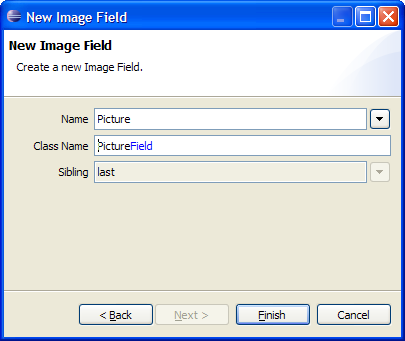
As an example for adding the form fields, the process is illustrated in Figure 5.25 for the creation of the picture field. In the field list we need to set non default properties for the PictureUrlField field and the PictureField field. The picture URL field will hold an URL pointing to the picture of the person to be displayed. As in the person form only the picture is to be displayed but not the picture URL, we need to make this field invisible. For this, select the PictureUrlField node in the Scout Explorer and then untick the Visible field in the Scout Object Properties. Note that to access the visibility property you need to open the section Advanced Properties first.
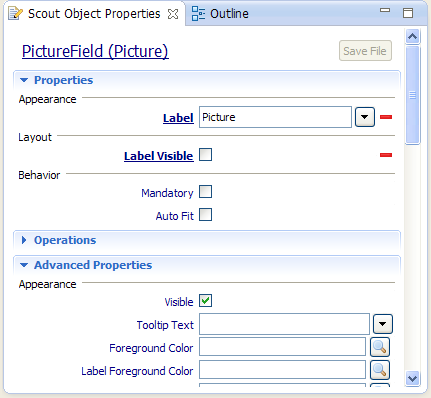
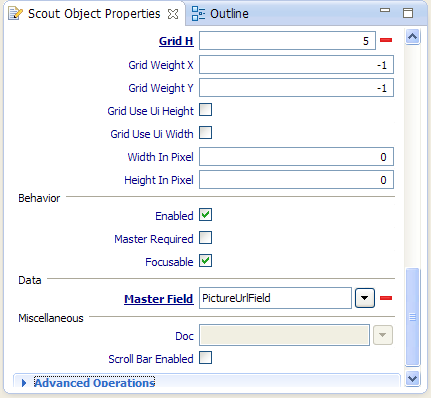
As the configuration of the picture field is more complex than the other fields, the changed properties are shown in the screenshots provided in Figure 5.26. First, no label is shown for the picture field as shown in the unticked Label Visible field of the Scout Object Properties. Then, property Grid H is set to 5. This results in the picture to cover the vertical space of 5 form fields.
Finally, we want the picture to be refreshed whenever the content of the picture URL is changed. For this, the property Master Field is set to the PictureUrlField. The implementation of the corresponding method execChangedMasterValue is provided in Listing 5.15. As we can see, the Scout helper class IOUtility is used to read the image content from the provided URL. This content is then used to assign the image content with the image field’s method setImage. Method setAutoFit is called to adapt the picture to the dimensions available to the image field.
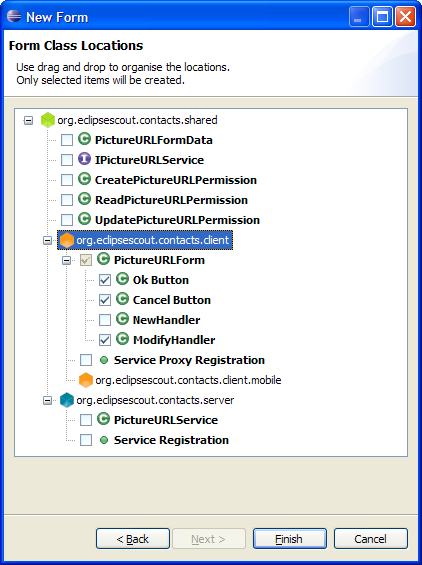
To edit a person’s picture link, we create a simple URL editor form as shown in Figure 5.27. As we only need this form to update the URL information of a person’s picture field, we do not need any connectivity to the backend of the ”My Contacts” application. That is why almost all form and service artefacts are deselected in the second wizard step shown on the right side of Figure 5.27.
As this form only holds a single URL field, we omit the description of the creation of the URL editor form’s content and provide the resulting Java code instead. In Listing 5.16 just the form’s MainBox code is shown.
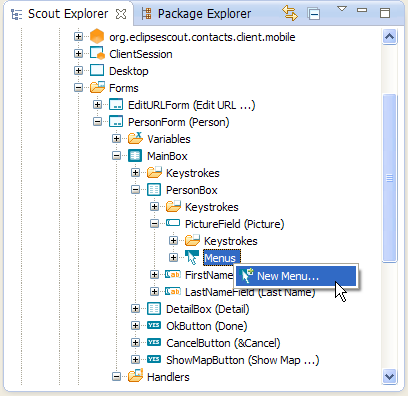
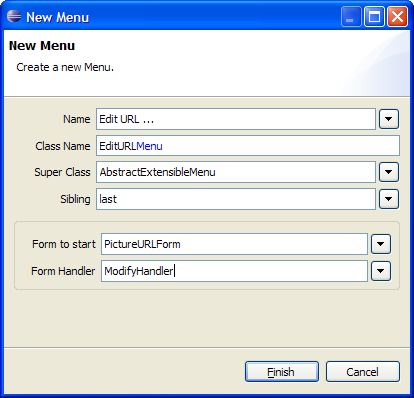
This form is then started via an ”Edit URL ...” contextmenu on the image field. The creation of this contextmenu is shown in Figure 5.28. See Listing 5.17 for the actual implementation of the execAction for this contextmenu.
Once the edit URL form is started with form.startModify() the client waits in method form.waitFor until the form is closed by the user. If the user has changed any field content (the picture URL in our case) and closed the form with the OK button, the method form.isFormStored returns true, and we can copy the new URL from the editor form field into the picture URL field of the person form. Such a change will then trigger method execChangedMasterValue of the PictureField which in turn updates the image shown in the person form.
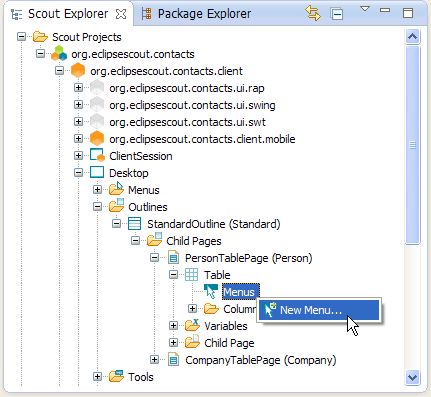
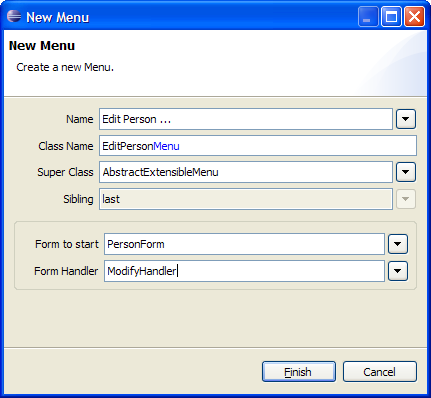
The user of the ”My Contacts” application wants to use the person form to show/edit attributes of a specific person. To support this use case, we need to link this form with the ”My Contacts” application. As we already have person pages that show some of the person’s attribute, we can now add context menus to this list to open/edit existing persons in the person form and to create new persons as well. This is achieved by using the New Menu wizard on the Menus node of the table of the person page according to Figure 5.29. In the Name field enter the new translated text ”Edit Person ...”. The form to start is the PersonForm and the ModifyHandler is the form handler to be used to start the form. As we have defined a meaningful primary key column on the person page and a matching variable is available for the person form, the Scout SDK wizard is generating the necessary code automatically. The implementation of the execAction method provided in Listing 5.18 works out of the box and should not need any manual tuning. Now, you may also add the ”New Person ...” menu in the same way. Except that you pick the NewHander in the New Menu wizard instead of the modify handler.
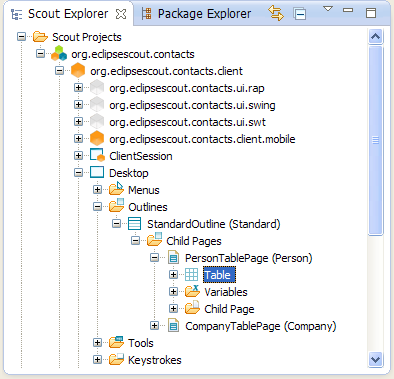
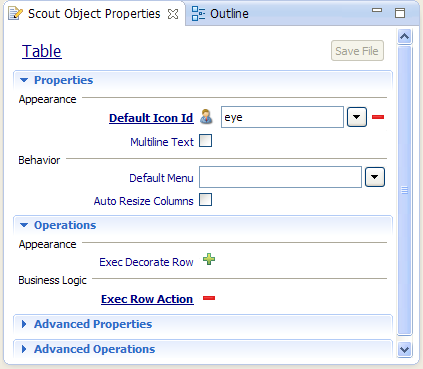
To open the person form with a double click on a person row or by hitting the <Enter> key, you may add a corresponding execRowAction on the person page. This method can be added to the person table by clicking on the green plus icon next to the operation Exec Row Action as shown in Figure 5.30. For the implementation of this method you may reuse the functionality implemented for the context menu according to Listing 5.19.
At the current stage of the ”My Contacts” application, we have no option to manage the relationship between people and companies. To manage this relation, we now add a company smart field to the person form. This smart field will then hold the current assignment of the person represented in the person form.
A Scout smart field can be viewed as user friendly dropdown field on steroids that also implements search-as-you-type to pick a specific entry. In the simplest case the smart field provides access to a small and locally provided list of key value pairs. But for the intended use in the ”My Contacts” application, we will need to access a list of elements provided by the server that will be compiled dynamically at runtime.
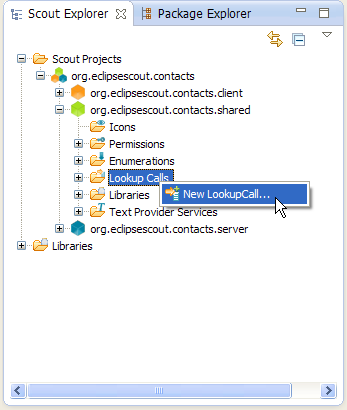
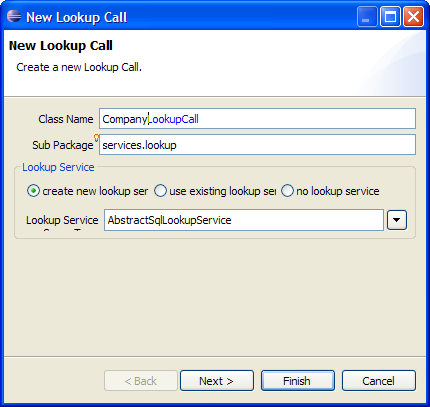
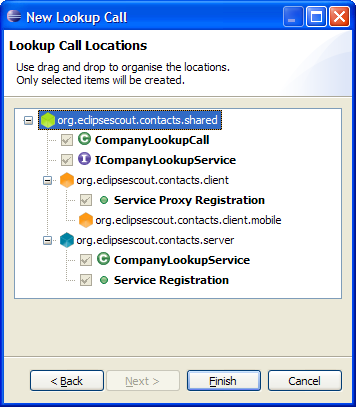
To create the access to this list, we start with the creation of the company lookup call. As shown in Figure 5.31 the lookup call is added on the Lookup Calls folder under the green shared node of the ”My Contacts” application. This opens the New Lookup Call wizard as shown in Figure 5.32. In the first wizard step, enter ”Company” into the Class Name field and verify that the wizard step looks the same as the screenshot shown on the left hand side of Figure 5.32. Before the wizard is closed, click on the Next button to move to the second wizard step. As shown on the right hand side of Figure 5.32 the wizard will also create a corresponding CompanyLookupService on the application’s server. We can now close this wizard with the Finish button.
The CompanyLookupCall just created by the Scout SDK wizard is provided in Listing 5.20. As we can see, the only method implemented is getConfiguredService that points to the specific server service to be used. In the Scout Explorer, the new company lookup service can be found in the Lookup Services folder under the blue server node of the application. In this service, we need to implement method getConfiguredSqlSelect as shown in Listing 5.21. For Scout lookup services, specific key, text and all criteria blocks need to be provided. This criteria are included in the SELECT statement using the <key>, <text> and <all> tags as shown in the listing. The Scout runtime uses the <key>-block in cases where a specific key is already assigned to the smart field. The <text>-block is used as a query criteria to create the dynamic search-as-you-type hit list based on the (sub)string entered by the user so far. Finally, the <text>-block is used to define the hit list to be shown when the user does not enter any text into the smart field but clicks on the field’s search icon instead. The bind variable :key and :text are provided by Scout and hold the value of the assigned key or the text entered into the smart field.
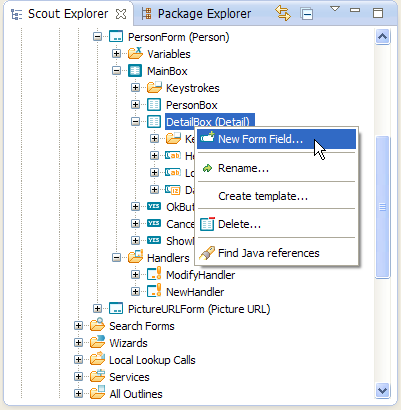
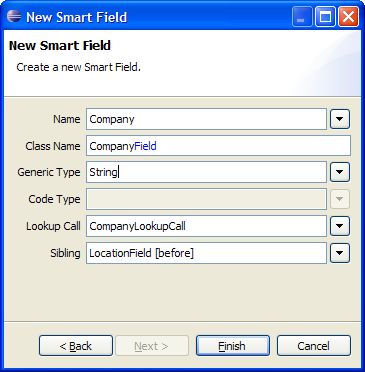
We are now ready to add the company smart field to the person form. To start the New Form Field wizard we use the context menu on the DetailBox of the person form as shown in Figure 5.34. In the first wizard step, we chose the SmartField entry as the field type and click the Next button. Then, we enter ”Company” into the Name field as shown on the right hand side of Figure 5.34. Make sure that you select the String entry in the Generic Type field as we are using string values to identify companies in the ”My Contacts” application. And in the LookupCall field, we can now select the CompanyLookupCall that we have just created before. Finally, the position of the new company smart field can be set in the Sibling field before the location field before the wizard is closed with the Finish button.
The implementation of the company smart field created by the Scout SDK wizard is provided in Listing 5.22. A look at the implementation of the CompanyField class shows its simplicity and the wiring with the company lookup service.
We now want to add the ”Map” form shown in the front of Figure 5.1. The purpose of this form is to show a map corresponding to the address entered into the location field of the person form using the Google Maps Image API13 . This also implies that only addresses that can correctly be parsed by the Maps Image API will lead to a useful map image.
To create the maps form we start the New Form wizard and enter the new translated text ”Map” into the Name field of the first wizard step. Then, we click the Next button to configure the artefacts to be created by the wizard. For the map form we can use the configuration as shown on the right hand side of Figure 5.27 with the difference that we do not need the Ok button. Having deselected most artefacts, the wizard can be closed with the Finish button.
After the form creation wizard has been closed, update the label of the cancel button to ”Close” in the button’s Scout Object Properties. Then, we can add an ”Address” variable to the form by starting the New Property Bean wizard on the Variables node of the newly created map form. In the property bean wizard, enter ”Name” into the Name field and set the Bean type field to String.
As the next step, the map image field is added to the from. For this, start the New Form Field wizard directly on the form’s MainBox node. In the first form field wizard step, select ImageField as the field type and click on the Next button. Before you can close the second wizard step with the Finish button, enter ”Map” into the Class Name field. To set the properties of the new map field, select the MapField node below the main box node of the map form. In the MapField’s Scout Object Properties untick the Label Visible property and add an execInitField method by clicking on the green plus icon next to this operation. The configuration of the map field can then be completed in section Advanced Properties. Here, we set the Grid H property to 6 and update the Width in Pixel property and the Height in Pixel property to a value of 400 each.
To add the Java code to display the map in the image field, click on the execInitField link in the Scout Object Properties of the map field. According to the implementation provided in Listing 5.23, an URL for the Maps Image API is first constructed. This URL also contains the content of the map form’s address variable and the configured dimension of the map field. The map picture returned by the Google API is then read using IOUtility.getContent and directly fed into the image fields setImage method.
The last step involving the implementation of the map form feature is its integration into the person form. As visible on the lower left part of the person form shown in Figure 5.1, a Show Map ... link is available. We now need to add such a link to the person form and add the necessary wiring for opening the newly created map form if the user clicks on this link. As a first step, the New Form Field wizard is started on the MainBox node. In the first wizard step, select the LinkButton from the available field types and click the Next button to load the second wizard step. Here, just enter the new translated text ”Show Map ...” into the Name field and close the wizard with the Finish button.
To add the necessary wiring code to the link button double click the ShowMapButton node in the Scout Explorer and implement its execClickAction method. As shown in Listing 5.24, we only need to create a new map form in the click action, set its address variable and open the form with form.startModify.
In the ”My Contacts” client application the person form is started via two separate form handlers called by the person page context menus. The new handler is used to start the form in the mode to create new persons while the modify handler is implemented to start the form for updating existing persons. When we look at the implementation of the modify handler provided in Listing 5.25, we see the two methods execLoad and execStore.
As already described in Section 3.2.3 of the ”Hello World” tutorial, execLoad is called by the Scout framework the the form is started. Similarly, method execStore is called by the Scout framework after the user has clicked the OK button of a form. In both methods, a corresponding service operation of the PersonService is called. From the form handler’s execLoad method the method load of the person service is called. And the form handler’s execStore method calls the person service’s method store as shown in Listing 5.26.
For the load method in Listing 5.26 it is assumed that the in the provided parameter formData the person’s id is available as a search criteria. It might be interesting to note that for the SQL SELECT and UPDATE statements we can provide the complete form data to use Scout’s support for bind variables.
The implementation of the person form’s new handler is implemented similar to it’s modify handler. Instead of calling the service operations load and store, the methods prepareCreate and create are used. In principle, method prepareCreate is not needed for the ”My Contacts” application. As its implementation has been created by the Scout SDK wizard, it does not any harm when the method is left as it is.
In Listing 5.27 the implementation of the PersonService’s create method is provided. First, the implementation checks if the provided form data contains a person id. If the person has been entered manually a value for this id is missing and a new id is provided using formData.setPersonId(UUID.randomUUID().toString()). The only responsibility of the INSERT statement following the person id check is to make sure we will have a row in the PERSON table for the person to be created. To save all other form data parameters, we just need to call the previously implemented store method.
Creating the company form and the necessary backend services is not described here. Instead this task is left as an exercise to the reader and in the text below some minimal guidelines are provided.
The main trick is to start with the New Form wizard to create the company form. This will create all necessary artefacts including the forms, necessary server services, and communication between the client and the server. Then, make sure you don’t forget to add a variable companyId to the company form. To decide on the fields that need to be on the company form you may check the setup of the database schema provided in Listing 5.9. If in doubt about what to do, please refer to the procedure used to create the person form.
In case you get lost completely, you may download the ”My Contacts” application from this books Github repository as described in the Scout wiki14 .
To access data from sites such as LinkedIn, Xing, Google+ or Facebook, most social networks provide an API that requires user authentication. The current defacto standard for such authentication is the Open Authentication Protocol (OAuth)15
The big advantage of the OAuth standard is the access token based authentication. If an application such as the ”My Contacts” example is in possession of an access token, it can fetch data from the hosting site or even act on the users behalf. It is important to note that the access token is just constructed of two values, the token and the secret. And both values are completely separate from the user’s username and password credentials. This means that an access token may be safely stored in other applications. Should such an application’s data get compromised, the username and password are still save. The user then has the option to remove the compromised access token.
For the ”My Contacts” application we use the Scribe Java library16 This library makes accessing social services very simple. At the same time the Scribe library is used here to demonstrate the integration of external Java libraries in Scout applications.
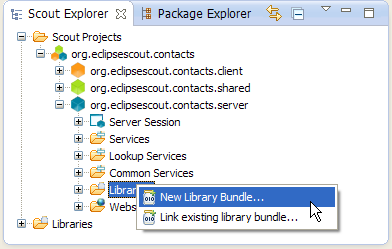
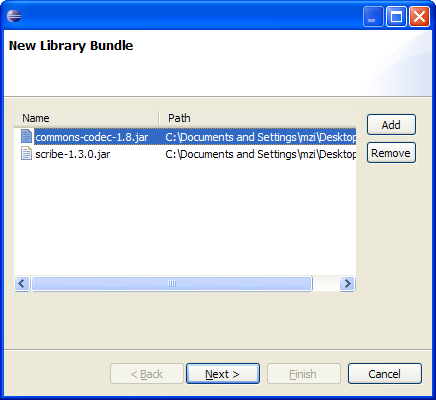
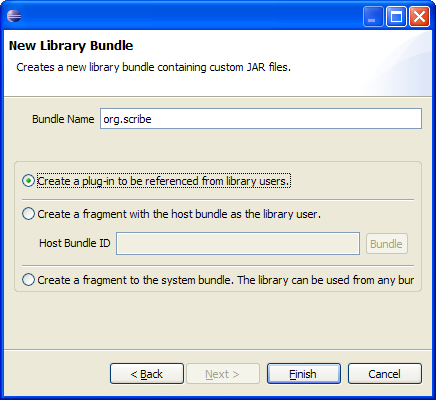
As we will use the Scribe library only on the Scout server side start the Scout SDK New Library Bundle wizard below the blue server node as shown in Figure 5.35. In the first wizard step shown on the left side of Figure 5.36 add the files scribe-1.3.0.jar and commons-codec-1.8.jar17 using the Add button. Once the two JAR files are listed in the library list of the wizard click the Next button. On the second wizard step, enter ”org.scribe” into the Bundle Name field as shown on the right side of Figure 5.36. Then, close the wizard with the Finish button.
The Scout SDK wizard then creates the corresponding library plugin and updates the server product files and the plugin dependencies of the applications server plugin accordingly. Once the wizard has completed the classes defined in the two JAR files can directly be accessed from the ”My Contact” application’s server plugin.
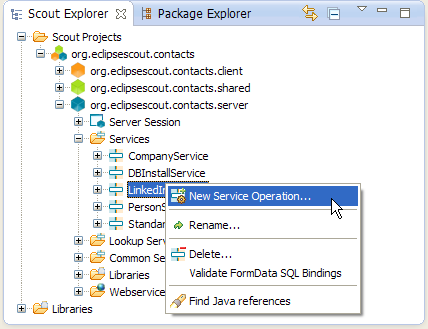
To access the LinkedIn data with Scribe a separate service LinkedInService is created in the Services folder under the blue server node. Before we add any service operations to the LinkedIn service, the service initialization method is implemented according to Listing 5.28. This initialization is not discussed further here. Instead, the interested reader is referred to the corresponding LinkedInExample on the Scribe web pages18 .
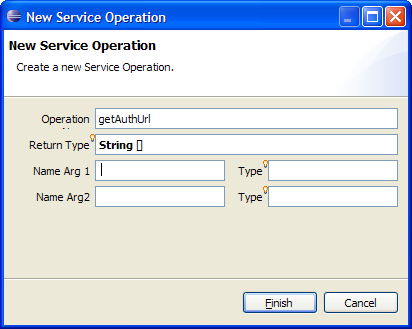
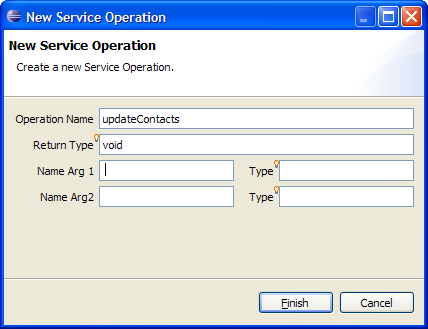
The first service operation getAuthUrl is added according to Figure 5.37. This operation will return the necessary information to create a request token and provides a link to open in a web browser to start the authentication against the LinkedIn account. For its implementation see Listing 5.29.
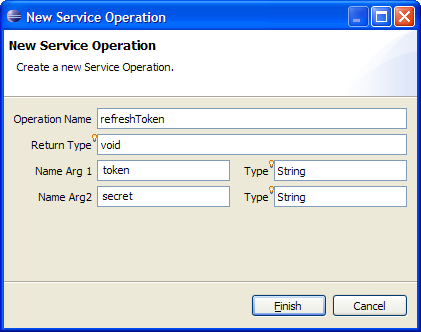
The next operations we add are used to refresh the users access token stored in the ”My Contacts” application and to refresh or download the users contacts stored in the user’s LinkedIn account. See Figure 5.38 for the necessary details for the creation of the two methods.
Method refreshToken is implemented according to Listing 5.30. Using the provided token parameters and the security code, the access token is created using m_service.getAccessToken(...). Then, the user id of the currently logged in user is obtained with ServerSession.get().getUserId(). Once we have both the access token and the user id available in method refreshToken, we can store the token and the secret values for the current user in table USERS_PARAM according to Listing 5.30.
In the current implementation of the ”My Contacts” application this id will always be set to anonymous. The reason for this is the AnonymousSecurityFilter security filter that is activated during the initial project creation step. As for logging, and database access, the configuration of the security filters of the server application is defined in the server’s config.ini file.
If you would like to change the ”My Contacts” application to a multi-user setup, the next simpler
option is to deactivate the anonymous security filter and use the basic security filter instead.
In the server’s config.ini file the necessary config lines are already prepared as shown in
Listing 5.31. Just set BasicSecurityFilter#active=true and ”My Contacts” the client
application will prompt you with a login dialog. In this dialog you may enter one of the login
credentials specified in in the BasicSecurityFilter#users parameter of the config.ini
file. To log in as user admin, enter password ”manager”. To add new users, just amend the
BasicSecurityFilter#users parameter with additional comma separated entries of the form
username
assword.
The implementation of service method updateContacts of the LinkedIn service is provided in Listing 5.32. First, a service reference is obtained to the person process service. Then, the LinkedIn contacts obtained by method readContacts are stored in a persons list object. For each person, a form data is created and its person id parameter is set to DomUtility.getValue(person, "id"). Using the load method of the person process service all attributes of the person are loaded from the server’s database. The new attribute values obtained from the corresponding LinkedIn contact are then used to update the corresponding form data parameters. The newly updated person form data is then stored in the database with service.create(formData). Before we go through the readContacts method, we have a look at the explicit format of the contact data provided by the LinkedIn API.
From the sample XML extract provided in Listing 5.33, we can readily identify the person id f7R6wGcblj, the first name Mike and some other attribute names with associated attribute values. A closer look reveals the identity of the person to be Mike Milinkovich, a well known character in the Eclipse community. For each LinkedIn contact this format is parsed in method readContacts into a DOM tree19 . Using the DomUtility helper class provided in Listing 5.34, these attribute values are then extracted from this DOM tree and used to update the existing person attributes.
Accessing the user’s LinkedIn contact list is implemented in method readContacts according to Listing 5.35. In this method, a signed OAuth request is first created using the access token provided by method getToken. The request specified by constant LINKEDIN_CONNECTIONS is defined as http://api.linkedin.com/v1/people/~/connections. According to the API specification20 this returns all connections of the user. To sign the request, the access token is retrieved from the database of the ”My Contact” application using method getToken. According to the implementation provided in Listing 5.35 the user id is first obtained from the user’s server session. The necessary parameters to create the access token are then retrieved from the USERS_PARAM table. We have now implemented all necessary server services and operations to access the LinkedIn API, to create/refresh access tokens and to retrieve the users contacts.
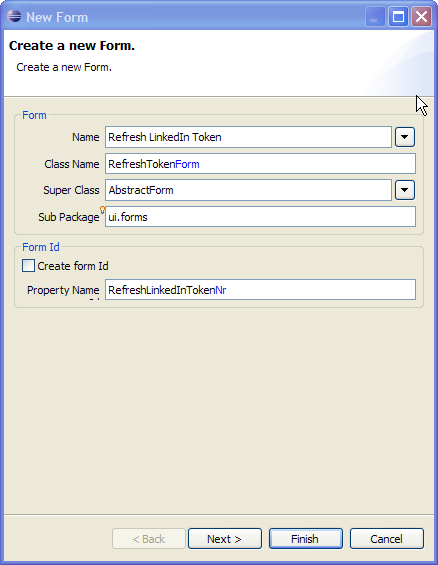
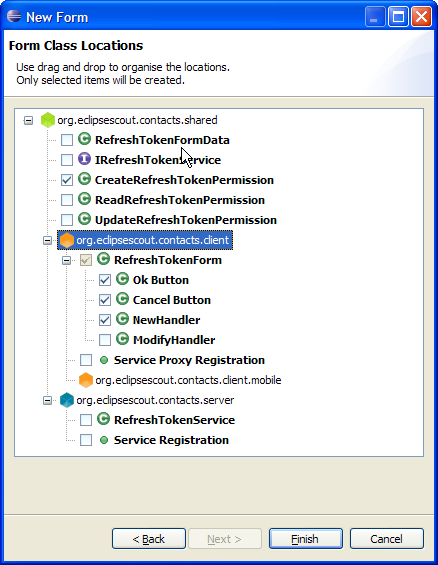
The last piece that is missing to complete the ”My Contacts” application is the user interaction for the LinkedIn integration implemented in the previous section. To allow the user to create/refresh an access token, we need to implement the refresh token form shown in Figure 5.2 at the beginning of this chapter. To create the form code, we use the New Form wizard of the Scout SDK as shown in Figure 5.39. For the Name field enter a new translated text ”Refresh LinkedIn Token” and fill ui.forms into the Sub Package field field. Then, click the Next button to switch to the second wizard step. Here, deselect the elements that will not be needed for the implementation of the refresh form according to the right hand side of Figure 5.39. Once the form has been created by the wizard, add the a Token and a Secret form variable of type string under the form’s Variables folder.
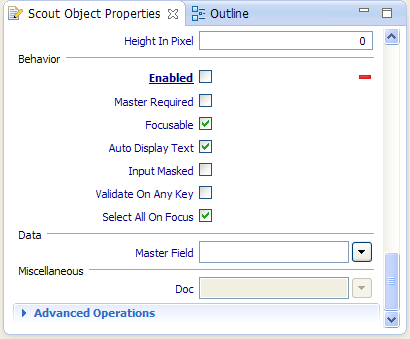
The next step is to add the desired layout and the necessary form fields. First, use the New Form Field wizard to add a new group box TokenBox to the MainBox node. And into the TokenBox add a ”Security Code” string field as shown on the left hand side of Figure 5.40. To provide a click-able link that opens a web browser with the LinkedIn authentication link, add a ”Open Auth URL” link of type LinkButton to the main box. To make the user to first click the authentication link button before he tries to fill any content into the security code field we initially disable this field. For this, first click on the security code field in the Scout Explorer and then open the Advanced Properties section of the fields Scout Object Properties. As shown on the right side of Figure 5.40, deselect the Enabled property.
The implementation of the forms’ structure is provided in Listing 5.36. In the execClickAction method of the link button OpenAuthURLButton the necessary information for the auth link is obtained from the server. For this, we are using the getAuthUrl operation implemented in the previous section. The parameters to create the request token are saved in the form’s token and secret variables. Then, the auth link is opened in a web browser with the shellOpen method of the client’s shell service. Finally, after opening the web browser we can enable the security field with getSecurityCodeField().setEnabled(true).
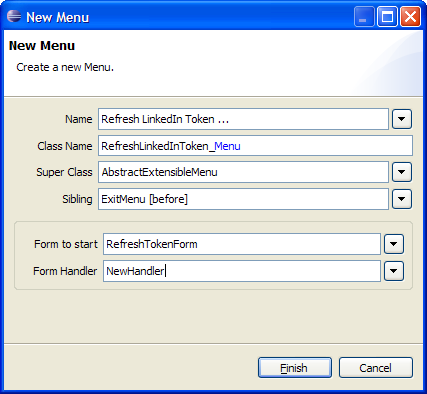
We can now integrate the form to refresh the LinkedIn access token under the applications ”File” menu. This is done using the New Menu wizard as shown in Figure 5.41. Enter the translated text ”Refresh LinkedIn Token ...” into the wizard’s Name field and pick the element Exit Menu [before] from the dropdown box of the Sibling field. In the Form to start field select the newly created refresh token form and use the NewHandler entry in the Form Handler field. To close the wizard, click the Finish button.
The implementation of the refresh menu is shown in Listing 5.38. In method execAction(), we need to amend the part after starting the refresh token form. If the method form.isFormStored() returns true, the user has modified the secure code field and it is fair to assume that the user wants to create/refresh his LinkedIn access token. For this, we first retrieve the necessary parameters to call the backend service operation refreshToken implemented in the previous chapter.
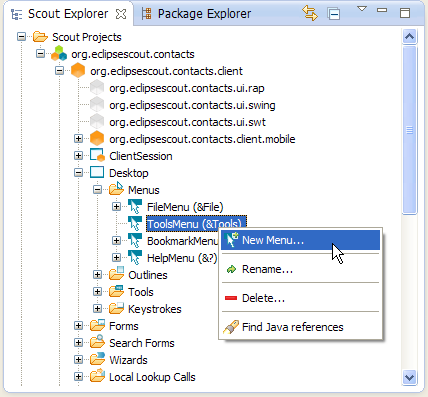
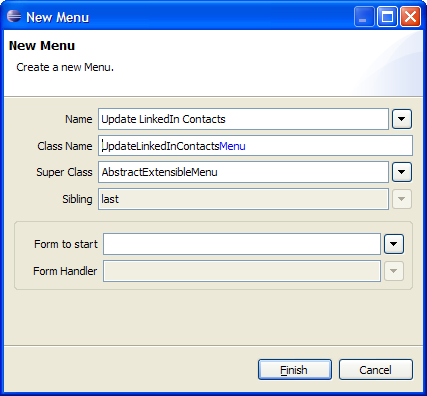
As the last missing component of the ”My Contacts” application, we add the menu to fetch the LinkedIn contacts and update the database accordingly. The menu entry is created as a sub menu of the ”Tools” menu. For this, use the new menu wizard on the ToolsMenu node as shown in Figure 5.42. The implementation of the menu’s execAction method shown in Listing 5.38 is trivial. We only need to call the operation of the LinkedInService implemented in the server part of the ”My Contacts” application.