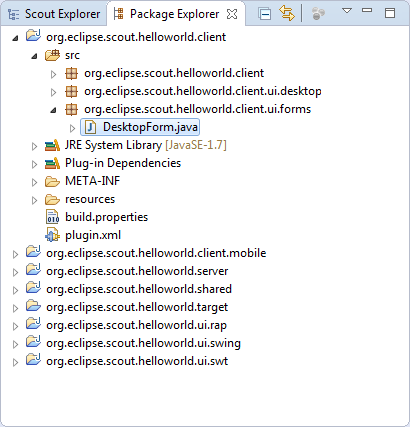
Figure 3.1: The Eclipse plugin projects of the ”Hello World” application shown by the Package
Explorer in the Scout SDK on the left hand side. The corresponding view in the Scout Explorer is
provided on the right hand side.
The previous ”Hello World” tutorial has been designed to cover the creation of a complete client server application in a minimal amount of time. In this chapter, we will take a deeper look at the ”Hello World” and provide background information along the way. The goal is to explain many of the used concepts in the context of a concrete Scout application to allow for a well rounded first impression of the Eclipse Scout framework and the tooling provided by the Scout SDK.
The structure of this chapter is closely related to the ”Hello World” tutorial. As you will notice, the order of the material presented here exactly follows the previous tutorial and identical section titles are used where applicable. In addition to Chapter 2, we include Section 3.2 to discuss the initial application generated by the Scout SDK.
The first thing you need for the creation of a new Scout project is to select a new workspace. For Eclipse, a workspace is a directory where Eclipse can store a set of projects in a single place. As Scout projects typically consist of several Eclipse plugin projects the default (and recommended) setting is to use a single workspace for a single Scout project.
In the case of the ”Hello World” application, the workspace contains seven plugin projects as shown on the left side of Figure 3.1. In the expanded source folder of the client plugin org.eclipse.scout.helloworld.client the organisation of the Java packages is revealed. The Scout Explorer provided on the right side of Figure 3.1 shows three colored top level nodes below the main project org.eclipse.scout.helloworld.
In the Scout Explorer, the main project node expands to the orange client node org.eclipse.scout.helloworld.client, the green shared node org.eclipse.scout.helloworld.client and the blue server node org.eclipse.scout.helloworld.server. The client node first presents the white user interface (UI) nodes org.eclipse.scout.helloworld.client.ui.* indicating the supported UI technologies. Next, the client mobile node org.eclipse.scout.helloworld.client.mobile is shown. It is responsible for adapting the layout of the user interface suitably for mobile and tablet devices. Finally, after the ClientSession node and the Desktop node, component specific folders allow for a simple navigation to the various client parts.
Comparing the Package Explorer with the Scout Explorer a couple of aspects are notable. First, the number and names of the Eclipse plugin projects is identical in both the Package Explorer and the Scout Explorer view. However, the Scout Explorer recognizes the Scout project structure and explicitly renders the relation between the different Eclipse plugins. In addition, individual node colors are used to indicate the role of each plugin project. Second, the focus of the Scout Explorer lies on the business functionality of the complete client server application. Artefacts only necessary to the underlying Eclipse platform are not even accessible. Third, on the individual elements rendered in the Scout Explorer, the Scout SDK provides menus to start wizards useful to the selected context. In the case of the ”Hello World” tutorial we could create the complete application (except for a single line of Java code) using these wizards .
When we revisit the New Scout Project wizard in Figure 2.2, it now becomes trivial to explain how the Project Name field org.eclipse.scout.helloworld was used as the common prefix for plugin project names and Java package names. Based on the project name, the last part helloworld was used for the Project Alias field. As we have seen in Section 2.7, this project alias is used by the Scout SDK to build the base names of the WAR files in the export step. In turn, after deploying the WAR files as described in Section 2.8, the RAP server application becomes available under the URL http://localhost:8080/helloworld. Should you have a catchy naming for you application in mind, com.mycompany.mycatchyname is therefore a good choice for the Project Name field.
In this section, we will walk you through the central Scout application model components of the ”Hello World” example. As each of these components is represented by a Java class in the Scout framework, we can explain the basic concept using the available ”Hello World” source code. Below, we will introduce the following Scout components.
Please note that most of the Java code was initially generated by Scout SDK. In many cases this code can be used ”as is” and does not need to be changed. Depending on your requirements, it might very well be that you want to adapt the provided code to fit your specific needs. However, a basic understanding of the most important Scout components should help you to better understand the structure and working of Scout applications.
The desktop is the central container of all visible elements of the Scout client application. It inherits from Scout class AbstractDesktop and represents the empty application frame with attached elements, such as the applications menu tree. In the ”Hello World” application, it is the Desktop that is first opened when the user starts the client application.
To find the desktop class in the Scout Explorer, we first navigate to the orange client node and double click the Desktop node just below. This will open the associated Java file Desktop.java in the editor view of the Scout SDK. Of interest is the overwritten callback method execOpened shown in Listing 3.1.
Method execOpened is called by the Scout framework after the desktop frame becomes visible. The only thing that happens here is the creation of a desktopForm object, that gets assigned an icon before it is started via method startView. This desktop form object holds the Message field text widget that is displayed to the user1 . More information regarding form elements are provided in the next section.
Scout forms are UI containers that hold form field widgets. A Scout form always inherits from Scout class AbstractForm and can either be displayed as a dialog in its own window or shown as a view inside of another UI container. In the ”Hello World” application a DesktopForm object is created and displayed as a view inside of the desktop element.
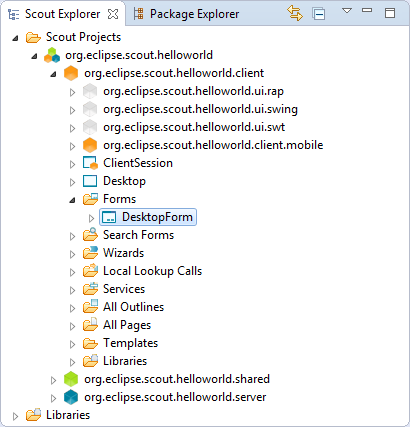
To find the desktop form class in the Scout Explorer, expand the orange client node2 . Below this node, you will find the Forms folder. Expand this folder to show the DesktopForm as shown in Figure 3.2. In the Scout Object Property window in the screenshot, we can also see the Display Hint property. Its value is set to ’View’ to display the desktop form as a view and not as a dialog in its own frame.
Expand the DesktopForm to show its children: Variables, MainBox and Handlers. The Variables sub folder contains variables. They are invisible to the application user. The ”Hello World” application is so simple, it does not need variables. The sub folder MainBox contains form fields. These are the visible user interface elements. The main box of our DesktopForm holds the DesktopBox containing the MessageField added with the New Form Field wizard. Finally, the Handlers sub folder contains all available form handlers. The view handler shown in Figure 3.2 has been added in the initial project creation step.
Form handlers are used to manage the form’s life cycle. Scout form handlers inherit from AbstractFormHandler and allow the implementation of desired behaviour before a form is opened, or after it is closed. This is achieved by overwriting callback methods defined in AbstractFormHandler. The necessary wiring is provided by the Scout framework, either by the initial project creation step or when using one of the provided Scout SDK wizards.
In the ”Hello World” application, it is the overwritten execLoad method in the ViewHandler that defines what will happen before the desktop form is shown to the user. The corresponding source code is provided in Listing 3.2. It is this execLoad method where most of the behaviour relevant to the ”Hello World” application is implemented. Roughly, this implementation is performing the following steps.
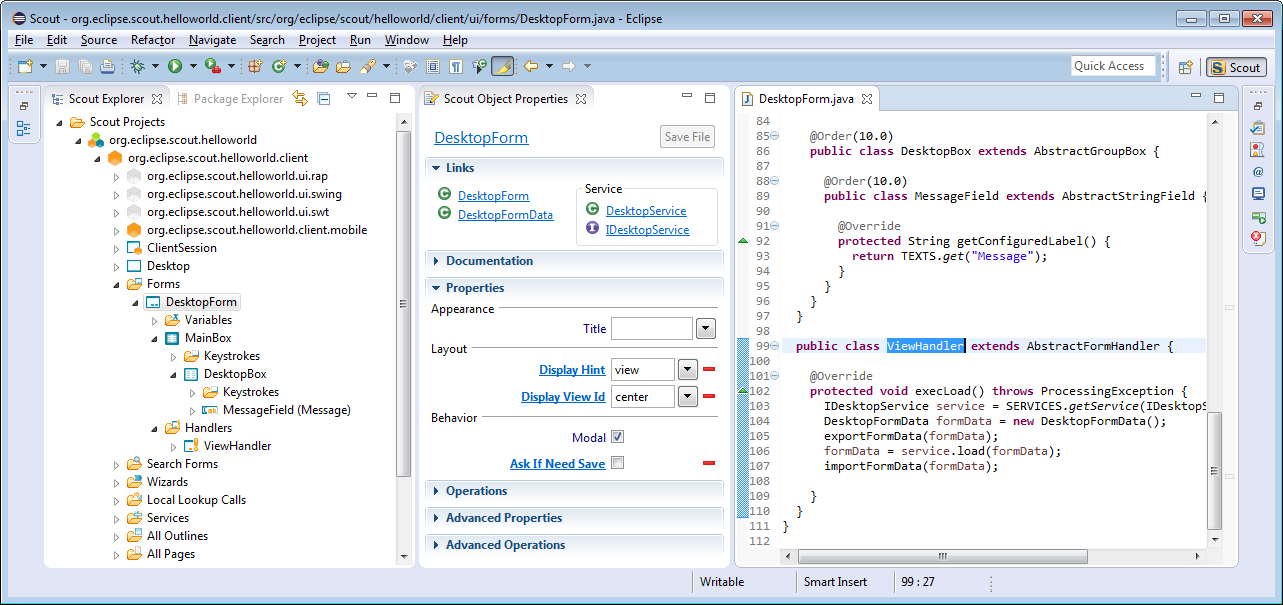
To open the ViewHandler class in the Java editor of the Scout SDK, double click on the ViewHandler in the Scout Explorer. Your Scout SDK should then be in a state similar to Figure 3.2. In the lower part of Listing 3.2 we can see the wiring between the desktop form and the view handler in method startView. Further up, we find method execLoad of the view handler class.
Before we discuss this method’s implementation, let us examine when and how execLoad is actually called. As we have seen in the Desktop class (see Listing 3.1), the form’s method startView is executed after the desktop form is created. Inside method startView (see Listing 3.2), the desktop form is started/opened using startInternal. In method startInternal a view handler is then created and passed as a parameter. This eventually leads to the call of our execLoad custom implementation.
We are now ready to dive into the implementation of method execLoad of the desktop form’s view handler. First, a reference to a form service identified by IDesktopService is obtained using SERVICES.getService. Then, a form data object (the DTO) is created and all current form field values are exported into the form data via method exportFormData. Strictly speaking, the exportFormData is not necessary for the use case of the ”Hello World” application. But, as this is generated code, there is no benefit when we manually delete the exportFormData command. Next, using the load service method highlighted in Listing 3.2, new form field values are obtained from the server and assigned to the form data object. Finally, these new values are imported from the form data into the form via the importFormData method. Once the desktop form is ready, showing it to the user is handled by the framework.
To add some background to the implementation of the execLoad above, the next section introduces services and form data objects.
Form services and form data objects are used in the Scout framework to exchange information between the Scout client and server applications. When needed, a service implemented on the server side can register a corresponding proxy service on the client. This proxy service is invoked by the client as if it were implemented locally. In fact, when we get a service reference using SERVICES.getService, we do not need to know if this service runs locally on the client or remotely on the server.
In the ”Hello World” example application, the client’s desktop form has an associated desktop service running on the server. This correspondence between forms and form services is also reflected in the Links section of the Scout Object Properties of the desktop form. As shown in Figure 3.2, links are provided not only for the desktop form, but for its desktop form data, the corresponding desktop form service as well as for the service interface IDesktopService. On the client, this interface is used to identify and register the proxy service for the desktop service.
To transfer data between the client and the server, the ”Hello World” application uses a DesktopFormData object as a DTO. This form data object holds all form variables and values for all the form fields contained in the form. Taking advantage of this correspondence, the Scout framework provides the convenience methods exportFormData and importFormData. As a result, the developer does not need to deal with any mapping code between the form data object and the form fields.
The actual implementation of the desktop form service in class DesktopService is implemented on the server side. As the class DesktopService represents an ordinary Scout service it inherits from AbstractService. It also implements its corresponding IDesktopService interface used for registering both the actual service as well as the proxy service.
To run a Scout application the Scout SDK provides launcher boxes in the Scout Object Properties as described in Section 2.3. These object properties are associated to the top level project node in the Scout Explorer. Using the Edit icon provided in the product launcher section of the Scout Object Properties, the list of launcher boxes can be specified as shown in Figure 3.3.
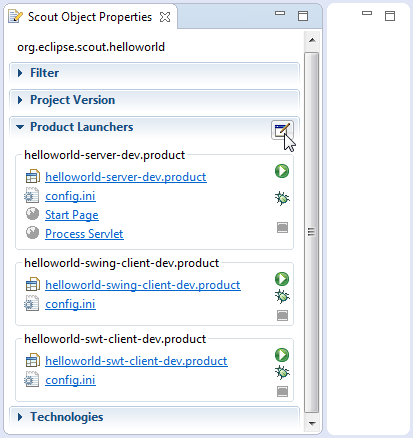
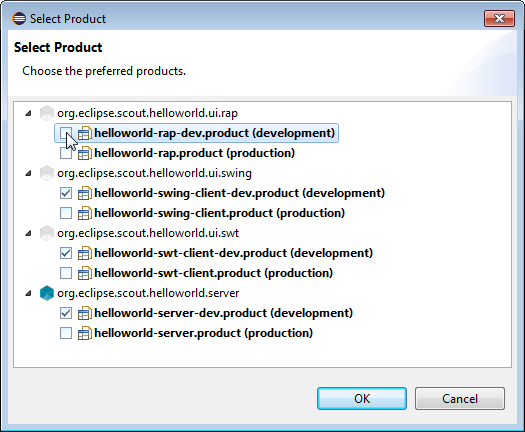
The available products shown on the right side of Figure 3.3 represent the Eclipse product files created in the initial project creation step. Product files4 are used in Eclipse to specify the configuration and content of an executable application. In the case of the ”Hello World” project, four executable applications — with two Eclipse product files for each application — have been defined by the Scout SDK. The four applications, one for the server application and one for each client technology, have already been discussed in Section 2.3.
We assume that Scout applications will be run in at least two different environments. Once from within the Eclipse IDE in the development environment, and once by the actual end users outside the Eclipse IDE. This second environment is named production environment. Depending on the complexity of deployment processes there might be some more environments to consider, such as testing and integration environments. This is the reason that the Scout SDK initially creates two product files that are associated with the development and the production environment.
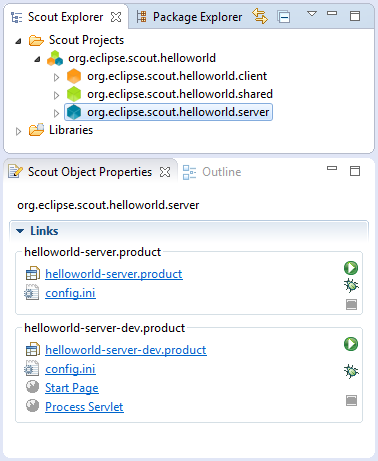
Even in the case of the simple ”Hello World” example, the Scout application is started in two target environments. The development environment defines the product in the context of the Scout SDK. To export and run the Scout application outside of the Scout SDK, the production product files are used to define the application when it is to be started on a Tomcat web server. Figure 3.4 illustrates this situation for the ”Hello World” server application. On the left side, the blue server node is selected in the Scout Explorer. This opens the two server launcher boxes for the production and the development environment. On the right side of Figure 3.4, the corresponding plugin project org.eclipse.scout.helloworld.server is expanded to show the file based organisation of the two product definitions.
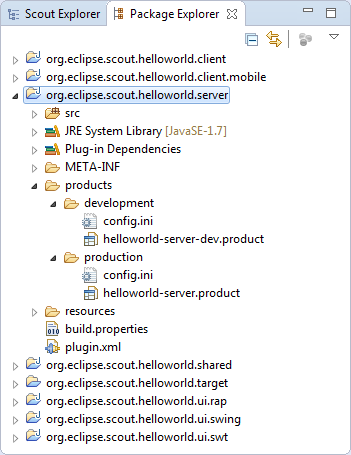
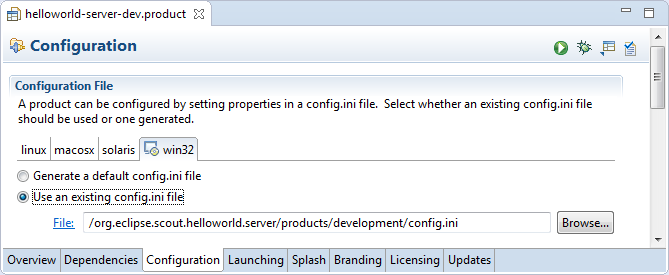
For the case of the ”Hello World” example we did not need to edit or change the product files generated by the Scout SDK. However, if your requirements are not met by the provided product files, you may use the Eclipse product file editor. A screenshot of this editor is shown in Figure 3.5 with the tab Dependencies opened. In the tab Dependencies, the complete list of necessary plugins is provided. Example plugins visible in Figure 3.5 include the ”Hello World” server and shared plugins, Scout framework plugins, and Jetty plugins. The Jetty5 plugins are only needed to run the ”Hello World” server application inside the Scout SDK. Consequently, Jetty plugins are not listed as a dependency in the Scout server’s production product file.
![]()
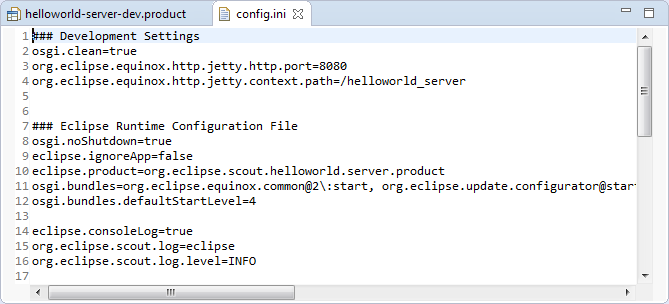
Switching to tab Configuration in the product file editor, shows the selected radio button Use an existing config.ini file and the link to the configuration file provided in the File field as shown in the upper part of Figure 3.6. Below, a part of the server’s config.ini file is shown. Both the entry in the product file pointing to the configuration file, and the content of the config.ini file has been generated by the Scout SDK during the initial project creation step. As shown in the lower part of Figure 3.6, Eclipse configuration files have the format of a standard property file. The provided key value pairs are read at startup time if the config.ini file can be found in folder configuration by the Eclipse runtime.
Having introduced Eclipse product files and configuration files based on the ”Hello World” server application, we will now look at the different client applications in turn. With Swing applications6 and SWT applications7 , two alternative UI technologies are currently available to build Scout desktop client applications. More recently, JavaFX8 is promoted as a successor to Swing and it is therefore likely, that Scout will provide JavaFX client applications in the future.
When we compare the product files for the Swing and the SWT client applications, it is apparent that both client applications share a large number of plugins. Most importantly, the complete UI model and the business logic is identical for both client applications. In other words, the value created by the Scout developer is contained in the two plugins org.eclipse.scout.helloworld.client and org.eclipse.scout.helloworld.shared. To create an executable client application, we only need to combine these two plugins with a set of plugins specific to the desired UI technology.
After starting the ”Hello World” Swing client or the corresponding SWT client application, the client application first reads the startup parameters from its config.ini file. Among other things, this client configuration file contains the parameter server.url to specify the URL to the ”Hello World” server. After the startup of the ”Hello World” client application, it can then connect to the ”Hello World” server application using this address.
For Scout web, tablet and mobile clients, the Eclipse RAP framework9 is used. The RAP framework provides an API that is almost identical to the one provided by SWT and allows to use Java for server-side Ajax10 . This setup implies that Scout tablet and mobile clients are not native clients but browser based11 .
Comparing the product file of the SWT client applications with the RAP application, we observe that the RAP development product does not include any SWT plugins, but a set of RAP and Jetty plugins. In addition, the RAP product also contains the Scout mobile client plugins org.eclipse.scout.rt.client.mobile and org.eclipse.scout.helloworld.client.mobile. These two plugins are responsible for transforming the UI model defined in the ”Hello World” client plugin to the different form factors of tablet computers and mobile phones.
If you start the ”Hello World” RAP application in your Scout SDK, you are launching a second server application in a Jetty instance on a different port than the ”Hello World” server application. As in the case of the desktop client applications, the RAP or Ajax server application knows how to connect to the ”Hello World” server application after reading the parameter server.url from its config.ini file.
Using the UI of the ”Hello World” application we explain in this section how the Scout UI form model is represented in Java. We also describe how this representation is exploited by the Scout SDK to automatically manage the form data objects used for data transfer between Scout client and Scout server applications. Finally, will have a brief look at internationalization12 support of Scout for texts.
As discussed in Section 3.2.2 Scout forms consist of variables, the main box and a number of form handlers. The main box represents the visible part of Scout’s form model. It may holds any number of form fields. Using container fields such as group boxes, it is possible to define complex structures such as hierarchical UI models containing multiple levels. In the Scout framework the forms structure is represented in the form of inner classes that are located inside of the MainBox class. And the New Form Field wizard of the Scout SDK fully supports this pattern. Listing 3.3 provides the concrete example using the the desktop form of the ”Hello World” tutorial.
Using inner Java classes to model a form’s content is a central aspect of the UI part of the Scout application model. It allows the Scout SDK to easily parse the form’s Java code on the fly and directly reflect changes to the form model in the Scout Explorer and the Scout Property View. However, this is not the only benefit for the Scout SDK. As form data objects hold all form variables and the values of all form fields contained in the form, the Scout SDK can keep the form data classes in sync with the forms of the application. It is important to note that this mechanism only depends on the Java code of the form field class. In consequence, the Scout SDK can update form field classes in the background even when form fields are manually coded into the form’s Java class. This includes adding all the necessary getter and setter methods to access the values of all the fields defined on a form. As a result, Scout developers don’t need to manually update form data objects when the UI model of a form is changed. The Scout SDK takes care of this time consuming and error prone task.
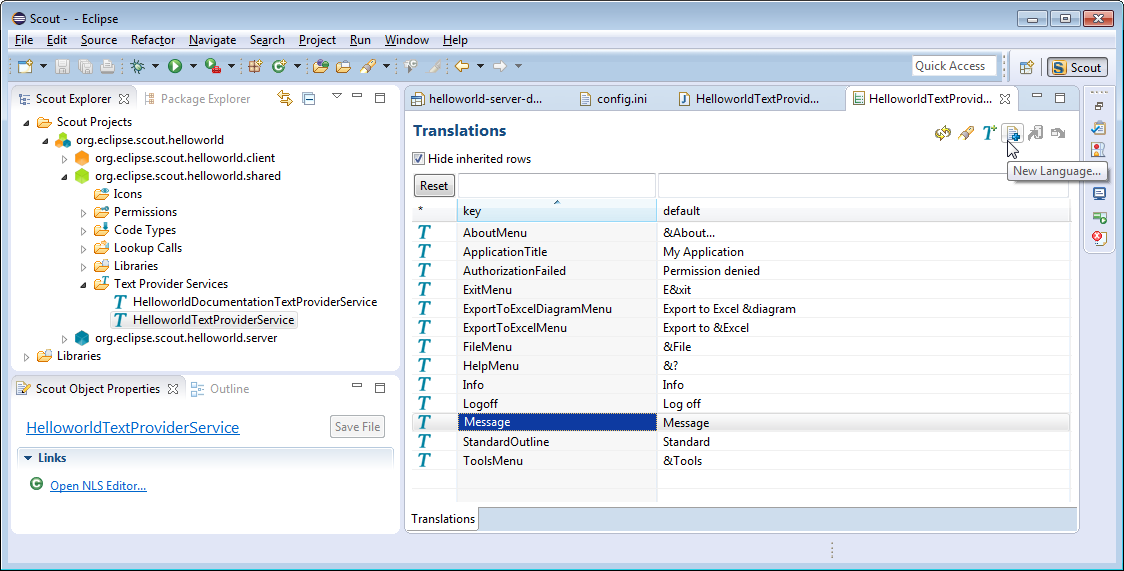
When we did add the Message field to the desktop form of the ”Hello World” application we had to enter a new translation entry for the label of the message field as shown in Figure 2.8. The individual translation entries are then stored in language specific text property files. To modify translated texts we can use the NLS editor13 provided by the Scout SDK as shown in Figure 3.7.
To access the translated label field entry in the application, the Scout SDK generated the implementation of getConfiguredLabel using TEXTS.get("Message") as shown in Listing 3.3. In the default Scout project setup, calling TEXTS.get uses the DefaultTextProviderService in the background. This text provider service then defines the access path for the text property files to use for the translation. To resolve the provided key, the user’s locale settings are used to access the correct text property file.
In this background section we take a closer look at Scout services and calling service methods remotely. We will first discuss the setup of an ordinary Scout service. Then, the additional components to call service methods remotely are considered. To explain the concepts in a concrete context, we use the setup of the DesktopService of our ”Hello World” example.
Scout services are OSGi services14 which in turn are defined by standard Java classes or interfaces. Scout is just adding a convenience layer to cover typical requirements in the context of client server applications. To support Scout developers as much as possible, the Scout SDK offers wizards that generate the necessary classes and interfaces and also take care of service registration.
All Scout services need to extend Scout’s AbstractService class and implement their own corresponding interface. This also applies to the ”Hello World” desktop service according to Listing 3.5. As shown in Figure 2.11, this service can be located in the Scout Explorer under the blue server node in the Services folder.
Before Scout services can be accessed and used, they need to be explicitly registered as a service in the correct place. For this registration mechanism, Scout is using Eclipse extension points and extensions15 which are conceptually similar to electrical outlets and plugs. And in order to work, as in the case of outlets and plugs, the plug must fit to the outlet. In our ”Hello World” example, the extension (plug) is represented by class DesktopService and the service extension point (outlet) is named org.eclipse.scout.service.services. What makes the desktop service fit to the service extension point is the fact that its interface IDesktopService extends Scout’s IService interface.
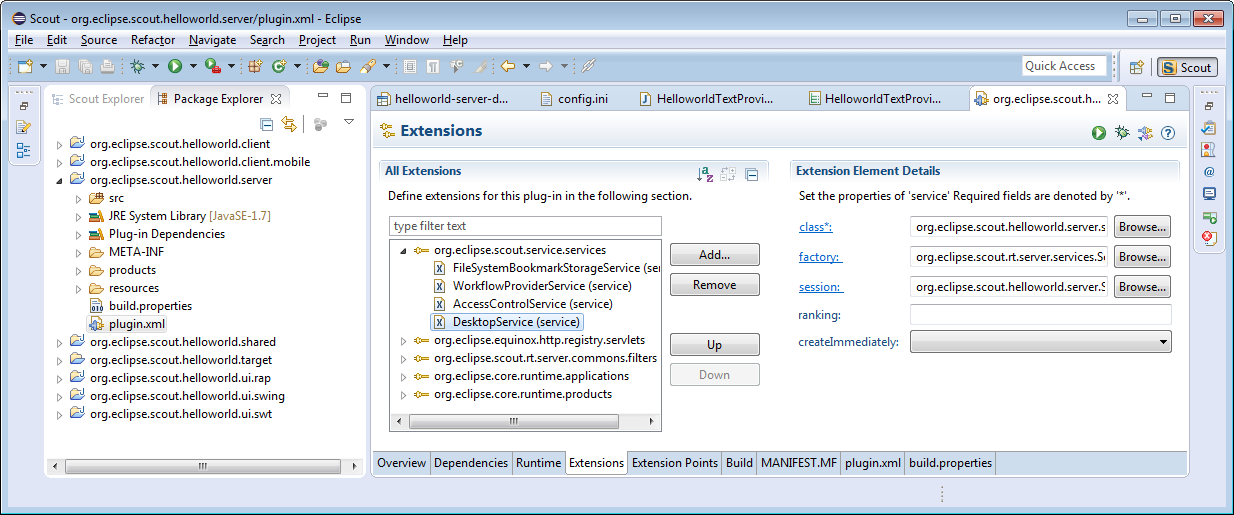
The registration of the desktop service under the service extension point is then defined in the plugin.xml file of the ”Hello World” server plugin. As shown in Figure 3.8, the plugin.xml file is located in the root path of plugin org.eclipse.scout.helloworld.server. To modify a plugin.xml, you can either use the Eclipse plugin editor or your favorite text editor. In Figure 3.8, the registration of the desktop service is shown in the Extensions tab of the plugin editor. For the corresponding XML representation in the plugin.xml file, see Listing 3.6.
In the ”Hello World” application the load method of the desktop service is called remotely from the client. But so far, we have only seen how the desktop service is implemented and registered in the server application. To call server service methods remotely from Scout client applications, the Scout framework provides client proxy services and the service tunnel. As the name implies, a client proxy service acts as a local proxy service (running in the Scout client application) of a server service (running remotely in the Scout server application).
Client proxy services are defined by a Java interface located in the shared plugin of the Scout application. As shown in Listing 3.5 of the desktop service, this service interface is also implemented by the desktop service class in the server plugin. Corresponding to the registration of the desktop service in the server plugin, client proxy services need to be registered in the client’s plugin.xml file. The content of the ”Hello World” client plugin configuration file is provided in Listing 3.7. To create proxy services in Scout clients, the ClientProxyServiceFactory is used. This is also reflected in the extension defined in Listing 3.7. Internally, this service factory then uses the service tunnel to create the local proxy services.
To call a remote service method from the Scout client application, we first need to obtain a reference to the proxy service. Using the SERVICES.getService method with the interface IDesktopService, we can obtain such a reference as shown in Listing 3.2 for the view handler of the desktop form. With this reference to the client’s proxy service, calling methods remotely works as if the service would be running locally. Connecting to the server, serializing the method call including parameters (and de serializing the return value) is handled transparently by Scout.
Rayo has been designed in 2009 by BSI for its CRM16 application and contact center solution. Since then, Rayo has been copied for Scout web applications and also adapted to work on touch/mobile devices.
The implementation of Rayo for desktop clients is based on the Java Synth look and feel17 . However, in a few cases it was necessary to adjust some of the synth classes. In order to do this, the adapted classes are copied form the OpenJDK implementation18 As OpenJDK is licenced under the GNU General Public Licence (GPL) with a linking exception it is not possible to distribute Rayo under the Eclipse Public Licence. That is why Rayo is not initially contained in the Eclipse Scout package but needs to be downloaded from the Eclipse Marketplace. Fortunately, there is still no restriction to use Rayo in commercial products. The only remaining restriction applies to modifying Rayo for commercial products. In this case you will be obliged to redistribute your modified version of Rayo under the same licence (GPL with classpath exception).
With Eclipse Scout 3.8 (Juno), the Scout framework also allows to build web clients based on Eclipse RAP. Great care has been taken to ensure, that the look and feel for Scout web applications matches the look and feel of the desktop as closely as possible. As RAP is already distributed under the EPL licence the Rayo for web apps is directly contained in the Scout package. TODO: Describe what to change to use RAP default look and feel
A similar approach was chosen for Rayo on tablets and mobile devices that are supported with Eclipse Scout 3.9 (Kepler). For such devices optimized components are used to take into account the smaller screens and the absence of a mouse (no context menus!) But as far as possible, the Rayo look and feel also applies to touch devices. TODO: Pointer to more info regarding mobile devices.
In this background section we look at the content and organisation of the two WAR files generated by the Scout SDK Export Scout Project wizard. The first WAR file holds the Scout server including a landing page to download the Scout desktop client. The desktop client is provided in the form of a standalone ZIP file. In the second WAR file, the Ajax server based on Eclipse RAP is contained. This Ajax server provides the URLs that can be accessed by web browsers running on desktop computers or tablet and mobile devices.
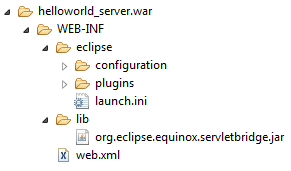
The content and its organisation of the exported WAR files was not specifically designed for Scout applications. Rather, it is defined according to server-side Equinox19 , the typical setup for running Eclipse based server applications on a web server. Using file helloworld_server.war as a concrete example, we will first describe the general organisation of the WAR file. Then, we introduce individual artefacts of interest that are contained in this WAR file.
The explicit organisation of the server WAR file is shown in Figure 3.9. From the left hand side of the figure we can see that on the top level only folder WEB-INF exists in the WAR file. This folder contains all files and directories that are private to the web application. Inside, the web deployment descriptor file web.xml as well as the directories lib and eclipse are located. While the web.xml file and directory lib are standard for servlet based based applications20 , directory eclipse contains all necessary artefacts for servlet based Eclipse applications21 . Such as Eclipse Scout server applications.
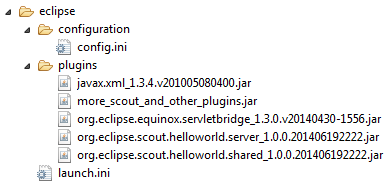
On the right hand side of Figure 3.9 the eclipse specific content of the WAR file is shown. From top to bottom we find the configuration file config.ini introduced in Section 3.3.3. In folder plugins the necessary plugins that constitute the eclipse application are located where the plugins are available in the form of JAR files22 . This includes plugins for servlet management, the eclipse platform including the servlet bridge, the scout framework parts and of course our ”Hello World” server and shared plugin. These ”Hello World” jar files exactly match with the plugin projects discussed in Section 3.1.

In Figure 3.10 some of the content of the ”Hello World” server plugin is shown. The first thing to note is that the plugin file conforms to the JAR file format including a META-INF/MANIFEST.MF file and the directory tree containing the Java class files, as the DesktopService.class implemented in Section 2.5 of the ”Hello World” tutorial. In folder resources/html the necessary files for the download page shown in Figure 2.20 including the zipped desktop client are contained. To access this download page the Scout server’s resource servlet ResourceServlet is responsible. It is registered under the servlet registry as shown in Listing 3.8. With setting ”/” of the alias parameter the download page becomes available under the root path of the Scout server application. For the mapping to the contents resources/html the parameter bundle-path is used.
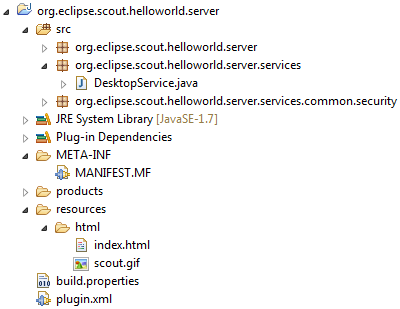
Revisiting the ”Hello World” server plugin project in the Eclipse package explorer as shown in Figure 3.11, we can see how the plugin project elements are transformed and copied into the JAR file. Examples files are plugin.xml and MANIFEST.MF as well as static HTML content of the download page (files index.html and scout.gif). The zipped client is missing of course. It is assembled, zipped and added into the Scout server JAR file by the Export Scout Project wizard of the Scout SDK. In case you need to change/brand/amend the download page for the desktop client, you have now learned where to add and change the corresponding HTML files.
In this section we will discuss two common pitfalls when working with the Scout IDE and Tomcat. The symptoms linked to these problems are Scout server applications that are not starting or Scout applications that fail to properly update.
In usual culprit behind Scout server applications that fail to start is a blocked port 8080. This setting can be created when we try to run both the Jetty web server inside the Scout SDK and the local Tomcat instance. In consequence, either Jetty or Tomcat is not able to bind to port 8080 at startup which makes it impossible for a client to connect to the right server. To avoid such conflicts, make sure that you always stop the Scout server application in the Scout SDK (effectively killing Jetty) before you restart your Tomcat server. Alternatively, you can assign two different ports to your Jetty webserver and your Tomcat webserver.
To modify Jetty’s port number in the Scout SDK you have to update the corresponding properties in the config.ini files of the development products of your Scout server application and all client applications. In the Scout server’s config.ini file the property is named org.eclipse.equinox.http.jetty.http.port, in the client config.ini files the relevant property is called server.url. To change the port number to 8081 for the ”Hello World” example in the Scout SDK you could use the following lines in the individual config.ini files.
| Scout Server | org.eclipse.equinox.http.jetty.http.port=8081 |
| Scout Desktop Client | server.url=http://localhost:8081/helloworld_server/process |
| Scout Ajax Server | server.url=http://localhost:8081/helloworld_server/ajax |
The second pitfall is connected to a web application that seems to refuse to update to the content of a freshly generated WAR file. At times it seems that your changes to a deployed WAR file do not find their way to the application actually running. In many cases this is caused by a cached instance of the previous version of your application located in Tomcat’s working directory. To save yourself much frustration, it often helps just to clear Tomcat’s working directory and restart Tomcat. For this, you may follow the following procedure.
How you start and stop Tomcat depends on the platform you are running it. If you have installed Tomcat on a Windows box according to Appendix C it will be running as a service. This means that to stop the Tomcat web server you need to stop the corresponding Windows service. For starting and stopping Tomcat on Mac/Linux/Unix systems, you can use the command line script files startup.sh and shutdown.sh located in Tomcat’s subdirectory bin.
For those interested in more advanced aspects of Apache Tomcat we recommend the article ”More about the Cat” by Chua Hock-Chuan23 .