Figure 4.1: The Eclipse IDE with the Scout perspective. The colors indicate the different elements.
View parts (blue), editor parts (green) and perspective buttons (purple).
In addition to the Scout runtime framework presented in the previous chapter, Eclipse Scout also includes a comprehensive tooling, the Scout SDK. Thanks to this tooling, developing Scout applications is made simpler, more productive and also more robust. Initially, a solid understanding of the Java language is sufficient to start developing Scout applications and only a rough understanding of the underlying Eclipse/OSGi/JEE technologies is required.
The Scout SDK consists of navigation support for the application model defined by the Scout runtime and provides many intuitive component wizards. This creates an ideal environment to beginners for building complete, high-quality Scout applications. Typically, Java developers only need a few days of Scout training to start creating their own advanced client server business applications.
The Scout SDK also helps developers to become more productive. Many repetitive and error prone tasks run automatically in the background or are taken care of by the component wizards of the Scout SDK. This starts with the initial creation of a Scout client server application, continues with the wizards to create complete dialogs and pages and includes the automatic management of the data transfer objects needed by the client server communication.
Finally, the application code created by the Scout SDK wizards helps to ensure that the resulting Scout application has a consistent and robust code base and is well aligned with the application model defined by the Scout runtime framework.
To get a good introduction into working with Eclipse as an IDE, we highly recommend the excellent tutorial by L. Vogel1 .
Whatever we will be working with in the Eclipse IDE, we are always working in the context of an Eclipse IDE perspective. An Eclipse IDE perspective contains the visual elements and the arrangement of those elements to support a specific development task within the Eclipse IDE. Perspectives relevant to the development of Scout applications are the Scout perspective, the Java perspective, the Debug perspective, and many others. To open a perspective available in the Eclipse IDE, the Open Perspective button or the Window → Open Perspective → Other... menu can be used.
Figure 4.1 provides a screenshot of the Eclipse Scout perspective indicating the corresponding perspective button and the main view parts and editor parts involved. Using drag and drop, views and editors can be freely moved around in the Eclipse IDE to suit the developer’s needs. Perspectives can be further individualized using the Window → Customize Perspective... menu. Here, the visibility of the toolbar items and menu entries can be defined. Once a suitable layout of all desired elements has been defined, this organisation may be saved as a personal perspective using the Eclipse IDE Window → Save Perspective As... menu.
In case a customizing step does not turn out as intended, with the Window → Reset Perspective... menu is always possible to go back to the last saved state of the current perspective.
The Scout SDK is added to the Eclipse IDE in the form of the Scout perspective2 . With the Scout Explorer and Scout Objects Properties, two view parts are contained in the Scout perspective. Additionally, the Scout SDK contains a comprehensive set of wizards that support the developer in creating Scout application components.
The Scout Explorer view allows the developer to navigate the complete Scout application model. Once an element in the Scout Explorer is selected, the Scout Object properties view allows to view and change selected properties of the selected element. Depending on the selected element in the Scout Explorer, the Scout SDK offers appropriate context menus to start the related wizards.
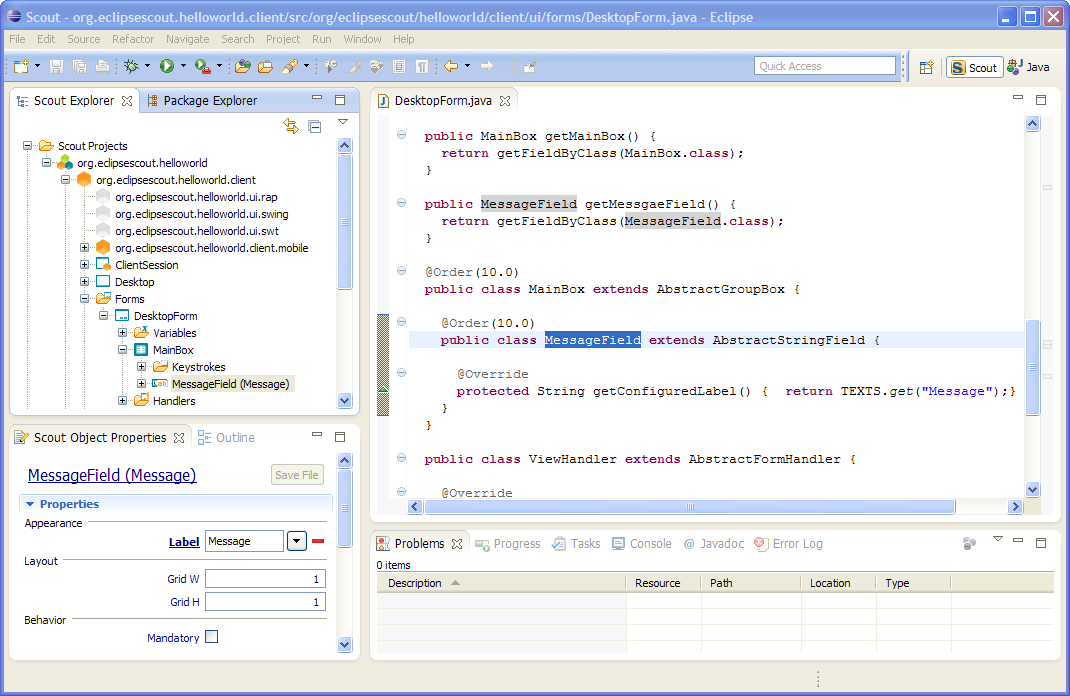
Figure 4.2 provides a screenshot of the Scout SDK perspective. In the Eclipse Scout Explorer shown in the upper left part of the screenshot, the message field in the desktop form of the ”Hello World” application is selected. In the Scout Object Properties located below, the message field’s appearance, layout and behaviour properties are displayed. On the right side, the corresponding source code is loaded in a Java editor.
When the developer changes a property of the selected element, the Java code is updated accordingly. For example, clicking the Mandatory property in the Scout Object Properties of the message field will insert the method getConfiguredLabel to the message field’s class. This demonstrates how the Scout SDK directly works on the Java source code. In fact, the Java source code is the only artefact relevant for the Scout SDK to ’understand’ the Scout application model. Taking advantage of this setup, the Scout SDK implements a full round-trip-engineering from creating the Java code for Scout application components, parsing code changes in the background, and displaying the current implementation of the Scout application in the Scout Explorer and the Scout Object Properties.
Thanks to the round-trip-engineering provided by the Scout SDK, the information presented in the Scout Explorer and the Scout Object Properties always stay in sync with the Java code of the Scout application. To illustrate this, we will re-use the ”Hello World” Scout project from Chapter 2. Start the Eclipse IDE with the workspace containing the ”Hello World” application. Then, navigate to method getConfiguredLabel as shown in Figure 4.2, and add the java snippet shown below to the class MessageField.
After having saved the code change, you can observe that the Mandatory property in the section Behaviour of the message field’s Scout Object properties has changed its state. The font of its label is now presented in bold face and underlined, the checkbox is ticked and a red minus icon is shown on the right side of the property. Obviously, the Scout SDK is directly operating on the project’s source code and does not rely or need any external meta data. This provides the flexibility to develop Scout applications with or without the support of the Scout SDK. And this choice offered to the Scout developer is one of the most important features provided by the Scout SDK. The Scout developer may take advantage of the development support provided by the Scout SDK without being restricted by the Scout tooling in any way.
Technically, the Scout SDK is a set of Eclipse plugins that operate on top of the Eclipse JDT and the Eclipse PDE projects. The Java Development Tools (JDT)3 contain a Java IDE supporting the development of any Java application, and the Plugin Development Environment (PDE)4 provides tools to create, develop, test, debug, build and deploy Eclipse plugins, and additional artefacts relevant for Eclipse based applications. As in the case of the Scout Runtime, the plugins representing the Scout SDK, the JDT and the PDE are all located in the plugins directory of your Eclipse installation and named org.eclipse.scout.sdk.*, org.eclipse.jdt.* and org.eclipse.pde.* .
The Scout Explorer view is responsible for the navigation support within the Scout application model. This navigation support is presented in the form of a tree view and includes the client with its UI components, the server and the shared part of a Scout application. It also includes all Scout application modules of modular Scout applications5 . For the actual navigation in the tree representing the Scout application both the mouse or the keyboard can be used.
To expand or collapse a selected node in the Scout Explorer, you may click on the tiny plus icon or the minus icon presented to the left of the node. Alternatively, you can also use the <Right> or the <Left>.
Once a node in the tree is selected, the Scout Object Properties view presents the associated configuration of the selected element. If the selected element represents a specific application model component, the corresponding Java source code can be accessed through a double click on the node, or hitting the <Enter>.
The navigation tree provided in the Scout Explorer view also allows the developer to add elements to your application. Depending on the selected node in the tree, the Scout SDK allows to start the applicable Scout SDK wizards using corresponding context menus. The wizards support the creation of application components, such as dialogues on the client side or services on the server side by generating the necessary Java code.
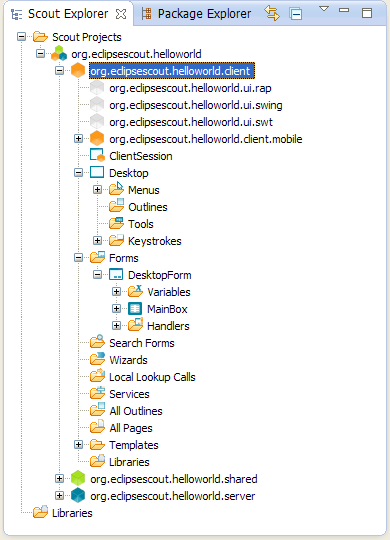
In Figure 4.3 the top level organisation of the client application model is shown as it is represented in the Scout Explorer. All client specific elements are located under the selected orange client node org.eclipsescout.helloworld.client. Right below, the three white UI plugins are located that represent the support for the corresponding UI technologies for Swing, SWT and Eclipse RAP. The orange org.eclipsescout.helloworld.client.mobile node contains all elements that are specific to mobile devices such as the MobileHomeForm
Specific nodes for the client session and the desktop of the Scout client allow access to the corresponding Scout application model components. While the client session is the main entry point for client-server communication, the desktop represents the root component of the visible part of a Scout client applications. Below, a set of folders group additional client model components according to their type. The forms folder for example holds all available forms, such as the desktop form that we have seen in the ”Hello World!” tutorial6 .
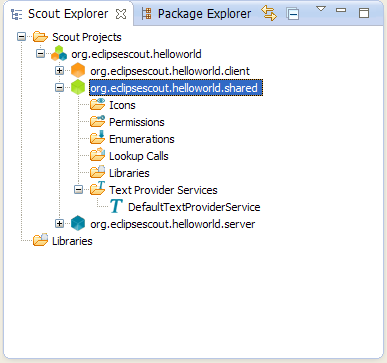
A screenshot of the expanded green shared node org.eclipsescout.helloworld. is provided in Figure 4.4. As the name ”shared” suggests, the corresponding plugin holds all application components that are required for both the Scout client and the Scout server application. This includes texts, icons, enumeration or codes, permissions, lookup calls. As shown in Figure 4.4, a separate folder for each resource type is provided under the shared node.
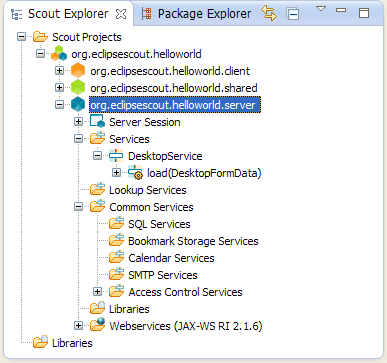
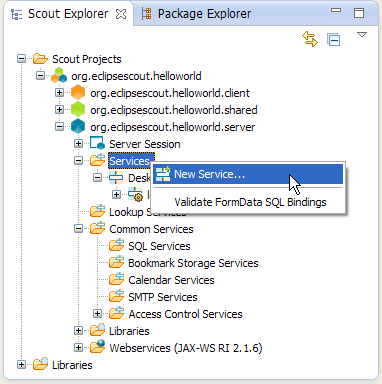
In Figure 4.5, the blue server node is expanded in the Scout Explorer view. As the primary responsibility of the Scout server application is dealing with requests, its components are mostly related to different types of services. Below the server session node, the Services folder holds services related to the processing logic of the application such as retrieving and updating data. The remaining folder group different more specific types of server services. Under the Webservices folder the Scout SDK support to provide and consume web services is located.
The right side of Figure 4.5 illustrates the access to the Scout SDK wizards via corresponding context menus. The New Service... menu shown in the screenshot will start the wizard to add a new Scout server service.
The different colored tree nodes discussed above are all represented by their individual Eclipse plugins. This includes the orange client node, the white UI nodes, the orange mobile client node, the green shared node and the blue server node. A Scout Swing client for example contains the plugins org.eclipsescout.helloworld.client, org.eclipsescout.helloworld.shared and org.eclipsescout.helloworld.client.ui.swing but not the other UI technology plugins. The Scout server contains the org.eclipsescout.helloworld.server plugin and the org.eclipsescout.helloworld.shared plugin.
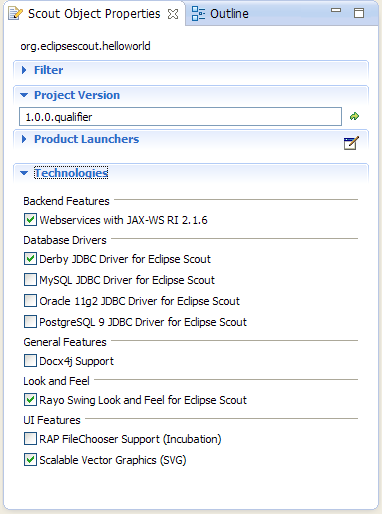
The Scout Object Properties view provides direct access to configurable properties and operations for the element selected in the Scout Explorer. Before we discuss the typical layout of an object property view we describe the special case of the property view for a complete Scout application. This property view is displayed when the application’s top level node is selected in the Scout Explorer as shown in Figure 2.3.
The main elements of the top-level application properties are the sections Product Launchers and the Technologies. As the product launcher section with its launcher boxes has already been covered in Section 2.3 and Section 3.3 we focus on the technologies section here. The technologies section allows to add Scout runtime features and functionalities to the Scout application or remove such elements from the application.
When the selection of a technology checkbox is changed, a message box is shown to the user. This box lists all project resources that are changed when the user confirms the action. Once the dialog is confirmed, the selected resources are modified by the Scout SDK to add or remove the feature.
For features containing licences not compatible to the Eclipse Public Licence (EPL) or features in incubation status, the necessary artefacts are not provided as part of the Eclipse Scout installation package. Instead, the associated artefacts need to be installed from a remote updated site first. Before any non-EPL content is downloaded from the internet, the user needs to review and confirm the associated licence. For this, a license confirmation dialog is shown upfront. After confirmation, the required files are downloaded and automatically installed in the local Eclipse instance of the developer. Usually, the Eclipse IDE needs to restart after a feature is downloaded and installed for the first time. Currently, the procedure described above is used for the following technologies.
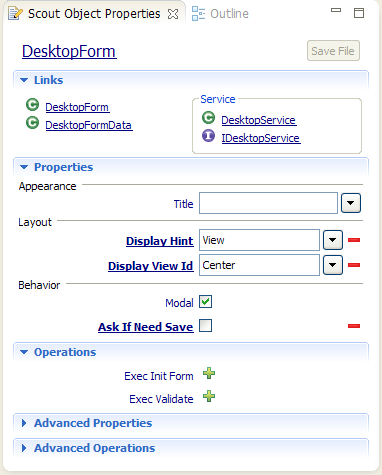
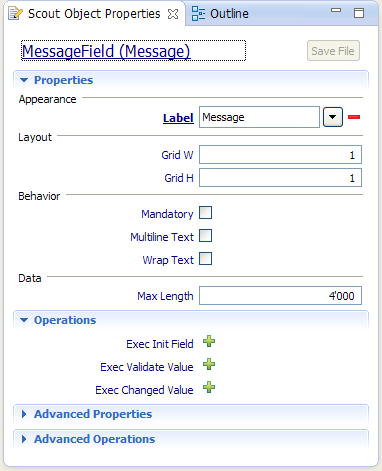
For the description of the Scout Object Properties of typical Scout components we use the example views provided in Figure 4.7. Both Scout Object Properties example views for the desktop form and the message field are take from the ”Hello World!” application described in Chapter 2. As in the case of the top-level node representing the complete Scout application, the typical layout of the Scout Object Properties view is organized into several sections. The content and ordering of the property sections always follows the same scheme.
If a folder node (such as the Forms folder under the orange client node), is selected in the Scout Explorer, the Scout Object Properties only shows a filter section with a filter field. The content in this filter field then restricts the elements below the folder icon accordingly. This feature is especially useful for the development of larger applications containing dozens of forms or services.
The Links section provides a set of hyperlinks as shown on the left hand side of Figure 4.7. The provided links all refer to Java classes and interfaces that related to the Scout component represented by the property view.
The available properties of a Scout component are listed in sections Properties and Advanced Properties. Basically, all available Java getConfigured methods of a Scout component are listed in one of the two sections depending on the frequency of their usage. Section Properties shows the often used properties, while the less frequently used properties are provided in section Advanced Properties. The examples in Figure 4.7 show the thematic organization of the sections into Appearance, Layout, Behaviour and other groups.
Access to object operations implemented with Java exec methods is provided in sections Operations and Advanced Operations. Again, the more and less frequently used operations are assigned to individual sections.
For all listed properties and operations the corresponding Javadoc is displayed in the form of a tooltip window. To display the available Javadoc, move the mouse pointer over the method of interest in the Scout Object Properties7 .
So far, we did only describe the content and organisation of the Scout Object Properties. In the reminder of this section we will describe the procedure to change or update the default values of properties or the default behaviour of Scout components. To indicate non-default property values or non-default behaviour, the font of the property or the operation is switched to underlined bold face. As an example, consider the property Ask If Need Save of the desktop form shown on the left side of Figure 4.7. The bold font visualizes that this does not correspond to the default behaviour of forms. And underlining of this property further indicates, that the label has become a clickable link. Clicking on this label will load the corresponding method into the Java editor in the Scout SDK.
To change a property for a specific Scout component just enter a value in the corresponding field or tick/untick the provided checkbox. In some cases the value may also be chosen from a dropdown list. For the label field shown on the right hand side of Figure 4.7, the ”Message” value refers to the text key to be used in method getConfiguredLabel. To enter a new label text, start typing the desired translated label and pick the option ”New translated text...”.
To reset a property or operation to its default value/behaviour, you may click on the red Minus icon provided on the right side of the property field. This will remove the overridden method from the object’s Java code.
The Scout SDK wizards allow the developer to create Scout application model components with just a few clicks. Creation wizards are provided for all major model components such as forms on the client side and services on the server side. The usage of wizards not only makes developing Scout applications efficient but also helps to create robust code and reduces the number of errors.
Scout SDK wizards can do many things. They add and update Java classes, register services in the plugin.xml files, manage plugin dependencies in the MANIFEST.MF files and update Eclipse product files when necessary. All these capabilities hide a lot of the complexity of writing Eclipse based applications. This simplifies the developing of Scout application considerably.
In the text below, descriptions of the most commonly used Scout SDK wizards are provided. First, the wizards to create and export complete Scout applications are described. Then, the wizards to create Scout application model components are introduced.
The New Scout Project wizard allows to create a new Scout client server application. In the Scout Explorer, the New Scout Project... context menu is provided on the top-level Scout Projects folder. The creation of a form based Scout application has already been introduced in Section 2.2 for the ”Hello World” tutorial. And Section 3.1 provides background information related to the artefacts created by this wizard. In the text below, we will describe the different steps of the creation wizard individually.
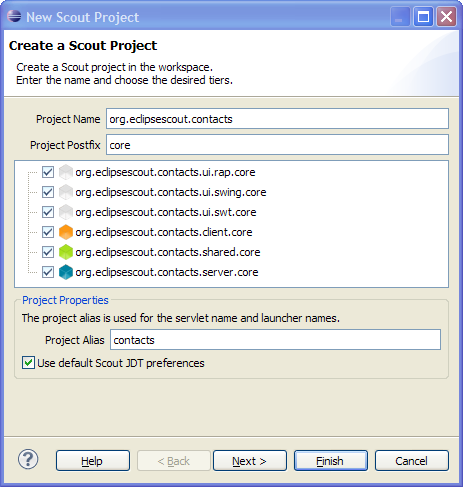
In the first wizard step shown on the left side of Figure 4.8, it is possible to choose the project name and and the application plugins to create. The Project Name field is used as base name of the application’s plugins and as the Java package base names inside of the plugins. If the project name is written as parts separated by periods, the last part is copied into the Project Alias field.
When building multi module applications, the optional Project Postfix field can be specified to apply a common naming schemes for the different modules. The resulting application plugins (UI, client, shared, server) are then named following the scheme <Project Name>.<plugin>.<Project Postfix>.
In the box below the postfix field the list of application plugins that may be created by this wizard is provided. Initially, all possible plugins are checked which is useful to quickly demonstrate a ”Hello World” application. However, for a typical setup only one or two UI plugins will be needed. To develop a mobile/web application only the RAP UI plugin is necessary. For a desktop only client, either the Swing or the SWT UI plugin will be needed. And in cases where the client needs to run both on the desktop and as a web/mobile application, the RAP and a desktop UI plugin can be chosen. A Scout application must not necessarily be a client-server application. It is also possible to create a client only or a server only application. But make sure to include the shared plugin in all possible use cases.
The content of the Alias field is used for the client’s executable file, the name of the servlet representing the Scout server application and to build the product launcher names. And if the Use default Scout JDT preferences field is checked, the Scout default Java development settings are used. Otherwise, you start with no settings and can apply your own template.
As we have seen in the ”Hello World” tutorial, it is sufficient to provide a project name in the first wizard step and click on the Finish button to create a form based client server application. But we can also click on the Next button to choose an application template.
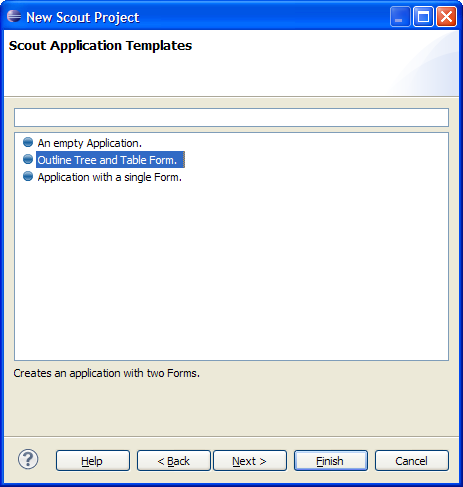
The second wizard step shown on the right side of Figure 4.8 allows to choose a Scout application template for the Scout project. When choosing the template Empty Application, you exactly know what you do and only a minimal code base is created. The other two application templates represent different application types. The template Application with a single Form is the default choice used for the ”Hello World” tutorial. Finally, the template Outline Tree and Table Form can be used to build explorer like applications. The outline tree is typically used to navigate between related business entities. And the tables are used to list a number of business entities with their attributes. We will use this template for the creation of a larger Scout application in Chapter 5. As in the case of the first wizard step, you may click Finish button to start the creation of an initial Scout application. Or, click on Next button and manually step through the third and last wizard step.
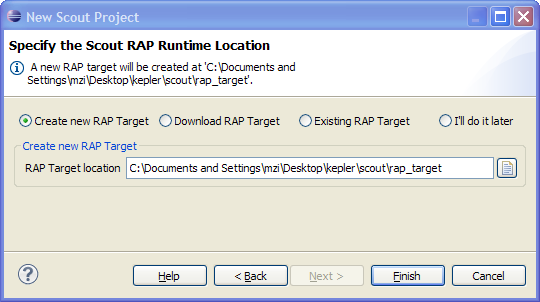
The third wizard step shown in Figure 4.9 is only available if the RAP UI plugin has been checked in Step 1. Because the RAP runtime must not be installed into the running Eclipse instance8 , a separate target platform is created and/or used by the Scout SDK. This target platform then contains all necessary plugins to run the Scout RAP UI. The different options provided by this wizard step are the following.
When choosing the option Create new RAP Target, a new RAP target platform will be created at the location specified. This target platform is then created by the Scout SDK in the given directory and used by all application plugins.
Option Download RAP Target will downloaded the target platform into the running workspace. This download will then only be available to the active workspace. The two download types are only download the RAP plugins (checkbox not ticked) and download a new Kepler Eclipse platform as well (checkbox ticked).
With the option Existing RAP Target an existing RAP target location can be specified. The wizard then detects whether the provided location contains a complete target platform or only the RAP target plugins. If a complete platform is detected, only the directory specified is used as the target platform. Otherwise, the plugins available to the running Eclipse and the content of the provided directory jointly define the target platform.
To manually define a RAP target platform choose option I’ll do it later. With this option, the Scout SDK does not create a RAP target platform for you. But note that the created project will not compile before a complete target platform has been created for the Scout application.
The Export a Scout Project wizard allows to export a complete Scout client server application as WAR files. In the Scout Explorer, the Export Scout Project... context menu is provided on the main application node just below the top-level Scout Projects folder.
As a simple use case, the usage of the export wizard is described in Section 2.7 of the ”Hello World” tutorial. And the corresponding background Section 3.7 provides information regarding the content and the organisation of the WAR files produced by this wizard.
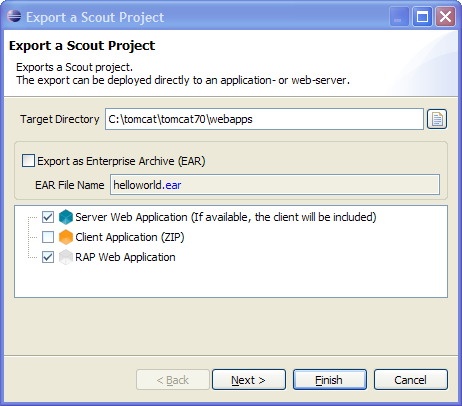
In the first export wizard step shown on the left hand side of Figure 4.10 the target directory and the type of content to be exported is defined. The Target Directory field is used to define the directory where the generated WAR files will be exported to. Checking the Export as Enterprise Archive (EAR) field the WAR file(s) will be packed into a EAR file using the file name provided in the EAR File Name field.
In the artefact selector box the content to be included in the export can be specified. The blue Server Web Application node represents the Scout server application. If ticked, the corresponding WAR file will also include a zipped desktop client if such a client is defined in the current Scout project. Selecting the orange Client Application (ZIP) node node will put a zipped client into the target directory. Finally, when working with web/mobile applications the necessary RAP server is represented by the white RAP Web Application node.
The default scenario assumes that you work with a Scout client server application including a SWT desktop client and corresponding web/mobile clients. For this setup you just need to provide a target directory before you can click the Finish button to start the export. To verify/update what the export wizard will create you may click the Next button to move to the second wizard step.
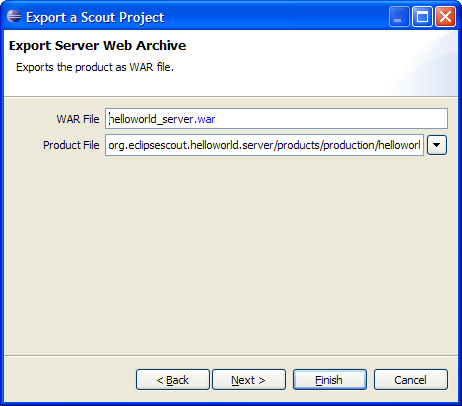
The second wizard step is shown on the right side of Figure 4.10. The server WAR file name proposed in the WAR File field uses the naming scheme <ProjectAlias>_server.war. In order for this WAR file to work out-of-the-box it it is recommended to use the proposed value. In the Product File field the server product file to be used for the creation of the WAR file can be specified. Clicking the Next button will move to the next wizard step to select the client product to be exported.
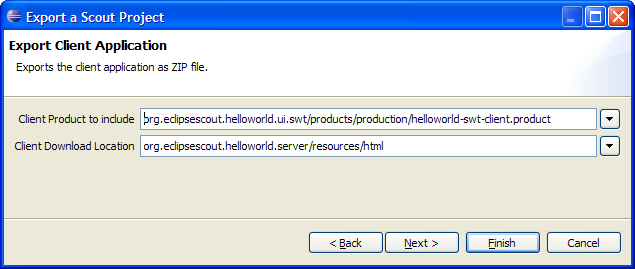
In the third wizard step shown in Figure 4.11 the client product file can be selected. If the current Scout project defines both a Swing and a SWT client, the default will use the SWT client. Clicking on the dropdown button next to the Client Product to include field will open a Select Product dialog to choose the right product from all available client products. In the Client Download Location field the path to the zipped client inside the server WAR file is defined. In order for this WAR file to work out-of-the-box it is recommended to use the proposed value. With the Next button the last export wizard step is shown.
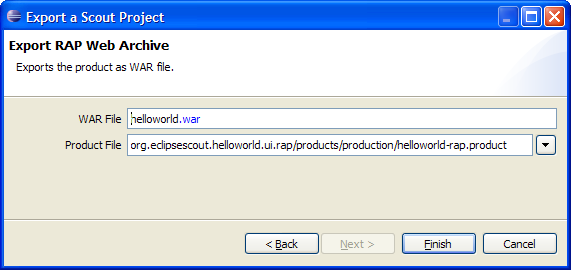
The last export wizard step is shown in Figure 4.12. A RAP server WAR file name is proposed in the WAR File field based on the naming scheme <ProjectAlias>.war. In order for this WAR file to work out-of-the-box it is recommended to use the proposed value. In the Product File field the RAP server product file to be used for the creation of the WAR file can be specified. The Finish button will then start the export wizard with the settings verified and/or updated in all export wizard steps.
After the wizard has completed the export, all resulting artefacts will be located in the target directory specified in the first wizard step.
The New Form Field wizard allows to create a new form field. In the Scout Explorer, the New Form Field... context menu is provided on Scout Explorer nodes representing composite form fields, such as the MainBox node.
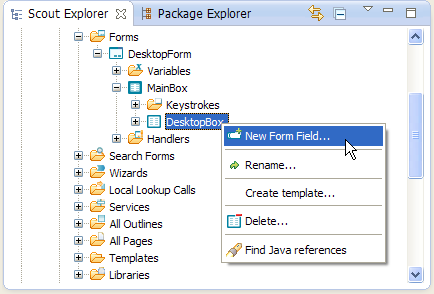
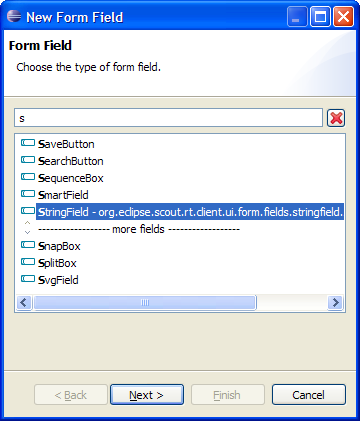
Figure 4.13 provides screenshots for starting the form field wizard with the context menu and the first wizard page. In the first wizard step, the list of all available Scout form field types is presented. To quickly find the desired form field type, a part of the type name can be entered in the search field above the field type list. In the screenshot on the right hand side of Figure 4.13 this search field contains the value ’s’ which filters the field type list accordingly. Once the type of the new form field is selected, the next wizard step can be loaded by clicking on the Next button.

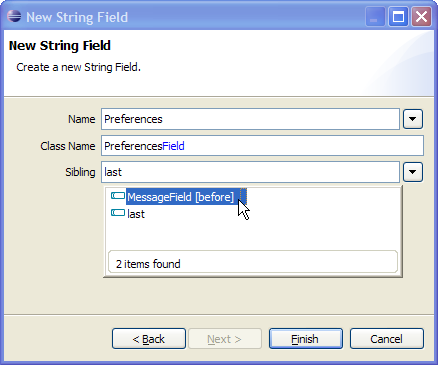
In the second wizard step shown in Figure 4.14 the remaining creation parameters for the new form field can be specified. The Name field is used to define the content of the field label. For this, a translated text entry has to be defined. By typing a string into the name field, all potentially matching existing translation entries are shown in a dropdown list. As shown in Figure 4.14 not only the text key is used to find matching entries but also translated text entries. When assigning the label for a preferences string field, the substring ”pref” lists a set of text keys that have a matching translated text entry.
![]()
One of the presented options in the list of text entries is the New translated text... entry. A double click on this entry starts the wizard to create a new text entry as shown on the left hand side of Figure 4.15. The Key Name field holds the text key that is used to access translated text9 . In the tabs below the key name field, the text translations for the registered languages can be provided. Make sure to at least provide a text in the default tab. This text will be used in the Scout application if no translation is available that better matches the logged in user’s locale.
Once the name field is filled in, the entered text key is also used to create a proposal for the Class Name field using the pattern <Field Name>Field. In contrast to the label field, the class name field is mandatory. If the field does not need a label the name field can remain empty. In that case, a class name still needs to be provided as described in Section 2.4 for the DesktopBox class in the ”Hello World” application.
The Sibling field is used to define the ordering of the form fields in the parent container. As shown on the right hand side of Figure 4.15, the new PreferencesField is to be placed before the message field.
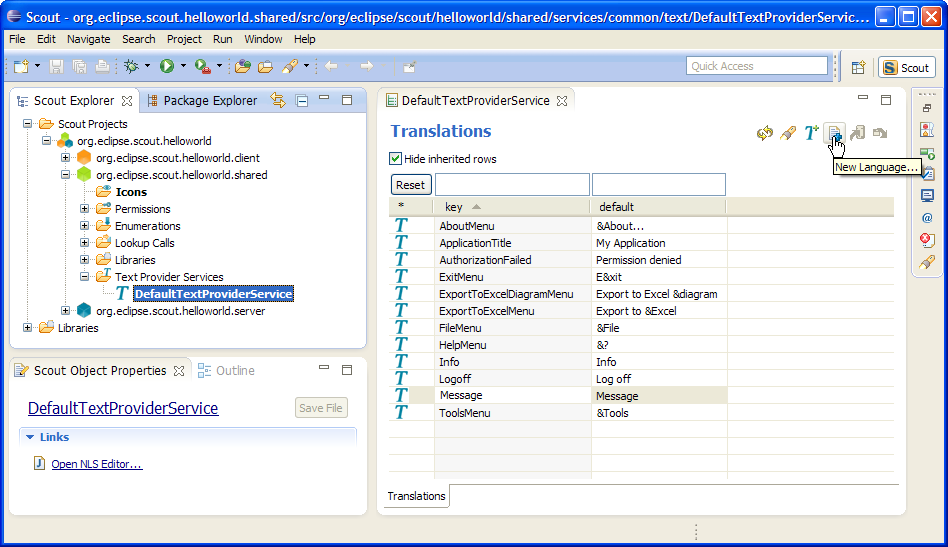
Access to translated texts in Scout applications is provided through text provider services located in the application’s shared plugin. This setup makes translated texts available in the client and the server application as the shared plugin is available in both the client and the server product. Consequently, the Scout SDK provides access to the NLS Editor to manage translated texts and application languages under the green shared node in the Scout Explorer view as shown in Figure 4.16.
To open the NLS editor, select the green shared node in the Scout Explorer and expand its Text Provider Services folder. Then, select the contained element DefaultTextProviderService. As shown in Figure 4.16, the NLS editor can be opened using the Open NLS Editor ... link. In the NLS editor translations can be edited individually by double-clicking into a translated text cell. This opens the editor to change the text to the desired value. To add a new translated text, the corresponding dialog can be opened by clicking on the button with the ’T’ icon next to the ’New language’ button (shown in Figure 4.16).
In Scout applications, translated texts are obtained with the method TEXTS.get("key") where ”key” represents the language independent text key. In a default Scout project setup, calling TEXTS.get uses the DefaultTextProviderService in the background. And this text provider service defines the access path for the text property files that are located in the applications shared plugin. Typically, these property files are collected in the plugin’s <youraplication>.shared/resources/texts directory according to the right hand side of Figure 4.17. To resolve the provided text key at runtime, the user’s locale settings is used to access the correct text property file.
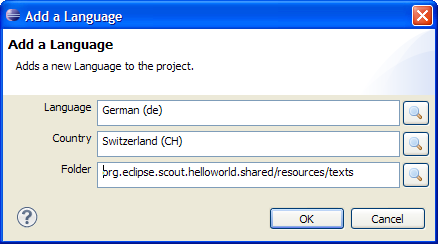
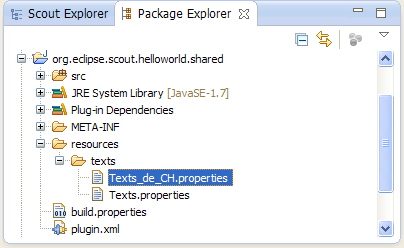
Adding support for a new language to a Scout project is also directly supported by the Scout SDK. To add support for a new translated language, click on the corresponding icon of the NLS editor as shown in Figure 4.16. In the opened language dialog, add the desired language and country localization and the target directory as shown in Figure 4.17. A new language properties file is then added to the shared plugin project as shown in Figure 4.17. The new language is now available as an additional column in the NLS editor and as a separate tab in the dialog to add new translated texts for Scout UI components such as form field labels.