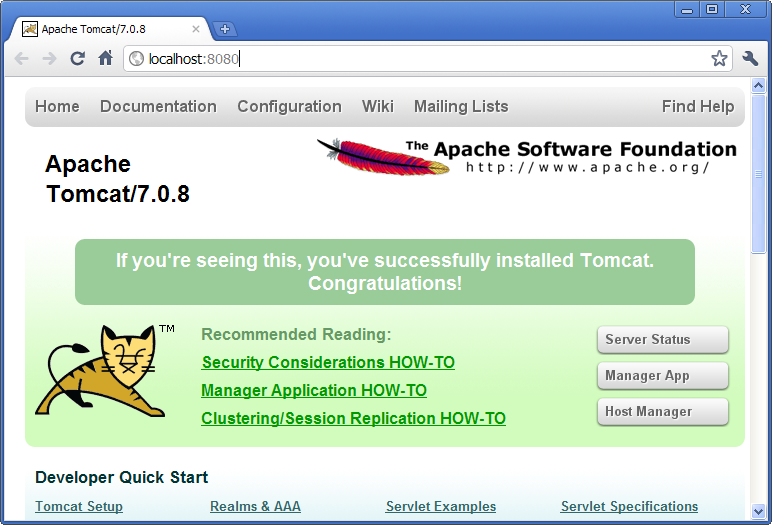
Figure C.1: A successful Tomcat 7 installation.
Apache Tomcat is an open source web server that is a widely used implementation of the Java Servlet Specification. Specifically, Tomcat works very well to run the server part of Scout client server applications. In case you are interested in getting some general context around Tomcat you could start with the Wikipedia article1 . Then get introduced to its core component ”Tomcat Catalina”2 before you switch to the official Tomcat homepage3 .
This section is not really a step by step download and installation guide. Rather, it points you to the proper places for downloading and installing Tomcat. We recommend to work with Tomcat version 7.0 but in case you already have version 6.0 running that should be good too. Start your download from the official download site4 .
Once you have downloaded and installed Tomcat 7 (see the sections below for plattform specific guidelines) you can start the corresponding service or deamon. To verify that Tomcat is actually running open a web browser of your choice and type http://localhost:8080 into the address bar. You should then see a confirmation of the successful installation according to Figure C.1.
According to the Tomcat setup installation for Windows5 download the package ”32-bit/64-bit Windows Service Installer” from the Tomcat 7 download site. Then, start the installer and accept the proposed default settings.
For installing Tomcat on OS X systems download the ”tar.gz” package from the Tomcat 7 download site. Then, follow the installation guide6 provided by Wolf Paulus.
For Linux systems download the ”tar.gz” package from the Tomcat 7 download site. Then, follow the description of the Unix setup7 to run Tomcat as a deamon. If you use Ubuntu, you may want to follow the tutorial8 for downloading and installing Tomcat provided by Lars Vogel.
Tomcat’s installation directory follows the same organisation on all platforms. Here, we will only introduce the most important aspects of the Tomcat installation for the purpose of this book.
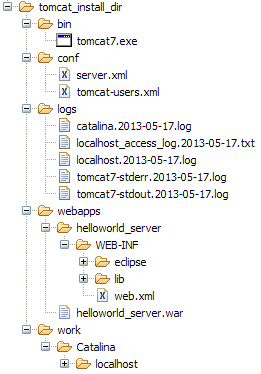
Note that some folders and many files of a Tomcat installation are not represented in Figure C.2. We just want to provide a basic understanding of the most important parts to operate the web server in the context of this book. In the bin folder, the executable programs are contained, including scripts to start and stop the Tomcat instance.
The conf folder contains a set of XML and property configuration file. The file server.xml represents Tomcat’s main configuration file. It is used to configure general web server aspects such as the port number of its connectors for the client server communication. For the default setup, port number 8080 is used for the communication between clients applications and the web server. The file tomcat-users.xml contains a database of users, passwords and associated roles. Folder logs contains various logfiles of Tomcat itself as well as host and web application log files.
The folder needed for deploying web applications into a Tomcat instance is called webapps. It can be used as the target for copying WAR files into the web server. The installation of the WAR file then extracts its content into the corresponding directory structure as shown in Figure C.2 in the case of the file helloworld_server.war.
Finally, folder work contains Tomcat’s runtime ”cache” for the deployed web applications. It is organized according to the hierarchy of the engine (Catalina), the host (localhost), and the web application (helloworld˙server).
Tomcat comes with the pre installed ”Manager App”. This application is useful to manage web applications and perform tasks such as deploying a web application from a WAR file, or starting and stopping installed web applications. A comprehensive documentation for the ”Manager App” can be found under the Tomcat homepage9 . Here we only show how to start this application from the hompage of a running Tomcat installation.
To access this application you can switch to the ”Manager App” with a click on the corresponding button on the right hand side. The button can be found on the right hand side of Figure C.1. Before you are allowed to start this application, you need to provide username and password credentials of a user associated with Tomcats’s manager-gui role.
To get at user names and passwords you can open file tomcat-users.xml located in Tomcat’s conf directory. In this file the active users with their passwords and associated roles are stored. See Listing C.1 for an example. From the content of this file, we see that user admin has password s3cret and also posesses the necessary role manager-gui to access the ”Manager App”. If file tomcat-users.xml does not contain any user with this role, you can simply add new user with this role to the existing users. Alternatively, you also can add the necessary role to an existing user. Just append a comma to the existing right(s) followed by the string manager-gui. Note that you will need to restart your Tomcat application after adapting the content of file tomcat-users.xml.
With working credentials you can now start the ”Manager App” as described the ”Hello World” tutorial in Section 2.8.