Hello Scout Classic
| This document is referring to a past Scout release. Please click here for the current version. |
Introduction
In this tutorial we will create your first Scout Classic application.
| If you don’t know what Scout Classic is yet, please read the Get Started Guide first. |
We will create the application using Eclipse or IntelliJ. The generated application will consist of a client and server part and simply display a text sent from the server.
Prerequisites
This section guides you through the installation of the tools required to start the Hello Scout application.
Currently there is IDE support for Scout application development for IntelliJ IDEA and Eclipse. Such an IDE is not required but makes the development much easier. This tutorial describes the setup for both IDEs. Please choose the one you prefer.
Node.js
First, Node.js needs to be installed as Scout uses it to build web assets. So if you don’t have it yet, visit the Node.js download site, choose the package for your platform and install it on your local machine.
Make sure the Node.js installation is on the PATH. You can verify it by using your command line:
c:\> node -v
v18.12.1
Add pnpm
Scout uses pnpm 7 as package manager. Therefore, install it into your Node installation by using your command line:
npm install -g pnpm@7.16.0and verify that it was installed successfully with:
c:\> pnpm -v
7.16.0
IntelliJ
If you have no IntelliJ yet, you can download it from the JetBrains download site. We recommend selecting the Ultimate edition to have the JavaScript support included in the IDE. There is a 30-day trial if you have no licence. For this tutorial you can also use the free Community Edition, but it requires some extra steps indicated.
Install or extract the package and start IntelliJ (see Run IntelliJ IDEA for the first time for instructions).
Follow the instructions until the Welcome to IntelliJ IDEA screen is shown.
On the left side switch to Plugins, search for Eclipse Scout and press the green Install button.
In case a Third-Party Plugins Privacy Notice is shown, press Accept. The Scout plugin does not collect or process any personal data.
Afterwards, the plugin is being downloaded from the JetBrains Marketplace and installed locally.
As soon as this is completed, press the Restart IDE button.
The same can also be achieved by navigating to File | Settings | Plugins in case you already have an existing IntelliJ project running.
Congratulations! You have successfully set up IntelliJ IDEA for Scout development.
Eclipse
Then download the Eclipse IDE for Scout Developers package for your platform by visiting the official Eclipse download page.
After the package selection, confirm the suggested mirror and extract the downloaded archive to your local disk.
Congratulations! You have successfully installed Eclipse for Scout development.
Create a Scout Project
The Scout project creation depends on the IDE chosen. Therefore, please follow the instructions in the corresponding section below.
IntelliJ
Start your IntelliJ (if not already running) and in the Welcome to IntelliJ IDEA screen click on New Project. The New Project wizard starts.
The same can also be achieved from the menu File | New | Project… if an existing project is open already.
On the left side select the Scout type.
You have to enter a Group Id, Artifact Id and a Display Name for your Scout project as shown in Figure 1.
As the created project will make use of Apache Maven, please refer to the Maven naming conventions to choose Group Id and Artifact Id for your project.
The Display Name is used as the application name presented to the user (e.g. in the browser title bar).
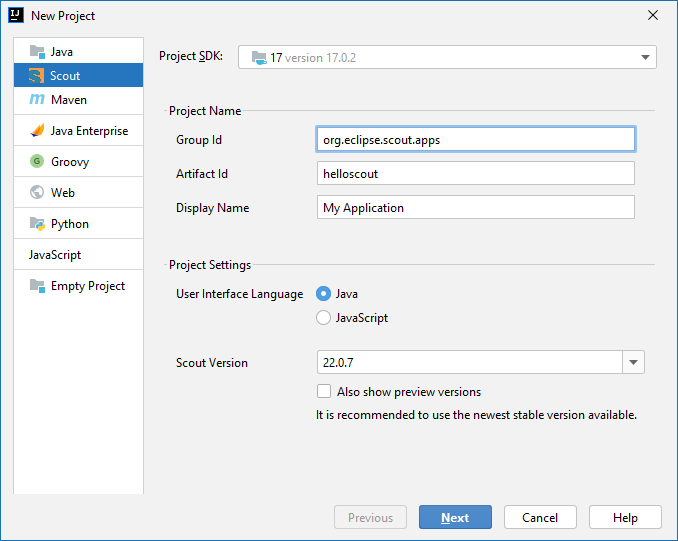
For the Hello Scout application just use the already pre-filled values and ensure the user interface programming language is set to Java as sown in Figure 1.
Then click the Next button.
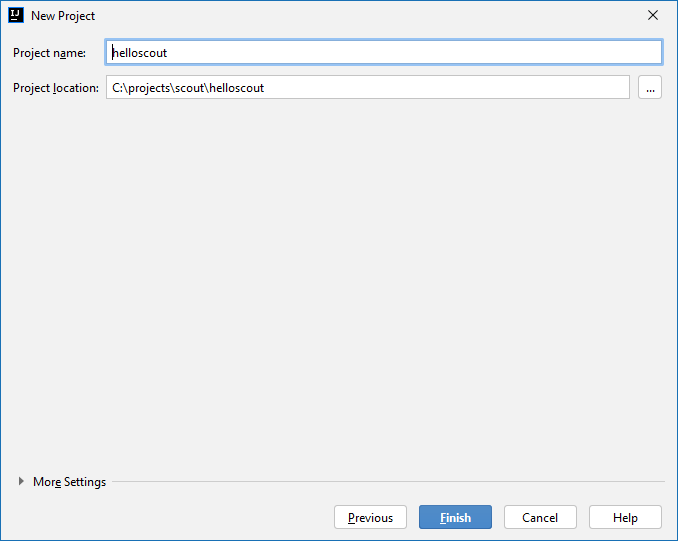
On the second page please specify project name and location and press Finish. The Scout plugin then creates the initial project content for you (you will see some Maven build output). Wait until all tasks have completed.
Afterwards, you will find the created Scout modules in the Project view as shown in Figure 3.
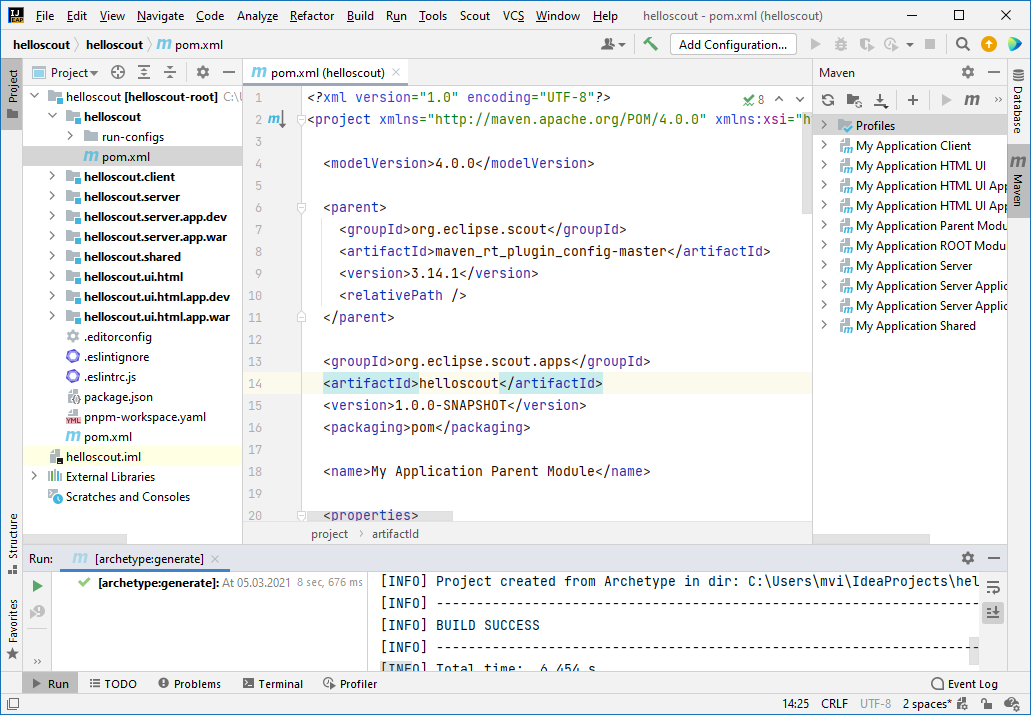
If the modules are not automatically created as indicated in Figure 3, right click on the root pom.xml and click Add as Maven Project.
|
Then you can start the Scout application for the first time.
Since the Hello Scout app consists of a backend and a frontend, two servers need to be started.
Before the frontend server can deliver any JavaScript code to the browser, the JavaScript build needs to be executed as well.
You could start each run configuration separately, but for the sake of convenience there is a compound run configuration available which starts all at once.
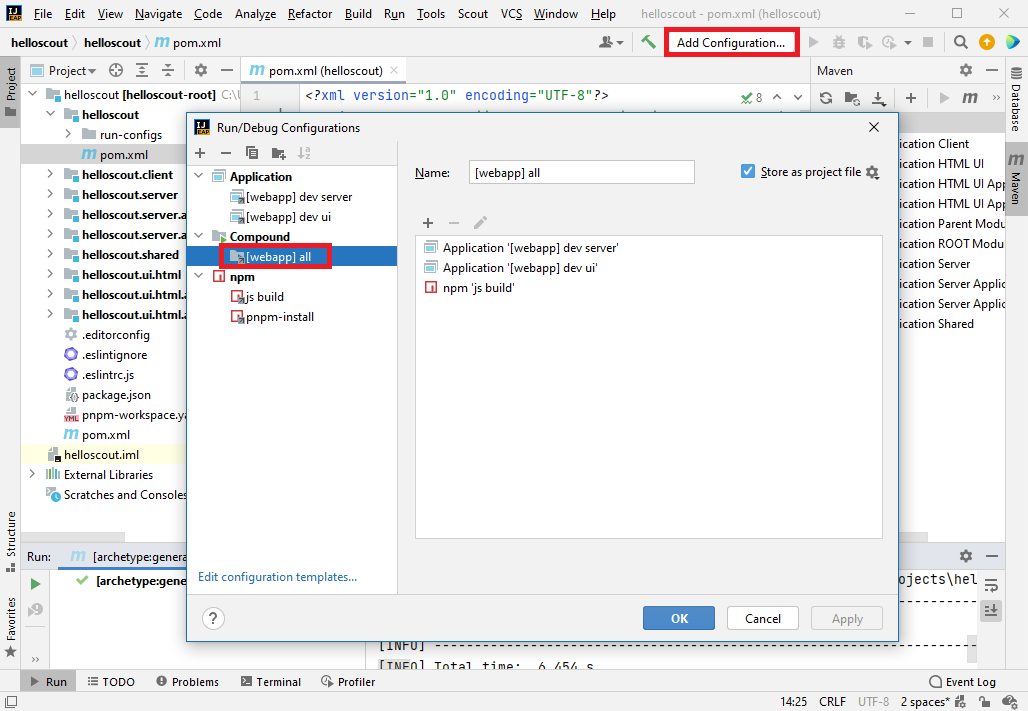
To start the launch configuration, use the Add Configuration… menu on the top as shown in Figure 4.
In the dialog, expand the Compound type on the left side, select the prepared run configuration [webapp] all and confirm with Ok.
Finally, click on the green triangle symbol directly right of the Add Configuration… menu.
This will execute the Java build and start the Java frontend server and backend server afterwards.
On IntelliJ Ultimate this will furthermore download all necessary JavaScript dependencies and execute the JavaScript build.
If using the Community Edition, additionally execute the following commands on the command line manually:
-
npm run pnpm-installin the root of your project (next to thepnpm-workspace.yaml) to install all JavaScript dependencies. -
npm run build:dev:watchin thehelloscout.ui.htmlmodule to start the JavaScript build and watcher. The watcher keeps on running and will continuously update the JavaScript assets as you change your JavaScript source files (hot-code-replace).
The JavaScript build fails in case the installed Node.js was not found or is too old.
In that case, follow the instructions in the section Prerequisites and check the IntelliJ settings in File | Settings | Languages & Frameworks | Node.js and NPM.
|
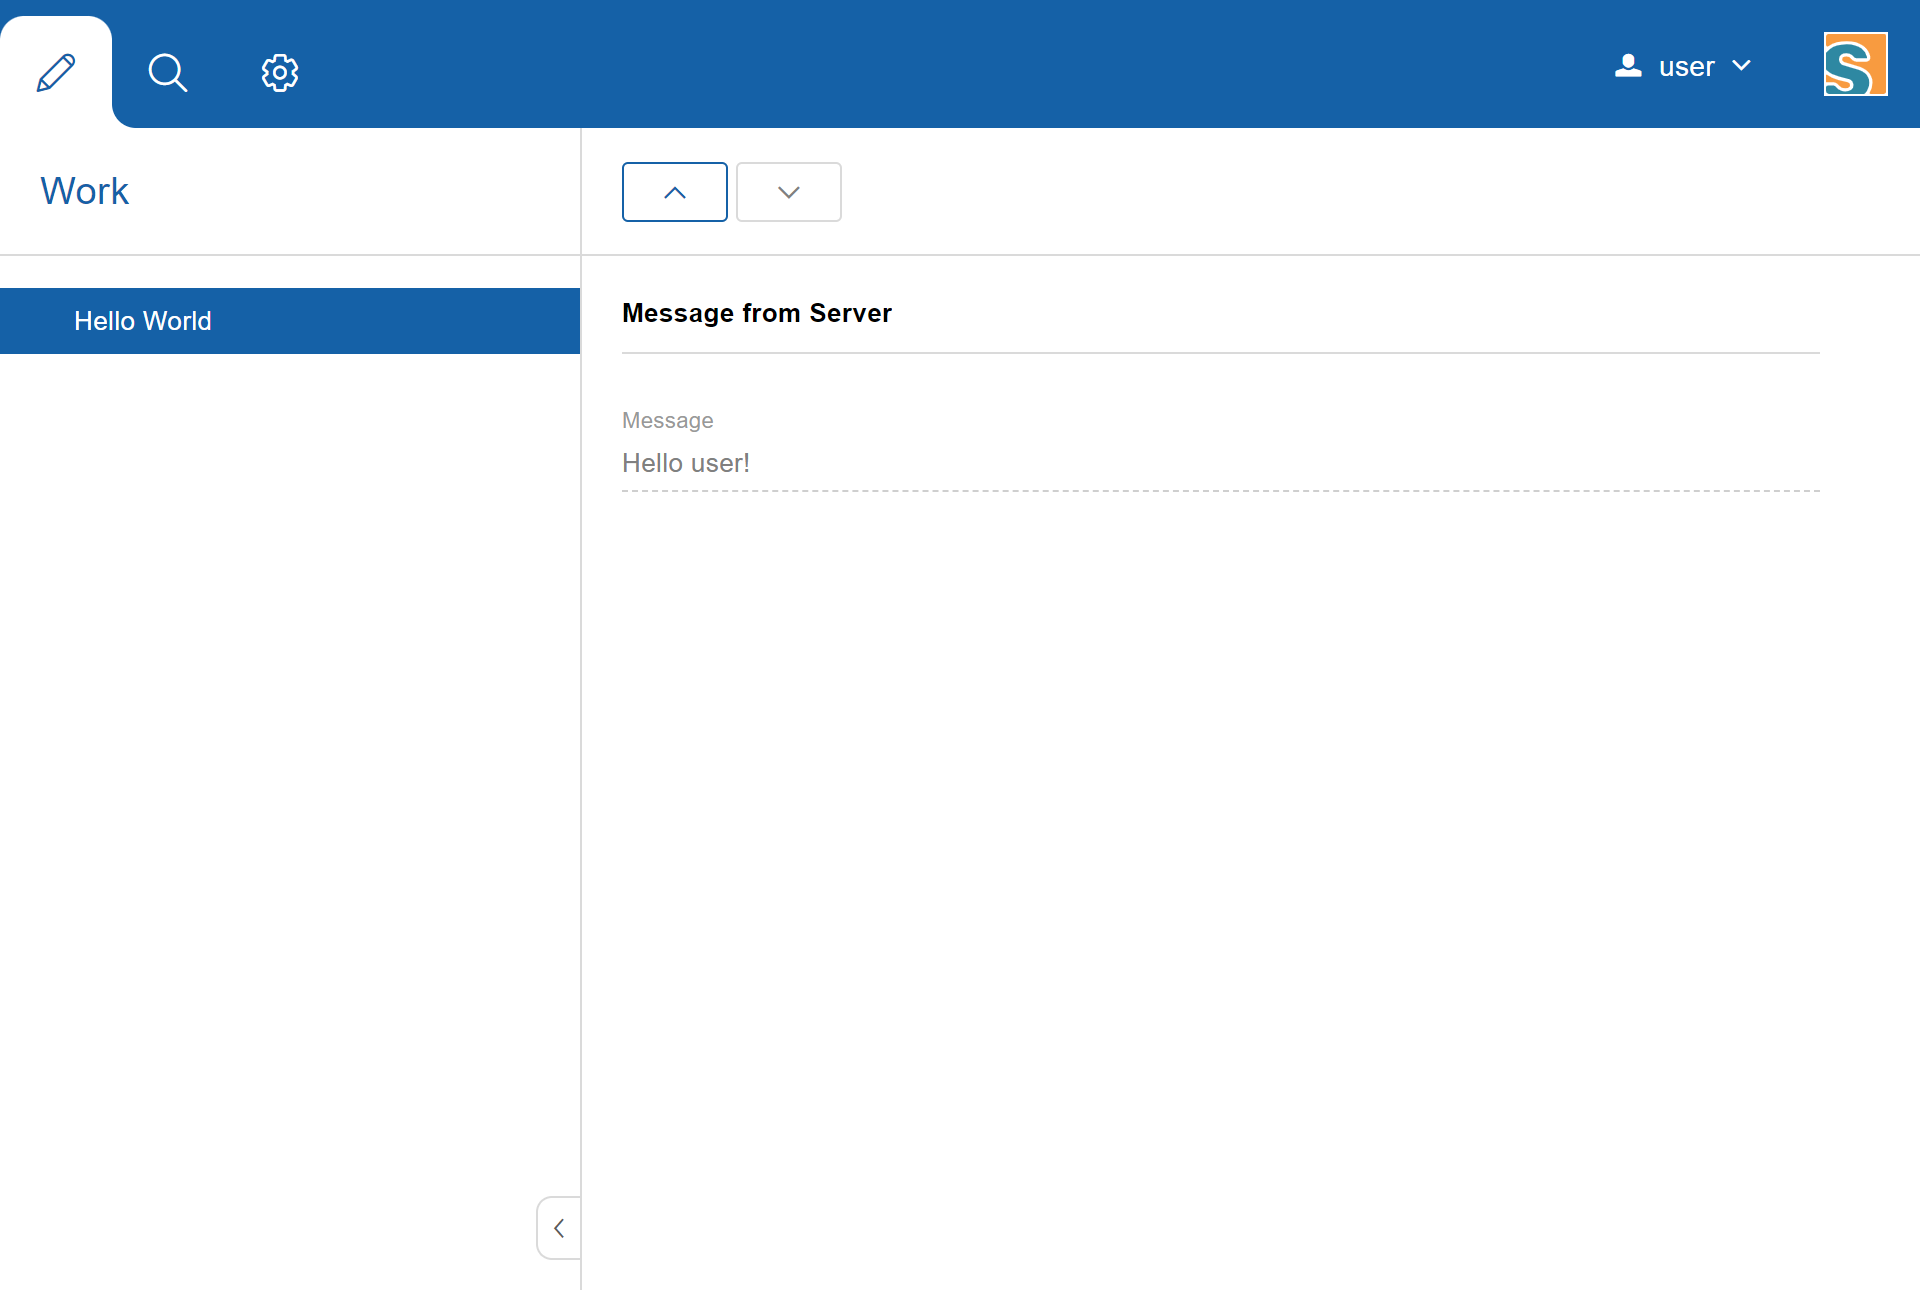
Once the JS build has been completed (this may take a while for the first time as some dependencies need to be downloaded) and the two servers have been started, the Hello Scout application can be accessed by navigating to http://localhost:8082/ in your favorite web browser.
The Hello Scout application is then presented as shown in Figure 5.
Eclipse
Start your Eclipse IDE and select an empty directory for your workspace as shown in Figure 6.
This workspace directory will then hold all the project code for the Hello Scout application.
Once the Eclipse IDE is running, it will show the Java perspective.

To create a new Scout project, select the menu and type Scout Project in the wizard search field.
Select the Scout Project wizard and press Next.
The New Scout Project wizard is then started as shown in Figure 7.
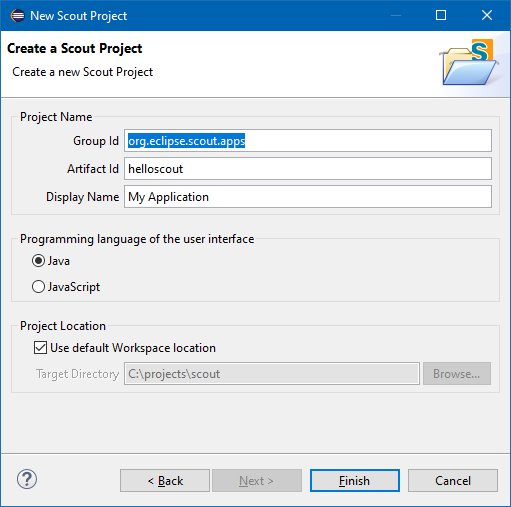
In the New Scout Project wizard you have to enter a Group Id, Artifact Id and a Display Name for your Scout project.
As the created project will make use of Apache Maven, please refer to the Maven naming conventions to choose Group Id and Artifact Id for your project.
The Display Name is used as the application name presented to the user (e.g. in the browser title bar).
For the Hello Scout application just use the already pre-filled values and ensure the user interface programming language is set to Java as sown in Figure 7.
Then click the Finish button to let the Scout SDK create the initial project code for you.
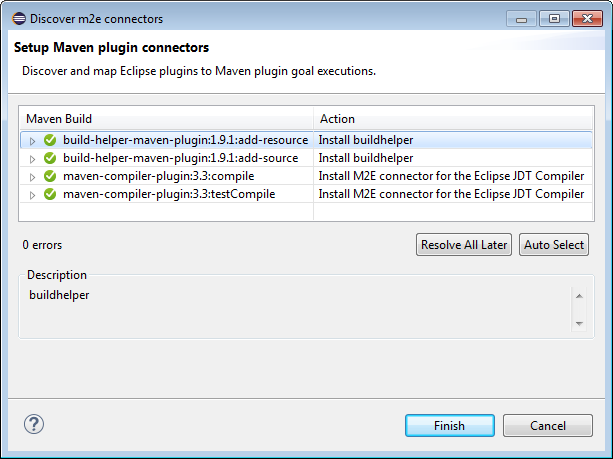
Depending on your Eclipse installation, some Maven plugin connectors may initially be missing.
In that case, a dialog as shown in Figure 8 appears.
In order to resolve the selected connectors and continue, click on Finish.
Afterwards, confirm the installation, accept the license and the message that some content has not been signed.
Finally, the installation of the maven plugin connectors requires a restart of the Eclipse IDE.
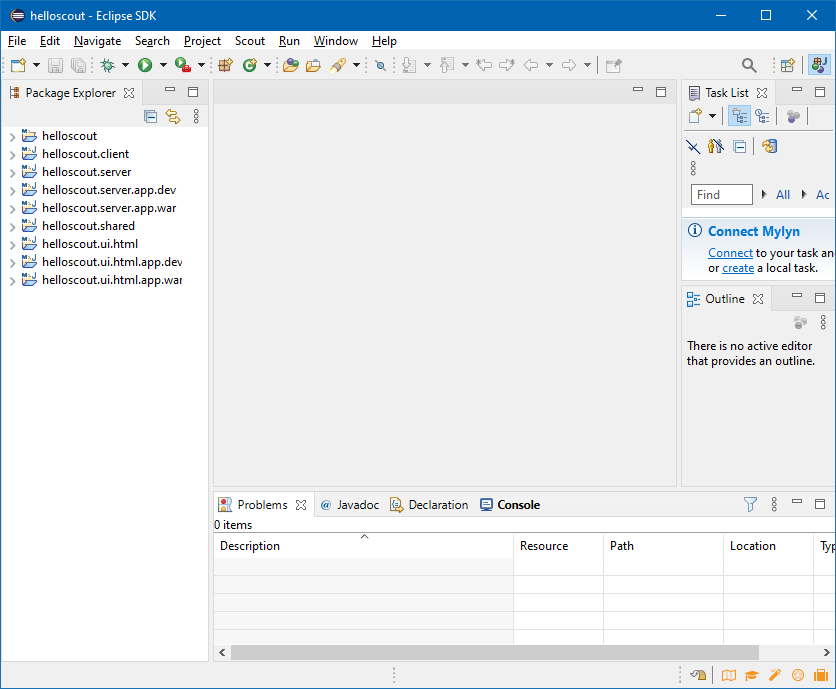
After the New Scout Project wizard has created the Maven modules for the Hello Scout application, the code is compiled by the Eclipse IDE.
You can see the created Maven modules in the Package Explorer as shown in Figure 9.
After the compilation, you can start the Scout application for the first time.
Since the Hello Scout app consists of a backend and a frontend, two servers need to be started.
Before the frontend server can deliver any JavaScript code to the browser, the JavaScript build needs to be executed as well.
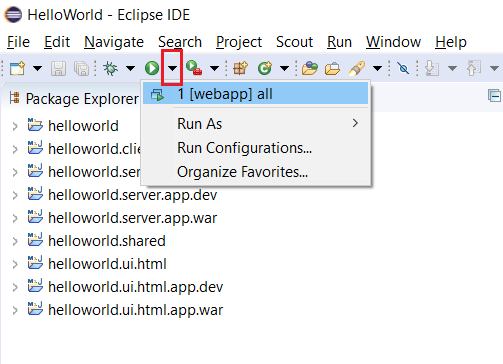
You could start each launch configuration separately, but for the sake of convenience there is a launch group available which starts all at once.
To start the launch group use the Run As menu as shown in Figure 10.
| The JavaScript build fails in case the installed Node.js was not found or is too old. In that case, follow the instructions in the section Prerequisites. |
Once the JS build has been completed successfully, the frontend and backend servers will be started automatically.
The servers are ready as soon as the console shows Server ready.
You can now access the Hello Scout application by navigating to http://localhost:8082/ in your favorite web browser.
The Hello Scout application is then presented as shown in Figure 11.
What’s Next?
Congratulations! You have successfully created your first Scout Classic application.
To gain experience working with Scout, we recommend going through the One Day Tutorial.
If you are interested in Scout’s concepts, architecture and features you probably want to have a look at the Technical Guide.
In case you should get stuck somewhere and need help, contact us on the Scout Forum or on Stack Overflow.
We wish you all the best on your journey with Scout.