How to Create a Custom Field
| This document is referring to a past Scout release. Please click here for the current version. |
This cheat sheet shows how to implement your own custom field for a ScoutJS application. In this example we will write a FlipCard field that will show a playing card. Clicking on the card will flip it from one side to the other.
Setup
For this example we use the helloscout git repository, but you can easily create the field in your own code base as well. In case you want to use the helloscout repo, clone and import it into your favourite IDE:
git clone https://github.com/bsi-software/helloscout.git
Read the readme and start the hellojs application to make sure it works.
Add Empty JS and CSS Files
Create the following files in the folder org.eclipse.scout.hellojs.ui.html
-
src/main/js/flipcard/FlipCardField.jsThe JavaScript file representing the field. -
src/main/js/flipcard/FlipCardField.lessThe LESS file containing the styles of the field.
Minimal Code for a New FormField
Create a Minimal FormField
The FlipCard will inherit from FormField. Every form field consists of a container, a label, the actual field, a mandatory-indicator and a status.
import {FormField} from '@eclipse-scout/core';

export default class FlipCardField extends FormField {
  _render() {
    // Create the container
    this.addContainer(this.$parent, 'flip-card-field');

    // Add a label
    this.addLabel();

    // Create the actual field. This will be your flip card.
    var $field = this.$parent.appendDiv('content');
    // add the field to the form field.
    this.addField($field);

    // Add other required form field elements
    this.addMandatoryIndicator();
    this.addStatus();
  };
}
Add the FlipCard to the HelloForm
Don’t forget to add the import for your FlipCardField.
{
  id: "hellojs.HelloForm",
  ...
  rootGroupBox: {
    ...
    fields: [
      {
        id: 'DetailBox',
        ...
        fields: [
          {
            id: 'NameField',
            ...

          },
          (1)
          {
            id: 'FlipCardField',
            objectType: FlipCardField,
            label: 'Flip the card',
            gridDataHints: {
              h: 5,
              weightY: 0
            }
          },
          {
            id: 'GreetButton',
            ...
          }
        ]
      }
    ]
  }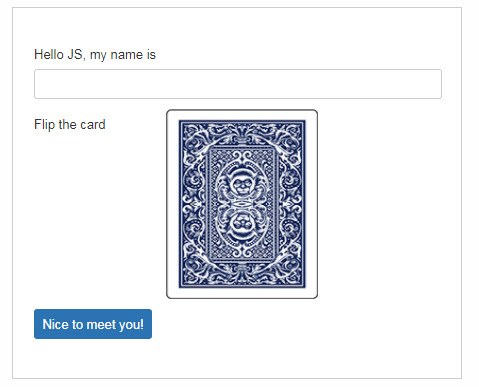
}| 1 | The FlipCard field |
Now reload your browser and you should get the following result:
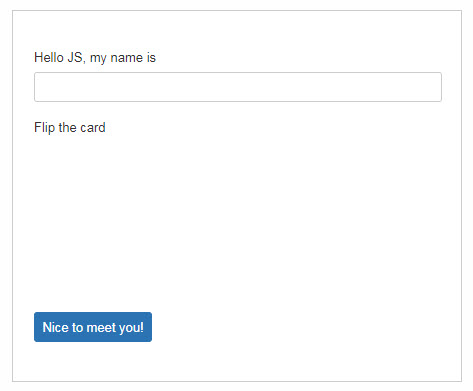
Full Featured Flip Card Field
import {FormField} from '@eclipse-scout/core';

export default class FlipCardField extends FormField {
    constructor() {
    super();
      this.$card = null;
      this.$front = null;
      this.$back = null;
      this.flipped = false;
      this.frontImage = null;
      this.backImage = null;
  }

  _render() {
    // Create the container
    this.addContainer(this.$parent, 'flip-card-field');
    // Add a label
    this.addLabel();

    // Create the actual field (1)
    var $field = this.$parent.appendDiv('content');
    // Create the card inside the field
    this.$card = $field.appendDiv('card')
      .on('mousedown', this._onCardMouseDown.bind(this)); //(2)
    this.$front = this.$card.appendDiv('front');
    this.$back = this.$card.appendDiv('back');
    // Add the field to the form field. It will be available as this.$field.
    this.addField($field);

    // Add other required form field elements
    this.addMandatoryIndicator();
    this.addStatus();
  }

  _renderProperties() { (3)
    super._renderProperties();
    this._renderFrontImage();
    this._renderBackImage();
    this._renderFlipped();
  }

  _renderFrontImage() {
    if (this.frontImage) {
      this.$front.append('<img src=\"' + this.frontImage + '\">');
    }
  }

  _renderBackImage() {
    if (this.backImage) {
      this.$back.append('<img src=\"' + this.backImage + '\">');
    }
  }

  _remove() { (4)
    super._remove();
    this.$card = null;
    this.$front = null;
    this.$back = null;
  }

  _onCardMouseDown() { (2)
    this.setFlipped(!this.flipped);
  }

  setFlipped(flipped) {
    this.setProperty('flipped', flipped);
  }

  _renderFlipped() {
    this.$card.toggleClass('flipped', this.flipped);
  }
}| 1 | Create the dom elements in the render function. |
| 2 | Add event handler which toggles the CSS class flipped. |
| 3 | Initial rendering of the properties. Applies the state to the DOM. |
| 4 | Keep the references clean. Reset DOM references when the field has been removed. |
import {FlipCardField} from '../index';

export default {
  id: 'hellojs.HelloForm',
  ...
  rootGroupBox': {
    ...
    fields: [
      {
        id: 'DetailBox',
        ...
        fields: [
          {
            id: 'NameField',
            ...

          },
          (1)
          {
            id: 'FlipCardField',
            objectType: FlipCardField,
            label: 'Flip the card',
            frontImage: 'img/card-back.jpg',
            backImage: 'img/card-front.jpg',
            gridDataHints: {
              h: 5,
              weightY: 0
            }
          },
          {
            id: 'GreetButton',
            ...
          }
        ]
      }
    ]
  }
}| 1 | FlipCard field is inserted after the name field. |
.flip-card-field {

  .card {
    position: absolute;
    cursor: pointer;
    height: 100%;
    width: 152px;
    transition: transform 1s; (1)
    transform-style: preserve-3d;

    &.flipped {
      transform: rotateY( 180deg );
    }

    & > div {
      display: block;
      height: 100%;
      width: 100%;
      position: absolute;
      backface-visibility: hidden; (2)

      &.back {
        transform: rotateY( 180deg ); (3)
      }

      & > img {
        height: 100%;
        width: 100%;
      }
    }
  }
}| 1 | Animation of the card. |
| 2 | Ensure back side is not visible. |
| 3 | Rotation to back side. |
Finally, create a folder img in the WebContent folder (org.eclipse.scout.hellojs.ui.html.app/src/main/resources/WebContent) and paste the two images of the card into that folder. You should be able to find the images using Google ;-)