Build Scout App and Deploy to Tomcat
| This document is referring to a past Scout release. Please click here for the current version. |
At some point during the application development you will want to install your software on a machine that is intended for productive use. This is the moment where you need to be able to build and package your Scout application in a way that can be deployed to an application server.
As Scout applications just need a servlet container to run, Scout applications can be deployed to almost any Java application server. For the purpose of this tutorial we will use Apache Tomcat.
Verify the Container Security Settings
First you need a Tomcat installation. If you do not yet have such an installation, you may want to read and follow the instructions provided in Appendix A.
Second you need to decide if the users of your application should communicate with the Scout frontend server using HTTPS.
We strongly recommend to use HTTPS for any productive environment.
This is why the Hello Scout applications are configured to use HTTPS for production by default.
In case you don’t want to use HTTPS the application must be slightly modified. Then you can skip the next section and instead follow the instructions in section Update the Scout Application to work with HTTP.
As a default Tomcat installation is configured to use HTTP only, you need to verify if the installation is properly configured for HTTPS too. In case HTTPS support is already enabled for your Tomcat installation, you may skip the next section.
More details on the SSL configuration can be found in the Tomcat Documentation to enable SSL/TLS.
Create and Install a Self-Signed Certificate
This section describes the creation and usage of a self-signed certificate in a localhost setting.
-
Create a keystore file with a self-signed certificate.
-
Adapt the HTTPS connector port in Tomcat’s server.xml configuration.
-
Export the self-signed certificate from the keystore.
-
Import the self-signed certificate into the Java certificate store.
The first step is to create a self-signed certificate using the keytool provided with the Java runtime.
The example command line below will create such a certificate using the alias tomcat_localhost and place it into the keystore file tomcat_localhost.jks
keytool.exe -genkey -keyalg RSA -dname CN=localhost -alias tomcat_localhost -keystore tomcat_localhost.jks -keypass changeit -storepass changeit
The second step is to uncomment the HTTPS connector element in the Tomcat’s server.xml configuration file.
Make sure parameter keystoreFile points to your newly created keystore file (if you are using a Windows box, make sure not to use the backslash characters in the path to the keystore).
After a restart of Tomcat you should then be able to access Tomcat on https://localhost:8443/manager/html.
<Connector port="8443" protocol="org.apache.coyote.http11.Http11NioProtocol"
           maxThreads="150" SSLEnabled="true" scheme="https" secure="true">
    <SSLHostConfig>
        <Certificate certificateKeystoreFile="/keystore/tomcat_localhost.jks" type="RSA" />
    </SSLHostConfig>
</Connector>
The third step is to export the newly created self-signed certificate from the tomcat_localhost.jks keystore file into the tomcat_localhost.der certificate file.
keytool.exe -exportcert -alias tomcat_localhost -storepass changeit -keystore tomcat_localhost.jks -file tomcat_localhost.der
In the last step add the self-signed certificate to the known certificates of the Java runtime.
Make sure you modify the cacerts file of the Java runtime that is used in your Tomcat installation and modify the path to the cacerts file accordingly.
keytool.exe -import -alias tomcat_localhost -trustcacerts -storepass changeit -keystore C:\java\jdk11\lib\security\cacerts -file tomcat_localhost.der
Your Tomcat installation is now properly configured for HTTPS.
In case the Scout frontend server cannot access the Scout backend server, your self-signed certificate might be missing in the Java installation used by Tomcat.
To verify that the certificate has been included in the file cacerts file use the following command.
keytool.exe -list -storepass changeit -keystore C:\java\jdk11\lib\security\cacerts | find "localhost"
Once you no longer need the self-signed certificate file in your Java installation make sure to remove the certificate again:
keytool.exe -delete -alias tomcat_localhost -storepass changeit -keystore C:\java\jdk11\lib\security\cacerts
Update the Scout Application to work with HTTP
If you prefer to work with HTTP only, you need to modify the security settings of your Scout application. This can be done with the steps described below.
-
In file
config.properties(in the folderhelloscout.ui.html.app.war/src/main/resources):-
Add the property
scout.auth.cookieSessionValidateSecure=falseto disable the check for an encrypted channel (HTTPS). -
Change the
scout.backendUrlproperty to use HTTP instead of HTTPS and change the port according to your Tomcat setup, typically 8080.
-
-
In file
web.xml(in the folderhelloscout.ui.html.app.war/src/main/webapp/WEB-INF) delete the<secure>true</secure>flag in the<cookie-config>element. -
In file
web.xml(in the folderhelloscout.server.app.war/src/main/webapp/WEB-INF) delete the<secure>true</secure>flag in the<cookie-config>element.
More on this topic can be found in the Scout Architecture Documentation.
Create WAR Files
You are now ready to move the Hello Scout application from our development environment to a productive setup.
The simplest option to move our application into the 'wild' is to build it using Maven.
This produces two WAR files [1].
The first WAR file contains the Scout backend server with all business logic. The second WAR file contains the Scout frontend server that is responsible for communicating with the web browser of the user.
To start the build open the directory containing the module helloscout in the command line and execute the Maven command mvn clean verify.
This starts the compilation, executes all test cases and bundles the result into two WAR files. As soon as the build is reporting success (this may take a few minutes) you can find the built WAR files:
-
The Scout backend WAR file
org.eclipse.scout.apps.helloscout.server.warin folderhelloscout/helloscout.server.app.war/target -
The Scout frontend WAR file
org.eclipse.scout.apps.helloscout.ui.html.warin folderhelloscout/helloscout.ui.html.app.war/target
To see the new files within Eclipse you may need to refresh the target folder below each project using the F5 keystroke.
Deploy to Tomcat
As the final step of this tutorial, you have to deploy the two WAR files representing your Hello Scout application to a Tomcat web server.
To verify a running Tomcat instance, type http://localhost:8080/ into the address bar of the web browser of your choice.
You should then see the page shown in Figure 1.
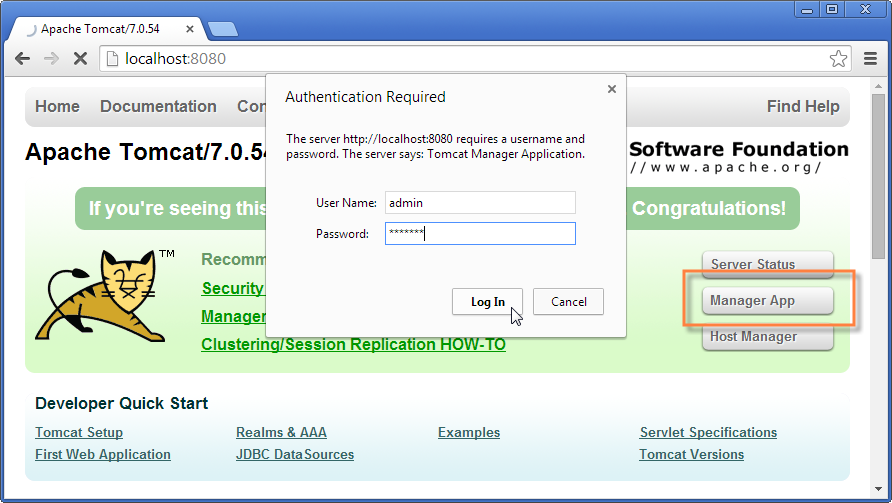
Manager App button (highlighted in red) the login box is shown in front. A successful login shows the "Tomcat Web Application Manager".Once the web browser displays the successful running of your Tomcat instance, switch to its Manager App by clicking on the button highlighted in Figure 1.
After entering user name and password the browser will display the Tomcat Web Application Manager as shown in Figure 2.
If you don’t know the credentials, you may look it up in the file tomcat-users.xml as described in Directories and Files.
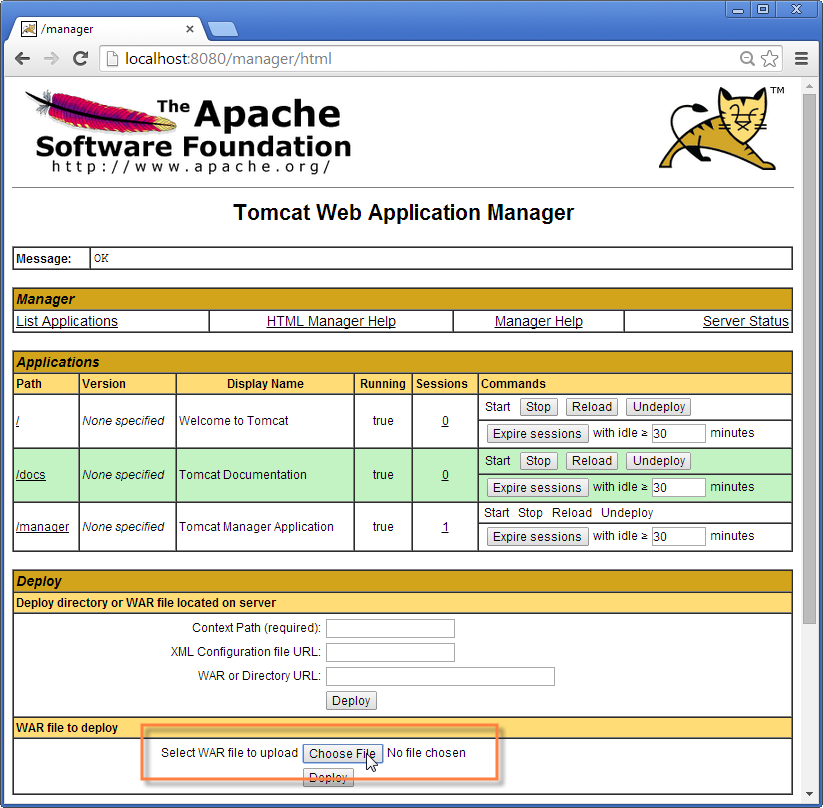
After logging into Tomcat’s manager application, you can select the WAR files to be deployed using the button Choose File as shown in Figure 2.
Then pick your just built org.eclipse.scout.apps.helloscout.server.war, close the file chooser and click on the button Deploy (the one located directly below button Choose File) to deploy the application to the Tomcat web server.
Then repeat this step with the second WAR file org.eclipse.scout.apps.helloscout.ui.html.war.
This will copy the selected WAR files into Tomcat’s webapps directory and unpack its contents into subdirectories with the same name as the WAR file.
You can now connect to the application using the browser of your choice by navigating to:
http://localhost:8080/org.eclipse.scout.apps.helloscout.ui.html/or
https://localhost:8443/org.eclipse.scout.apps.helloscout.ui.html/if you have chosen to configure HTTPS for the Tomcat installation. In this case you might need to accept your self-signed certificate as the browser does not yet trust it.
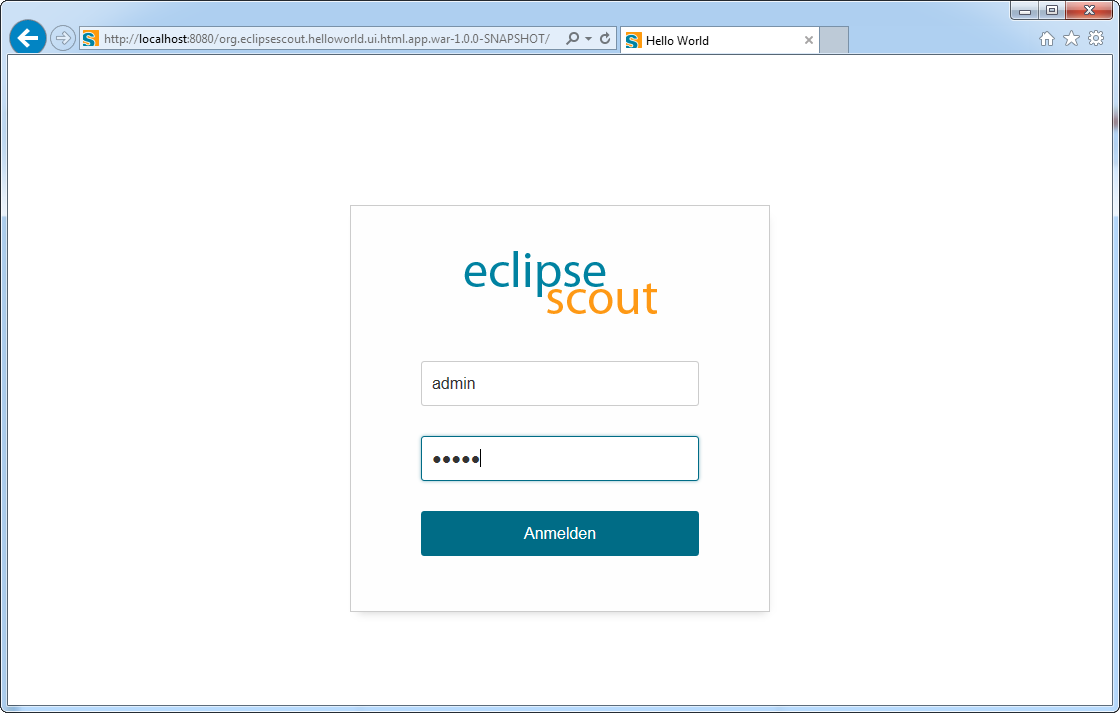
Then you will see the login page as shown in Figure 3. Two users have been predefined: admin with password admin and scott with password tiger.
You can find this configuration in the config.properties file of the application.
| In a productive environment it is recommended to deploy the server and the user interface into two different servlet containers running on dedicated machines. This is because these two tiers have different requirements on resources, load balancing and access protection. Furthermore, it is strongly recommended using an encrypted connection (e.g. TLS 1.3 [2]) between client browsers and the Scout frontend server AND between the Scout frontend and backend server! |
Appendix A: Apache Tomcat Installation
Apache Tomcat is an open source servlet container that is a widely used. In case you are interested in getting some general context around Tomcat you could start with the Wikipedia article.[3]. Then get introduced to its core component “Tomcat Catalina”.[4]. before you switch to the official Tomcat homepage.[5].
This section is not really a step by step download and installation guide. Rather, it points you to the proper places for downloading and installing Tomcat. We recommend to work with Tomcat version 9.0. Start your download from the official download site.[6].
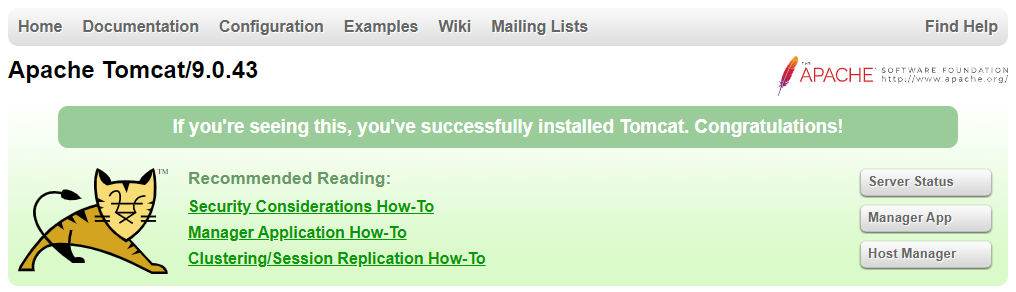
Once you have downloaded and installed Tomcat 9 (see the sections below for plattform specific guidelines) you can start the corresponding service or daemon. To verify that Tomcat is actually running open a web browser of your choice and type http://localhost:8080 into the address bar. You should then see a confirmation of the successful installation according to Figure 4.
Platform Specific Instructions
According to the Tomcat setup installation for Windows.[7] download the package “32-bit/64-bit Windows Service Installer” from the Tomcat 9 download site. Then, start the installer and accept the proposed default settings.
For installing Tomcat on OS X systems download the “tar.gz” package from the Tomcat 9 download site. Then, follow the installation guide.[8] provided by Wolf Paulus.
For Linux systems download the “tar.gz” package from the Tomcat 9 download site. Then, follow the description of the Unix setup.[9] to run Tomcat as a daemon. If you use Ubuntu, you may want to follow the tutorial.[10] for downloading and installing Tomcat provided by Lars Vogel.
Directories and Files
Tomcat’s installation directory follows the same organisation on all platforms. Here, we will only introduce the most important aspects of the Tomcat installation for the purpose of this tutorial.
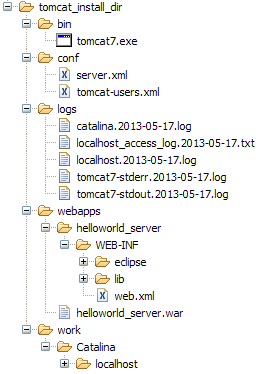
Note that some folders and many files of a Tomcat installation are not represented in Figure 5.
We just want to provide a basic understanding of the most important parts to operate the web server in the context of this tutorial.
In the bin folder, the executable programs are contained, including scripts to start and stop the Tomcat instance.
The conf folder contains a set of XML and property configuration files.
The file server.xml represents Tomcat’s main configuration file.
It is used to configure general web server aspects such as the port number of its connectors for the client server communication.
For the default setup, port number 8080 is used for the communication between client applications and the web server.
The file tomcat-users.xml contains a database of users, passwords and associated roles.
Folder logs contains various logfiles of Tomcat itself as well as host and web application log files.
The folder needed for deploying web applications into a Tomcat instance is called webapps.
It can be used as the target for copying WAR files into the web server.
The installation of the WAR file then extracts its content into the corresponding directory structure as shown in Figure 5.
Finally, the folder work contains Tomcat’s runtime cache for the deployed web applications.
The Tomcat Manager Application
Tomcat comes with the pre installed Manager App.
This application is useful to manage web applications and perform tasks such as deploying a web application from a WAR file, or starting and stopping installed web applications.
A comprehensive documentation for the Manager App can be found on the Tomcat homepage.[11].
Here we only show how to start this application from the homepage of a running Tomcat installation.
To access this application you can switch to the Manager App with a click on the corresponding button on the right side as shown in Figure 4.
Before you are allowed to access this application, you need to provide credentials of a user associated with Tomcats’s manager-gui role.
  <tomcat-users>
    <!--
    NOTE: By default, no user is included in the "manager-gui" role required
    to operate the "/manager/html" web application. If you wish to use it
    you must define such a user - the username and password are arbitrary.
    -->
    <user name="admin" password="s3cret" roles="manager-gui"/>
  </tomcat-users>
To get at user names and passwords you can open file tomcat-users.xml located in Tomcat’s conf directory.
In this file the active users with their passwords and associated roles are stored.
See Listing 1 for an example.
From the content of this file, you see that user admin has password s3cret and possesses the necessary role manager-gui to access the Manager App.
If file tomcat-users.xml does not contain any user with this role, you can simply add new user with this role to the existing users.
Alternatively, you also can add the necessary role to an existing user.
Just append a comma to the existing roles followed by the string manager-gui.
You will need to restart your Tomcat application after adapting the content of file tomcat-users.xml.
|